tire pressure CHEVROLET CAMARO SS 2010 Owner's Manual
[x] Cancel search | Manufacturer: CHEVROLET, Model Year: 2010, Model line: CAMARO SS, Model: CHEVROLET CAMARO SS 2010Pages: 372, PDF Size: 1.91 MB
Page 294 of 372
The compact spare tire, if the
vehicle has one, is not included
in the tire rotation.
After the tires have been rotated,
adjust the front and rear inflation
pressures as shown on the Tire
and Loading Information label.
SeeTire Pressure on page 9-54
andVehicle Load Limits on
page 8-12.
Reset the Tire Pressure Monitor
System. SeeTire Pressure
Monitor Operation on page 9-57.
Make certain that all wheel
nuts are properly tightened.
See “Wheel Nut Torque” under
Capacities and Specications on
page 11-2.{WARNING
Rust or dirt on a wheel, or on the
parts to which it is fastened, can
make wheel nuts become loose
after time. The wheel could come
off and cause an accident. When
changing a wheel, remove any
rust or dirt from places where the
wheel attaches to the vehicle.
In an emergency, use a cloth or
a paper towel to do this; but be
sure to use a scraper or wire
brush later, if needed, to get all
the rust or dirt off. SeeIf a Tire
Goes Flat on page 9-69.
When It Is Time for
New Tires
Various factors, such as
maintenance, temperatures,
driving speeds, vehicle loading,
and road conditions influence
when you need new tires.
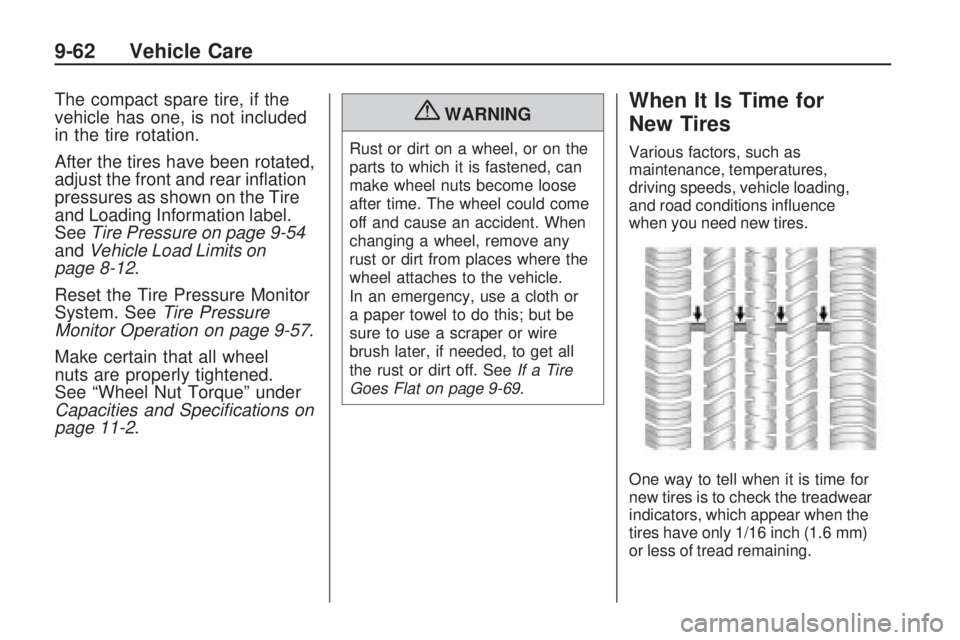
One way to tell when it is time for
new tires is to check the treadwear
indicators, which appear when the
tires have only 1/16 inch (1.6 mm)
or less of tread remaining.
9-62 Vehicle Care
Page 295 of 372
The vehicle needs new tires if any
of the following statements are true:
•You can see the indicators at
three or more places around
the tire.
•You can see cord or fabric
showing through the tire’s rubber.
•The tread or sidewall is cracked,
cut, or snagged deep enough to
show cord or fabric.
•The tire has a bump, bulge,
or split.
•The tire has a puncture, cut, or
other damage that cannot be
repaired well because of the size
or location of the damage.
The rubber in tires degrades over
time, even if they are not being used.
This is also true for the spare tire,
if the vehicle has one. Multiple
conditions affect how fast this aging
takes place, including temperatures,
loading conditions, and inflationpressure maintenance. With proper
care and maintenance tires typically
wear out before they degrade due to
age. If you are unsure about the
need to replace the tires as they get
older, consult the tire manufacturer
for more information.
Buying New Tires
GM has developed and matched
specific tires for your vehicle. The
original equipment tires installed
on your vehicle, when it was new,
were designed to meet General
Motors Tire Performance Criteria
Specification (TPC Spec) system
rating. If you need replacement
tires, GM strongly recommends
that you get tires with the same
TPC Spec rating. This way, your
vehicle will continue to have tires
that are designed to give the
same performance and vehicle
safety, during normal use, as the
original tires.GM’s exclusive TPC Spec
system considers over a dozen
critical specifications that impact
the overall performance of your
vehicle, including brake system
performance, ride and handling,
traction control, and tire pressure
monitoring performance. GM’s
TPC Spec number is molded
onto the tire’s sidewall near the
tire size. If the tires have an
all-season tread design, the TPC
Spec number will be followed
by an MS for mud and snow.
SeeTire Sidewall Labeling
on page 9-49for additional
information.
GM recommends replacing tires
in sets of four. This is because
uniform tread depth on all tires
will help keep your vehicle
performing most like it did
when the tires were new.
Vehicle Care 9-63
Page 296 of 372
Replacing less than a full set of
tires can affect the braking and
handling performance of your
vehicle. SeeTire Inspection on
page 9-61andTire Rotation on
page 9-61for information on
proper tire rotation.
{WARNING
Mixing tires could cause you
to lose control while driving.
If you mix tires of different
sizes, brands, or types
(radial and bias-belted tires),
the vehicle may not handle
properly, and you could have a
crash. Using tires of different
sizes, brands, or types may
also cause damage to your
vehicle. Be sure to use the
correct size, brand, and type
of tires on all wheels. It is all
right to drive with your compact
(Continued)
WARNING (Continued)
spare temporarily, as it was
developed for use on your
vehicle. SeeCompact Spare
Tire on page 9-83.
{WARNING
If you use bias-ply tires on the
vehicle, the wheel rim flanges
could develop cracks after
many miles of driving. A tire
and/or wheel could fail
suddenly, causing a crash.
Use only radial-ply tires with
the wheels on the vehicle.
If you must replace your
vehicle’s tires with those that do
not have a TPC Spec number,
make sure they are the same
size, load range, speed rating,
and construction type (radial
and bias-belted tires) as your
vehicle’s original tires.Vehicles that have a tire
pressure monitoring system
could give an inaccurate
low-pressure warning if
non-TPC Spec rated tires
are installed on your vehicle.
Non-TPC Spec rated tires may
give a low-pressure warning that
is higher or lower than the proper
warning level you would get with
TPC Spec rated tires. SeeTire
Pressure Monitor System on
page 9-56.
Your vehicle’s original equipment
tires are listed on the Tire and
Loading Information Label.
SeeVehicle Load Limits on
page 8-12, for more information
about the Tire and Loading
Information Label and its location
on your vehicle.
9-64 Vehicle Care
Page 300 of 372
If you need to replace any of the
wheels, wheel bolts, wheel nuts,
or Tire Pressure Monitor System
(TPMS) sensors, replace them only
with new GM original equipment
parts. This way, you will be sure to
have the right wheel, wheel bolts,
wheel nuts, and TPMS sensors for
the vehicle.
{WARNING
Using the wrong replacement
wheels, wheel bolts, or wheel
nuts on your vehicle can be
dangerous. It could affect the
braking and handling of your
vehicle, make your tires lose
air and make you lose control.
You could have a collision in
which you or others could be
injured. Always use the correct
wheel, wheel bolts, and wheel
nuts for replacement.Notice:The wrong wheel can
also cause problems with bearing
life, brake cooling, speedometer
or odometer calibration, headlamp
aim, rear differential, bumper
height, vehicle ground clearance,
and tire or tire chain clearance to
the body and chassis.
SeeIf a Tire Goes Flat on page 9-69
for more information.
Used Replacement Wheels
{WARNING
Putting a used wheel on the
vehicle is dangerous. You cannot
know how it has been used or how
far it has been driven. It could fail
suddenly and cause a crash. If you
have to replace a wheel, use a
new GM original equipment wheel.
Tire Chains
{WARNING
Do not use tire chains. There is
not enough clearance. Tire chains
used on a vehicle without the
proper amount of clearance can
cause damage to the brakes,
suspension, or other vehicle parts.
The area damaged by the tire
chains could cause you to lose
control of the vehicle and you or
others may be injured in a crash.
Use another type of traction
device only if its manufacturer
recommends it for use on the
vehicle and tire size combination
and road conditions. Follow that
manufacturer’s instructions.
(Continued)
9-68 Vehicle Care
Page 303 of 372
Tire Sealant and
Compressor Kit
{WARNING
Idling a vehicle in an enclosed
area with poor ventilation is
dangerous. Engine exhaust may
enter the vehicle. Engine exhaust
contains Carbon Monoxide (CO)
which cannot be seen or smelled.
It can cause unconsciousness and
even death. Never run the engine
in an enclosed area that has no
fresh air ventilation. For more
information, seeEngine Exhaust
on page 8-25.
{WARNING
Over-inflating a tire could cause
the tire to rupture and you or
others could be injured. Be sure to
read and follow the tire sealant and
compressor kit instructions and
inflate the tire to its recommended
pressure. Do not exceed the
recommended pressure.
{WARNING
Storing the tire sealant and
compressor kit or other equipment
in the passenger compartment
of the vehicle could cause injury.
In a sudden stop or collision,
loose equipment could strike
someone. Store the tire sealant
and compressor kit in its original
location.If this vehicle has a tire sealant and
compressor kit, there may not be a
spare tire, tire changing equipment,
and on some vehicles there may not
be a place to store a tire.
The tire sealant and compressor
can be used to temporarily seal
punctures up to 6 mm (
1⁄4inch) in the
tread area of the tire. It can also be
used to inflate an under inflated tire.
If the tire has been separated from
the wheel, has damaged sidewalls,
or has a large puncture, the tire
is too severely damaged for the tire
sealant and compressor kit to be
effective. SeeRoadside Assistance
Program on page 12-6.
Read and follow all of the tire
sealant and compressor kit
instructions.
Vehicle Care 9-71
Page 304 of 372

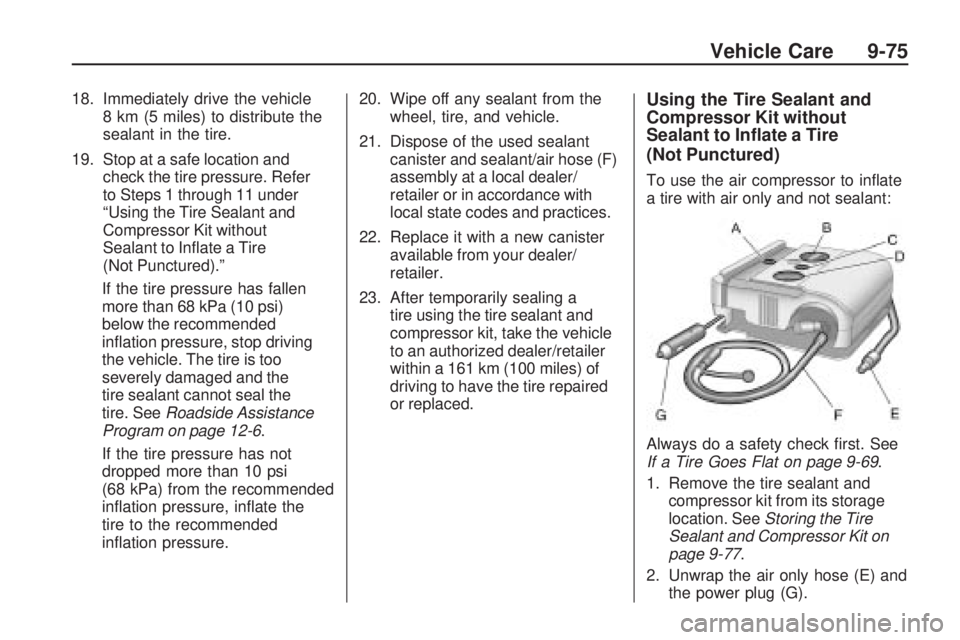
The kit includes:
A. On/Off Button
B. Selector Switch
(Sealant/Air or Air Only)
C. Pressure Relief Button
D. Pressure Gage
E. Air Only Hose (Black)
F. Sealant/Air Hose (Clear)
G. Power PlugTire Sealant
Read and follow the safe handling
instructions on the label adhered
to the compressor.
Check the tire sealant expiration
date on the sealant canister.
The sealant canister should be
replaced before its expiration date.
Replacement sealant canisters are
available at your local dealer/retailer.
See “Removal and Installation of the
Sealant Canister” following.
There is only enough sealant to
seal one tire. After usage, the
sealant canister and sealant/air
hose assembly must be replaced.
See “Removal and Installation of
the Sealant Canister” following.
Using the Tire Sealant and
Compressor Kit to
Temporarily Seal and Inate a
Punctured Tire
Follow the directions closely for
correct sealant usage.
When using the tire sealant
and compressor kit during cold
temperatures, warm the kit in a
heated environment for 5 minutes.
This will help to inflate the tire faster.
9-72 Vehicle Care
Page 305 of 372
Always do a safety check first.
SeeIf a Tire Goes Flat on
page 9-69. Do not remove any
objects that have penetrated
the tire.
1. Remove the tire sealant and
compressor kit from its storage
location. SeeStoring the Tire
Sealant and Compressor Kit
on page 9-77.
2. Unwrap the sealant/air hose (F)
and the power plug (G).
3. Place the kit on the ground.
Make sure the tire valve
stem is positioned close to the
ground so the hose will reach it.
4. Remove the valve stem cap
from the flat tire by turning it
counterclockwise.5. Attach the sealant/air hose (F)
onto the tire valve stem. Turn
it clockwise until it is tight.
6. Plug the power plug (G) into the
accessory power outlet in the
vehicle. Unplug all items from
other accessory power outlets.
SeePower Outlets on page 4-9.
If the vehicle has an accessory
power outlet, do not use the
cigarette lighter.
If the vehicle only has a cigarette
lighter, use the cigarette lighter.
Do not pinch the power plug
cord in the door or window.
7. Start the vehicle. The vehicle
must be running while using
the air compressor.8. Turn the selector switch (B)
clockwise to the Sealant + Air
position.
9. Press the on/off (A) button
to turn the tire sealant and
compressor kit on.
The compressor will inject
sealant and air into the tire.
The pressure gage (D) will
initially show a high pressure
while the compressor pushes the
sealant into the tire. Once the
sealant is completely dispersed
into the tire, the pressure will
quickly drop and start to rise
again as the tire inflates with
air only.
Vehicle Care 9-73
Page 306 of 372
10. Inflate the tire to the
recommended inflation pressure
using the pressure gage (D).
The recommended inflation
pressure can be found on the
Tire and Loading Information
label. SeeTire Pressure on
page 9-54.
The pressure gage (D) may
read higher than the actual tire
pressure while the compressor
is on. Turn the compressor off
to get an accurate pressure
reading. The compressor may
be turned on/off until the correct
pressure is reached.
Notice:If the recommended
pressure cannot be reached after
approximately 25 minutes, the
vehicle should not be driven
farther. The tire is too severely
damaged and the tire sealant and
compressor kit cannot inate the
tire. Remove the power plug from
the accessory power outlet and
unscrew the inating hose from
the tire valve. SeeRoadside
Assistance Program on page 12-6.11. Press the on/off button (A)
to turn the tire sealant and
compressor kit off.
The tire is not sealed and will
continue to leak air until the
vehicle is driven and the sealant
is distributed in the tire,
therefore, Steps 12 through 18
must be done immediately after
Step 11.
Be careful while handling the
tire sealant and compressor
kit as it could be warm
after usage.
12. Unplug the power plug (G) from
the accessory power outlet in
the vehicle.
13. Turn the sealant/air hose (F)
counterclockwise to remove it
from the tire valve stem.
14. Replace the tire valve
stem cap.
15. Replace the sealant/air
hose (F), and the power plug (G)
back in their original location.16. If the flat tire was able to inflate
to the recommended inflation
pressure, remove the maximum
speed label from the sealant
canister and place it in a highly
visible location. The label is a
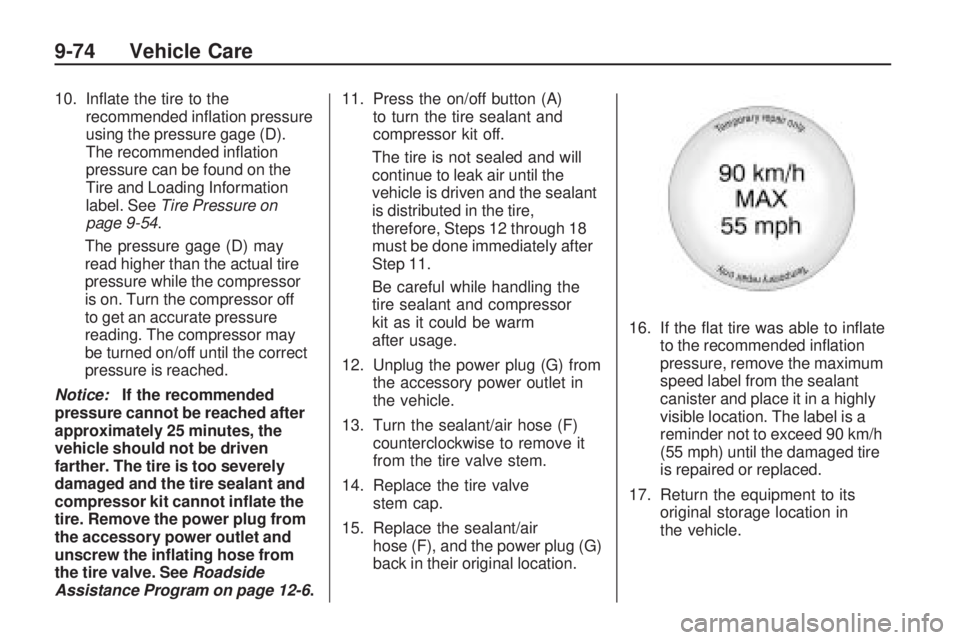
reminder not to exceed 90 km/h
(55 mph) until the damaged tire
is repaired or replaced.
17. Return the equipment to its
original storage location in
the vehicle.
9-74 Vehicle Care
Page 307 of 372
18. Immediately drive the vehicle
8 km (5 miles) to distribute the
sealant in the tire.
19. Stop at a safe location and
check the tire pressure. Refer
to Steps 1 through 11 under
“Using the Tire Sealant and
Compressor Kit without
Sealant to Inflate a Tire
(Not Punctured).”
If the tire pressure has fallen
more than 68 kPa (10 psi)
below the recommended
inflation pressure, stop driving
the vehicle. The tire is too
severely damaged and the
tire sealant cannot seal the
tire. SeeRoadside Assistance
Program on page 12-6.
If the tire pressure has not
dropped more than 10 psi
(68 kPa) from the recommended
inflation pressure, inflate the
tire to the recommended
inflation pressure.20. Wipe off any sealant from the
wheel, tire, and vehicle.
21. Dispose of the used sealant
canister and sealant/air hose (F)
assembly at a local dealer/
retailer or in accordance with
local state codes and practices.
22. Replace it with a new canister
available from your dealer/
retailer.
23. After temporarily sealing a
tire using the tire sealant and
compressor kit, take the vehicle
to an authorized dealer/retailer
within a 161 km (100 miles) of
driving to have the tire repaired
or replaced.Using the Tire Sealant and
Compressor Kit without
Sealant to Inate a Tire
(Not Punctured)
To use the air compressor to inflate
a tire with air only and not sealant:
Always do a safety check first. See
If a Tire Goes Flat on page 9-69.
1. Remove the tire sealant and
compressor kit from its storage
location. SeeStoring the Tire
Sealant and Compressor Kit on
page 9-77.
2. Unwrap the air only hose (E) and
the power plug (G).
Vehicle Care 9-75
Page 308 of 372
3. Place the kit on the ground.
Make sure the tire valve
stem is positioned close to the
ground so the hose will reach it.
4. Remove the tire valve stem cap
from the flat tire by turning it
counterclockwise.
5. Attach the air only hose (E) onto
the tire valve stem by turning it
clockwise until it is tight.
6. Plug the power plug (G) into the
accessory power outlet in the
vehicle. Unplug all items from
other accessory power outlets.
SeePower Outlets on page 4-9.
If the vehicle has an accessory
power outlet, do not use the
cigarette lighter.
If the vehicle only has a cigarette
lighter, use the cigarette lighter.
Do not pinch the power plug
cord in the door or window.7. Start the vehicle. The vehicle
must be running while using
the air compressor.
8. Turn the selector switch (B)
counterclockwise to the Air
Only position.
9. Press the on/off (A) button to
turn the compressor on.
The compressor will inflate the
tire with air only.
10. Inflate the tire to the
recommended inflation pressure
using the pressure gage (D).
The recommended inflation
pressure can be found on the
Tire and Loading Information
label. SeeTire Pressure on
page 9-54.
The pressure gage (D) may
read higher than the actual tire
pressure while the compressor
is on. Turn the compressor off
to get an accurate reading.
The compressor may be turned
on/off until the correct pressure
is reached.11. Press the on/off button (A)
to turn the tire sealant and
compressor kit off.
Be careful while handling the
tire sealant and compressor kit
as it could be warm after usage.
12. Unplug the power plug (G) from
the accessory power outlet in
the vehicle.
13. Disconnect the air only hose (E)
from the tire valve stem, by
turning it counterclockwise, and
replace the tire valve stem cap.
14. Replace the air only hose (E)
and the power plug (G) and
cord back in its original location.
15. Place the equipment in
the original storage location
in the vehicle.
9-76 Vehicle Care