CHEVROLET CAPTIVA SPORT 2013 Owners Manual
Manufacturer: CHEVROLET, Model Year: 2013, Model line: CAPTIVA SPORT, Model: CHEVROLET CAPTIVA SPORT 2013Pages: 374, PDF Size: 6.66 MB
Page 261 of 374
Black plate (27,1)Chevrolet Captiva Sport Owner Manual - 2013 - crc - 11/12/12
Vehicle Care 10-271. Open the hood. See Hood on
page 10 ‑ 3 .
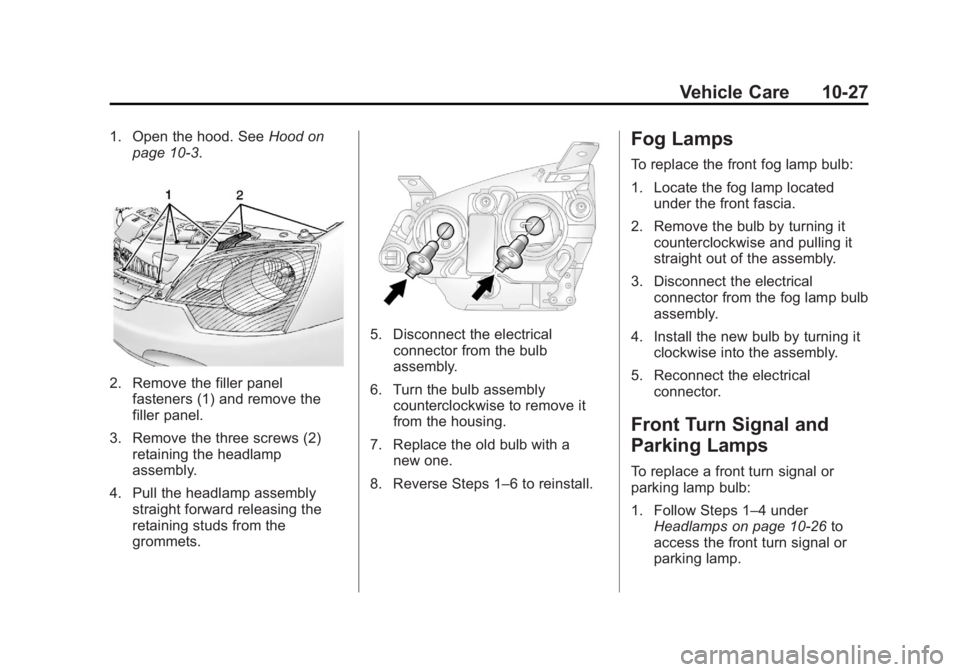
2. Remove the filler panel
fasteners (1) and remove the
filler panel.
3. Remove the three screws (2)
retaining the headlamp
assembly.
4. Pull the headlamp assembly
straight forward releasing the
retaining studs from the
grommets. 5. Disconnect the electrical
connector from the bulb
assembly.
6. Turn the bulb assembly
counterclockwise to remove it
from the housing.
7. Replace the old bulb with a
new one.
8. Reverse Steps 1 – 6 to reinstall.Fog Lamps To replace the front fog lamp bulb:
1. Locate the fog lamp located
under the front fascia.
2. Remove the bulb by turning it
counterclockwise and pulling it
straight out of the assembly.
3. Disconnect the electrical
connector from the fog lamp bulb
assembly.
4. Install the new bulb by turning it
clockwise into the assembly.
5. Reconnect the electrical
connector.
Front Turn Signal and
Parking Lamps To replace a front turn signal or
parking lamp bulb:
1. Follow Steps 1 – 4 under
Headlamps on page 10 ‑ 26 to
access the front turn signal or
parking lamp.
Page 262 of 374
Black plate (28,1)Chevrolet Captiva Sport Owner Manual - 2013 - crc - 11/12/12
10-28 Vehicle Care
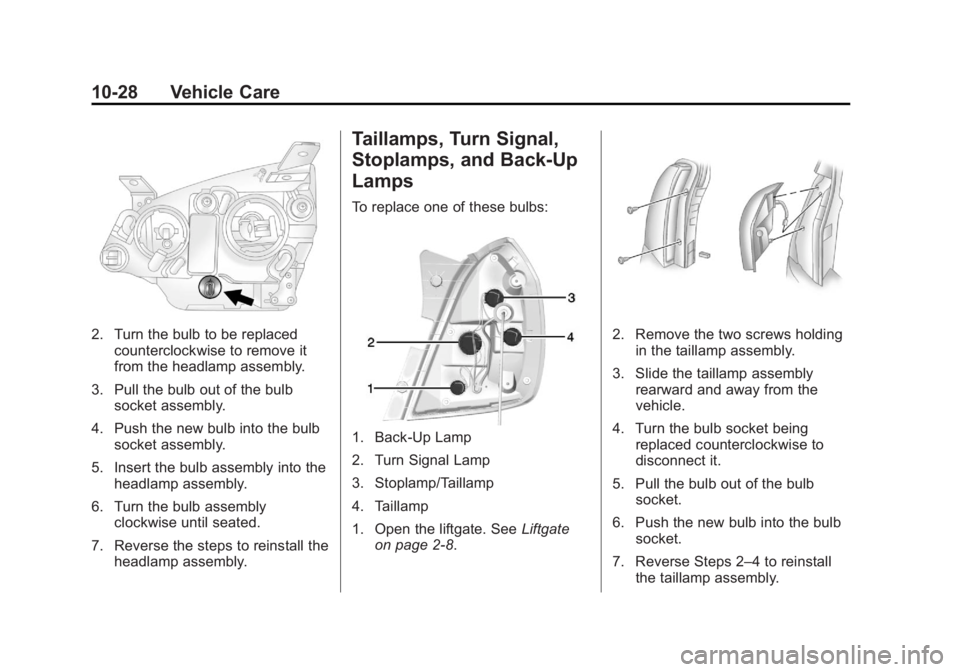
2. Turn the bulb to be replaced
counterclockwise to remove it
from the headlamp assembly.
3. Pull the bulb out of the bulb
socket assembly.
4. Push the new bulb into the bulb
socket assembly.
5. Insert the bulb assembly into the
headlamp assembly.
6. Turn the bulb assembly
clockwise until seated.
7. Reverse the steps to reinstall the
headlamp assembly. Taillamps, Turn Signal,
Stoplamps, and Back-Up
Lamps To replace one of these bulbs:
1. Back-Up Lamp
2. Turn Signal Lamp
3. Stoplamp/Taillamp
4. Taillamp
1. Open the liftgate. See Liftgate
on page 2 ‑ 8 . 2. Remove the two screws holding
in the taillamp assembly.
3. Slide the taillamp assembly
rearward and away from the
vehicle.
4. Turn the bulb socket being
replaced counterclockwise to
disconnect it.
5. Pull the bulb out of the bulb
socket.
6. Push the new bulb into the bulb
socket.
7. Reverse Steps 2 – 4 to reinstall
the taillamp assembly.
Page 263 of 374
Black plate (29,1)Chevrolet Captiva Sport Owner Manual - 2013 - crc - 11/12/12
Vehicle Care 10-29
License Plate Lamp To replace one of these bulbs:
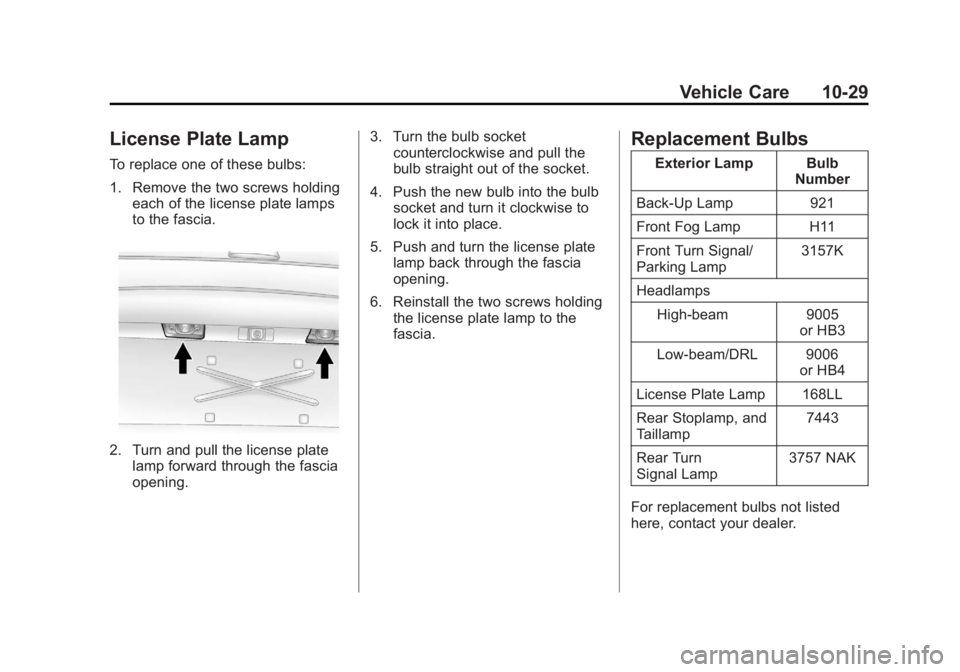
1. Remove the two screws holding
each of the license plate lamps
to the fascia.
2. Turn and pull the license plate
lamp forward through the fascia
opening. 3. Turn the bulb socket
counterclockwise and pull the
bulb straight out of the socket.
4. Push the new bulb into the bulb
socket and turn it clockwise to
lock it into place.
5. Push and turn the license plate
lamp back through the fascia
opening.
6. Reinstall the two screws holding
the license plate lamp to the
fascia. Replacement Bulbs Exterior Lamp Bulb
Number
Back-Up Lamp 921
Front Fog Lamp H11
Front Turn Signal/
Parking Lamp 3157K
Headlamps
High-beam 9005
or HB3
Low-beam/DRL 9006
or HB4
License Plate Lamp 168LL
Rear Stoplamp, and
Taillamp 7443
Rear Turn
Signal Lamp 3757 NAK
For replacement bulbs not listed
here, contact your dealer.
Page 264 of 374
Black plate (30,1)Chevrolet Captiva Sport Owner Manual - 2013 - crc - 11/12/12
10-30 Vehicle Care
Electrical System Electrical System
Overload The vehicle has fuses and circuit
breakers to protect against an
electrical system overload.
When the current electrical load is
too heavy, the circuit breaker opens
and closes, protecting the circuit
until the current load returns to
normal or the problem is fixed. This
greatly reduces the chance of circuit
overload and fire caused by
electrical problems.
Fuses and circuit breakers protect
power devices in the vehicle.
Replace a bad fuse with a new one
of the identical size and rating.
If there is a problem on the road and
a fuse needs to be replaced, the
same amperage fuse can be
borrowed. Choose some feature of
the vehicle that is not needed to use
and replace it as soon as possible. Headlamp Wiring An electrical overload may cause
the lamps to go on and off, or in
some cases to remain off. Have the
headlamp wiring checked right away
if the lamps go on and off or
remain off.
Windshield Wipers If the wiper motor overheats due to
heavy snow or ice, the windshield
wipers will stop until the motor cools
and will then restart.
Although the circuit is protected
from electrical overload, overload
due to heavy snow or ice may
cause wiper linkage damage.
Always clear ice and heavy snow
from the windshield before using the
windshield wipers.
If the overload is caused by an
electrical problem and not snow or
ice, be sure to get it fixed. Fuses and Circuit
Breakers The wiring circuits in the vehicle are
protected from short circuits by
fuses. This greatly reduces the
chance of circuit overload and fire
caused by electrical problems.
There are two fuse blocks — the
engine compartment fuse block, and
the instrument panel fuse block.
To identify and check fuses and
relays, refer to the Fuse Usage
Chart on the inside surface of the
fuse panel door or cover.
Engine Compartment
Fuse Block The engine compartment fuse block
is on the right side of the engine
compartment, near the battery.
Notice: Spilling liquid on any
electrical component on the
vehicle may damage it. Always
keep the covers on any electrical
component.
Page 265 of 374
Black plate (31,1)Chevrolet Captiva Sport Owner Manual - 2013 - crc - 11/12/12
Vehicle Care 10-31
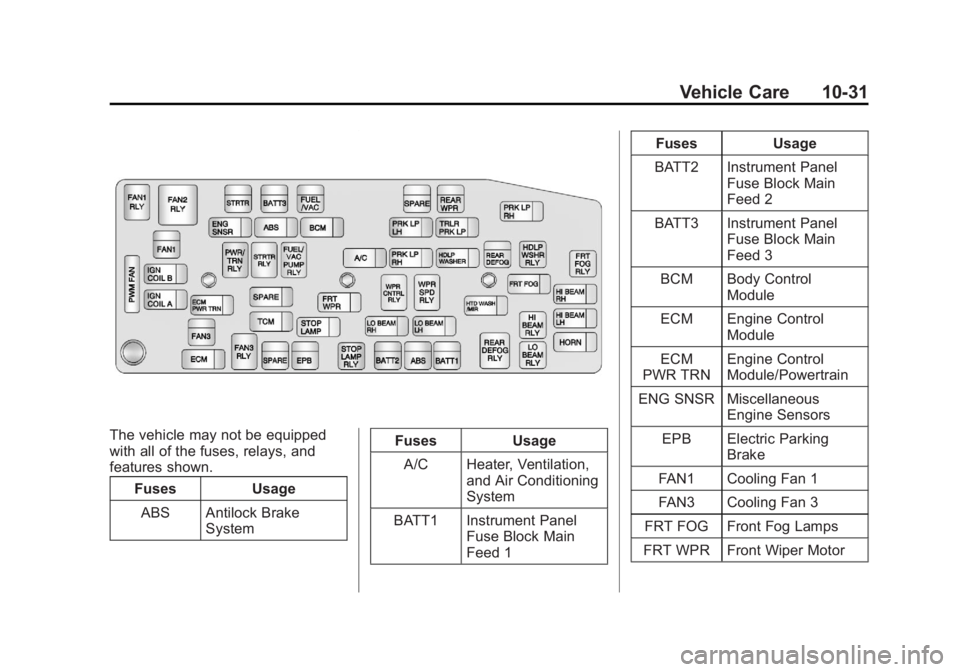
The vehicle may not be equipped
with all of the fuses, relays, and
features shown.
Fuses Usage
ABS Antilock Brake
System Fuses Usage
A/C Heater, Ventilation,
and Air Conditioning
System
BATT1 Instrument Panel
Fuse Block Main
Feed 1 Fuses Usage
BATT2 Instrument Panel
Fuse Block Main
Feed 2
BATT3 Instrument Panel
Fuse Block Main
Feed 3
BCM Body Control
Module
ECM Engine Control
Module
ECM
PWR TRN Engine Control
Module/Powertrain
ENG SNSR Miscellaneous
Engine Sensors
EPB Electric Parking
Brake
FAN1 Cooling Fan 1
FAN3 Cooling Fan 3
FRT FOG Front Fog Lamps
FRT WPR Front Wiper Motor
Page 266 of 374
Black plate (32,1)Chevrolet Captiva Sport Owner Manual - 2013 - crc - 11/12/12
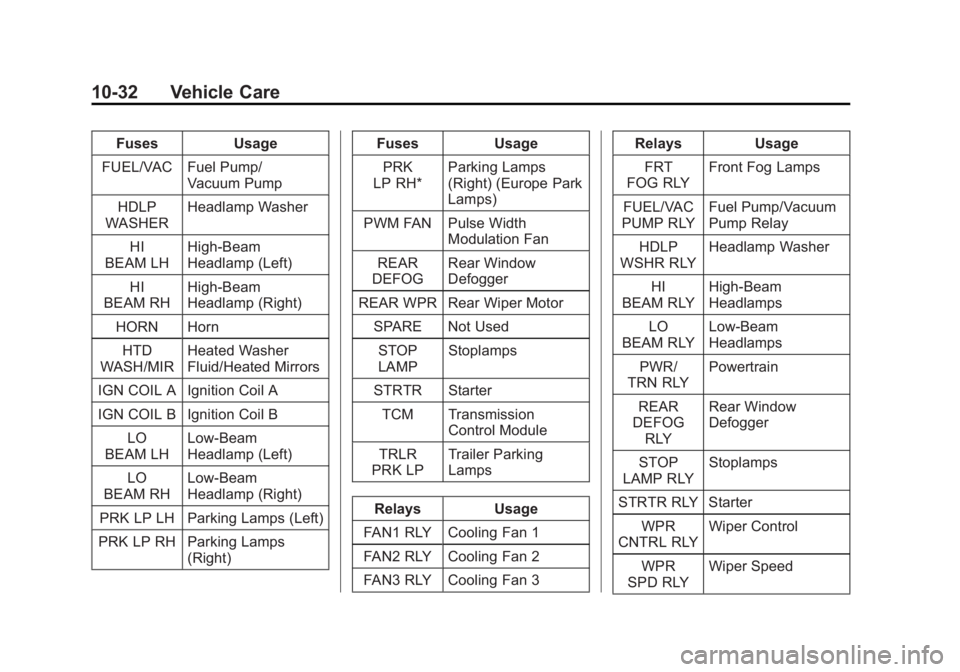
10-32 Vehicle Care Fuses Usage
FUEL/VAC Fuel Pump/
Vacuum Pump
HDLP
WASHER Headlamp Washer
HI
BEAM LH High-Beam
Headlamp (Left)
HI
BEAM RH High-Beam
Headlamp (Right)
HORN Horn
HTD
WASH/MIR Heated Washer
Fluid/Heated Mirrors
IGN COIL A Ignition Coil A
IGN COIL B Ignition Coil B
LO
BEAM LH Low-Beam
Headlamp (Left)
LO
BEAM RH Low-Beam
Headlamp (Right)
PRK LP LH Parking Lamps (Left)
PRK LP RH Parking Lamps
(Right) Fuses Usage
PRK
LP RH* Parking Lamps
(Right) (Europe Park
Lamps)
PWM FAN Pulse Width
Modulation Fan
REAR
DEFOG Rear Window
Defogger
REAR WPR Rear Wiper Motor
SPARE Not Used
STOP
LAMP Stoplamps
STRTR Starter
TCM Transmission
Control Module
TRLR
PRK LP Trailer Parking
Lamps
Relays Usage
FAN1 RLY Cooling Fan 1
FAN2 RLY Cooling Fan 2
FAN3 RLY Cooling Fan 3 Relays Usage
FRT
FOG RLY Front Fog Lamps
FUEL/VAC
PUMP RLY Fuel Pump/Vacuum
Pump Relay
HDLP
WSHR RLY Headlamp Washer
HI
BEAM RLY High-Beam
Headlamps
LO
BEAM RLY Low-Beam
Headlamps
PWR/
TRN RLY Powertrain
REAR
DEFOG
RLY Rear Window
Defogger
STOP
LAMP RLY Stoplamps
STRTR RLY Starter
WPR
CNTRL RLY Wiper Control
WPR
SPD RLY Wiper Speed
Page 267 of 374
Black plate (33,1)Chevrolet Captiva Sport Owner Manual - 2013 - crc - 11/12/12
Vehicle Care 10-33
Instrument Panel Fuse
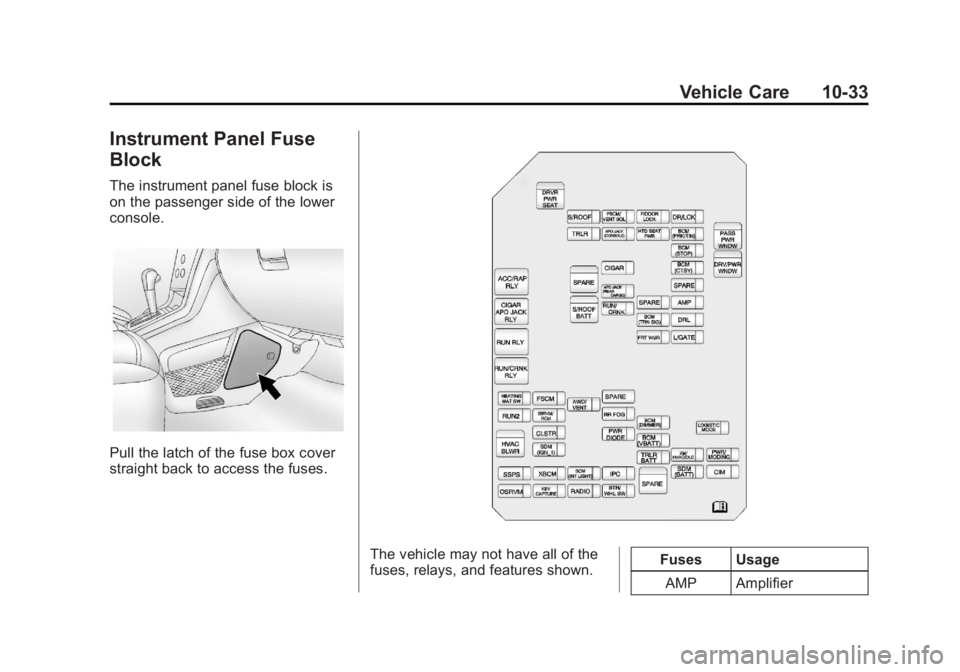
Block The instrument panel fuse block is
on the passenger side of the lower
console.
Pull the latch of the fuse box cover
straight back to access the fuses.
The vehicle may not have all of the
fuses, relays, and features shown. Fuses Usage
AMP Amplifier
Page 268 of 374
Black plate (34,1)Chevrolet Captiva Sport Owner Manual - 2013 - crc - 11/12/12
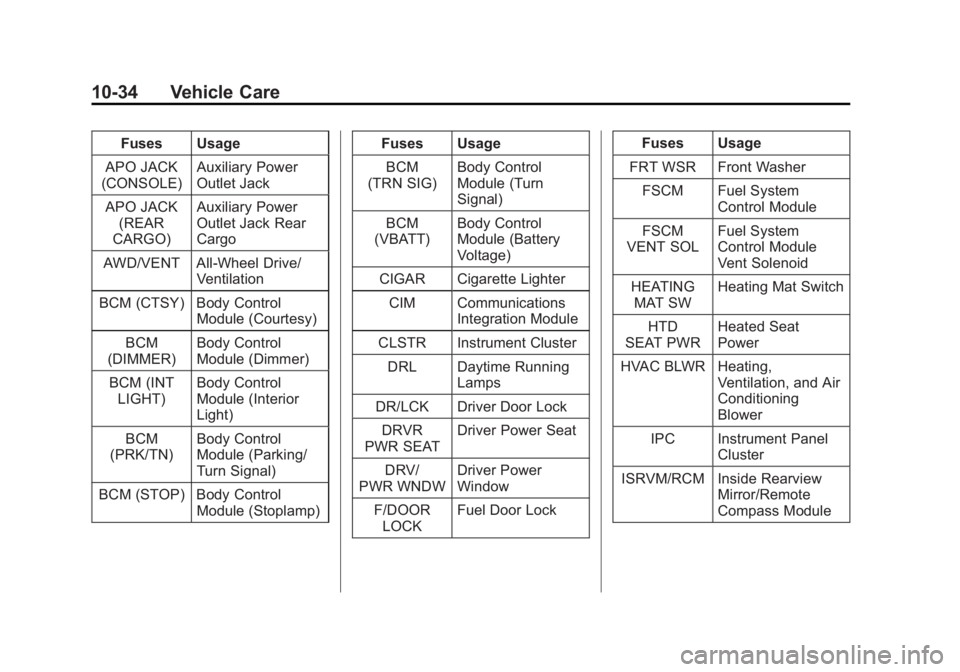
10-34 Vehicle Care Fuses Usage
APO JACK
(CONSOLE) Auxiliary Power
Outlet Jack
APO JACK
(REAR
CARGO) Auxiliary Power
Outlet Jack Rear
Cargo
AWD/VENT All-Wheel Drive/
Ventilation
BCM (CTSY) Body Control
Module (Courtesy)
BCM
(DIMMER) Body Control
Module (Dimmer)
BCM (INT
LIGHT) Body Control
Module (Interior
Light)
BCM
(PRK/TN) Body Control
Module (Parking/
Turn Signal)
BCM (STOP) Body Control
Module (Stoplamp) Fuses Usage
BCM
(TRN SIG) Body Control
Module (Turn
Signal)
BCM
(VBATT) Body Control
Module (Battery
Voltage)
CIGAR Cigarette Lighter
CIM Communications
Integration Module
CLSTR Instrument Cluster
DRL Daytime Running
Lamps
DR/LCK Driver Door Lock
DRVR
PWR SEAT Driver Power Seat
DRV/
PWR WNDW Driver Power
Window
F/DOOR
LOCK Fuel Door Lock Fuses Usage
FRT WSR Front Washer
FSCM Fuel System
Control Module
FSCM
VENT SOL Fuel System
Control Module
Vent Solenoid
HEATING
MAT SW Heating Mat Switch
HTD
SEAT PWR Heated Seat
Power
HVAC BLWR Heating,
Ventilation, and Air
Conditioning
Blower
IPC Instrument Panel
Cluster
ISRVM/RCM Inside Rearview
Mirror/Remote
Compass Module
Page 269 of 374
Black plate (35,1)Chevrolet Captiva Sport Owner Manual - 2013 - crc - 11/12/12
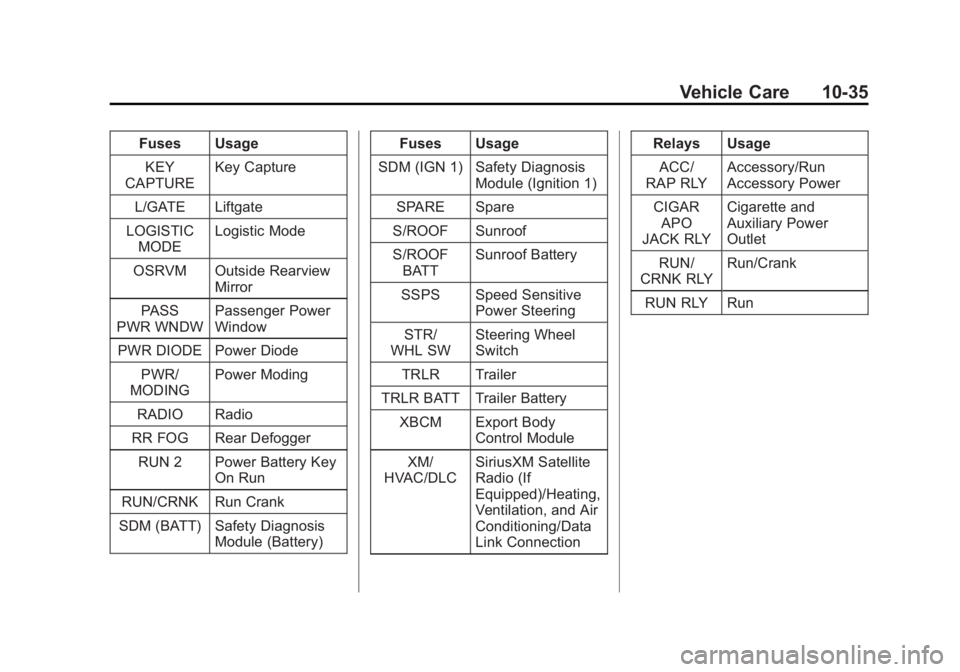
Vehicle Care 10-35Fuses Usage
KEY
CAPTURE Key Capture
L/GATE Liftgate
LOGISTIC
MODE Logistic Mode
OSRVM Outside Rearview
Mirror
PASS
PWR WNDW Passenger Power
Window
PWR DIODE Power Diode
PWR/
MODING Power Moding
RADIO Radio
RR FOG Rear Defogger
RUN 2 Power Battery Key
On Run
RUN/CRNK Run Crank
SDM (BATT) Safety Diagnosis
Module (Battery) Fuses Usage
SDM (IGN 1) Safety Diagnosis
Module (Ignition 1)
SPARE Spare
S/ROOF Sunroof
S/ROOF
BATT Sunroof Battery
SSPS Speed Sensitive
Power Steering
STR/
WHL SW Steering Wheel
Switch
TRLR Trailer
TRLR BATT Trailer Battery
XBCM Export Body
Control Module
XM/
HVAC/DLC SiriusXM Satellite
Radio (If
Equipped)/Heating,
Ventilation, and Air
Conditioning/Data
Link Connection Relays Usage
ACC/
RAP RLY Accessory/Run
Accessory Power
CIGAR
APO
JACK RLY Cigarette and
Auxiliary Power
Outlet
RUN/
CRNK RLY Run/Crank
RUN RLY Run
Page 270 of 374
Black plate (36,1)Chevrolet Captiva Sport Owner Manual - 2013 - crc - 11/12/12
10-36 Vehicle Care
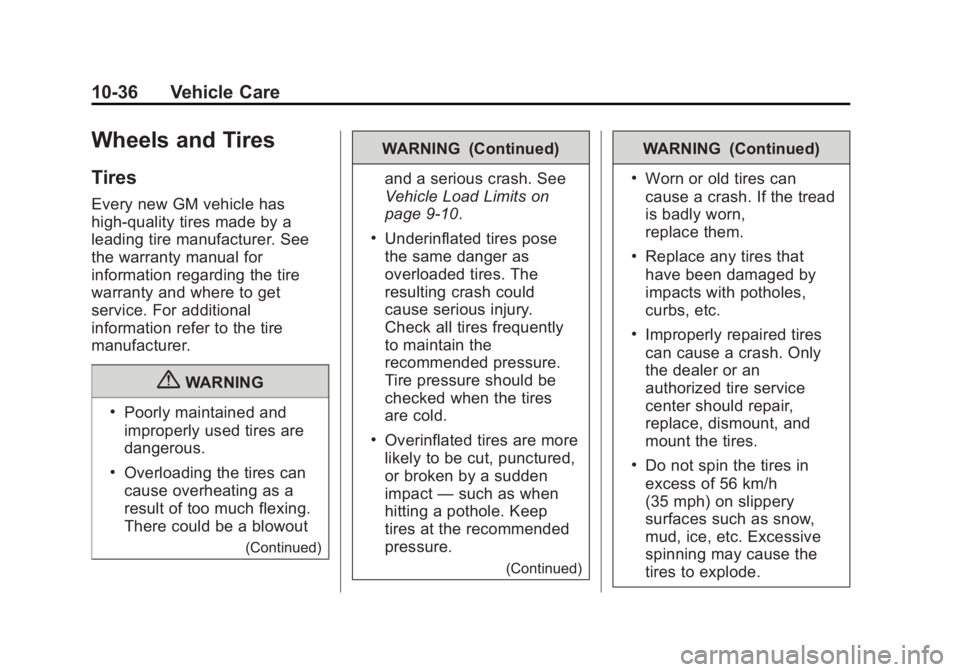
Wheels and Tires Tires Every new GM vehicle has
high-quality tires made by a
leading tire manufacturer. See
the warranty manual for
information regarding the tire
warranty and where to get
service. For additional
information refer to the tire
manufacturer.
{ WARNING .
Poorly maintained and
improperly used tires are
dangerous. .
Overloading the tires can
cause overheating as a
result of too much flexing.
There could be a blowout
(Continued) WARNING (Continued)
and a serious crash. See
Vehicle Load Limits on
page 9 ‑ 10 . .
Underinflated tires pose
the same danger as
overloaded tires. The
resulting crash could
cause serious injury.
Check all tires frequently
to maintain the
recommended pressure.
Tire pressure should be
checked when the tires
are cold. .
Overinflated tires are more
likely to be cut, punctured,
or broken by a sudden
impact — such as when
hitting a pothole. Keep
tires at the recommended
pressure.
(Continued) WARNING (Continued) .
Worn or old tires can
cause a crash. If the tread
is badly worn,
replace them. .
Replace any tires that
have been damaged by
impacts with potholes,
curbs, etc. .
Improperly repaired tires
can cause a crash. Only
the dealer or an
authorized tire service
center should repair,
replace, dismount, and
mount the tires. .
Do not spin the tires in
excess of 56 km/h
(35 mph) on slippery
surfaces such as snow,
mud, ice, etc. Excessive
spinning may cause the
tires to explode.