sport mode CHEVROLET CAPTIVA SPORT 2015 Owner's Manual
[x] Cancel search | Manufacturer: CHEVROLET, Model Year: 2015, Model line: CAPTIVA SPORT, Model: CHEVROLET CAPTIVA SPORT 2015Pages: 373, PDF Size: 4.11 MB
Page 1 of 373
2k15_chev_captiva_sport_23446878A.ai(Modern Bridge - Level 2 / #23321109) Spine = Printer AdjustColor = Black
Date = 03/18/14
Captiva Sport
2015
2015 Captiva Sport
chevrolet.com (U.S.)
chevrolet.com.mx (Mexico)
23446878 A
Page 4 of 373
Black plate (3,1)Chevrolet Captiva Sport Owner Manual (GMNA-Localizing-U.S./Mexico-
7576028) - 2015 - First Edition - 3/21/14
Introduction iii
The names, logos, emblems,
slogans, vehicle model names, and
vehicle body designs appearing in
this manual including, but not limited
to, GM, the GM logo, CHEVROLET,
the CHEVROLET Emblem, and
CAPTIVA are trademarks and/or
service marks of General Motors
LLC, its subsidiaries, affiliates,
or licensors.
This manual describes features that
may or may not be on the vehicle
because of optional equipment that
was not purchased on the vehicle,
model variants, country
specifications, features/applications
that may not be available in your
region, or changes subsequent to
the printing of this owner manual.Refer to the purchase
documentation relating to your
specific vehicle to confirm the
features.
Keep this manual in the vehicle for
quick reference.Using this Manual
To quickly locate information about
the vehicle, use the Index in the
back of the manual. It is an
alphabetical list of what is in the
manual and the page number where
it can be found.
About Driving the Vehicle
As with other vehicles of this type,
failure to operate this vehicle
correctly may result in loss of
control or an accident. Be sure to
read the driving guidelines in this
manual in the section called
“Driving
and Operating” and specifically Driver Behavior on page 9-2,
Driving Environment on page 9-2,
and
Vehicle Design on page 9-2.
Danger, Warnings, and
Cautions
Warning messages found on vehicle
labels and in this manual describe
hazards and what to do to avoid or
reduce them.
{Danger
Danger indicates a hazard with a
high level of risk which will result
in serious injury or death.
{Warning
Warning indicates a hazard that
could result in injury or death.
Litho in U.S.A.
Part No. 23446878 A First Printing©2014 General Motors LLC. All Rights Reserved.
Page 19 of 373
Black plate (14,1)Chevrolet Captiva Sport Owner Manual (GMNA-Localizing-U.S./Mexico-
7576028) - 2015 - First Edition - 3/21/14
1-14 In Brief
3:Sets a delay between wipes.
Move the switch on top of the lever
left for less frequent wipes or right
for more frequent wipes.
a: Slow wipes.
1:Fast wipes.
Windshield Washer
Pull the windshield wiper lever to
spray windshield washer fluid and
activate the wipers. The wipers will
continue until the lever is released
or the maximum wash time is
reached.
Rear Window Wiper/Washer
The rear wiper and rear wash button
is on the instrument panel above the
climate control system.
=: Press to wash and wipe the
rear window.
5: Press to turn the delayed
wiping on or off.
See Windshield Wiper/Washer on
page 5-3 andRear Window Wiper/
Washer on page 5-4.
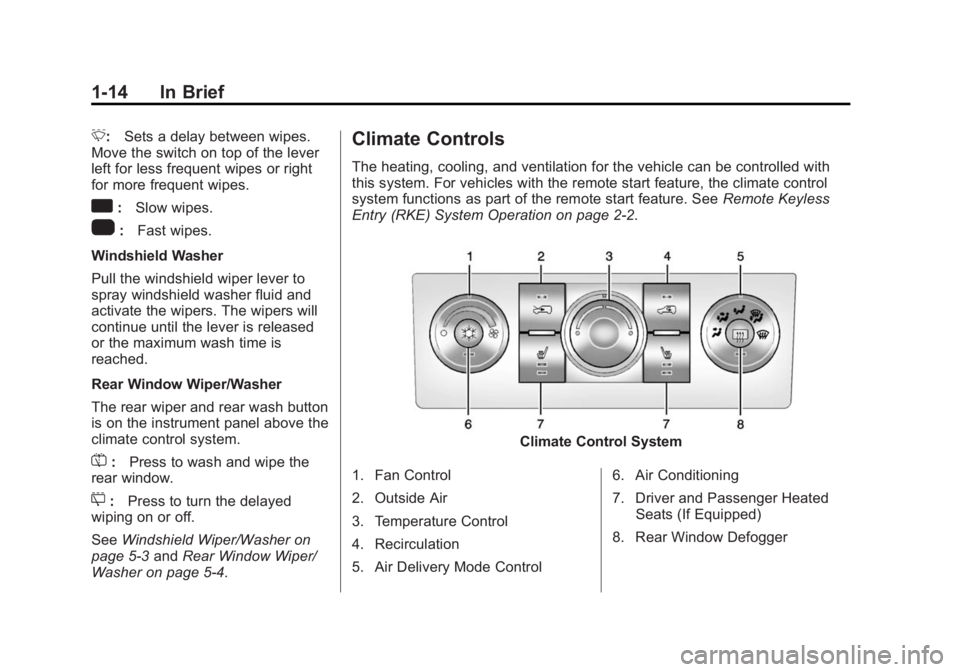
Climate Controls
The heating, cooling, and ventilation for the vehicle can be controlled with
this system. For vehicles with the remote start feature, the climate control
system functions as part of the remote start feature. See Remote Keyless
Entry (RKE) System Operation on page 2-2.
Climate Control System
1. Fan Control
2. Outside Air
3. Temperature Control
4. Recirculation
5. Air Delivery Mode Control 6. Air Conditioning
7. Driver and Passenger Heated
Seats (If Equipped)
8. Rear Window Defogger
Page 20 of 373
Black plate (15,1)Chevrolet Captiva Sport Owner Manual (GMNA-Localizing-U.S./Mexico-
7576028) - 2015 - First Edition - 3/21/14
In Brief 1-15
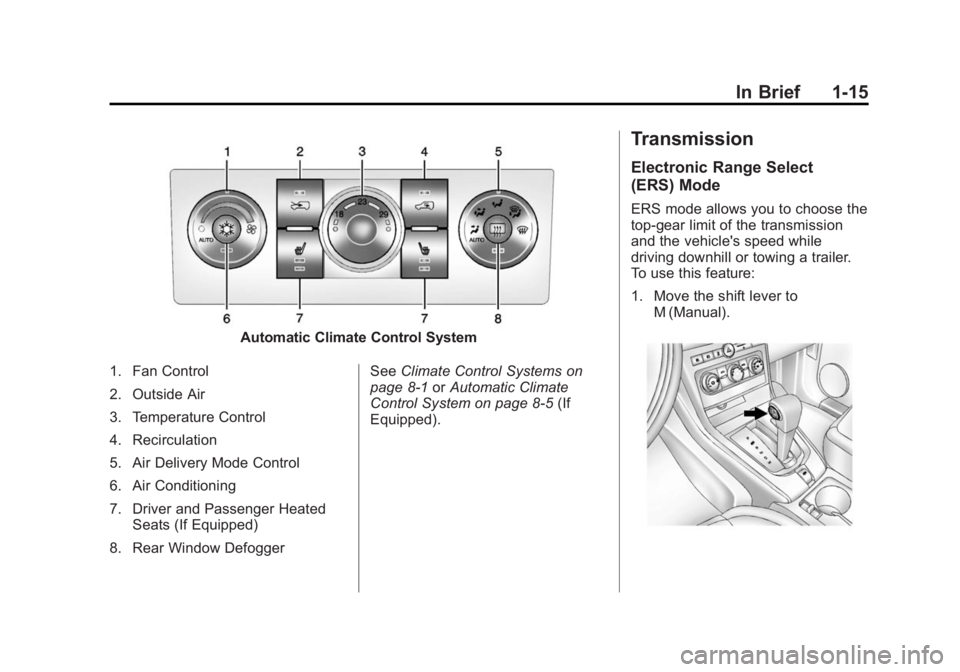
Automatic Climate Control System
1. Fan Control
2. Outside Air
3. Temperature Control
4. Recirculation
5. Air Delivery Mode Control
6. Air Conditioning
7. Driver and Passenger Heated Seats (If Equipped)
8. Rear Window Defogger See
Climate Control Systems on
page 8-1 orAutomatic Climate
Control System on page 8-5 (If
Equipped).
Transmission
Electronic Range Select
(ERS) Mode
ERS mode allows you to choose the
top-gear limit of the transmission
and the vehicle's speed while
driving downhill or towing a trailer.
To use this feature:
1. Move the shift lever to M (Manual).
Page 21 of 373
Black plate (16,1)Chevrolet Captiva Sport Owner Manual (GMNA-Localizing-U.S./Mexico-
7576028) - 2015 - First Edition - 3/21/14
1-16 In Brief
2. Press the plus/minus buttonlocated on the shift lever, to
increase or decrease the gear
range available.
See Manual Mode on page 9-22.Vehicle Features
Radio(s)
O
:Press to turn the system on
and off. Turn to increase or
decrease the volume.
BAND: Press to choose between
FM, AM, or SiriusXM
®, if equipped.
f: Select radio stations.
©SEEK or¨SEEK: Seek or scan
stations.
4(Information): If equipped with
XM, MP3, WMA, or RDS features,
press to display additional text
information related to the current
FM-RDS or SiriusXM station, or CD,
MP3, or WMA song. Song title
information will be displayed on the
top line of the display while the artist
information will be displayed on the
bottom line, if the information is
available during XM, CD, MP3,
or WMA playback. When
information is not available, "No
Info" displays. For more information about these
and other radio features, see
Operation on page 7-3.
Storing a Favorite Station
A maximum of 36 stations can be
stored as favorites using the six
softkeys below the radio station
frequency tabs and by using the
radio FAV button. Press FAV to go
through up to six pages of favorites,
each having six favorite stations
available per page. Each page of
favorites can contain any
combination of AM, FM, or SiriusXM
stations.
See
Operation on page 7-3.
Setting the Clock
To set the time and date:
1. Turn the ignition key to ACC/
ACCESSORY or ON/RUN.
2. Press
Oto turn the radio on.
3. Press
Hand HR, MIN, MM, DD,
and YYYY (hour, minute, month,
day, and year) display.
Page 30 of 373
Black plate (3,1)Chevrolet Captiva Sport Owner Manual (GMNA-Localizing-U.S./Mexico-
7576028) - 2015 - First Edition - 3/21/14
Keys, Doors, and Windows 2-3
/(Remote Vehicle Start):
If equipped, this button is used to
operate the remote start feature.
See Remote Vehicle Start on
page 2-4.
Q(Lock): Press to lock all the
doors, including the liftgate. The
vehicle's lamps may flash and the
horn may sound. See “Remote Door
Lock” under Vehicle Personalization
on page 5-35.
On some models, the fuel door will
also be locked when the doors are
locked.
K(Unlock): Press once to unlock
the driver door. If
Kis pressed
again within five seconds, all
remaining doors unlock. The interior
lamps come on and stay on for
20 seconds or until the ignition is
turned on. The exterior lamps may
flash when unlocking the vehicle.
See “Remote Door Unlock” under
Vehicle Personalization on
page 5-35.
L(Vehicle Locator/Panic
Alarm): Press and release to
locate the vehicle. The turn signal
lamps flash and the horn sounds
three times. Press and hold
Lto
activate the panic alarm. The turn
signal lamps flash and the horn
sounds repeatedly for 30 seconds.
The alarm turns off when the
ignition is turned to ON/RUN or
when
Lis pressed again. The
ignition must be in LOCK/OFF for
the panic alarm to work.
Programming Transmitters to
the Vehicle
Only RKE transmitters programmed
to the vehicle will work. If a
transmitter is lost or stolen, a
replacement can be purchased and
programmed through your dealer.
When the replacement transmitter is
programmed to the vehicle, all
remaining transmitters must also be
programmed. Any lost or stolen
transmitters no longer work once the new transmitter is programmed.
Each vehicle can have up to eight
transmitters programmed to it.
Battery Replacement
Replace the battery if the REPLACE
REMOTE KEY FOB BATTERY
message displays on the Driver
Information Center (DIC). See
“REPLACE REMOTE KEY FOB
BATTERY”
underKey and Lock
Messages on page 5-31.
{Caution
When replacing the battery, do
not touch any of the circuitry on
the transmitter. Static from your
body could damage the
transmitter.
Page 57 of 373
Black plate (14,1)Chevrolet Captiva Sport Owner Manual (GMNA-Localizing-U.S./Mexico-
7576028) - 2015 - First Edition - 3/21/14
3-14 Seats and Restraints
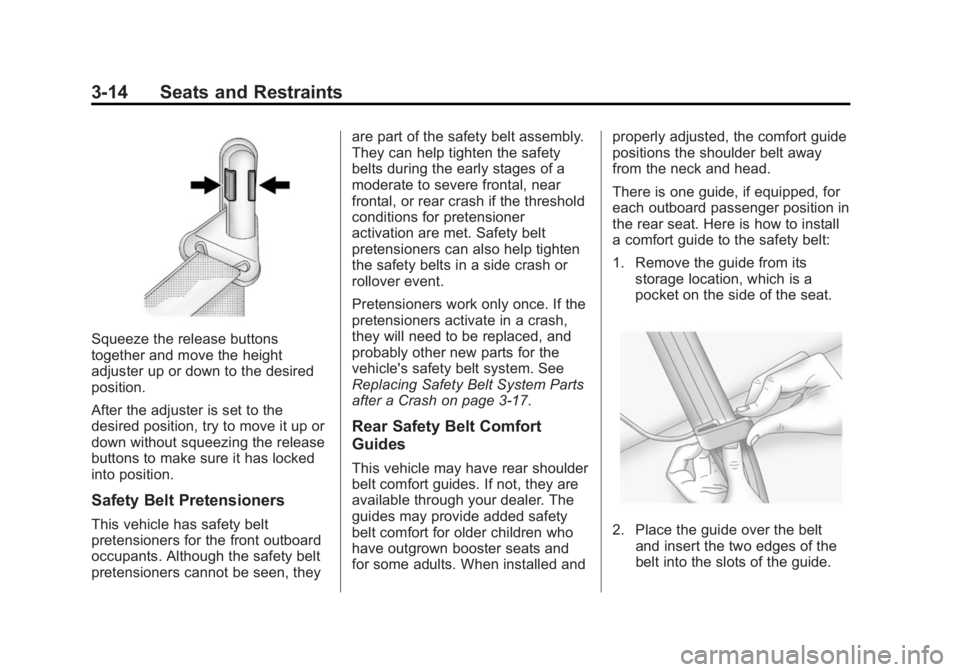
Squeeze the release buttons
together and move the height
adjuster up or down to the desired
position.
After the adjuster is set to the
desired position, try to move it up or
down without squeezing the release
buttons to make sure it has locked
into position.
Safety Belt Pretensioners
This vehicle has safety belt
pretensioners for the front outboard
occupants. Although the safety belt
pretensioners cannot be seen, theyare part of the safety belt assembly.
They can help tighten the safety
belts during the early stages of a
moderate to severe frontal, near
frontal, or rear crash if the threshold
conditions for pretensioner
activation are met. Safety belt
pretensioners can also help tighten
the safety belts in a side crash or
rollover event.
Pretensioners work only once. If the
pretensioners activate in a crash,
they will need to be replaced, and
probably other new parts for the
vehicle's safety belt system. See
Replacing Safety Belt System Parts
after a Crash on page 3-17.
Rear Safety Belt Comfort
Guides
This vehicle may have rear shoulder
belt comfort guides. If not, they are
available through your dealer. The
guides may provide added safety
belt comfort for older children who
have outgrown booster seats and
for some adults. When installed and
properly adjusted, the comfort guide
positions the shoulder belt away
from the neck and head.
There is one guide, if equipped, for
each outboard passenger position in
the rear seat. Here is how to install
a comfort guide to the safety belt:
1. Remove the guide from its
storage location, which is a
pocket on the side of the seat.
2. Place the guide over the beltand insert the two edges of the
belt into the slots of the guide.
Page 64 of 373
Black plate (21,1)Chevrolet Captiva Sport Owner Manual (GMNA-Localizing-U.S./Mexico-
7576028) - 2015 - First Edition - 3/21/14
Seats and Restraints 3-21
Warning (Continued)
that person causing severe injury
or even death. The path of an
inflating airbag must be kept
clear. Do not put anything
between an occupant and an
airbag, and do not attach or put
anything on the steering wheel
hub or on or near any other
airbag covering.
Do not use seat accessories that
block the inflation path of a
seat-mounted side impact airbag.
Never secure anything to the roof
of a vehicle with roof-rail airbags
by routing a rope or tie‐down
through any door or window
opening. If you do, the path of an
inflating roof-rail airbag will be
blocked.
When Should an Airbag
Inflate?
This vehicle is equipped with
airbags. SeeAirbag System on
page 3-17. Airbags are designed to
inflate if the impact exceeds the
specific airbag system's deployment
threshold. Deployment thresholds
are used to predict how severe a
crash is likely to be in time for the
airbags to inflate and help restrain
the occupants. The vehicle has
electronic sensors that help the
airbag system determine the
severity of the impact. Deployment
thresholds can vary with specific
vehicle design.
Frontal airbags are designed to
inflate in moderate to severe frontal
or near frontal crashes to help
reduce the potential for severe
injuries, mainly to the driver's or
front outboard passenger's head
and chest.
Whether the frontal airbags will or
should inflate is not based primarily
on how fast the vehicle is traveling. It depends on what is hit, the
direction of the impact, and how
quickly the vehicle slows down.
Frontal airbags may inflate at
different crash speeds depending on
whether the vehicle hits an object
straight on or at an angle, and
whether the object is fixed or
moving, rigid or deformable, narrow
or wide.
Frontal airbags are not intended to
inflate during vehicle rollovers, in
rear impacts, or in many side
impacts.
In addition, the vehicle has
advanced technology frontal
airbags. Advanced technology
frontal airbags adjust the restraint
according to crash severity.
Seat-mounted side impact airbags
are designed to inflate in moderate
to severe side crashes depending
on the location of the impact.
Seat-mounted side impact airbags
are not designed to inflate in frontal
impacts, near frontal impacts,
rollovers, or rear impacts.
Page 65 of 373
Black plate (22,1)Chevrolet Captiva Sport Owner Manual (GMNA-Localizing-U.S./Mexico-
7576028) - 2015 - First Edition - 3/21/14
3-22 Seats and Restraints
A seat-mounted side impact airbag
is designed to inflate on the side of
the vehicle that is struck.
Roof-rail airbags are designed to
inflate in moderate to severe side
crashes depending on the location
of the impact. In addition, these
roof-rail airbags are designed to
inflate during a rollover or in a
severe frontal impact. Roof-rail
airbags are not designed to inflate in
rear impacts. Both roof-rail airbags
will inflate when either side of the
vehicle is struck, if the sensing
system predicts that the vehicle is
about to roll over on its side, or in a
severe frontal impact.
In any particular crash, no one can
say whether an airbag should have
inflated simply because of the
vehicle damage or repair costs.
What Makes an Airbag
Inflate?
In a deployment event, the sensing
system sends an electrical signal
triggering a release of gas from theinflator. Gas from the inflator fills the
airbag causing the bag to break out
of the cover. The inflator, the airbag,
and related hardware are all part of
the airbag module.
For airbag locations, see
Where Are
the Airbags? on page 3-19.
How Does an Airbag
Restrain?
In moderate to severe frontal or
near frontal collisions, even belted
occupants can contact the steering
wheel or the instrument panel. In
moderate to severe side collisions,
even belted occupants can contact
the inside of the vehicle.
Airbags supplement the protection
provided by safety belts by
distributing the force of the impact
more evenly over the
occupant's body.
Rollover capable roof-rail airbags
are designed to help contain the
head and chest of occupants in the
outboard seating positions in the first and second rows. The rollover
capable roof-rail airbags are
designed to help reduce the risk of
full or partial ejection in rollover
events, although no system can
prevent all such ejections.
But airbags would not help in many
types of collisions, primarily
because the occupant's motion is
not toward those airbags. See
When
Should an Airbag Inflate? on
page 3-21.
Airbags should never be regarded
as anything more than a supplement
to safety belts.
What Will You See after
an Airbag Inflates?
After the frontal airbags and
seat-mounted side impact airbags
inflate, they quickly deflate, so
quickly that some people may not
even realize an airbag inflated.
Roof-rail airbags may still be at least
partially inflated for some time after
they deploy. Some components of
the airbag module may be hot for
Page 66 of 373
Black plate (23,1)Chevrolet Captiva Sport Owner Manual (GMNA-Localizing-U.S./Mexico-
7576028) - 2015 - First Edition - 3/21/14
Seats and Restraints 3-23
several minutes. For location of the
airbag modules, seeWhat Makes
an Airbag Inflate? on page 3-22.
The parts of the airbag that come
into contact with you may be warm,
but not too hot to touch. There may
be some smoke and dust coming
from the vents in the deflated
airbags. Airbag inflation does not
prevent the driver from seeing out of
the windshield or being able to steer
the vehicle, nor does it prevent
people from leaving the vehicle.
{Warning
When an airbag inflates, there
may be dust in the air. This dust
could cause breathing problems
for people with a history of
asthma or other breathing trouble.
To avoid this, everyone in the
vehicle should get out as soon as
it is safe to do so. If you have
breathing problems but cannot
get out of the vehicle after an
(Continued)
Warning (Continued)
airbag inflates, then get fresh air
by opening a window or a door.
If you experience breathing
problems following an airbag
deployment, you should seek
medical attention.
The vehicle has a feature that may
automatically unlock the doors, turn
on the interior lamps and hazard
warning flashers, and shut off the
fuel system after the airbags inflate.
The feature may also activate,
without airbag inflation, after an
event that exceeds a predetermined
threshold. You can lock the doors,
turn off the interior lamps and
hazard warning flashers by using
the controls for those features. You
must first, however, turn the ignition
key to the following ignition switch
positions:
1. Turn the ignition key to LOCK/OFF. 2. Turn the ignition key to ON/RUN.{Warning
A crash severe enough to inflate
the airbags may have also
damaged important functions in
the vehicle, such as the fuel
system, brake and steering
systems, etc. Even if the vehicle
appears to be drivable after a
moderate crash, there may be
concealed damage that could
make it difficult to safely operate
the vehicle.
Use caution if you should attempt
to restart the engine after a crash
has occurred.
In many crashes severe enough to
inflate the airbag, windshields are
broken by vehicle deformation.