ECO mode CHEVROLET CAVALIER 1984 1.G Owners Manual
[x] Cancel search | Manufacturer: CHEVROLET, Model Year: 1984, Model line: CAVALIER, Model: CHEVROLET CAVALIER 1984 1.GPages: 105, PDF Size: 24.23 MB
Page 18 of 105
Downloaded from www.Manualslib.com manuals search engine Driving with the trunk lid, hatchback or liftgate on station wagon models open is not recommended. Under some conditions, exhaust gases may be drawn
into the vehicle. If the trunk lid, hatchback or liftback must remain open for
some reason while moving, or if electrical wiring or other cable connections to a trailer must pass through the seal between the trunk lid, hatchback or liftback
and the body, follow these precautions:
• Close all windows.
• Adjust the heating or cooling system to force outside air into the vehicle as
described abcve, but set the fan to high speed.
• On vehicles with outside air vents in or under the instrument panel, open the vents fully.
NEW VEHICLE "BREAK-IN" PERIOD
You can drive your new vehicle from its very first mile/kilometer without
following a formal "break-in" schedule. However, there are things you can do during the first few hundred miles/kilometers of driving that will add to the
future performance and economy of your vehicle.
We recommend you limit your speed during the first 500 miles (800 kilometers)
to a maximum of 55 mph (90 km/h); but do not drive for long periods at any
one constant speed, either fast or slow. During this time, avoid full throttle
starts and, if possible, avoid hard stops especially during the first 200 miles (320 kilometers) of driving.
Always drive at moderate speed until the engine has completely warmed up.
I! you plan to use your new vehicle for trailer towing, see the following.
TRAILER TOWING
This car is designed and intended to be used mainly to carry people. Towing a
trailer
will affect handling, durability and economy. Your safety and satisfaction
depend upon proper use of correct equipment. Also, you should avoid
overloads and other abusive use.
The maximum loaded trailer weight you can pull with your vehicle depends on
your intended use
and what special equipment has been installed on it.
Information on trailer towing ability, special equipment required, and optional
equipment available should be obtained from your dealer. Ask for the trailering brochure. Or, write: Consumer Relations Department, Chevrolet Motor
Division, Warren, Michigan 48090.
(In Canada, write to General Motors of
Canada Limited, Customer Services Department, Oshawa, Ontario L lJ 5Z6.)
Tires
When towing trailers, be sure your tires are properly inflated to the inflation pressure shown on the Tire Placard on the driver's door.
The allowable passenger and cargo load for this vehicle, also shown on the
Tire
Placard, is reduced by the trailer tongue weight whenever the trailer is
attached to the vehicle. See "Service and Maintenance," Section 5 for more tire information.
Maintenance
More frequent service is required when using your vehicle to pull a trailer. See
the Maintenance Schedule folder for Automatic Transaxle Fluid and Engine Oil change requirements for trailering.
2-2
Page 22 of 105
Downloaded from www.Manualslib.com manuals search engine Other Gasolinel Alcohol Blends
Some fuel suppliers sell gasoline containing alcohol without advertising the
presence of
alcohol or giving it a special name such as gasohol. " you are not
sure whether there is alcohol in the gasoline you buy, check with the service
station operator.
DO NOT USE gasolines containing methanol (methyl or wood alcohol) that do
not
also contain cosolvents and corrosion inhibitors for methanol. Also, DO NOT USE gasolines that contain more than 5 percent methanol even if they
contain
cosolvents and corrosion inhib~ors. Fuel system damage or vehicle performance problems resuHing from the use of such fuels is not the
responsibility
of Chevrolet and may not be covered under the new vehicle
warranties.
Mhough gasolines containing 5 percent or less methanol and appropriate
cosolvents and inhibitors for methanol may be suitable for use in your vehicle,
evidence of their suitability is as yet incomplete; therefore, Chevrolet cannot, at
this time, endorse their use.
NOTICE: Take care to not spill gasoline during refueling. Guolines containing alcohol can cause paint damage, whiCh may notba covered under the New Vehicle Warranty.
OPERATION IN FOREIGN COUNTRIES
All models are specifically bum to comply with United States Federal Regulations regarding environmental quality. To comply, unleaded fuel of
sufficient octane rating must be used. These
fuels may not be available in
other countries. "you intend to take your vehicle outside the U.S. or Canada,
contact the GM Overseas Service Section at the
following address, to find out
what you must
do in order to operate your vehicles in other countries, or for
additional information and a. copy of the applicable maintenance schedule.
General Motors Corporation, Overseas Service Section, 2-128 General Motors
Building,
Detroij, Michigan 48202, (313) 556-4862.
When
writing, please include:
•
the Vehicle Identification Number and
• the countries in which yOu plan to travel.
Before taking your vehicle to a foreign country, check to see if the proper fuel
is available. Most major oil companies or domestic auto clubs should have this
information. Foreign offices of major oil
COmpanies or auto clubs may also be
of
help.
Be aware that, use of leaded gasoline or use of fuel that has a lower octane
rating than is required by your
vehicle, will cause the emission control system to lose its effectiveness and can cause ,engine knock or serious engine
damage. Ne~her GM Overseas nor Chevrolet will be responsible for damage to
your
vehicle as a result of not USing the proper fuel.
IMPORTANT FACTS YOU SHOULD KNOW ABOUT FUEL
ECONOMY AND HOW
TO IMPROVE IT
How you drive, where you drive, and when you drive all affect how many
miles/kilometers you can get from a galion/liter of fuel. You can save fuel if
you avoid
"Jackrabbit" starts, maintain as constant a throttle position as traffic
conditions
allow once you have reached cruising speed, and avoid sudden
stops which waste energy in the form of heat generated in braking.
2-6
Page 23 of 105
Downloaded from www.Manualslib.com manuals search engine Frequent short trips, excessive idling and use of the air conditioner in cool
weather (when "vent" would provide adequate comfort), all can contribute to
decreased fuel economy .
The careful attention you give your vehicle as far as maintenance and repairs
are concerned will also help fuel economy . Proper engine and air cleaner
maintenance, lubrication intervals, wheel alignment and tire inflation pressures, when closely adhered to, will pay dividends in improved fuel economy as well as longer vehicle Irte.
Fuel Selection
Use only unleaded gasoline meeting the octane ratings given under "Fuel Requirements " in this section of the manual. Unleaded gasoline must be used
for the
emission control system to operate properly . Leaded gasoline will
damage the Computer Command
Control system oxygen sensor (if so equipped) and affect emission control. Using leaded gasoline can also damage
other parts of the emission control system and could result in loss of emission warranty coverage.
STEERING COLUMN CONTROLS
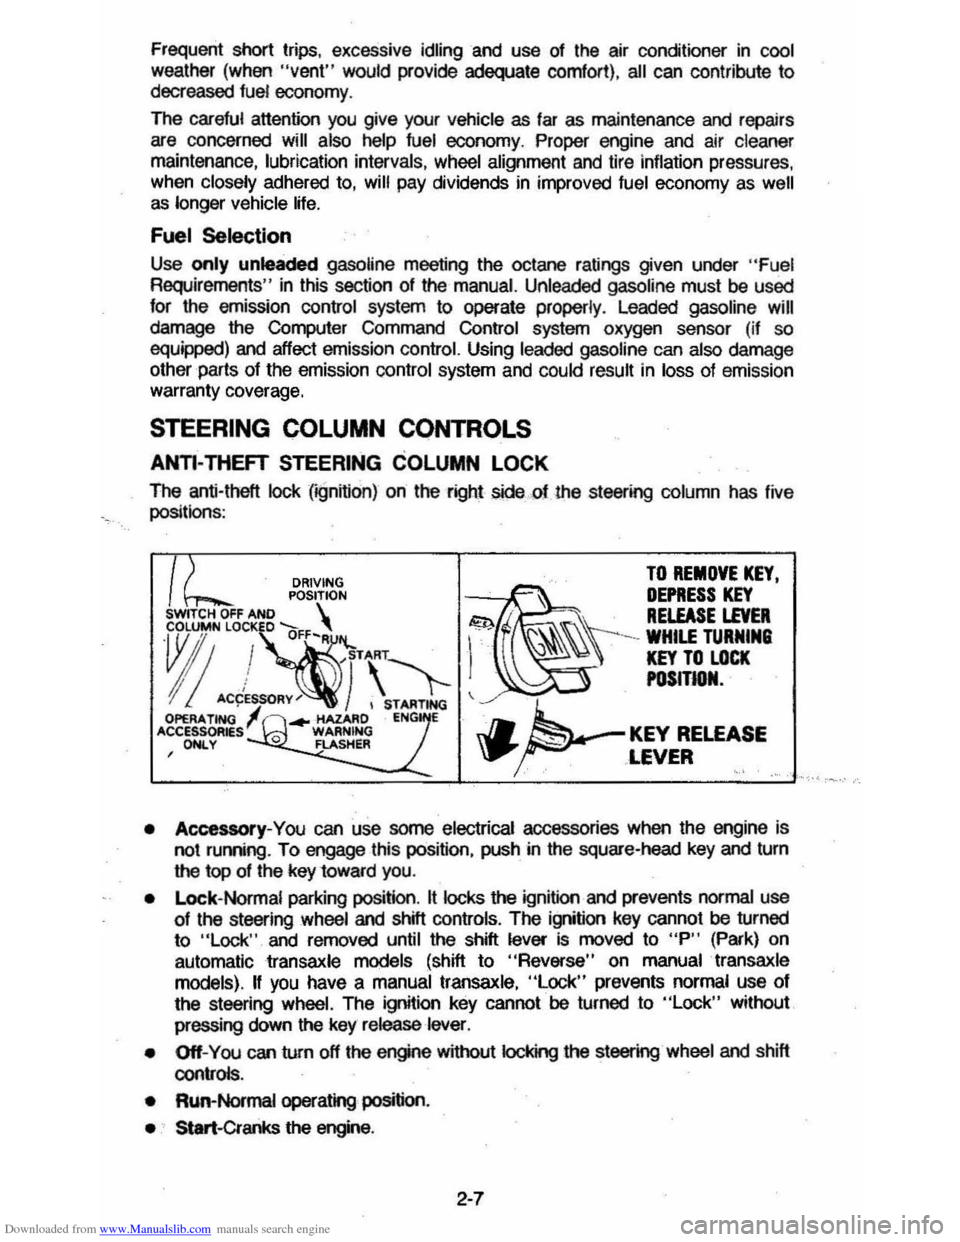
ANTl-THEFT STEERING COLUMN LOCK
The anti-theft lock (;gnifion) on the right sidecf the st_ing column has live
positionS :
DRIVING TO REMOVE KEY.
POSITION ~~ DEPRESS KEY SWITCH OFF AND S . . RELEASE LEVER
~"!~·\'1-1 ~\\\-=~"
I! ACCES~RY~) , STARTING ~ OPERA. TING ... -HAZARD ENG E 'CCESSOR~sl 0 WARNING J.. KEY RELEASE , ONLY FLASHER \P' ... ~ ,LEVER '.' .'
• Accessory-You can use some electrical accessories when the engine is
not ruming . To engage this position, push in the square-head key and turn
the top of the key 10ward you.
•
Lock- Normal parking position. It locks the ignition and prevents normal use 01 the st_ing wheel and shill controls. The ignition key cannot be turned
to "Lock " and removed until the shift lever is moved to "P" (Park) on
automatic
transaxle models (shift to "Reverse" on manual transaxle
models).
II you have a manual transaxle, "Lock" prevents normal use 01
the steering wheel. The ignition key cannot be turned to "Lock" without
pressing down
the key release lever.
• Off-You can turn off the engine without IocI
• Run-Normal operating position.
• Start-Cranks the engine .
2-7
Page 32 of 105
Downloaded from www.Manualslib.com manuals search engine CRUISE CONTROL WITH RESUME/ACCEL FEATURE
Cruise Control is an optional speed control system. The system allows the vehicle· to keep a constant forward speed during most normal driving without
keeping your foot on the accelerator pedal, thus increasing driver comfort on
long trips. The system
can hold a speed of about 30 mph (50 km/h) or higher
within the limits of your engine.
The
system is also designed to resume a pre-set cruising speed after:
• Braking. clutching with manual transaxle vehicles, without using the
accelerator pedal.
•
Accelerating from a given set speed to a higher control speed.
The system also allows the driver to "Tap-up" and increase speed or "Tap
down" to decrease vehicle speed in increments of about 1 mph (1.6 km/h)
when needed. This feature is useful when traffic conditions warrant a small
adjustment in speed. The controls are part of the turn signal lever. The
"Cruise" switch must be moved to "On" before the system will work. The "Set/Coast" button is in the end of the turn signal lever.
To Engage at Cruising Speed
Accelerate to the desired speed, push in the "Sel/Coast" button all the way
and release it (or use the "Resume/ Accel" (R/ A) switch during first
engagement only). Take your foot off the accelerator pedal and the set speed
will be maintained up Qr down hill. The Cruise Control is designed to disengage
when you apply the brakes and also with the clutch on manual transaxle
vehicles.
It will also disengage by moving the "Resume/ Accel" (R/ A) switch to
off or by turning the ignition off. (To disengage the system without coming to a
complete
stop, push the brake pedal or clutch lightly; use just enough force to
disengage the system, witi)out stopping the vehicle:)
To Change Cruising Speed
To reset the Cruise Control to a faster speed, accelerate to the speed you wish. Push in the "Set/Coast" button all the way, (for less than a second) then release it.
Or, use the "Resume/ Aceel" switch to accelerate and reset to the speed you
wish. The "Resume/ Accel" (R/ A) switch must be held (over a second) in
order to engage the accel mode. Speed may also be increased by tapping the
"Resume/
Accel" switch for less than a second while cruising. The set speed
will
be increased by about 1 mph (1.6 km/h) for every tap. "Tap-ups" are
limited to 10 mph (16 km/h) above vehicle speed.
To reset to a
slower speed, push in the "Set/Coast" button all the way and hold it there. Wait until the vehicle slows to the desired speed, then release the
button.
Speed may also be decreased by tapping the "Sel/Coast" button for less than a second while cruising and the memory speed will be decreased
about 1
mph (1.6 km/h) for every tap, "Tap-downs" are limited to a minimum
cruising speed of 23 mph (37 km/h).
To "Resume" a Pre-Set Speed
After braking or stopping the vehicle without turning off the ignition, you can "resume" to your last set cruising speed by accelerating to 30 mph (50 km/h)
or more
and sliding the cruise switch momentarily to "Resume/ Accel"; when
you release the "Resume/ Accel" switch, your vehicle will accelerate to the
cruising speed set before braking or stopping.
2-16
Page 44 of 105
Downloaded from www.Manualslib.com manuals search engine • MAX (AIR COND) --Air from the passengel' cOlTlpaftment is mixed with a small amount of outside air. conditioned and discharged from !he upper
outlets . This position. with the temperature
lever in full COLD. is used for
maximum cooling under conditions of high temperature and humidity .
• NORM (AIR COND) --Outside air is conditioned as ~ passes through the
system and is discharged from the upper outlets. This position is used for most air conditioning situations.
• BI-LEVEL (AIR COND) --Outside air is conditioned and directed out the
upper outlets PLUS the heater outlet. This position provides comfort and
keeps the windshield clear under low fogging conditions .
• VENT (ECONOMY) --Outside air is discharged from the upper outlet s. This position is provided for cool to moderate weather operation when
refrigeration is not required. The refrigeration compressor is turned off.
Operating Information -The engine cooling fan is automatically engaged in all air conditioning modes and defrost mode (with high air conditioning pressure).
• HEATER (ECONOMY) --Outside air is delivered from the heater outlet with
a small amount from the defroster outlets and the side window . defogger outlets. This position is used for most winter driving. The air conditioning compressor is turned off.
• DEFROST c_ Outs ide air is cond~ioned and delivered from the defroster
outlets w i1h a small amount from the heater outlet. This position is
recommended for conditions of severe fogging and icing
only.
Operating Tip
For satisfactory operation of the air conditioning system. windows should always be closed, except for the first two or three minutes to remove hot air if
the car has been closed. This provides a fast cool-down in normal air
conditioning mode.
ELECTRO-CLEAR REAR WINDOW DEFOGGER
The optional defogger consists of a heating element bonded to the inside
surface
of the rear glass . The unit is operated by a switch on the instrument panel and functions only in the ON position. When activated an indicator light
will illuminate.
After the defogger has operated for a short time. the system will
automatically shut off. If further defrosting or defogging is desired . simply actuate the switch again.
The defogger
will not function if the ignition is turned off.
Refrain from removing decals or other materjal' from the inside of rear window
with a razor or other sharp instrument since this may damage . the heating
element.
Clear snow and ice from the rear window to improve tihe efficiency of the rear
window defogger.
2-28
Page 53 of 105
Downloaded from www.Manualslib.com manuals search engine To store the sunshield when rennoved from the car, always select a place
where the sunshade can lay flat without anything stored on top of it or leaned against it. Hanging the sunshade flat on a wall by its hinges is an excellent way
to store it.
As with any decorative surface. washing with a mild soap and water solution is
recommended . Abrasive materials or chemical solvents may adversely affect
the finish of the sunshade.
FOLDING SEATBACK OPERATION
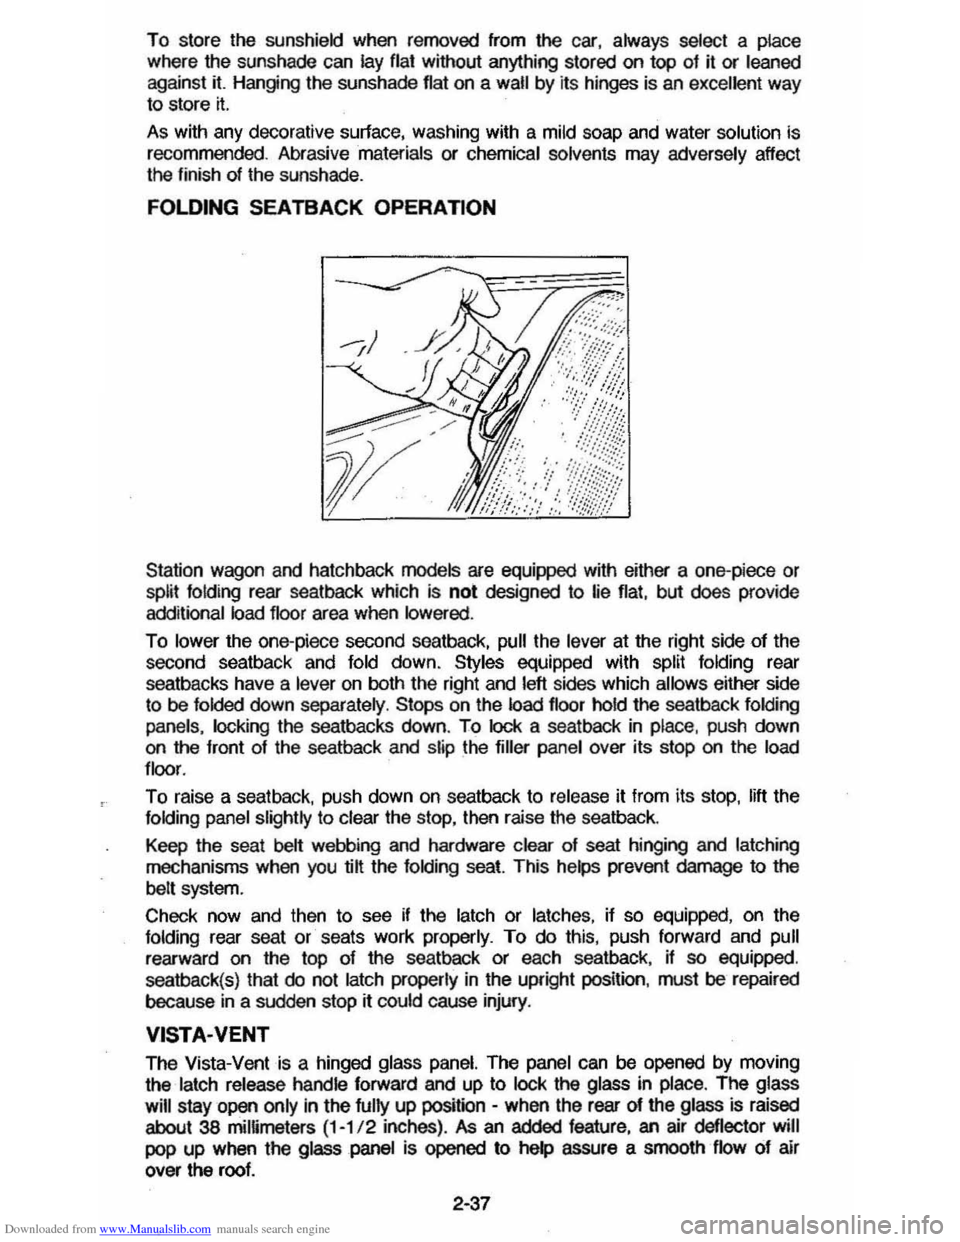
Station wagon and hatchback models are equipped with either a one-piece or split folding rear seatback which is not designed to lie flat, but does provide
additional load floor area when lowered .
To lower the one-piece second seatback, pull the lever at the right side of the
second seatback and fold down. Styles equipped with split folding rear
seatbacks have a
lever on both the right and left sides which allows either side
to be folded down separately . Stops on the load floor hold the seatback folding
panels. locking
the seatbacks down. To lock a seatback in place, push down on the front of the seatback and slip the filler panel over its stop on the load
floor .
To raise a seat back. push down on seatback to release it from its stop. lift the folding panel slightly to clear the stop, then raise the seatback.
Keep the seat
belt webbing and hardware clear of seat hinging and latching
mechanisms when you @ the folding seat. This helps prevent damage to the
belt system.
Check now and then
to see if the latch or latches, if so equipped, on the folding rear seat or seats work properly. To do this, push forward and pull
rearward on the top of the seatback or each seatback, if so equipped.
seatback(s) that
do not latch properly in the upright position. must be repaired
because
in a sudden stop rt could cause injury.
VISTA·VENT
The Vista-Vent is a hinged glass panel. The panel can be opened by moving
the
latch release handle forward and up to lock the glass in place. The glass
will
stay open only in the fully up position -when the rear of the glass is raised
about 38 mimmeters (1-1/ 2 inches) . As an added feature, an air deflector will
pop up when the glass panel is opened to help assure a smooth flow of air
over the roof.
2·37
Page 60 of 105
Downloaded from www.Manualslib.com manuals search engine 1. Position the vehicle with the good (charged) battery so that the booster Qumper) cables will reach but never let the vehicles touch. Also, be sure
booster cables to be used do not have loose or missing insulation.
2. tn both vehicles :
• Turn off ignition and all lights and accessories except the hazard
flasher or any lights needed for lhe work area.
• Apply the parking brake firmly, and shift the automatic transaxle or transmission to Park (or manual transaxle or transmission to neutral).
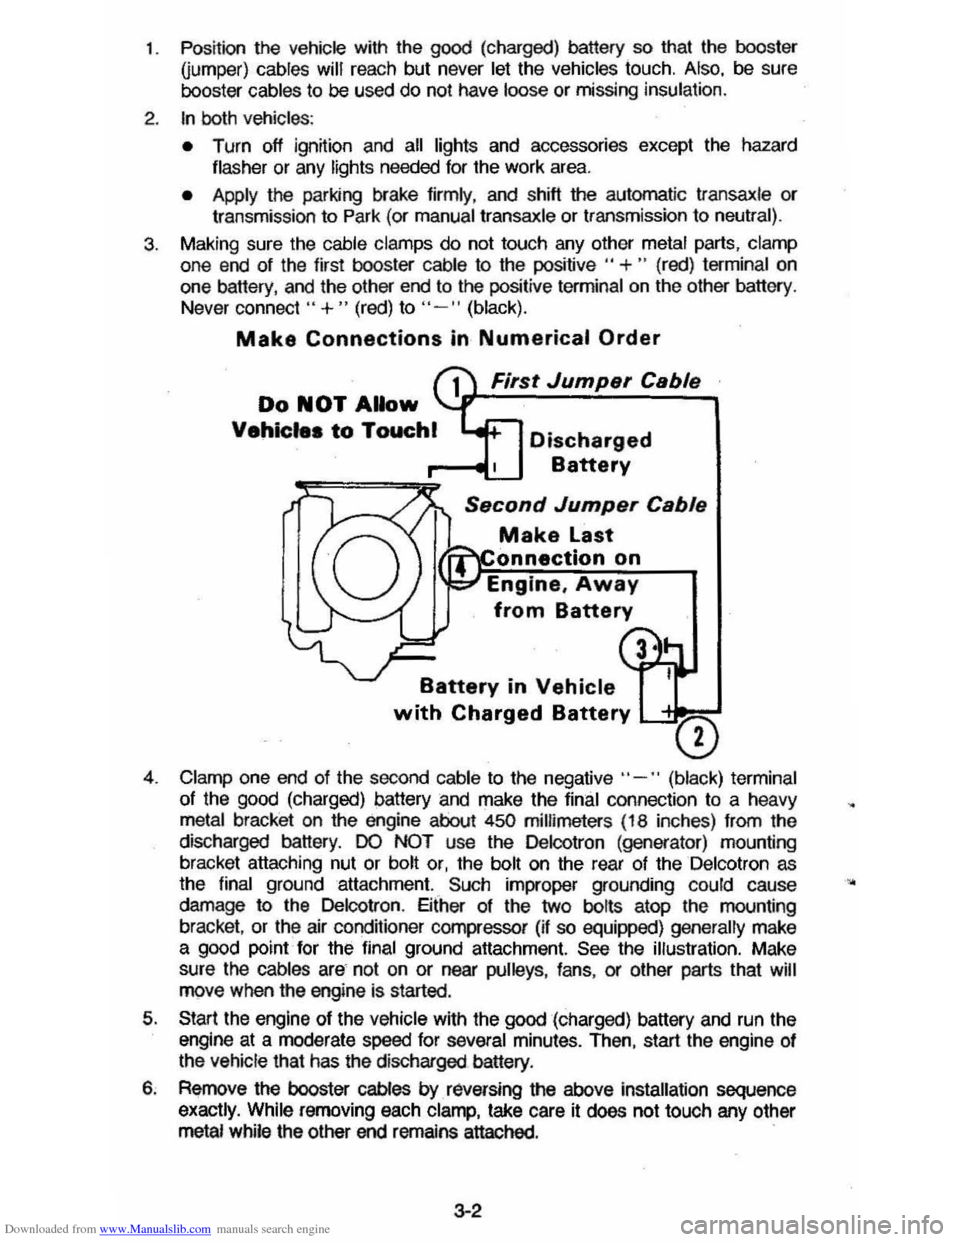
3. Making sure the cable clamps do not touch any other metal parts, clamp
one end of the first booster cable to the positive " +" (red) terminal on
one battery, and the other end to the positive terminal on the other battery .
Never connect"
+ " (red) to "- " (black).
Make Connections in Numerical Order
First Jump.r C.bl.
Do NOT Allow
Vehicle. to Touchl Discharged
Battery
S.cond Jump.r C.bl.
Make Last
onnectlon on
Engine,
Away
from Battery
Battery in Vehicle
with Charged Battery L-'= ___
o
4. Clamp one end of the second cable to the negative" -" (black) terminal
of the
good (charged) battery and make the final connection to a heavy metal bracket on the engine about 450 millimeters (18 inches) from the
discharged battery.
DO NOT use the Delcotron (generator) mounting
bracket attaching nut or bolt or, the bolt on the rear of the Delcotron as
the final ground attachment. Such improper grounding could cause
damage to the Delcotron . Either of the two bolts atop the mounting
bracket ,
or the air conditioner compressor (if so equipped) generally make a good point for the final ground attachment. See the illustration. Make
sure
the cables are not on or near pulleys , fans , or other parts that will move when the engine is started.
5. Start the engine of the vehicle with the good (charged) battery and run the
engine at a moderate speed for several minutes. Then, start the engine of
the vehicle that has the discharged battery.
6. Remove the booster cables by. raversing the above installation sequence
exactly. While removing each clamp, take care it does not touch any other metal while the other end remains attached. .
3-2
•
Page 66 of 105
Downloaded from www.Manualslib.com manuals search engine TOWING
Proper equipment must be used to prevent damage to vehicles during any
towing . State (provincial in
Canada) and local laws which apply to vehicles in .'
tow must be foltowed. Gel detailed towing instructions from your dealer.
Your vehicle, if equipped with
an automatic transaxle, may be towed on alt four
wheels at speeds less than
35 mph (55 km/h) for distances up to 50 miles (80
kilometers). These speed and distance restrictions do not apply if your vehicle
has a manual transaxle . The driveline and steering must be normalty operable.
For such towing, the steering must
be unlocked, transaxle in neutral and the
parking brake released.
Connect to main structural parts of the vehicle. Do NOT attach to bumpers or brackets. Remember also that power assist for
brakes
and steering wilt not be available when the engine is off.
n the vehicle is to be towed by a wrecker , use only equipment designed for this
purpose, following
the instructions of the wrecker manufacturer . Towing on the rear wheels is preferred because of the front-wheel drive. However, if
necessary, your vehicle may be towed backwards on the front drive wheels at speeds up to 35 mph (55 km/h) for distances of 50 miles (80 kilometers) if it is
equipped with
an automatic transaxle. These speed and distance restrictions do not apply ij your vehicle has a manual transaxle. Severe damage to the
transaxle may result
II speeder distance ~m~s are exceeded.
A safety chain system must
be used. for alt towing .
FREEING VEHICLE FROM SAND, MUD, SNOW OR ICE
n your vehicle gets stuck in sand, mUd, snow or ice, shift the transaxle from a
forward range to reverse in a repeat pattern.
(On manual transaxle models, shift the Ifansaxle from First or Second to Reverse .) Apply a tight pressure to
the accelerator pedal
while the transaxle is in gear. Remove your foot from the
accelerator while shifting.
Do not race the engine. For best traction, avoid
spinning the wheels. Incorrect rocking of your' vehicle while it is stuck may
resuh in damage to vehicle components.
CAUTION: Do ............ -.. _ IN. 35 ""'" ,55 Om/h). _ In)ufy .... .-nave (including tire, vehicle body parte. and/or tr.., .. xle failure) mIIy mutt from exCQ:live wheel spinning.
If the vehicle remains stuck after several rocking attempts, seek other
assistance. Also
see the Notice under "Automatic Transaxles" in "Starting and
Operating", Section 2 01 this manual .
Extended Vehicle Storage
If you plan to store your vehicle over an extended period of time, certain steps
should
be taken to give it maximum protection. It is recommended that you
write the Consumer Relations Department , Chevrolet Motor Division, Warren,
Michigan 48090,
(in Canada, write to General Motors of canada Um~ed,
Customer Services Departmeht, Oshawa, Ontario L 1 J5Z6) for detailed
instructions on how to prepare your vehicle for storage .
3-8
Page 67 of 105
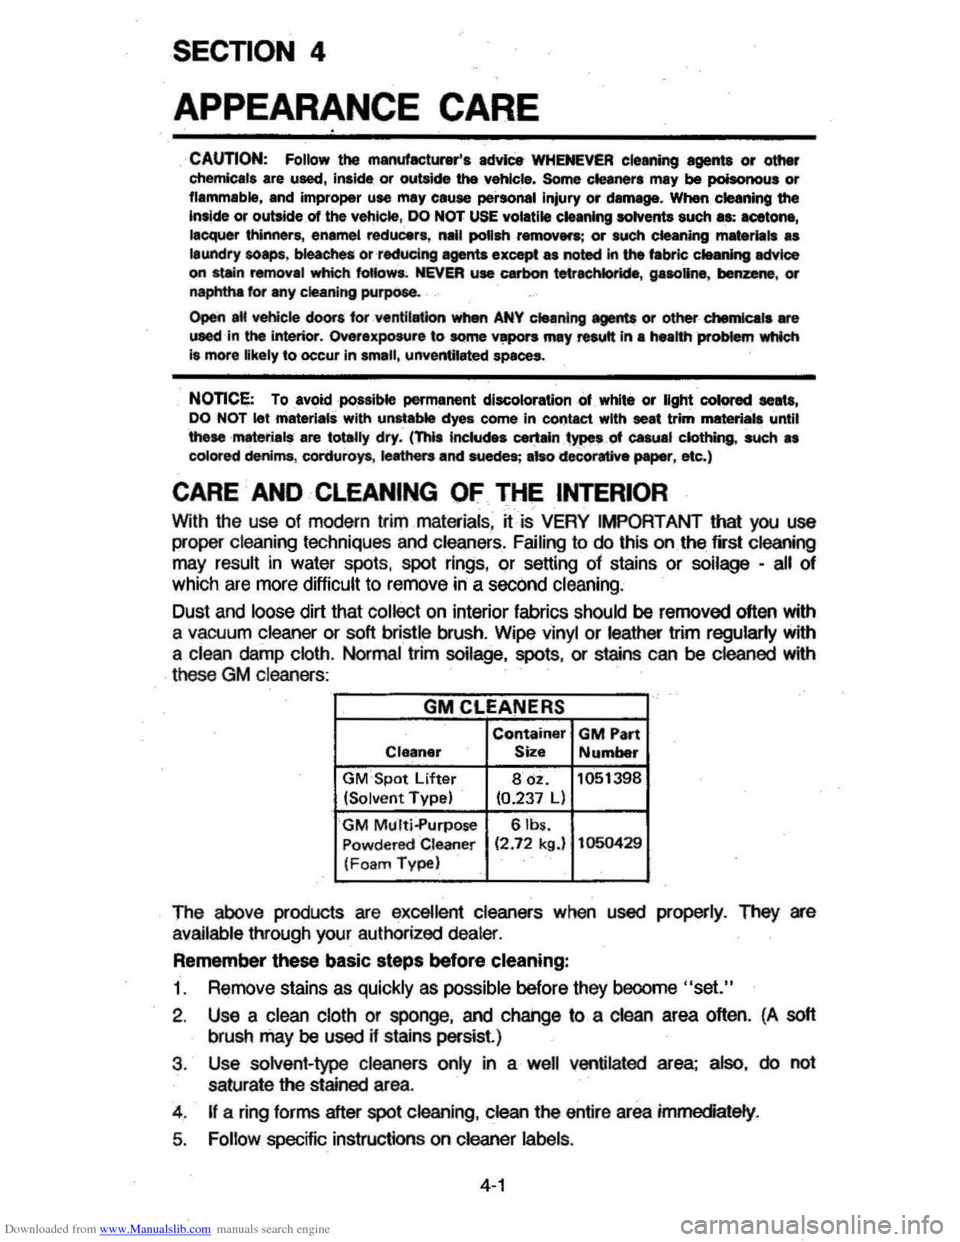
Downloaded from www.Manualslib.com manuals search engine SECTION 4
APPEARANCE CARE
CAUTION: Follow the manufacturer'. advic:e WHENEVER cleaning agents or other chemicals are used, inside, or outaide the vehicle. Some clelner. may be poisonous or flammable, and improper UM may cause personal injury or daf1lllge. When cleaning the Inaide or outsideot the vehic~, DO NOT USE volatile cleaning aolYents such Ia: acetone, lacquer thinners, enamel reducers, nail poUsh removers; or such cleaning mmeriliis .. laundry soaps, bleaches or redudng agents except as noted In the fIIbric clHning MtYlce on stein removal which: faNow. . NEVER use carbon tetrlChlorkle, gasoline, benzene, or naphtha for any cleaning purpose .
()pen aM vehicle doors tor ventlillUon when ANY c5unlng agenu or other -chemk:ata _. uaed In the interior. Overexposure to some YIjIpOI'S may Nautt In a health -probtem which I. more likely to occur in small, unvent8ated spaces.
NonCE: Toavoidpoasible permanent discoloration ,Of, white or light COlored leN, DO NOT let triaterials with un .. able dyes come in contact with seat trim material, until
these rMterials are totally dry. (ThIs Includes cet:t-~YP8' of casual clothing. such •• colored denims, corduroys , IeMhers and suedes; alsodecorltive paper, etc.)
CARE AND CLEANING OF THE INTERIOR
With the use of modern trim materials, ~ is VERY IMPORTANT that you use
proper cleaning techniques and cleaners. Failing to do this on the fi'st cleaning may result in water spots, spot rings, or setting of stains or soilage -all of
which are more difficult to remove in a second cleaning :
Dust
and loose dirt that collect on interior fabrics should be removed often with
a vacuum
cleaner or soft bristle brush. Wipe vinyl or leather trim regularly with
a clean damp cloth. Normal trim soilage, spots, or stains can be cleaned with
these
GM c leaners :
GMCLEANERS
Container GM Part Cleaner Size Number
GM"Spot Lifter 80z. 1051398 (Solv en t Type) 10.237 L)
GM Multj-Purpose SIbs. P owdered Clean er 12.72 kg.} 1050429 (Foa m Type)
The above products are excellent cleaners when used properly. Tlley are
available through your authorized
dealer.
Remember these basic steps before cleaning:
t. Remove stains as quickly as possible before they beoome "set."
2. Use a clean Cloth or sponge, and change to a clean area often. (A soft
brush may be used if stains persist.)
3 . Use solvent-type cleaners
only in a well ventilated area; also, do not
saturate the stained area.
4 .
If a ring forms after spot cleaning , clean the entire area immediately .
5. Follow specific instruction s on cleaner labels.
4-1
Page 93 of 105
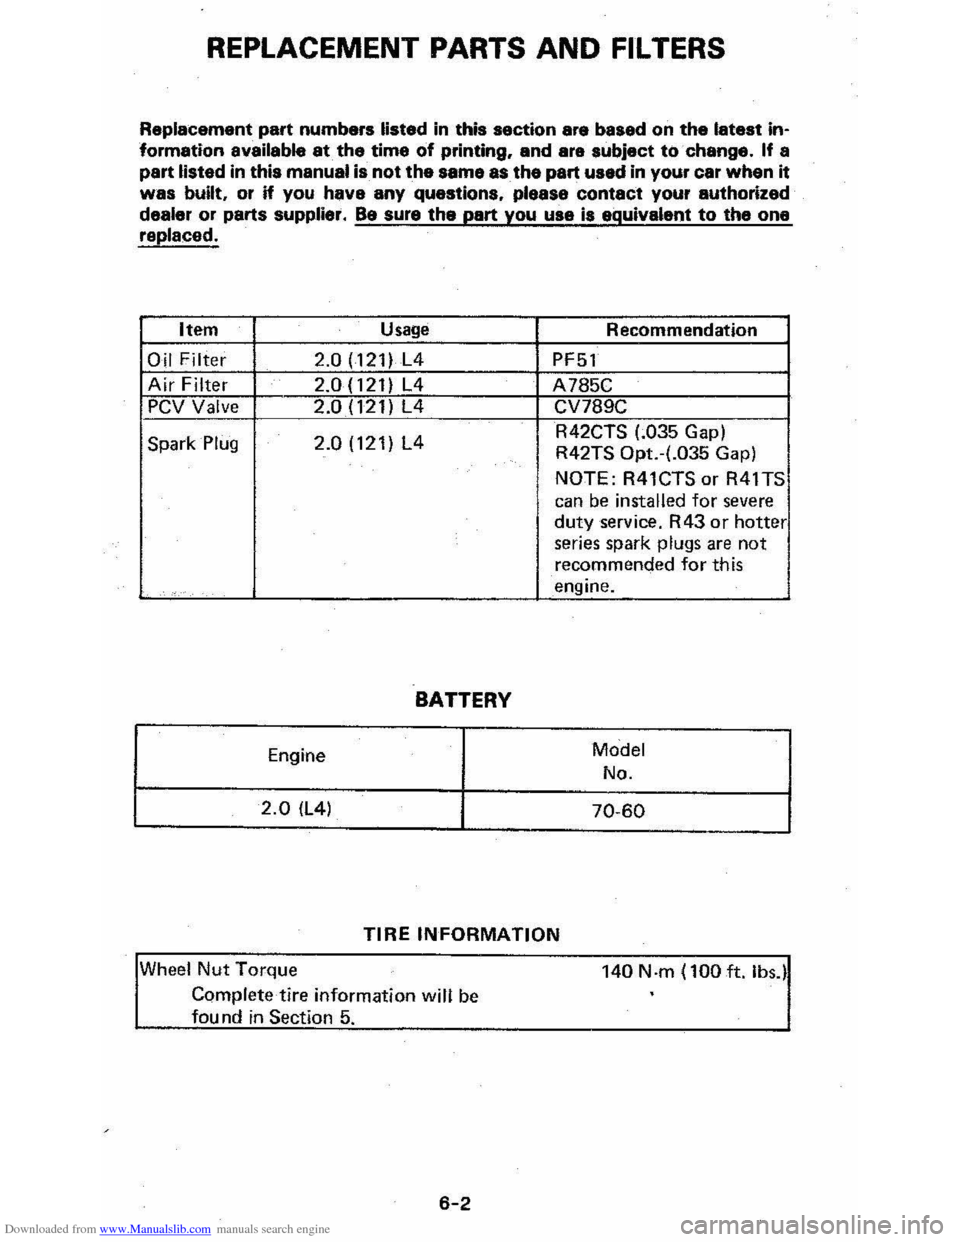
Downloaded from www.Manualslib.com manuals search engine REPLACEMENT PARTS AND FILTERS
Replacement part numbers listed in this section are based on the latest information available at the time of printing. and ara subject to change. If a
part listed in this manual is not the same as the part used in your car when it
was built, or if you have any questions. please contact your authorized
dealer or parts supplier. Be sure the part you use is equivalent to the one replaced.
Item Usage
Oil Filter 2.0 (121) L4
Air Filter 2.0 (121) L4
PCV Valve 2.0 (121) L4
Spark Plug 2.0 (121) L4
BATTERY
Engine
2.0 (L4)
Recommendation
PF51
A785C
CV789C
R42CTS (.035 Gap) R42TS Opt.-(.035 Gap)
NOTE: R41CTS or R41TS
can be installed for severe
duty service. R43 or hotter series spark plugs are not
recommended for this
engine.
Model
No.
70-60
TIRE INFORMATION
Wheel Nut Torque
Complete tire information will be
fau nd in Section 5.
6-2
140 N·m (100 ft. Ib,.)