flat tire CHEVROLET CAVALIER 1984 1.G Owners Manual
[x] Cancel search | Manufacturer: CHEVROLET, Model Year: 1984, Model line: CAVALIER, Model: CHEVROLET CAVALIER 1984 1.GPages: 105, PDF Size: 24.23 MB
Page 18 of 105
Downloaded from www.Manualslib.com manuals search engine Driving with the trunk lid, hatchback or liftgate on station wagon models open is not recommended. Under some conditions, exhaust gases may be drawn
into the vehicle. If the trunk lid, hatchback or liftback must remain open for
some reason while moving, or if electrical wiring or other cable connections to a trailer must pass through the seal between the trunk lid, hatchback or liftback
and the body, follow these precautions:
• Close all windows.
• Adjust the heating or cooling system to force outside air into the vehicle as
described abcve, but set the fan to high speed.
• On vehicles with outside air vents in or under the instrument panel, open the vents fully.
NEW VEHICLE "BREAK-IN" PERIOD
You can drive your new vehicle from its very first mile/kilometer without
following a formal "break-in" schedule. However, there are things you can do during the first few hundred miles/kilometers of driving that will add to the
future performance and economy of your vehicle.
We recommend you limit your speed during the first 500 miles (800 kilometers)
to a maximum of 55 mph (90 km/h); but do not drive for long periods at any
one constant speed, either fast or slow. During this time, avoid full throttle
starts and, if possible, avoid hard stops especially during the first 200 miles (320 kilometers) of driving.
Always drive at moderate speed until the engine has completely warmed up.
I! you plan to use your new vehicle for trailer towing, see the following.
TRAILER TOWING
This car is designed and intended to be used mainly to carry people. Towing a
trailer
will affect handling, durability and economy. Your safety and satisfaction
depend upon proper use of correct equipment. Also, you should avoid
overloads and other abusive use.
The maximum loaded trailer weight you can pull with your vehicle depends on
your intended use
and what special equipment has been installed on it.
Information on trailer towing ability, special equipment required, and optional
equipment available should be obtained from your dealer. Ask for the trailering brochure. Or, write: Consumer Relations Department, Chevrolet Motor
Division, Warren, Michigan 48090.
(In Canada, write to General Motors of
Canada Limited, Customer Services Department, Oshawa, Ontario L lJ 5Z6.)
Tires
When towing trailers, be sure your tires are properly inflated to the inflation pressure shown on the Tire Placard on the driver's door.
The allowable passenger and cargo load for this vehicle, also shown on the
Tire
Placard, is reduced by the trailer tongue weight whenever the trailer is
attached to the vehicle. See "Service and Maintenance," Section 5 for more tire information.
Maintenance
More frequent service is required when using your vehicle to pull a trailer. See
the Maintenance Schedule folder for Automatic Transaxle Fluid and Engine Oil change requirements for trailering.
2-2
Page 23 of 105
Downloaded from www.Manualslib.com manuals search engine Frequent short trips, excessive idling and use of the air conditioner in cool
weather (when "vent" would provide adequate comfort), all can contribute to
decreased fuel economy .
The careful attention you give your vehicle as far as maintenance and repairs
are concerned will also help fuel economy . Proper engine and air cleaner
maintenance, lubrication intervals, wheel alignment and tire inflation pressures, when closely adhered to, will pay dividends in improved fuel economy as well as longer vehicle Irte.
Fuel Selection
Use only unleaded gasoline meeting the octane ratings given under "Fuel Requirements " in this section of the manual. Unleaded gasoline must be used
for the
emission control system to operate properly . Leaded gasoline will
damage the Computer Command
Control system oxygen sensor (if so equipped) and affect emission control. Using leaded gasoline can also damage
other parts of the emission control system and could result in loss of emission warranty coverage.
STEERING COLUMN CONTROLS
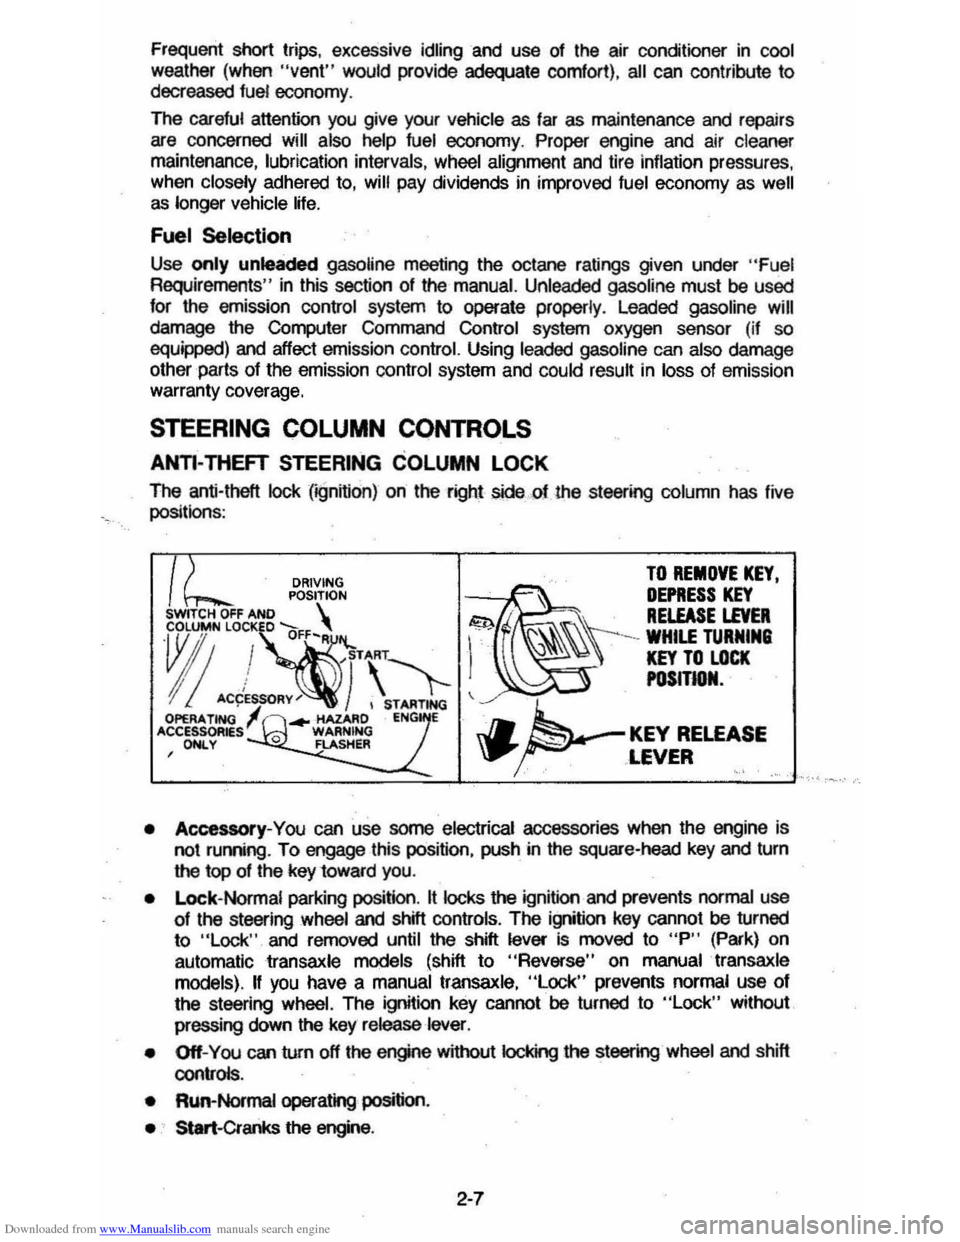
ANTl-THEFT STEERING COLUMN LOCK
The anti-theft lock (;gnifion) on the right sidecf the st_ing column has live
positionS :
DRIVING TO REMOVE KEY.
POSITION ~~ DEPRESS KEY SWITCH OFF AND S . . RELEASE LEVER
~"!~·\'1-1 ~\\\-=~"
I! ACCES~RY~) , STARTING ~ OPERA. TING ... -HAZARD ENG E 'CCESSOR~sl 0 WARNING J.. KEY RELEASE , ONLY FLASHER \P' ... ~ ,LEVER '.' .'
• Accessory-You can use some electrical accessories when the engine is
not ruming . To engage this position, push in the square-head key and turn
the top of the key 10ward you.
•
Lock- Normal parking position. It locks the ignition and prevents normal use 01 the st_ing wheel and shill controls. The ignition key cannot be turned
to "Lock " and removed until the shift lever is moved to "P" (Park) on
automatic
transaxle models (shift to "Reverse" on manual transaxle
models).
II you have a manual transaxle, "Lock" prevents normal use 01
the steering wheel. The ignition key cannot be turned to "Lock" without
pressing down
the key release lever.
• Off-You can turn off the engine without IocI
• Run-Normal operating position.
• Start-Cranks the engine .
2-7
Page 62 of 105
Downloaded from www.Manualslib.com manuals search engine coolant level in the see-through recovery tank. The coolant level should be at
or above the
"FULL HOT" mark on the recovery tank.
CAUTION: Keep hand., toots and clothing -away from the engine COOling fa", to help prevent personIl intUry. lhiIlan is electric and can come on whether Or not the engine Is rUnning. 111. tan can start automatically In .respon .. to a heat sensor when the ignition Is in "Run."
Make sure the water pu"",, belts are not broken, or off the pulleys , and that the fan runs when the engine is running and there is an indication on the instrument panel of an overheat condition.
If the coolant level in the recovery tank is low, look for leaks at the radiator
hoses and connections, heater hoses and connections, radiator I and water pump. If you find major leaks, or spot other problems that may have caused
the engine to overheat,
do not run the engine untilthese problems have been
corrected. If you do not find a leak or other problem, caretully add coolant to
the recovery tank. (Coolant is a mixture of ethylene glycol antifreeze and water; see "Engine Cooling System" in "'Service and Maintenance," Section 5, for the proper antifreeze and mixture.) .
CAUTION: Under: some:' conditione, the ethylen~ glycol In engine coolant Is . combustible. -To help avoid being burned, DO NOT spill antifreeze or coolant on the exhauat system or hot engine parts..
If the coolant level in the recovery tank is at the correct level but there is still
an indication on the instrument panel of an overheat condition:
•
You may add coolant directly to the radiator. YOU MUST LET ENGINE COOL FIRST. See "Coolant Replacement" under "Engine Cooling
System"
in Section 5, "Service and Maintenance" in this manual. Follow steps t through 3 for the correct way to remove the radiator
cap
and add coolant.
Once the Engine Coolant Temperature light has gone out (or the Engine Coolant Temperature gage no longer signals an overheat condition), you can
resume
driving at a reduced speed. Return to normal driving after about ten
minutes If the light does not come back on (or the gage pointer does not again
show
ao overheat condition).
tf no cause for the overheat condition was found, see a qualified service technician.
JACKING
CAUTION
To help avoid personal injury:
• FollOW all jacking and stowage instructions .
• Use jack only for lifting this vehicle during wheel change.
• Never get beneath the vehicle, start or run engine while vehicle is
supported by jack.
• Always securely restow spare tire (or flat tire) and all jacking equipment.
3-4
Page 63 of 105
Downloaded from www.Manualslib.com manuals search engine JACKING INSTRUCTIONS
JACl LOCATIONS TO RQCI(ER FLANGE NOTCH
~
OCKER FlANGE N
JACI(HEAD , GROOve
~
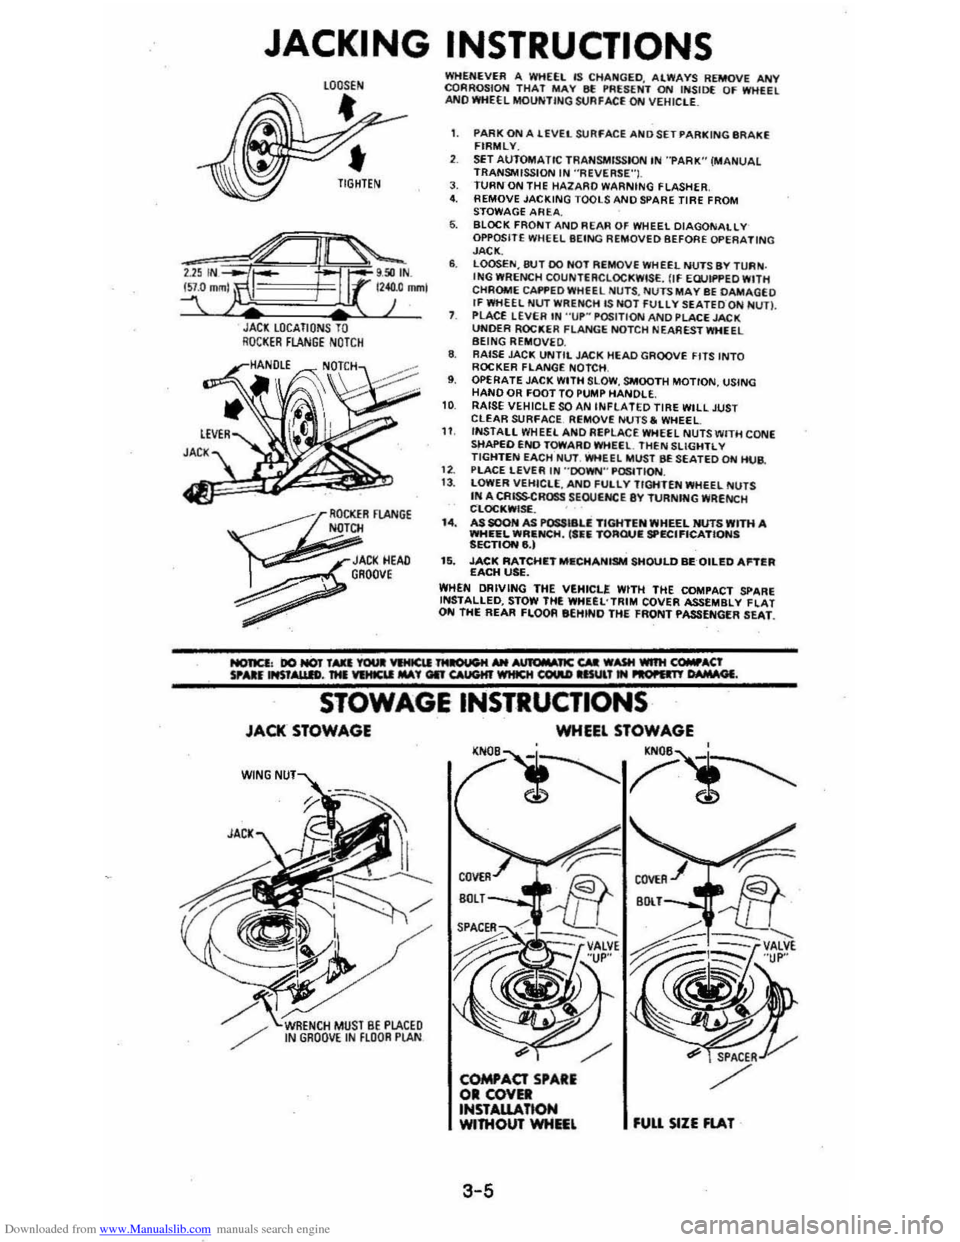
WHENEVER A WHEEL IS CHA~GED. ALWAYS REMOVE ANY CQRROSIOH THAT MAY 8f !'RUENT ON INSID( OF WHEEL ANO WHEEL MOUNTING StJAFACE ON VEHIClE_
1. PARK ON A lEVEL SURFACE AND SET PARKING IIR AKE FIRMLY.
SET AUTOMATIC TRANSMISSION IN "PARK" (MANUAL TRANSMISSION IN ·'ReVERSE"I. J. TURN ON THE HAlARO WARNING FLASHER 4. REMOVE JACKING TOOLS AND SPARE TIRE FROM
STOWAGE AREA. 6. BLOCK FRONT AND REAR OF WHEEL DIAGONALLY OPPOSITE WHEEL BEING REMOVED BEFORE OPERATING JACK. 6. LOOSEN,8tH DO HOT REMOVE WHEEL NUTS BY TURN . ING WRENCH COUNTERCLOCKWISE. flf EWIf'PED WITH
CHROME CAI'f'EDWHfEL NU TS , NUTS MAY BE DAMAGEO If WHEEL NUT WRENCH lS NOT FUllY SEATEDQN NUn. PLACE LEVER IN "UP~ POSITION AND PLACE JACK UNOER ROCKER FLANGE NOTCH NEA REST WHEEL BEING REMOVE D. 8. RAISE JAC!!; UNTIL JACK HEAD GROOVE FITS INTO ROCKER FLANGE NOTCH , 9. OPERATE JACK WITH SLOW , SMOOTH MOTION, USING HAND OR FOOT TO PUMP HANDLE. 10 RAISE VEHICLE SOAN INfLATED TIRE WILL JUST CLEAR SURfACE. Ri;MOVE NUTS. WHEEL 11 INSTALL WHEEL ANO Ai;PLACE WHEEL NUTS WITH CONE sttAPEO END TOWARO WHEEl. THEN SLiGHTL V TIGHTEN EACH Nl.IT. WHEEL MUST BE SEATED ON HUB.
1 2. PlACE LEVER IN "'DOWN'" P~TION. 13 . lOWER VEHICLE, ANO fULlY TIGHTEN WHEEL NUTS IN A CRISSCROSS SEOUtNCE 8Y TURNfNG WRENCH CLOC!!;WISf. . I.. AS SOON AS POSSI8U TIGHTEN WHEEL NUTS WITH A WHEEL WRIlNCH, ('fiIi TORQUIE SPECIFICATIONS SECTIONe,) 15. JACK RATCHIETMIlCHANISM SHOULD BEQILED Antill EACH USE. WHEN DRIVING THE VEHICLE WITH THE COMPACT SPARE INSTALLED, STOW THE WHUL'TRIM COVER ASSEMBLY flAT ON THE REAR FLOOR eEHINO THE FRONT PASSENGER SEAT.
STOWAGE INSTRUCTIONS
JACK STOWAGE
W(NG
WHEEL STOWAGE
'N
3-5
fUU SIZE FlAT
Page 64 of 105
Downloaded from www.Manualslib.com manuals search engine Stowage of Tire and Jack
CAUTION: Always securely reatow the, spare tire assembly (or flat tir.), all jacking
equipment, and the cover , using the means provided . When driving the car with the Compact Spare instel~. stow the ",Met COYer in the trunk. In station wagons and hatchbecks, when the rear seat Is folded down, stow the wheel cover nat on the rear floor behind the right front seat. When the r •• r' seat is up, stow the wheel cover in the rear area . This will help keep SUch1tung. trom being thrown about and injuring people during II colhion or • sudden maneuver ..
WHEEL NUT TORQUE
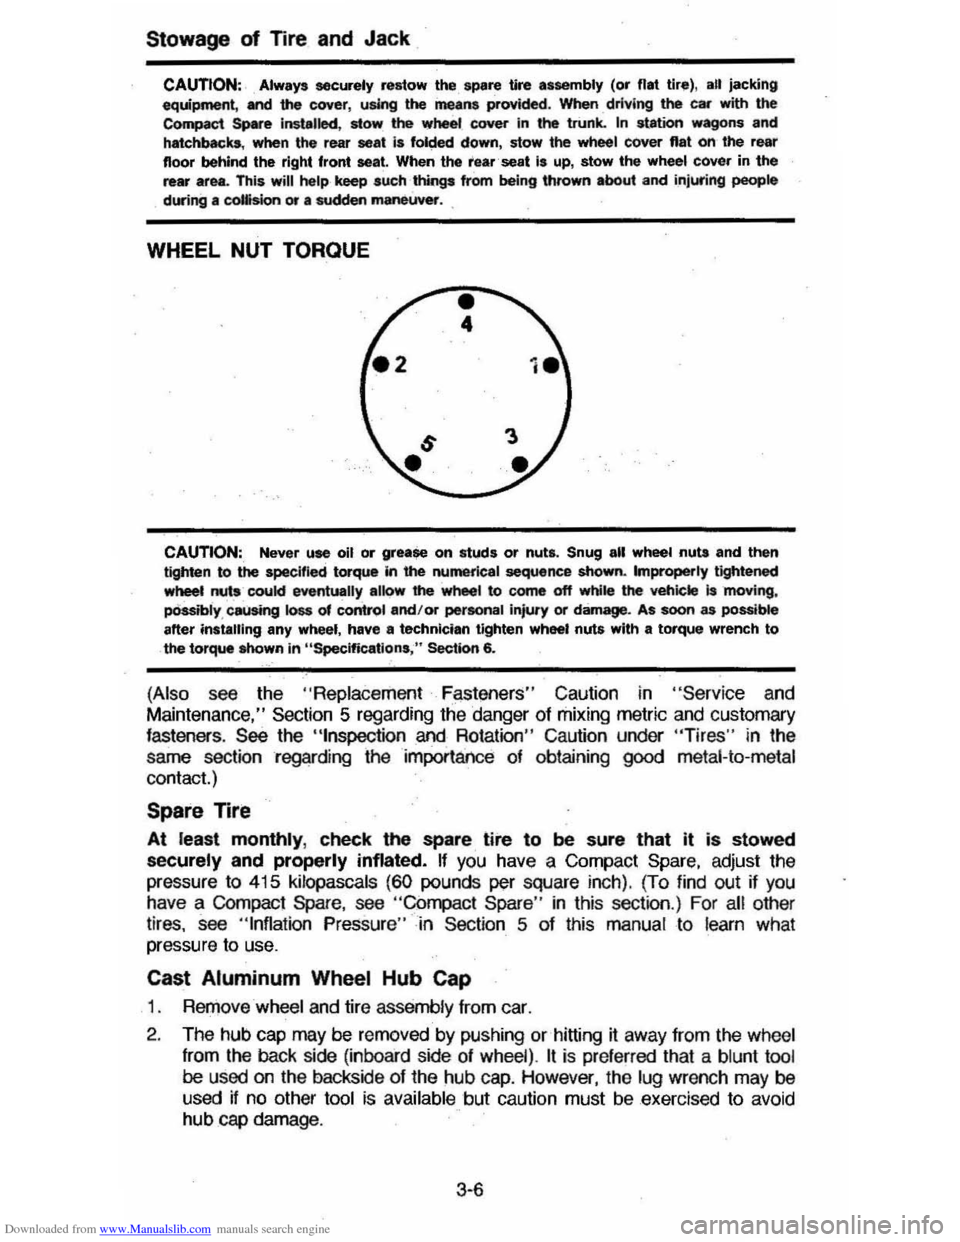
CAUTION:, Never use oil or grease on studs or nuts. Snug all wheel nuta and then tighten to the specified torque In the numerical sequence shown. Improperly tightened wheet nuts coukl eventually alk>w' the wheel to come off while the veh;ckt is 'moving, pOssibly , causing loss of control and/or pertonal injury or damage. As soon as possible after instilling any wheel, have II technician tighten wheel nuts with a torque wrench to the torque Mlown in "Specifications ," Section 6.
(Also see the "Replace ment F~st!3ners" Caution in "Servic e and
Maintenance," Section 5 regarding the danger of mixing metric and customary fasteners . See the "tnspection and Rotation" Caution under "Tires" in the
same section regarding the importance of obtaining
good metal-to-metal
contact.)
Spare Tire
At least monthly, check the spare tire to be sure that it is stowed
securely and properly inflated. If you have a Compact Spare, adjust the
pressure
to 415 kilopascals (60 pounds per square inch). (To find out if you have a COmpact Spare, see "Compact Spare " in this section .) For all other
tires, see "Inflation Pressure"-in Section 5 of this manual to learn what
pressure to use.
Cast Aluminum Wheel Hub Cap
1 . RerJ)ove wheel and tire assemb ly from car.
2 . The hub
cap may be removed by pushing or hitting it away from the wheel
from
the back side (inboard side of wheel) . It is pre ferred that a blunt tool be used on the backside of the hub cap. However, the lug wrench may be
used if no other tool is available but caution must be exercised to avoid hub cap damage .
3·6
Page 65 of 105
Downloaded from www.Manualslib.com manuals search engine 3. Install wheel and tire assembly and install hub cap by pushing or hitting
into place (the wheel can be mounted with hub cap in place). The hub cap
must be oriented by engaging the bump on the side of the hub cap
retention tab with the cutout on the side of the wheel pilot hole.
Compact Spare
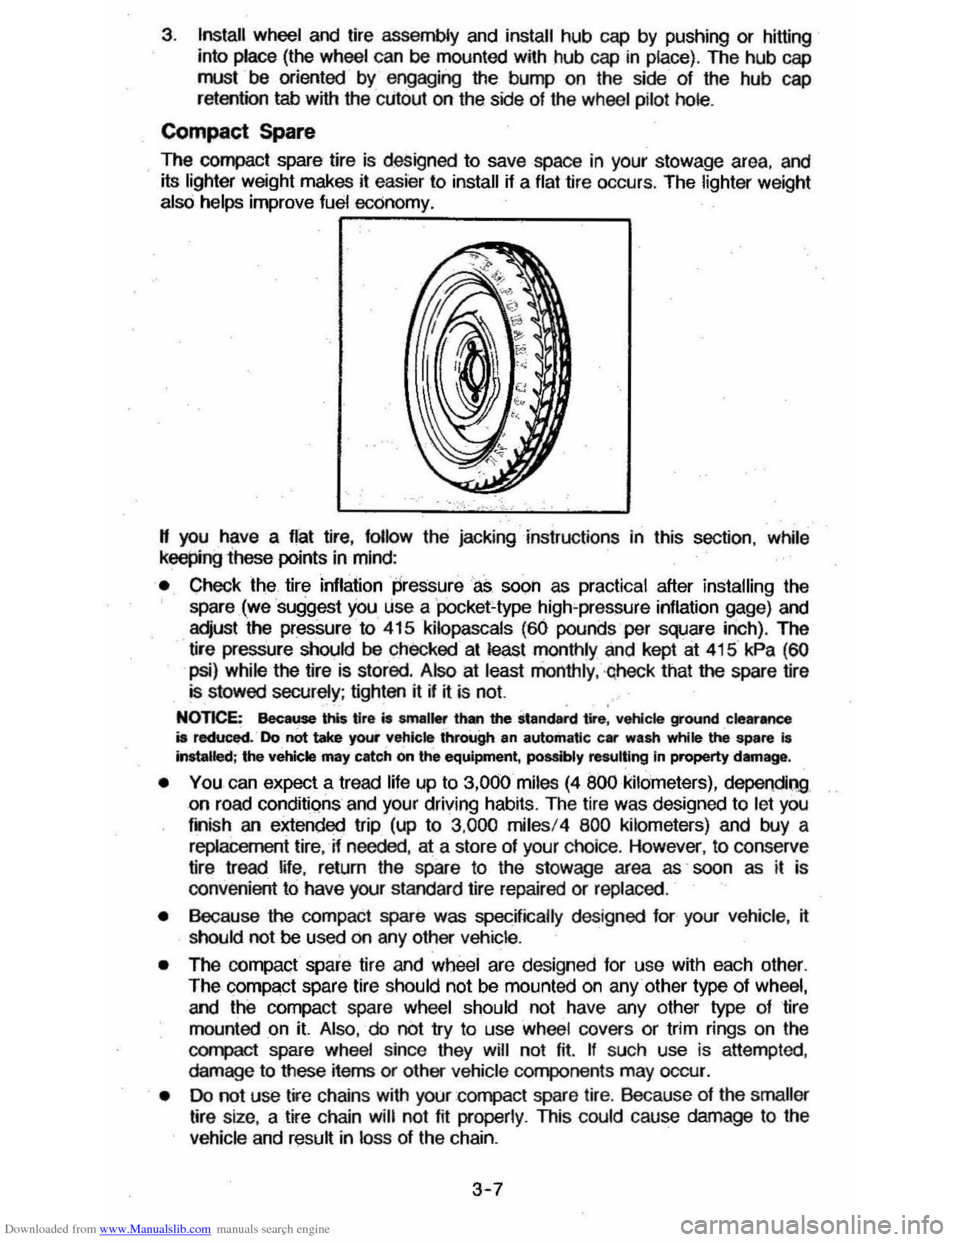
The compact spare tire is designed to save space in your stowage area, and
its lighter weight makes it easier to install if a flat tire occurs. The lighter weight also helps improve fuel economy. ~--~------~~
" you have a flat tire, follow the jacking Instructions in this section, while keepingihese points in mind:
• Check the tire inflaiionpressureas soon as practical after installing the
spare (we suggest you use a 'pocket-type high'pressure inflation gage) and
adjust the pressure to 415
kilopascals (60 pounds per square inch). The
tire pressure should be checked at least monthly and kept at 415 kPa (60
psi) while the tire is stored . Also at least monthly , ·qheck that the spare lire is stowed securely ; tighten it if ~ is not.
NOTICE: Bee ... this tire is smaller than the standard tire, vehicle ground clearance is reduced. Do not take your vehicle through an automatic car wash while ~ spare I. Installed; the vehicle may catch on the equipment, possibly resulting In property damag_.
• YOU can expect a tread life up to 3,000 miles (4 800 kilometers), dependiQg on road conditions and your driving habits. The tire was designed to let you
finish an extended trip (up to 3,000 miles/4 800 kilometers) and buy a replacement tire, -if needed, at a store of your choice. However, to conserve
tire tread ~fe, return the spare to the stowage area as' soon as it is
convenient to have your standard tire repaired or replaced.
• Because the compact spare was specnically designed for your vehicle , ~ should not be used on any other vehicle.
• The compact spare tire and wheel are designed for use with each other.
The compact spare tire should not be mounted on any other type of wheel, and the compact spare wheel should not have any other type of tire
mounted on it. Also, do not try to use wheel covers or trim rings on the
CQr1l>aCt spare whe el since they will not fit. If such use is attempted,
damage to tIlese items or other vehicle components may occur.
• Do not use tire chains with your :compact spare tire. Because of the smaller tire size, a tire chain will not fit properly. This could cause damage to the
vehicle and result in loss of the chain.
3-7
Page 85 of 105
Downloaded from www.Manualslib.com manuals search engine CAVAUER BUMPER SYSTEM
The front and rear bumpers have a rubber- ike plastic cover over an energy
absorbing impact bar.
In an impact , the cover may return to its original shape
without showing that it was struck.
If the impact was great enough, the energy
absorbing devices and impact bar may have been damaged.
To be sure the burrc:>er is in a state of full readiness , it should be checked by your Chevrolet
dealer . The check should be mada if you can sae Ihat the burrc:>er is out of
position . " should also be checked ij the car has been in a serious collision in
which the bumper was struck, even when no damage to the bumper system
can be seen.
TIRES
CAUTION: To reduce the risk of loa of vehicle control and personal injury:
• The tires MUST BE properly in118Wd, and your vehicle MUST NOT BE overioaded (Me the Tir. Placard on the driver'. door).
• Your vehiele MUST NOT BE operated at speeds fa. than 85 mph ('140 km/h) un .... _ft-has police pursuit tires or equlVaienthigh ·speed capability tirea , regllf'dless of the legal speed 1irn!L Be Stn to cOIl$un a Ure dealer to determine II the tires on your vehicle are hlgh speed capability tires before operating )our vehk:le at such
-For more safety information, see the reat of this "Tire.~' ,~on.
The tires installed on your vehicle are engineered to provide a proper balance
of these peffor~ characteristics under noonal driving conditions :
• Endurance
• Handling
•
Noise
• Aide
• Road Hazard Resistance
• Aoling Resistance
• Traction
• Tread Mileage
This section has some tipS on how you can get the most benefit from these
tires .
Vehicle Loading
The tires on your vehicle will perform well at all normal loads when. inflated as
recommended on the Tire
Placard (located on the driver's door of your vehicle). Do not load your vehicle beyond the load limits (total kilograms or
pounds) shown on the Tire Placard . The placard tells you the design limits of the vehicle, not just of the tires .
Station wagon loads should be moved as far forward as possible. Luggage carriers do not increase the maximum load limits shown on the Tire Placard. See also "Stowing Things In (or On) The Car" in Section 2 of this manual.
5-12
Page 86 of 105
Downloaded from www.Manualslib.com manuals search engine /" VEHICLE CAPACITY OCCUP."TS COLD TIRE PRESSURE ' , ~~, mT CtR RR TOTAL C_, ~E~R
MAX [ LOAD I [ 1
A A TIRE [ I
.. T"ES AAf ,.qT ,~o ... OONiNG '00' "50 ". 'P" TO THE'" SIZE R'V,""ME>.<:lEl) PR"5lJRES
SPARE TIRE ,
SIZE ( )
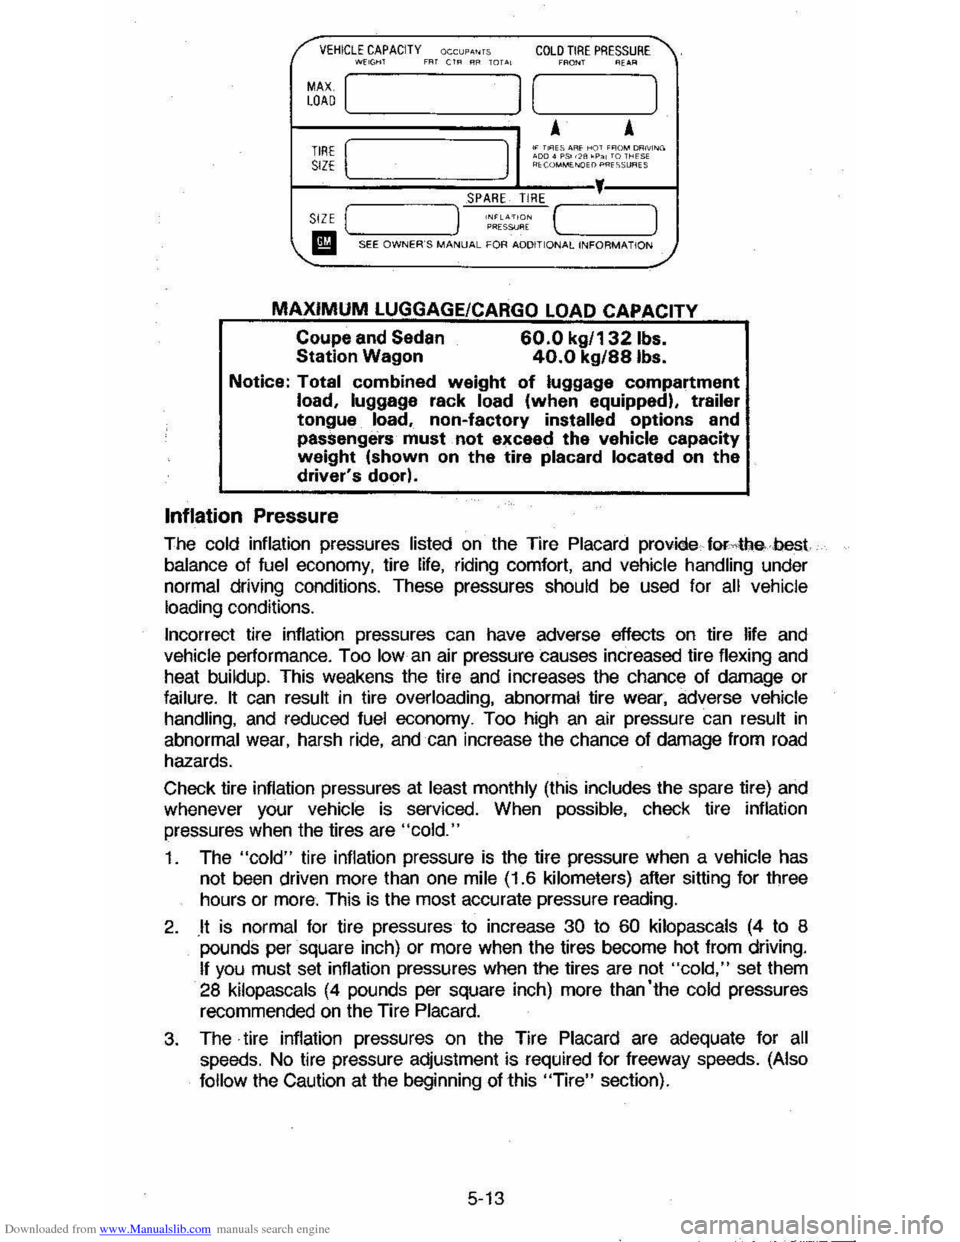
MAXIMUM LUGGAGE/CARGO LOAD CAPACITY
Coupe and Sedan Station Wagon 60.0 kg/' 321bs. 40.0 kg/88Ibs.
Notice: Total combined weight of luggage compartment load, luggage rack load (when equipped), trailer tongue load, non-factory installed options and
passenge'rs' must. not exceed the vehicle capacity weight (shown on the tire placard located on the driver's door).
Inflation Pressure
The cold inflation pressures listed on the Tire Placard provide forAIlebest
balance of fuel economy, tire life, riding comfort, and vehicle handling under normal driving conditions. These pressures should be used for all vehicle
loading conditions.
Incorrect tire inflation pressures can have adverse effects on tire life
and vehicle performance. Too Iowan air pressure causes increased tire flexing and
heat buildup. This weakens the tire and increases the chance of damage or
failure. It can result in tire overloading, abnormal tire wear, adverse vehicle handling, and reduced fuel economy. Too high an air pressure can result in
abnormal wear, harsh ride, and can increase the chance of damage from road
hazards.
Check tire inflation pressures at
least monthly (this includes the spare tire) and
whenever your vehicle is serviced. When possible, check tire inflation
pressures
when the tires are "cold."
1. The "cold" tire inflation pressure is the tire pressure when a vehicle has
not been driven more than one mile (1.6 kilometers) after sitting for three
hours or
more. This is the most accurate pressure reading.
2. .It is normal for tire pressures to increase 30 to 60 kilopascals (4 to 8 pounds per square inch) or more when the tires become hot from driving.
If you must set inflation pressures when the tires are not "cold," set them
28 kilopascals (4 pounds per square inch) more than'the cold pressures
recommended on the Tire Placard.
3. The· tire inflation pressures on the Tire Placard are adequate for all speeds. No tire pressure adjustment is required for freeway speeds. (Also
follow
the Caution at the beginning of this "Tire" section).
5-13
Page 87 of 105
Downloaded from www.Manualslib.com manuals search engine 4. Always use a tire pressure gage when checking inflation pressures (we
suggest you purchase a
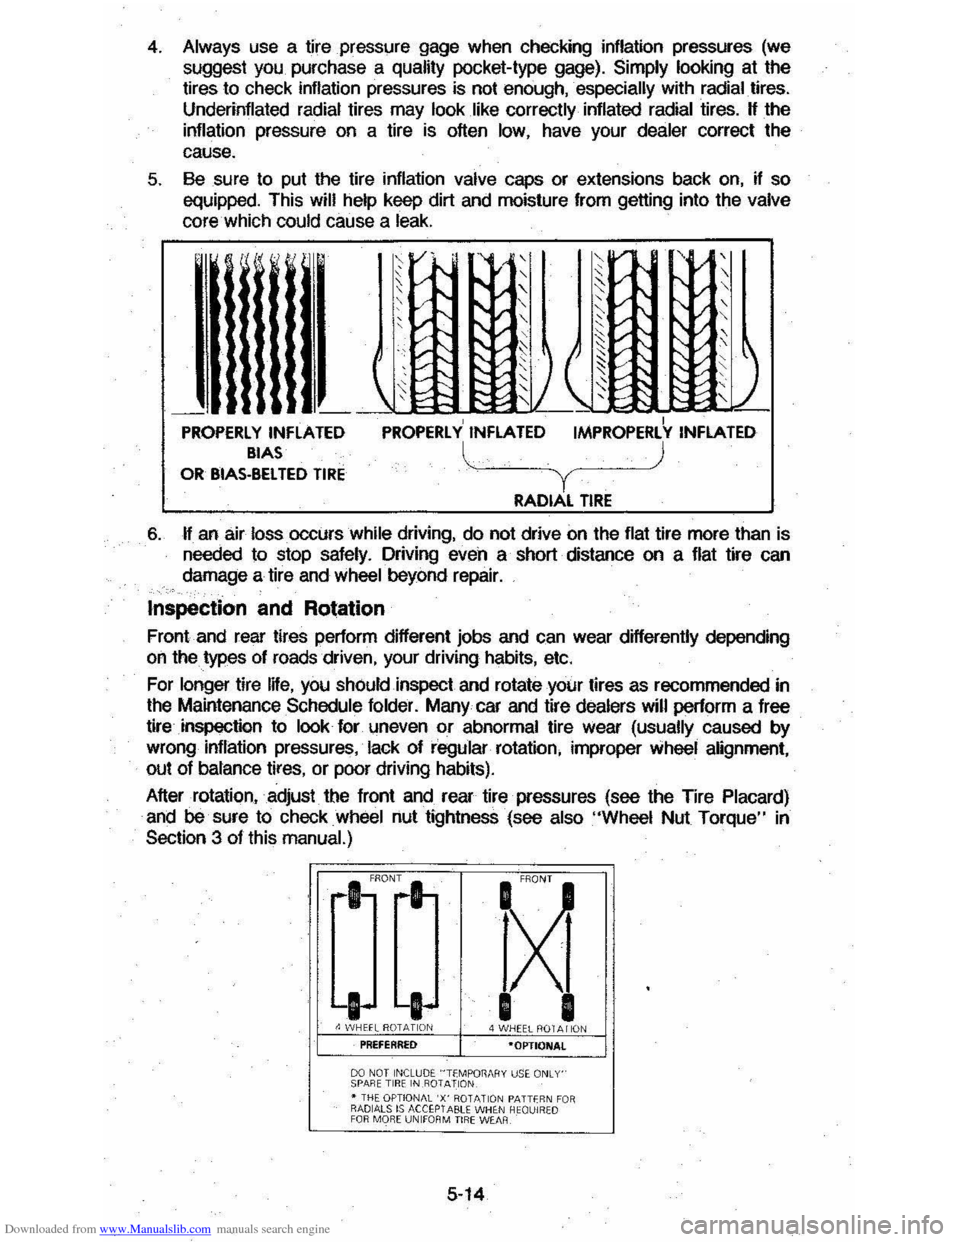
quality pocket-type gage). Simply looking at the tires to check inflation pressures is not enough, . especially with radial. tires.
Underinflated radial tires may look like correctly inflated radial tires. H the
inflation pressure on a tire is often low, have your dealer correct the
cause.
5. Sesure to put the tire inflation valve caps or extensions back on, if so
equipped. This will help keep dirt and moisture from getting into the valve core which could cause a leak.
't! [' V-. , ,-',/ ,
~v"
, " ,
, ,,-I"-v " I'V " ' v-I'-,
" "
,/ " I~ ~::;: ~ ~, ,/
~ J ( " ~ ~ ~ r;S ) :::: ~ ~ t;: ~/ 2~ t: ,
\' , --I PROPERLY INflATED PROPERLY INFLATED IMPROPERLY INFLATED BIAS l ) OR BIAS-BelTED TIRE Y RADIAL TIRE
6. H an air loss. occurs while driving, do not drive on the flat tire more than is
needed to stop safely. Driving even a short distance on a flat tire can
damage a tire and
wheel beyond repair.
Inspection and Rotation
Front and rear tires perform different jobs and can wear differently depending
on the types of roads driven, your driving habits, etc.
For
longer tire IHe, you shOuld inspect and rotate your tires as recommended in
the Maintenance Schedule folder. Many car and tire dealers will perform a free
tire
inspection to look for \meven or abnormal tire Wear (usually caused by
wrong inflation pressures, lack of regular rotation, improper wheel alignment,
out of bslance tires, or poor driving habits).
After rotation, adjust the front and rear tire pressures (see the Tire
Placard)
and be sure to check wheel nut tightness (see also "Wheel Nut Torque" in
Section 3 of this manual.)
fXi
I I 4 WHEEL ROT A I iON ·OPTIONAl
00 NOT INCLUDE "TfMPOT1MIY uS~ ONLY' SPARE TIR E IN .R01 AllON • THE OPTIONAL 'X' ROTATIO N PATTfR N FO R RADIALS IS ACCEPTABU WHE N HEQUIRW
FOR MO RE UNIfOR M TIRE WEAR
5-14
Page 88 of 105
Downloaded from www.Manualslib.com manuals search engine CAUTION; Whenever a wheel is changed, always remove any corrOsion that may be present on inside of wheeland wheel mounting surface on vehicle. Installing wheels
without good metal·to--metalcontact at the mounting surfaces can cause wheel nuts to
loosen, which can later allow a wheel to come off while the vehicle -is moving, possibly
causing loss of control.
Alignment and Balance
Proper wheel alignment improves tire tread life. Your vehicle's suspension
parts should be inspected often and
aligned when needed. (See the
Maintenance
Schedule Folder for more information.) Ball joints have built-in
wear indicators and some movement in the joints is normal.
Improper alignment • will not-cause the vehicle to vibrate. However, improper
alignment can cause:
• the tires to roll at an angle, which will result in faster tire wear;
• your tires _ to wear unevenly;
•
your vehicle to "pull" to the left or right.
Proper tire balancing provides the
best riding comfort and helps reduce tire
tread wear. Out-of-balance tires can cause annoying vibration and uneVen tire
wear such as cupping and flat spots.
Traction
Driving, cornering, and braking traction are reduced -w~ater. snovv' ic:e., gravel, or other material is on the road. Adjust driving practices and vehiCia
speed to road conditions.
When driving on wet
or sluShy roads, a wedge of water can build up between
the tire and road. This is known as hydroplaning, and may cause partial or
complete loss of traction, vehicle control, and stopping ability.
To red\ICe the chance of traclion loss, follow these tips:
1. Slow down during rainstorms or when roads are slushy.
2. StoW down if the road has standing water or puddles.
3. Replace the tires when the tread wear indicators are showing.
4. Keep the tires properly inflated.
H your vehicle has Tpc radial tires (see "Tire Replacement" in this section),
yoU, .lifes were designed to provide better snow traction. In fact, these tires
shOuld be adequate for driving in mO$ wiAter conditions. Howeve" ij you do feel you do need to buyconvenlional snow tires, be sure they are the same
size, load range, and .construction type (bias, bias· belled, Or radial) as your
other tires.
Tire Chain$ or Similar Traction Devices
If you buy tire chains for your car, make sure they are'designated as SAE
Class "S" type chaios. Use of other types of chains may cause damage to
your vehicle.
Use
of chains may adversely affect your vehicle's handling. -When using
chains: (1) adjust speed to road conditions, (2) avoid sharp turns, and (3) when
possible, avoid
locked-wheel braking.
In addition, to help prevent chain damage to your vehicle:
5-15