roof CHEVROLET CAVALIER 1984 1.G Owners Manual
[x] Cancel search | Manufacturer: CHEVROLET, Model Year: 1984, Model line: CAVALIER, Model: CHEVROLET CAVALIER 1984 1.GPages: 105, PDF Size: 24.23 MB
Page 6 of 105
Downloaded from www.Manualslib.com manuals search engine SECTION 1
BEFORE DRIVING YOUR CAVALIER
TRANSAXLE
While reading this manual, you will nole many references 10 Ihe "transaxle." The transaxle is a transmission and differential (axle) combined in a singl ,e unit.
To avoid confusion, the word
"transaxle" will be used throughout this manual 10 refer to bolh Ihe transmission and differenlial funclions.
DRIVER DAILY CHECKUST
Be sure you know how to use your vehicle and its equipment before operating it
Before Entering the Vehicle
1. See that windows, mirrors and lights are clean and unobstructed.
2. If any lire does not look normal, check it with a pressure gage.
3. Look for fluid leaks .
4. Be sure everything is properly stowed.
5. Check the area behind the vehicle if you are about to back up.
__ Before Driving Off
1. Lock all doors.
2. Adjust the seat and any movable head restraint
3. Adjust inside and outside mirrors.
4. DO NOT allow anyone to ride where there is no seat belt ; and ALWAYS properly fasten the seat belt.
5. Check that all the warning lights work as the key is turned to "Run" or "Start"
6. Check all gages (including the fuel gage).
7 . Release the parking brake (and make sure the
"BRAKE " light turns .off).
See related topics in this manual
or the Maintenance Schedule folder H problems are found.
STOWING THINGS IN (OR ON) THE VEHICLE
CAUTION: Put luggage or cargo In the trunk, or rea' area if postible. Cargo weight,
whether In the trunk or rear area, should be located as far forward as possible. Cargo weight on the roof Shoukt be positioned .s evenly as possible. Secure all i1ems in place to help keep them -from being thrown about and injuring people during a cot"-ion or sudden maneuver. Do not pile luggage or cargo higher than the seetbaCks. Do not place anything on the filler panel, or any cargo cover between the rear seat~.ck and window.
GUARD AGAINST THEFT
Your new Cava~er has many features to help prevent then of the vehicle, its
equipment, and contents. But these anti-then features
depend upon you to work.
t -1
Page 7 of 105
Downloaded from www.Manualslib.com manuals search engine The time to be most on guard is when leaving the vehicle:
1. Park in a lighted spot when you can, and fully close all windows and
any roof panels.
2 .
Lock the steering column and take the keys:
• Turn the key to "Lock" while depressing the key release lever (if so
equipped) and remove the
key. This locks the ignition and both
steering and shift controls , unless your manual transaxJe vehicle has a key release lever . In thai case . Ihe shiH control is not locked. The key can be removed only when the ignition is locked.
• II you must leave a key wilh the vehicle. leave the square-head key
only. Take the oval-head key with you. This will help prevent unwanted
entry into your vehicle or any locked compartment at a later date. Be
sure to
lock the glove box since the remote release button allows the
hatchback.
tailgate , or trunk to be opened even though the ignition key
has been removed .
3. Keep items that may appear to be of value out of sight and locked up
when possible.
4 .
Lock all doors.
KEYS
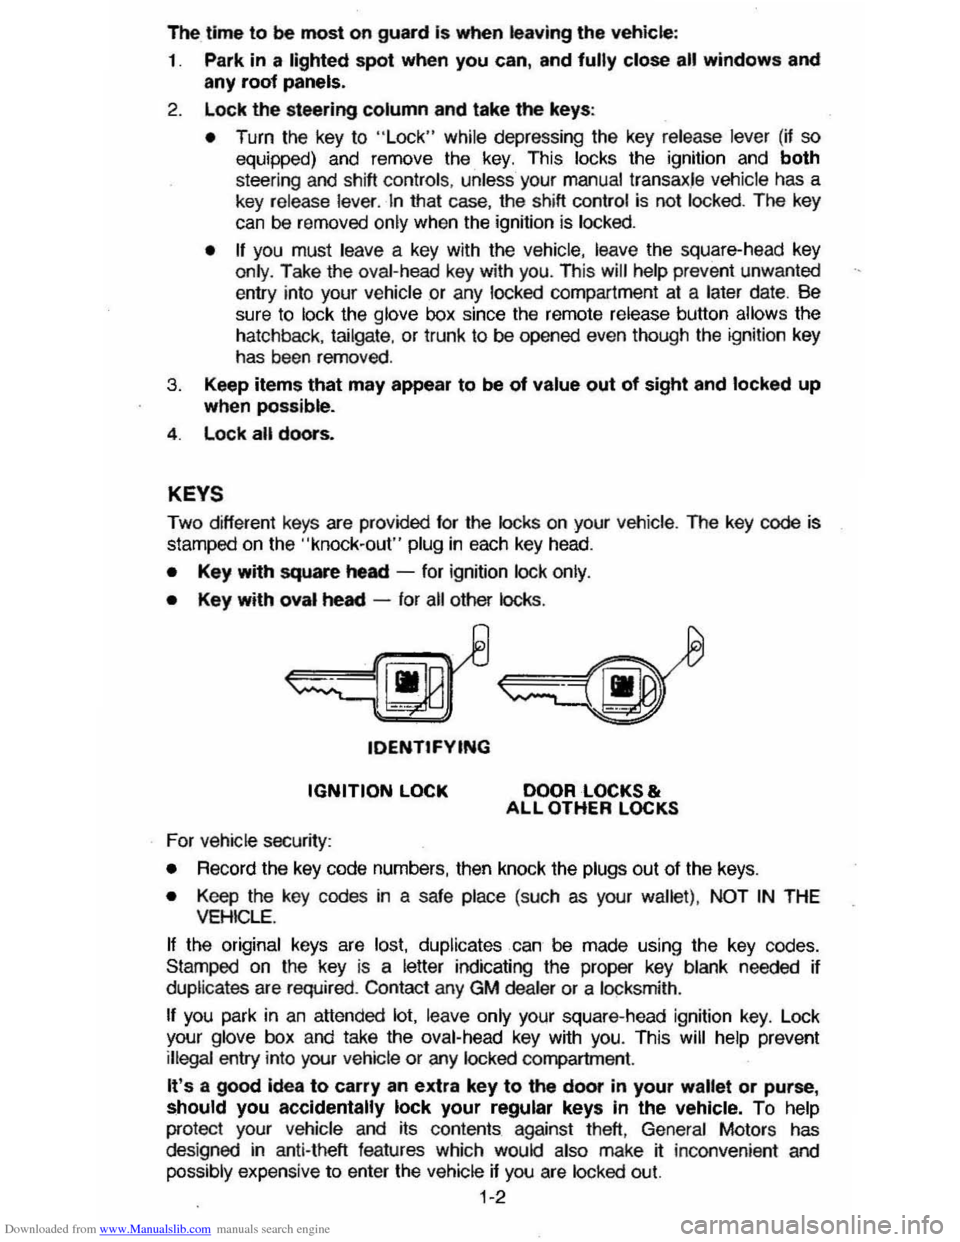
Two different keys are provided for the locks on your vehicte. The key code is
stamped on the "knock-out" plug in each key head.
• Key with square heed -for ignition lock only.
• Key with oval heed -for all other locks .
tDENTtFYING
IGNITION LOCK
For vehicle security:
DOOR LOCKS & ALL OTHER LOCKS
•
Record the key code numbers, then knock the plugs out of the keys.
• Keep the key codes in a safe place (such as your wallet) . NOT IN THE VEHICLE.
If the original keys are lost. duplicates can be made using the key codes.
Stamped on the key
is a letter indicating the proper key blank needed if
duplicates are required . Contact any GM dealer or a locksmith .
If you park in an attended lot. leave only your square-head ignition key. Lock
your glove box and take the oval-head key with you. This will help prevent illegal entry into your vehicle or any locked compartment.
It's a good idea to carry an extra key to the door in your wallet or purse, should you accidentally lock your regular keys In the vehicle. To help
protect your Vehicle and its contents against theft, General Motors has
des igned in anti-theft features which would also make jf: inconvenient and
possibly expensive to enter the vehicle if you are locked out.
1-2
Page 53 of 105
Downloaded from www.Manualslib.com manuals search engine To store the sunshield when rennoved from the car, always select a place
where the sunshade can lay flat without anything stored on top of it or leaned against it. Hanging the sunshade flat on a wall by its hinges is an excellent way
to store it.
As with any decorative surface. washing with a mild soap and water solution is
recommended . Abrasive materials or chemical solvents may adversely affect
the finish of the sunshade.
FOLDING SEATBACK OPERATION
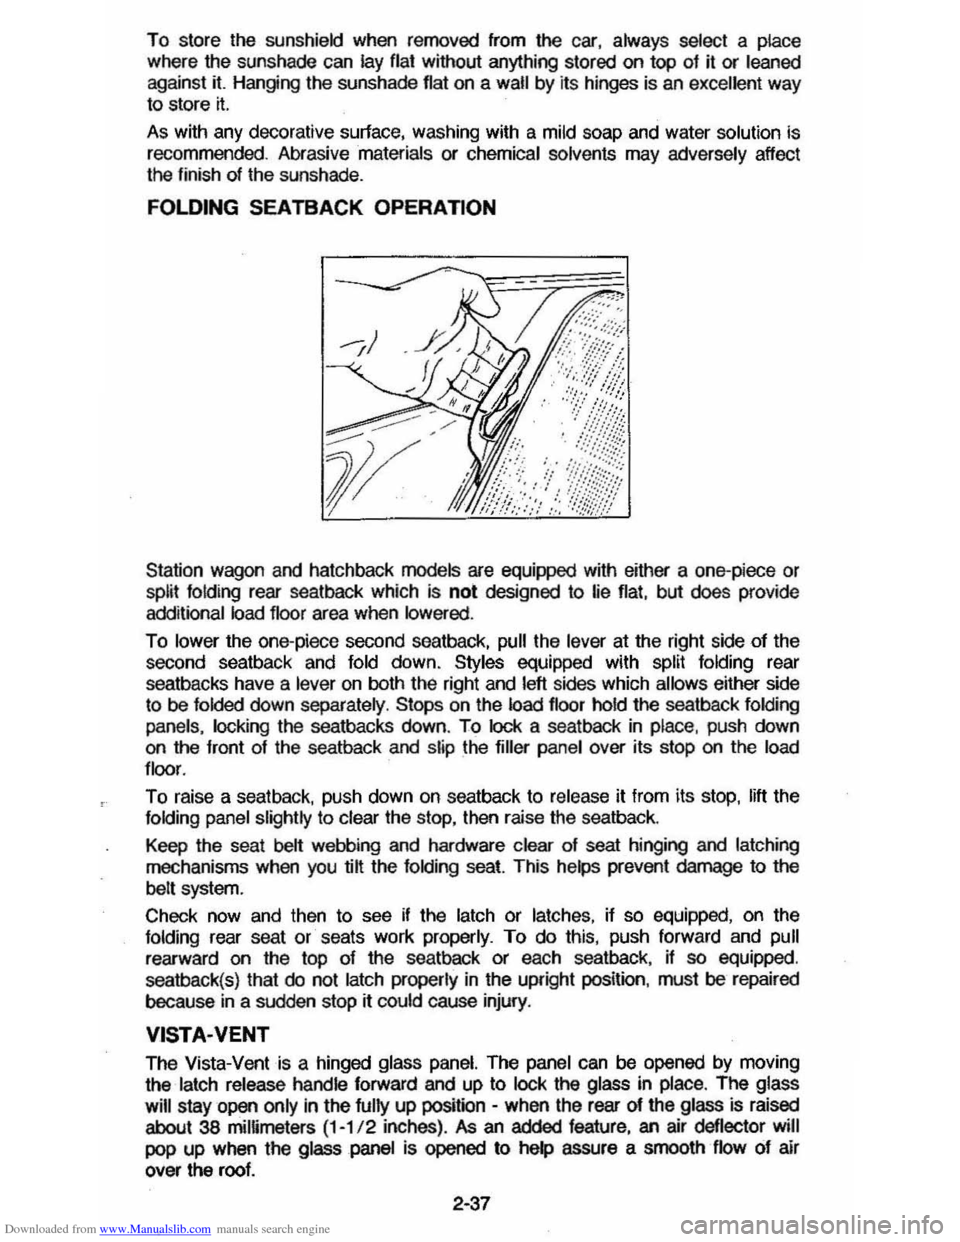
Station wagon and hatchback models are equipped with either a one-piece or split folding rear seatback which is not designed to lie flat, but does provide
additional load floor area when lowered .
To lower the one-piece second seatback, pull the lever at the right side of the
second seatback and fold down. Styles equipped with split folding rear
seatbacks have a
lever on both the right and left sides which allows either side
to be folded down separately . Stops on the load floor hold the seatback folding
panels. locking
the seatbacks down. To lock a seatback in place, push down on the front of the seatback and slip the filler panel over its stop on the load
floor .
To raise a seat back. push down on seatback to release it from its stop. lift the folding panel slightly to clear the stop, then raise the seatback.
Keep the seat
belt webbing and hardware clear of seat hinging and latching
mechanisms when you @ the folding seat. This helps prevent damage to the
belt system.
Check now and then
to see if the latch or latches, if so equipped, on the folding rear seat or seats work properly. To do this, push forward and pull
rearward on the top of the seatback or each seatback, if so equipped.
seatback(s) that
do not latch properly in the upright position. must be repaired
because
in a sudden stop rt could cause injury.
VISTA·VENT
The Vista-Vent is a hinged glass panel. The panel can be opened by moving
the
latch release handle forward and up to lock the glass in place. The glass
will
stay open only in the fully up position -when the rear of the glass is raised
about 38 mimmeters (1-1/ 2 inches) . As an added feature, an air deflector will
pop up when the glass panel is opened to help assure a smooth flow of air
over the roof.
2·37
Page 54 of 105
Downloaded from www.Manualslib.com manuals search engine >1;' l ' "0'
VENT GLASS ~C"rl I / iT'--.... /.1 TO AEMOVE GLASS I,~ATCH ASSEMBlY
PUSH HERE TO ~ / SEPARATE THE @ ':ATCH ASSEM81. Y TRIM LACE~ i VISTA VENT GLASS STOWAGE BAG
/, ---~\~ ~STOWAGEBAG
\~ . ~~ ESCUTCHEON ASSEMBLY S', I I '
" I .,'
OPEN VISTA VENT INTERIOR VIEW VIEWA RETAINER
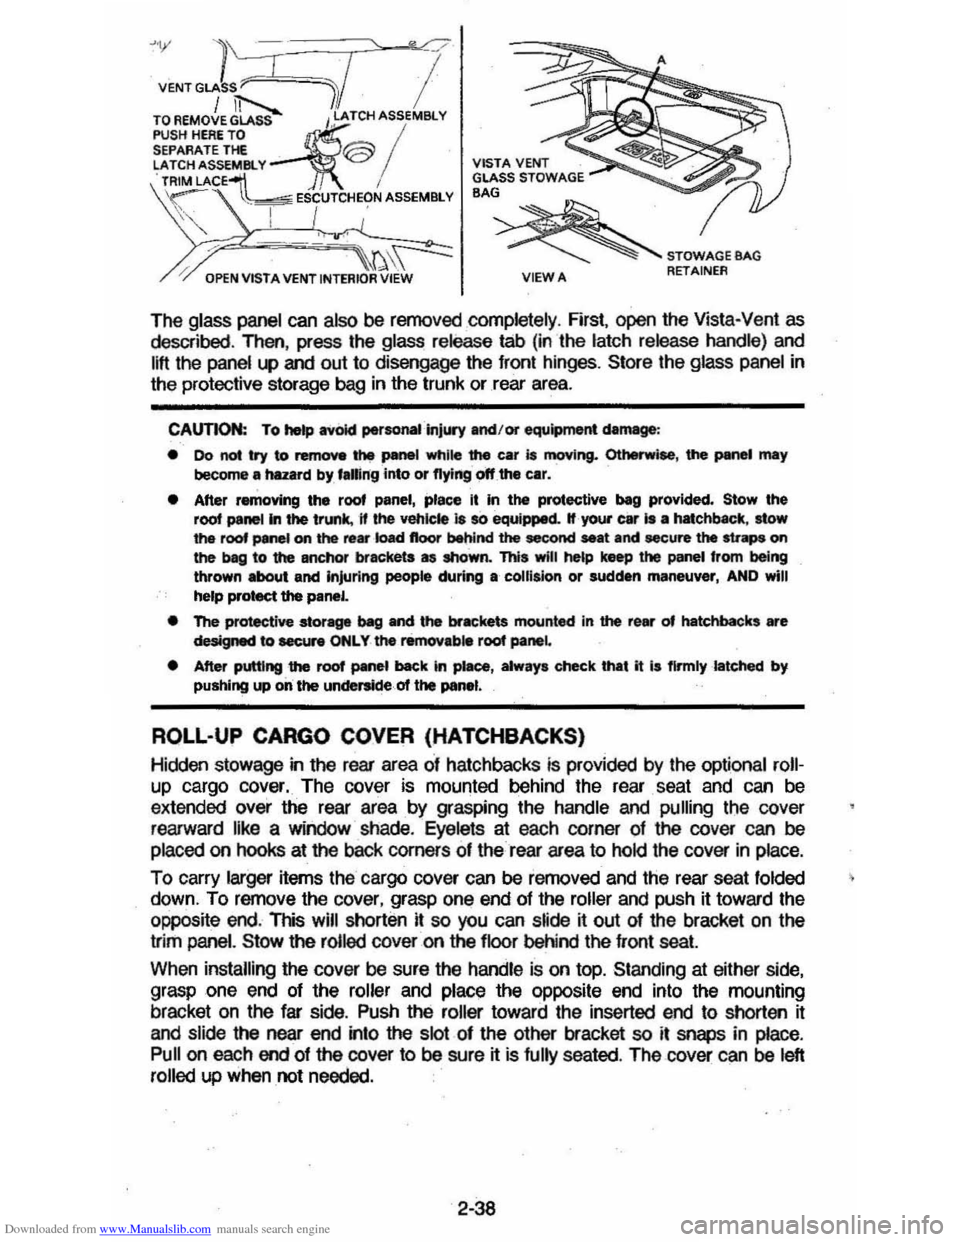
The glass panel can also be removed completely , First, open the Vista-Vent as described , Then, press the glass release tab (in the latch release handle) and
lift the panel
l.P and out to disengage the front hinges, Store the glass panel in
the protective storage bag in the trunk or rear area.
CAUTION: To hetp avoid perso ..... ·injUIY and/or equipment damage :
• 00 not try to remove the panel while the car is moving. Otherwise, the PMWI may become a hazard by, f.ling into or flying off the car.
• After removing the roof panel, place It in the protective beg provided. Stow the root panel In the trunk, 11 the vehicle 18 so equipped. If your car Is • hatchbKk, stow the roof panel on the re ... ·k)ad floor behind the second seat and secure the straps on the beg to the anchor brackets as shown. This will he&p keep the panel from being thrown about and Injuring people during a collision or sudden maneuver, AND will
help protect the panel.
• The protective stor-ve ~ and the brackets mounted in the rear of hatchbacks are designed to eecur. ONLY the removab. root panel
• After putting the roof panel back In piaee, alway. check that it I. flrmlylatehed by pushing up on the underside of the panel.
ROLL-UP CARGO COVER (HATCHBACKS)
Hidclen stowage in the rear area of hatchbacks is provided by the optional roll
up cargo cover. The cover is mounted behind the rear . seat and can be
extended over the rear area by grasping the handle and pulling the cover
rearward like a window shade.
Eyelets at each corner of the cover can be
placed on hooks at the baCk corners of the rear area to hold the cover in place.
To carry larger items the cargo cover can be removed and the rear seat folded
down, To remove the cover, grasp one end of the roller and push it toward the
opposite end. This
will shorten it so you can s~de ~ out of the bracket on the
trim
panel. Stow the rolled cover on the floor behind the front seat
When installing the cover be sure the handle is on top. Standing at either side,
grasp one end of the roller and place the
opPOSite end into the mounting
bracket on the far side . Push the roller toward the inserted end to shorten it
and slide the near
end into the slot of the other bracket so it snaps in place,
Pull on each end of the cover to be sure it is fully seated . The cover can be left
rolled up when not needed.
2-38
Page 56 of 105
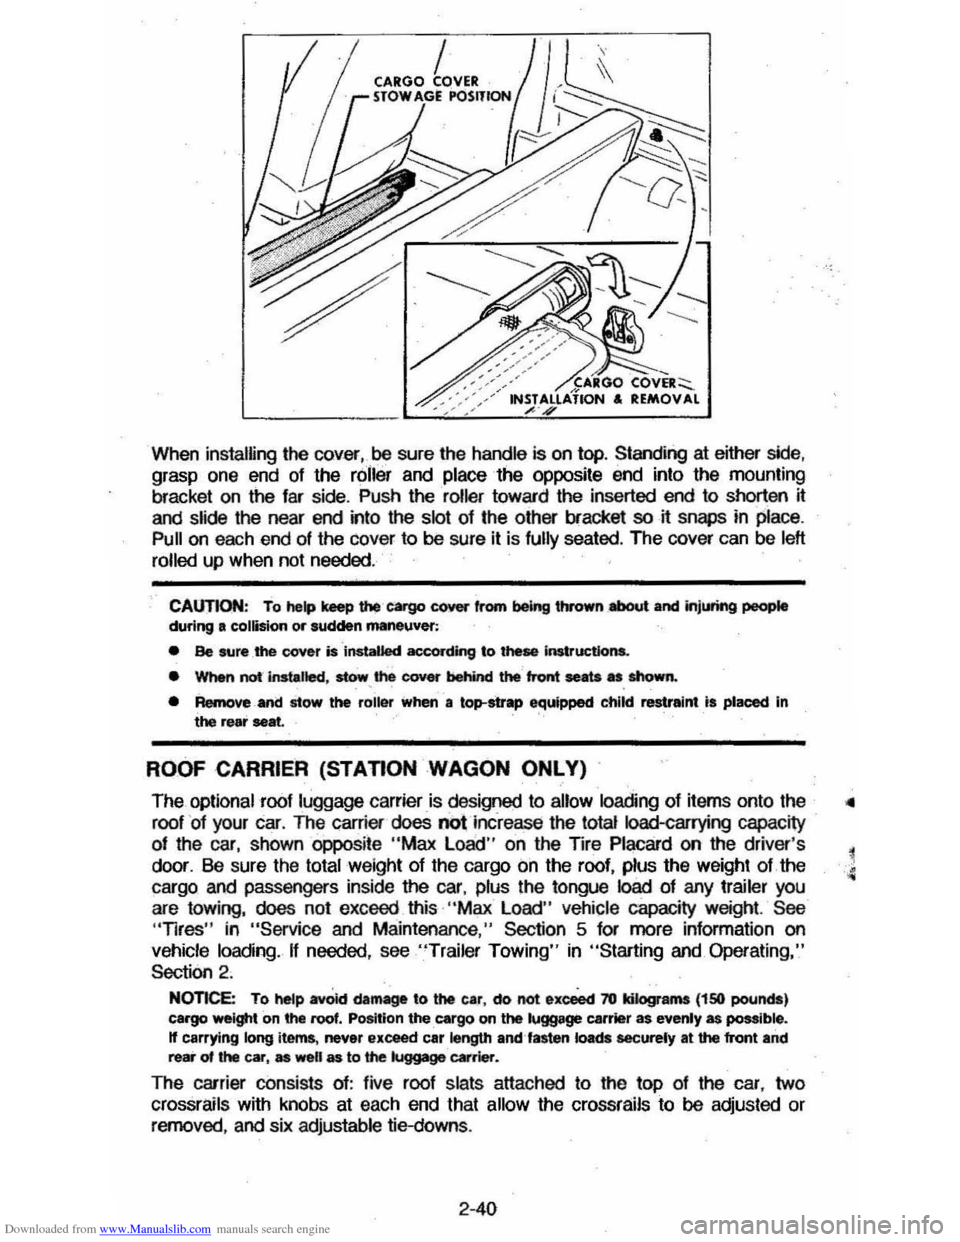
Downloaded from www.Manualslib.com manuals search engine When installing the cover,oo sure the handle is on top. Standing at either side, grasp one end of the roller and place the opposite end into the mounting
bracket on
the far side . Push the roller toward the inserted end to shorten it
and slide the near end into the slot of the other bracket so it snaps in place.
Pull on each end of the cover to 00 sure it is fully seated. The cover can be left
rolled
up when not needed .
CAUTION: To help keep u.., cargo cover from being thrown .,.a,oot and jnjlM'ing people during a collision or sudden maneuver:
• Be sure _the cover is installed according to these Instructions.
• WMn not-instalted, stow, the cover behind the front seats as shown.
• Remove and stow the roiler when a top-strap equipped child restraint is placed In the rear seat.
ROOF CARRIER (STAnON WAGON ONLY)
The optional roof luggage carrier is designed to allow loading of items onto the
roof
' of your car. The carrier does not increase the total Ioad-carrying capacity
of the car, shown oppoSite "Max Load " on the TIre Placard on the driver's
door. Be sure the
total weight of the cargo on the roof, plus the weight of the
cargo and passengers inside
the car, plus the tongue load of any trailer you
are towing, does not exceed this· "Max Load" vehicle capacity weight. See "Tires" in "Service and Maintenance," Section 5 for more information on
vehicle loading. If needed, see "Trailer Towing" in "Starting and. Operating,"
Section 2 .
NOnce: To hetp avOid damage to the car, do not exceect 70 kilograms (150 pounds) cargo weight on the roof. Position the cargo on the luggage carrier as evenly as possible. If carrying long items , never exceed car length emUasten loads eacurely at the front and rear of the car, as well as to the luggage ~rier.
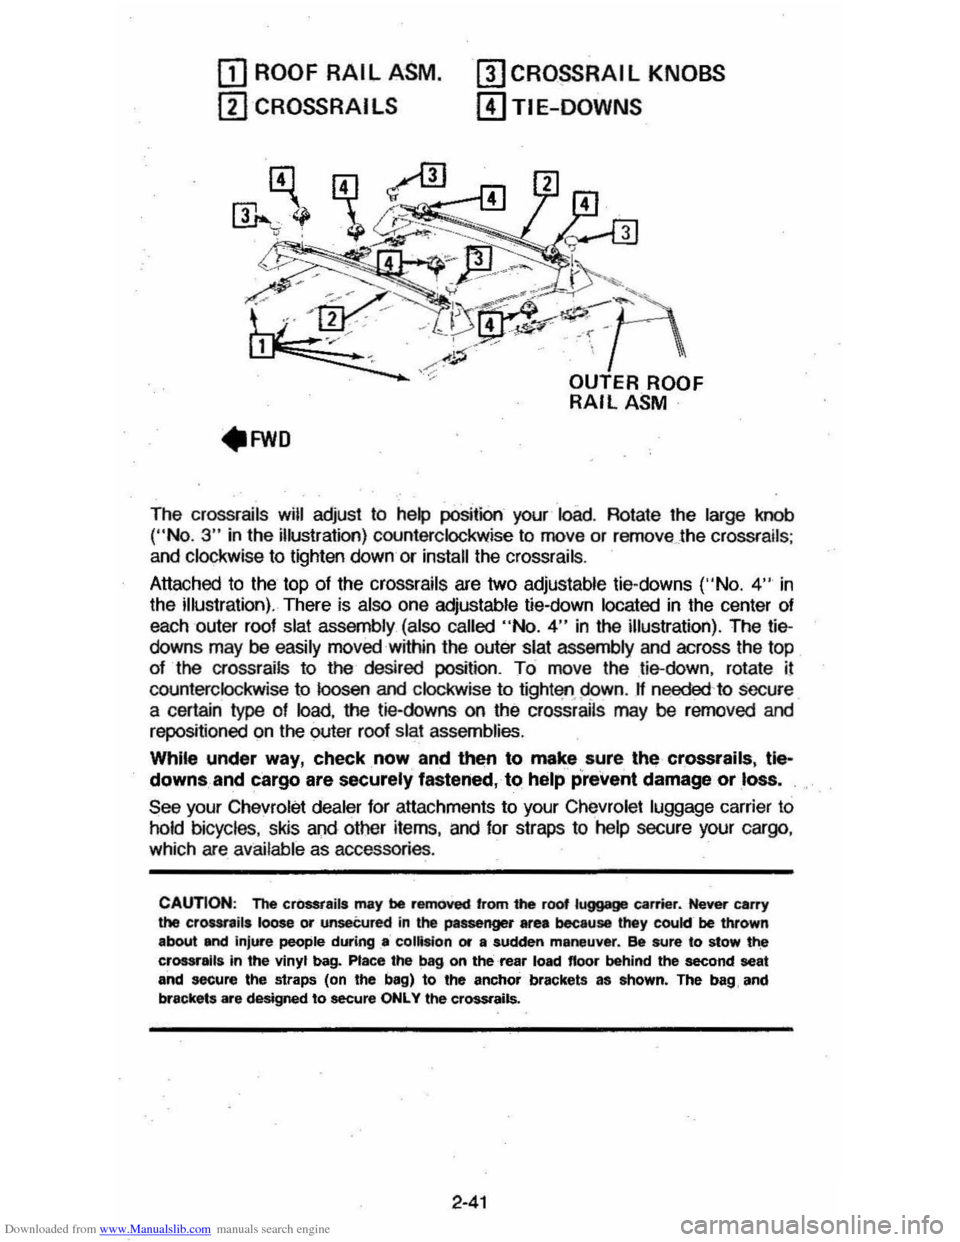
The carrier consists of: five roof slats attached to the top of the car, two
crossrails with knobs at each end that allow the crossrails to 00 adjusted or removed, and six adjustable tie-downs.
2-40
Page 57 of 105
Downloaded from www.Manualslib.com manuals search engine OJ ROOF RAIL ASM.
ill CROSSRAI LS
mCRO~RAIL KNOBS
[!)TIE-DOWNS
The crossrails will adjust to help position your load. Rotate the large knob ("No.3" in the illustration) counterclockwise to move or remove . the crossrails ;
and clockwise to lighten down or install the crossrails .
Attached to the top
of the crossrails are two adjustable tie-downs ('·No. 4" in
the illustration). There is also one adjustable tie-down located in the center of
each outer roof
slat assembly (also called "No.4" in the illustration). The tiedowns may be easily moved within the outer slat assembly and across the top
of the crossrails to the desired position. To move the tie-down, rotate il
counterclockwise to loosen and clockwise to tight'lfl.95>wn. If needed 'to secure
a certain type of load, the tie-downs on the crossrails may be rerncved and
repositioned on the outer roof slat assemblies.
While under way, check, now and then to make sure, the crossrails, tle~
downs, and cargo are securely fastened, to help prevent damage or loss.
See your Chevrolet dealer for attachments to your Chevrolet luggage carrier to
hold bicycles, skis and other items, and for straps to help secure your cargo ,
which are available as accessories .
CAUTION: The cr0SSt8ils may be removed 'rom the root luggage carrier. Never carry the crour,ils loose or unseCured in the passenger area because they cookr be thrown
about and injure people during .. collision or a sudden maneuver. ee sure to stow t~ crossralla in the vinyl bag. Place the bag on the rea, load floor behind the second seat and secure the straps (on the bag) to the anchor brackets as ahown. The bag, and
brackets are designed to secure ONLY the crossrails.
2-41
Page 70 of 105
Downloaded from www.Manualslib.com manuals search engine Glass Surfaces
Glass surfaces should be cleaned on a regular baSis. Use of GM Glass
Cleaner
or a commercial househo .1d glass cleaner will remove normal tobacco
srooke and dust films sometimes caused by ingredients used in vinyls and
interior plastics.
Never use abrasive cleaners on any vehicle gl~s, as they may cause,
scratches. If abrasive cleaners are used on the insieje of the rear window, any electric defogger element may be damaged. Avoid placing decals on the inside
rear window , since they may have to be scraped off later. Any temporary
license , etc. should not be 'att ached across the defogger grid.
Cleaning Glass Roof Panels
Never use abrasive cleaners on any glass roof panels, such as Vista-Vent
panels , as such cleaners may cause scratches. Also, if you use such cleaners on the inside surface, the tinted coating may be damaged . Avoid placing decals on the inside surface, since they may later have to be scraped off.
CARE AND CLEANING OF THE EXTERIOR
Exterior Rnish
The paint finish on your vehicle prOVides-beauty, depth 01 color , gloss retention
and durabiMy .
Washing Your Vehicle
The best way to preserve your vehicle's finish is to keep it clean by frequent
washings. Wash the
vehicle in lukewarm or cold water.
Do not use hot water or wash your
vehicle in the direct rays 01 the sun. Do not
use strong soap or
chemical detergents. All cleaning agents should be flushed proinptly from the surface and not allowed to dry on the linish .
POlishing and Waxing
Polishing is recommended to remove built-up residue and eliminate any "weathered" appearance.
Your dealer offers several polishes and cleaners which have proven value in maintaining original finish appearance and durability.
Protecting Exterior Bright Metal Parts
Bright metal parts should be cleaned regularly to keep their luster. Washing
with water
is all that is usually needed. However , you may use GM Chrome polish on chrome or stainless steel trim, n necessary .
Use special care with
aluminum trim. To avoid damag ing protective trim, never use auto or chrome polish, steam or caustic soap to clean aluminum. A coating
of wax, rubbed to a high polish, is recommended for all bright metal parts.
Cleaning Aluminum Wheels
Preserve the original appearance of aluminum wheels (il your vehicle has
them) by keeping them
clean and free from build-up of road dirt and/or road salt. Regular cleaning followed by a' coat Of wax is recommended. Do not use
abrasive
cleaners , as they could damage the protective coating.
4-4