CHEVROLET CAVALIER 1999 3.G Owners Manual
Manufacturer: CHEVROLET, Model Year: 1999, Model line: CAVALIER, Model: CHEVROLET CAVALIER 1999 3.GPages: 368, PDF Size: 2.79 MB
Page 121 of 368

yellowblue
2-57
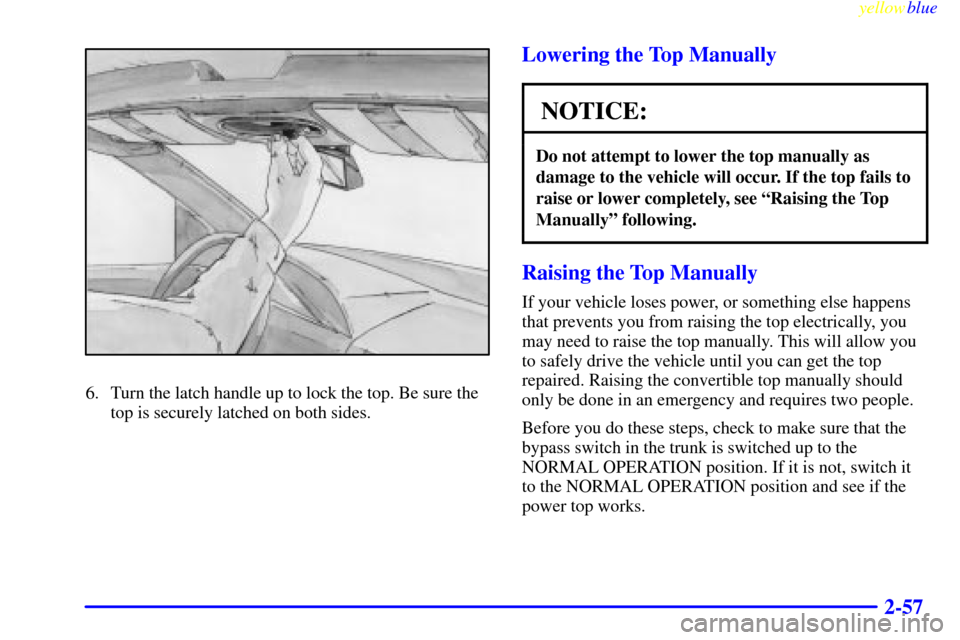
6. Turn the latch handle up to lock the top. Be sure the
top is securely latched on both sides.
Lowering the Top Manually
NOTICE:
Do not attempt to lower the top manually as
damage to the vehicle will occur. If the top fails to
raise or lower completely, see ªRaising the Top
Manuallyº following.
Raising the Top Manually
If your vehicle loses power, or something else happens
that prevents you from raising the top electrically, you
may need to raise the top manually. This will allow you
to safely drive the vehicle until you can get the top
repaired. Raising the convertible top manually should
only be done in an emergency and requires two people.
Before you do these steps, check to make sure that the
bypass switch in the trunk is switched up to the
NORMAL OPERATION position. If it is not, switch it
to the NORMAL OPERATION position and see if the
power top works.
Page 122 of 368

yellowblue
2-58
1. Set the parking brake and shift your automatic
transaxle to PARK (P) or your manual transaxle to
NEUTRAL (N). Turn the engine off.
2. Push the button in the latch handle and rotate the
handle down.
3. Open the trunk.
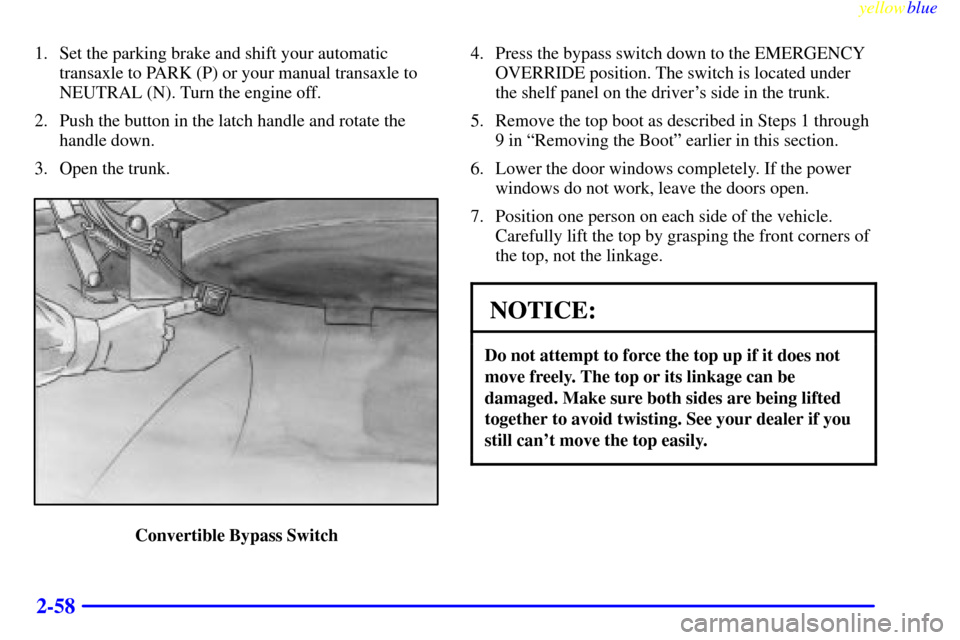
Convertible Bypass Switch4. Press the bypass switch down to the EMERGENCY
OVERRIDE position. The switch is located under
the shelf panel on the driver's side in the trunk.
5. Remove the top boot as described in Steps 1 through
9 in ªRemoving the Bootº earlier in this section.
6. Lower the door windows completely. If the power
windows do not work, leave the doors open.
7. Position one person on each side of the vehicle.
Carefully lift the top by grasping the front corners of
the top, not the linkage.
NOTICE:
Do not attempt to force the top up if it does not
move freely. The top or its linkage can be
damaged. Make sure both sides are being lifted
together to avoid twisting. See your dealer if you
still can't move the top easily.
Page 123 of 368

yellowblue
2-59
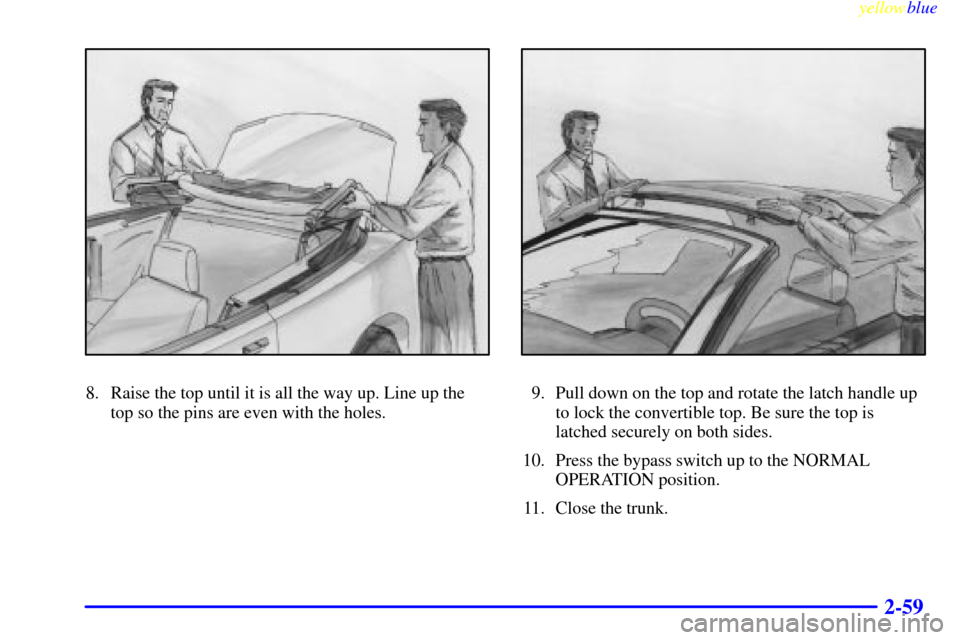
8. Raise the top until it is all the way up. Line up the
top so the pins are even with the holes.9. Pull down on the top and rotate the latch handle up
to lock the convertible top. Be sure the top is
latched securely on both sides.
10. Press the bypass switch up to the NORMAL
OPERATION position.
11. Close the trunk.
Page 124 of 368

yellowblue
2-60
The Instrument Panel -- Your Information System
Page 125 of 368

yellowblue
2-61
The main components of your instrument panel are:
A. Instrument Panel Intensity Control
B. Turn Signal/Multifunction Lever
C. Hazard Warning Flashers Switch
D. Ignition Switch
E. Windshield Wiper/Washer Controls
F. Cigarette Lighter/Accessory Power Outlet
G. Audio SystemH. Climate Controls and Rear Window Defogger
I. Shift Lever
J. Parking Brake Lever
K. Tilt Steering Wheel Lever (If Equipped)
L. Hood Release Lever
M. Fuse Panel
Page 126 of 368

yellowblue
2-62
Instrument Panel Clusters
Your instrument panel cluster is designed to let you know at a glance how your vehicle is running. You'll know how
fast you're going, about how much fuel is left in the tank, and many other things you'll need to drive safely
and economically.
Standard Cluster
Page 127 of 368

yellowblue
2-63
Optional Cluster
Page 128 of 368

yellowblue
2-64 Speedometer and Odometer
Your speedometer lets you see your speed in both miles
per hour (mph) and kilometers per hour (km/h). Your
odometer shows how far your vehicle has been driven,
in either miles (used in the United States) or kilometers
(used in Canada).
You may wonder what happens if your vehicle needs a
new odometer installed.
If the new one can be set to the mileage total of the old
odometer, then it must be. But if it can't, then it's set at
zero and a label must be put on the driver's door to show
the old mileage reading when the new odometer
was installed.
Trip Odometer (If Equipped)
The trip odometer can tell you how far your vehicle has
been driven since you last reset the trip odometer
to zero.
The trip odometer reset button is located next to the
odometer. By pressing the reset button, you can alternate
between the season odometer and the trip odometer. To
reset the trip odometer, press and hold the reset button
for one to two seconds.
Tachometer (If Equipped)
The tachometer displays the
engine speed in revolutions
per minute (rpm).
NOTICE:
Do not operate the engine with the tachometer in
the red area, or engine damage may occur.
Page 129 of 368

yellowblue
2-65
Warning Lights, Gages and Indicators
This part describes the warning lights and gages that
may be on your vehicle. The pictures will help you
locate them.
Warning lights and gages can signal that something is
wrong before it becomes serious enough to cause an
expensive repair or replacement. Paying attention to
your warning lights and gages could also save you or
others from injury.
Warning lights come on when there may be or is a
problem with one of your vehicle's functions. As you
will see in the details on the next few pages, some
warning lights come on briefly when you start the
engine just to let you know they're working. If you are
familiar with this section, you should not be alarmed
when this happens.
Gages can indicate when there may be or is a problem
with one of your vehicle's functions. Often gages and
warning lights work together to let you know when
there's a problem with your vehicle.When one of the warning lights comes on and stays on
when you are driving, or when one of the gages shows
there may be a problem, check the section that tells you
what to do about it. Please follow this manual's advice.
Waiting to do repairs can be costly
-- and even
dangerous. So please get to know your warning lights
and gages. They're a big help.
Safety Belt Reminder Light
When the key is turned to RUN or START, a chime will
come on for about eight seconds to remind people to
fasten their safety belts, unless the driver's safety belt is
already buckled.
The safety belt light will
also come on and stay on
for about 20 seconds, then it
will flash for about 55
seconds. If the driver's belt
is already buckled, neither
the chime nor the light will
come on.
Page 130 of 368

yellowblue
2-66 Air Bag Readiness Light
There is an air bag readiness light on the instrument
panel, which shows AIR BAG. The system checks the
air bag's electrical system for malfunctions. The light
tells you if there is an electrical problem. The system
check includes the air bag sensor, the air bag modules,
the wiring and the crash sensing and diagnostic module.
For more information on the air bag system, see ªAir
Bagº in the Index.
This light will come on
when you start your engine,
and it will flash for a few
seconds. Then the light
should go out. This means
the system is ready.
If the air bag readiness light stays on after you start the
engine or comes on when you are driving, your air bag
system may not work properly. Have your vehicle
serviced right away.
The air bag readiness light should flash for a few
seconds when you turn the ignition key to RUN. If the
light doesn't come on then, have it fixed so it will be
ready to warn you if there is a problem.
Charging System Light
The charging system light
will come on briefly when
you turn on the ignition, and
the engine is not running, as
a check to show you it
is working.
Then it should go out when the engine is started.
If it stays on, or comes on while you are driving, you
may have a problem with the electrical charging system.
It could indicate that you have a loose generator drive
belt, or another electrical problem. Have it checked right
away. Driving while this light is on could drain
your battery.
If you must drive a short distance with the light on, be
certain to turn off all your accessories, such as the radio
and air conditioner.