sunroof CHEVROLET CAVALIER 2004 3.G Owners Manual
[x] Cancel search | Manufacturer: CHEVROLET, Model Year: 2004, Model line: CAVALIER, Model: CHEVROLET CAVALIER 2004 3.GPages: 354, PDF Size: 2.42 MB
Page 1 of 354
Seats and Restraint Systems........................... 1-1
Front Seats
............................................... 1-2
Rear Seats
............................................... 1-7
Safety Belts
.............................................. 1-8
Child Restraints
.......................................1-29
Air Bag Systems
......................................1-47
Restraint System Check
............................1-56
Features and Controls..................................... 2-1
Keys
........................................................ 2-2
Doors and Locks
....................................... 2-7
Windows
.................................................2-12
Theft-Deterrent Systems
............................2-14
Starting and Operating Your Vehicle
...........2-16
Mirrors
....................................................2-30
OnStar
®System
......................................2-32
Storage Areas
.........................................2-33
Sunroof
..................................................2-34
Instrument Panel............................................. 3-1
Instrument Panel Overview
.......................... 3-2
Climate Controls
......................................3-16
Warning Lights, Gages, and Indicators
........3-20
Audio System(s)
.......................................3-35Driving Your Vehicle....................................... 4-1
Your Driving, the Road, and Your Vehicle
..... 4-2
Towing
...................................................4-29
Service and Appearance Care.......................... 5-1
Service
..................................................... 5-3
Fuel
......................................................... 5-4
Checking Things Under the Hood
...............5-10
Bulb Replacement
....................................5-41
Windshield Wiper Blade Replacement
.........5-45
Tires
......................................................5-46
Appearance Care
.....................................5-72
Vehicle Identi�cation
.................................5-79
Electrical System
......................................5-80
Capacities and Speci�cations
.....................5-85
Normal Maintenance Replacement Parts
......5-86
Maintenance Schedule..................................... 6-1
Maintenance Schedule
................................ 6-2
Customer Assistance and Information.............. 7-1
Customer Assistance and Information
........... 7-2
Reporting Safety Defects
...........................7-10
Index.................................................................1
2004 Chevrolet Cavalier Owner ManualM
Page 65 of 354
Keys...............................................................2-2
Remote Keyless Entry System.........................2-3
Remote Keyless Entry System Operation...........2-4
Doors and Locks.............................................2-7
Door Locks....................................................2-7
Power Door Locks..........................................2-8
Rear Door Security Locks................................2-9
Lockout Protection........................................2-10
Leaving Your Vehicle....................................2-10
Trunk..........................................................2-10
Windows........................................................2-12
Manual Windows..........................................2-12
Power Windows............................................2-13
Sun Visors...................................................2-13
Theft-Deterrent Systems..................................2-14
Content Theft-Deterrent.................................2-14
Passlock
®....................................................2-15
Starting and Operating Your Vehicle................2-16
New Vehicle Break-In....................................2-16
Ignition Positions..........................................2-16
Starting Your Engine.....................................2-18
Engine Coolant Heater..................................2-19Automatic Transaxle Operation.......................2-20
Manual Transaxle Operation...........................2-23
Parking Brake..............................................2-25
Shifting Into Park (P) (Automatic Transaxle)......2-26
Shifting Out of Park (P)
(Automatic Transaxle)................................2-27
Parking Your Vehicle (Manual Transaxle).........2-27
Parking Over Things That Burn.......................2-28
Engine Exhaust............................................2-28
Running Your Engine While You Are Parked. . . .2-29
Mirrors...........................................................2-30
Manual Rearview Mirror.................................2-30
Outside Remote Control Mirror.......................2-30
Outside Power Mirrors...................................2-30
Outside Convex Mirror...................................2-31
Outside Breakaway Mirror..............................2-31
OnStar®System.............................................2-32
Storage Areas................................................2-33
Cupholder(s)................................................2-33
Center Console Storage Area.........................2-34
Convenience Net..........................................2-34
Sunroof.........................................................2-34
Section 2 Features and Controls
2-1
Page 98 of 354
Center Console Storage Area
To open the center console, pull the lift lever up and the
lid back.
To close the center console, push the lid down until
it clicks.
Convenience Net
Your vehicle may have a convenience net. You will see
it inside the back wall of the trunk. Put small loads
behind the net. It can help keep them from falling over
during sharp turns or quick starts and stops.
Unclip a corner of the convenience net to �t larger
objects behind the net, then reclip it to secure them in
place. The net is not for larger, heavier loads. Store
them in the trunk as far forward as you can.
You can unhook the net so that it will lie �at when you
are not using it.
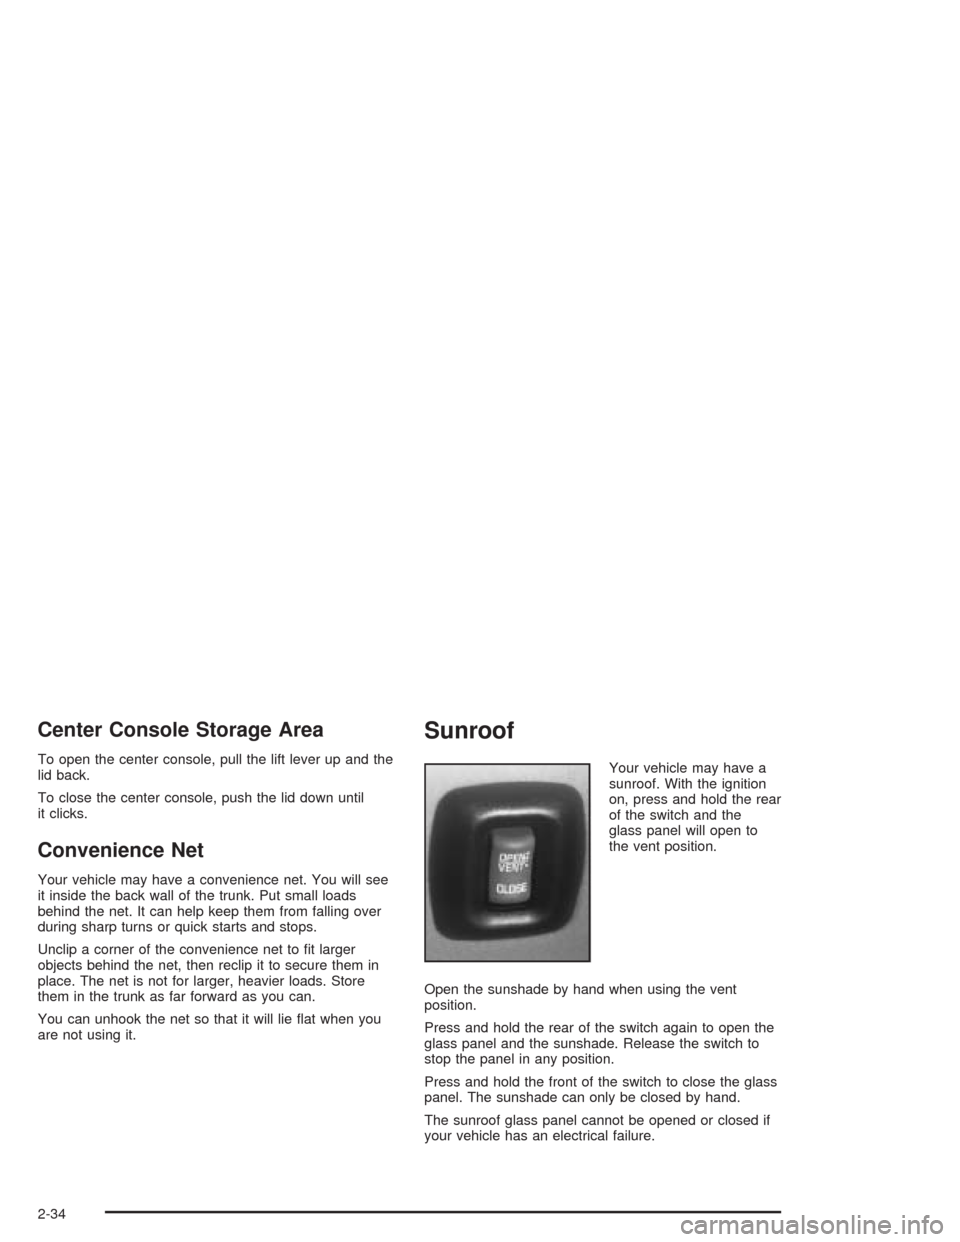
Sunroof
Your vehicle may have a
sunroof. With the ignition
on, press and hold the rear
of the switch and the
glass panel will open to
the vent position.
Open the sunshade by hand when using the vent
position.
Press and hold the rear of the switch again to open the
glass panel and the sunshade. Release the switch to
stop the panel in any position.
Press and hold the front of the switch to close the glass
panel. The sunshade can only be closed by hand.
The sunroof glass panel cannot be opened or closed if
your vehicle has an electrical failure.
2-34
Page 166 of 354
Care of Your CDs
Handle CDs carefully. Store them in their original cases
or other protective cases and away from direct
sunlight and dust. If the surface of a CD is soiled,
dampen a clean, soft cloth in a mild, neutral detergent
solution and clean it, wiping from the center to the edge.
Be sure never to touch the side without writing when
handling CDs. Pick up CDs by grasping the outer edges
or the edge of the hole and the outer edge.
Care of Your CD Player
The use of CD lens cleaners for CD players is not
advised, due to the risk of contaminating the lens of the
CD optics with lubricants internal to the CD mechanism.
Fixed Mast Antenna
The �xed mast antenna can withstand most car washes
without being damaged. If the mast should ever
become slightly bent, straighten it out by hand. If the
mast is badly bent, replace it.
Check occasionally to make sure the mast is still
tightened to the fender. If tightening is required, tighten
by hand, then with a wrench one quarter turn.
XM™ Satellite Radio
Antenna System
The XM™ Satellite Radio antenna is located on the roof
of your vehicle. Keep this antenna clear of snow and
ice build up for clear radio reception.
The performance of the XM system may be affected if
the sunroof is open.
Chime Level Adjustment
Chime level adjustment is only available on RDS radios.
The radio is the vehicle chime producer. The chime is
produced from the driver’s side front door speakers.
To change the volume level, press and hold
pushbutton 6 with the ignition on and the radio power
off. The chime volume level will change from the normal
level to loud, and LOUD will appear on the radio
display. To change back to the default or normal setting,
press and hold pushbutton 6 again. The chime level
will change from the loud level to normal, and NORMAL
will appear on the radio display. Each time the chime
volume is changed, three chimes will sound as an
example of the new volume selected. Removing the
radio and not replacing it with a factory radio or chime
module will disable vehicle chimes.
3-68
Page 293 of 354
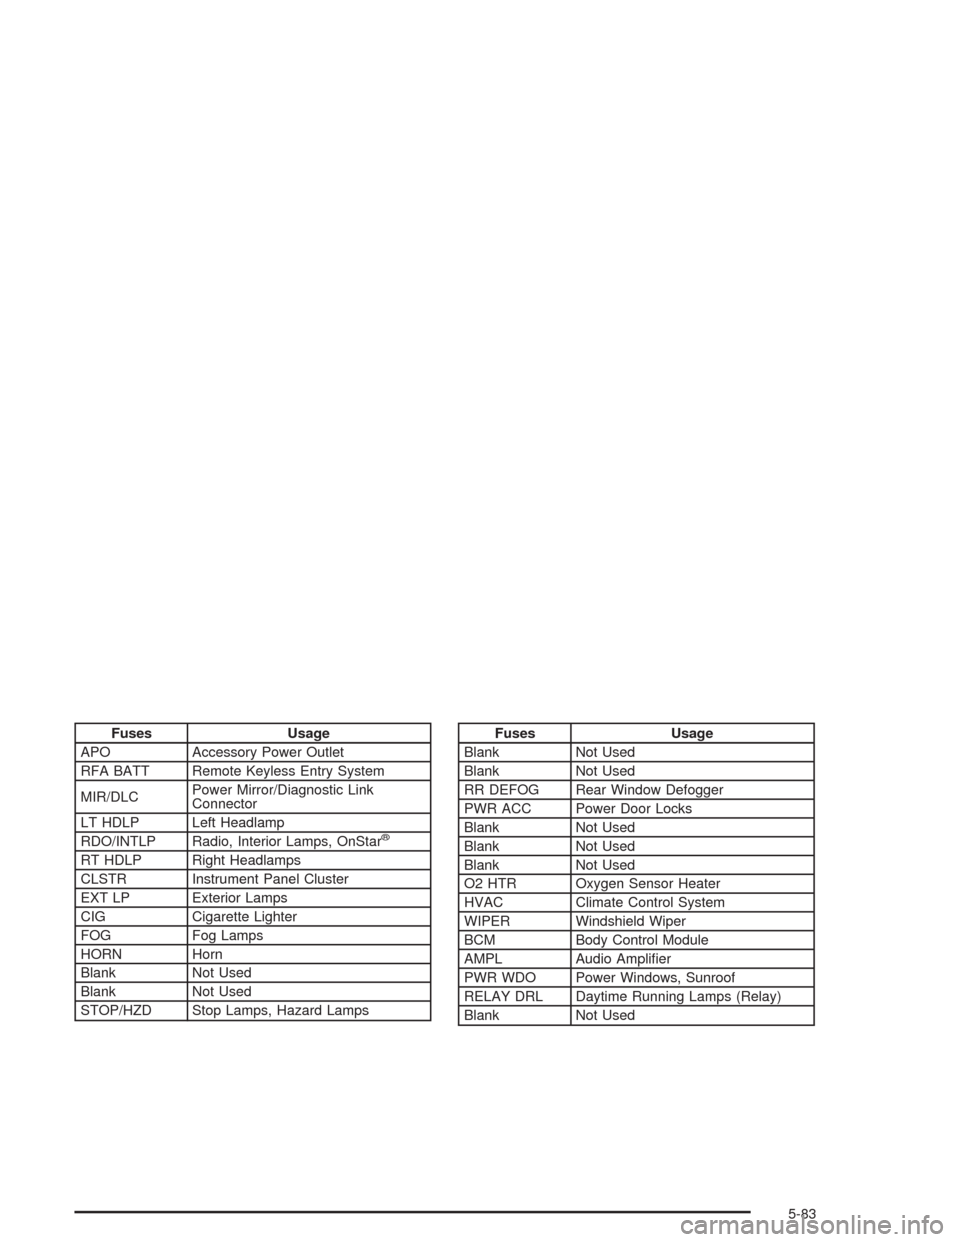
Fuses Usage
APO Accessory Power Outlet
RFA BATT Remote Keyless Entry System
MIR/DLCPower Mirror/Diagnostic Link
Connector
LT HDLP Left Headlamp
RDO/INTLP Radio, Interior Lamps, OnStar
®
RT HDLP Right Headlamps
CLSTR Instrument Panel Cluster
EXT LP Exterior Lamps
CIG Cigarette Lighter
FOG Fog Lamps
HORN Horn
Blank Not Used
Blank Not Used
STOP/HZD Stop Lamps, Hazard Lamps
Fuses Usage
Blank Not Used
Blank Not Used
RR DEFOG Rear Window Defogger
PWR ACC Power Door Locks
Blank Not Used
Blank Not Used
Blank Not Used
O2 HTR Oxygen Sensor Heater
HVAC Climate Control System
WIPER Windshield Wiper
BCM Body Control Module
AMPL Audio Ampli�er
PWR WDO Power Windows, Sunroof
RELAY DRL Daytime Running Lamps (Relay)
Blank Not Used
5-83
Page 351 of 354
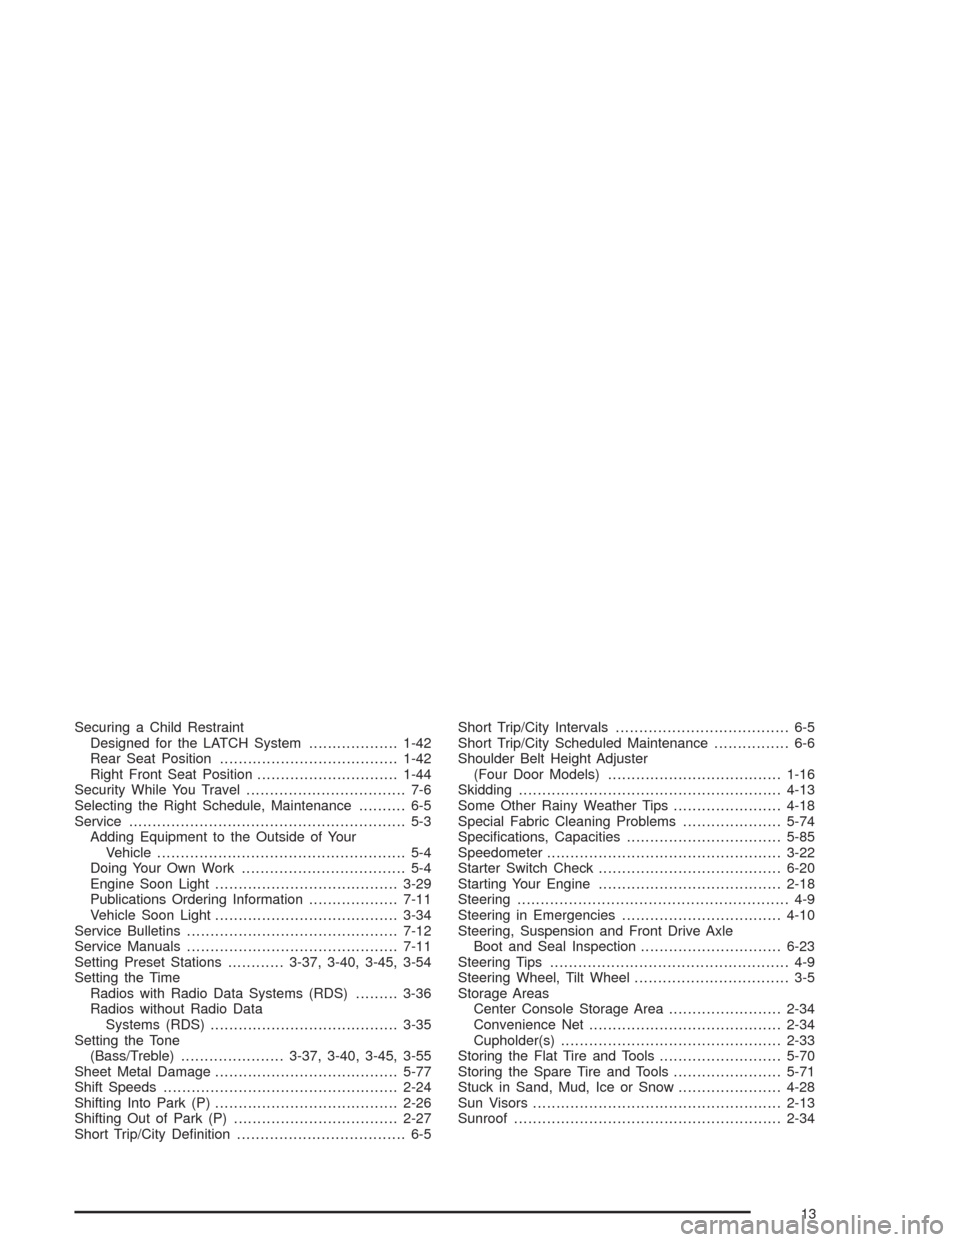
Securing a Child Restraint
Designed for the LATCH System...................1-42
Rear Seat Position......................................1-42
Right Front Seat Position..............................1-44
Security While You Travel.................................. 7-6
Selecting the Right Schedule, Maintenance.......... 6-5
Service........................................................... 5-3
Adding Equipment to the Outside of Your
Vehicle..................................................... 5-4
Doing Your Own Work................................... 5-4
Engine Soon Light.......................................3-29
Publications Ordering Information...................7-11
Vehicle Soon Light.......................................3-34
Service Bulletins.............................................7-12
Service Manuals.............................................7-11
Setting Preset Stations............3-37, 3-40, 3-45, 3-54
Setting the Time
Radios with Radio Data Systems (RDS).........3-36
Radios without Radio Data
Systems (RDS)........................................3-35
Setting the Tone
(Bass/Treble)......................3-37, 3-40, 3-45, 3-55
Sheet Metal Damage.......................................5-77
Shift Speeds..................................................2-24
Shifting Into Park (P).......................................2-26
Shifting Out of Park (P)...................................2-27
Short Trip/City De�nition.................................... 6-5Short Trip/City Intervals..................................... 6-5
Short Trip/City Scheduled Maintenance................ 6-6
Shoulder Belt Height Adjuster
(Four Door Models).....................................1-16
Skidding........................................................4-13
Some Other Rainy Weather Tips.......................4-18
Special Fabric Cleaning Problems.....................5-74
Speci�cations, Capacities.................................5-85
Speedometer..................................................3-22
Starter Switch Check.......................................6-20
Starting Your Engine.......................................2-18
Steering.......................................................... 4-9
Steering in Emergencies..................................4-10
Steering, Suspension and Front Drive Axle
Boot and Seal Inspection..............................6-23
Steering Tips................................................... 4-9
Steering Wheel, Tilt Wheel................................. 3-5
Storage Areas
Center Console Storage Area........................2-34
Convenience Net.........................................2-34
Cupholder(s)...............................................2-33
Storing the Flat Tire and Tools..........................5-70
Storing the Spare Tire and Tools.......................5-71
Stuck in Sand, Mud, Ice or Snow......................4-28
Sun Visors.....................................................2-13
Sunroof.........................................................2-34
13