instrument panel CHEVROLET CITY EXPRESS 2015 Owner's Manual
[x] Cancel search | Manufacturer: CHEVROLET, Model Year: 2015, Model line: CITY EXPRESS, Model: CHEVROLET CITY EXPRESS 2015Pages: 297, PDF Size: 3.5 MB
Page 138 of 297

Black plate (1,1)Chevrolet City Express Owner Manual (GMNA-Localizing-U.S./Canada-
7707496) - 2015 - CRC - 11/26/14
Climate Controls 8-1
Climate Controls Climate Control Systems Climate Control Systems . . . . . . 8-1
Air Vents Air Vents . . . . . . . . . . . . . . . . . . . . . . 8-3
Maintenance Service . . . . . . . . . . . . . . . . . . . . . . . 8-4
Climate Control
Systems The vehicle ’ s heating, cooling, and
ventilation can be controlled with
this system.
1. Air Delivery Mode Control
2. Outside Air/Recirculation Air
Intake Control
3. Temperature Control
4. Heated Outside Mirrors (If
Equipped) 5. Rear Window Defogger (If
Equipped)
6. Fan Control
7. A/C (Air Conditioning)
A (Fan Control): Turn clockwise
or counterclockwise to increase or
decrease the fan speed. Turning the
fan control to 0 turns the fan off. The
fan must be turned on to run the air
conditioning compressor.
Temperature Control: Turn
clockwise or counterclockwise to
increase or decrease the
temperature.
Air Delivery Mode Control: Turn
clockwise or counterclockwise to
change the current airflow mode.
Select from the following air delivery
modes:
Y (Vent): Air is directed to the
instrument panel outlets.
\ (Bi-Level): Air is divided
between the instrument panel and
floor outlets.
Page 140 of 297
Black plate (3,1)Chevrolet City Express Owner Manual (GMNA-Localizing-U.S./Canada-
7707496) - 2015 - CRC - 11/26/14
Climate Controls 8-3The rear window defogger can be
turned off by pressing
1 again or
by turning the ignition to ACC/
ACCESSORY or LOCK.
M (Heated Outside Mirrors, If
Equipped): Press to turn on or off.
An indicator light comes on in the
display to show that the feature is
on. This helps to clear fog or frost
from the surface of the mirror. The
ignition must be in the ON position
for the heated outside mirrors
to work.
{ Caution
Using a razor blade or sharp
object on the inside rear window
can damage the antenna or
defogger. Repairs would not be
covered by the vehicle warranty.
Do not stick anything to the rear
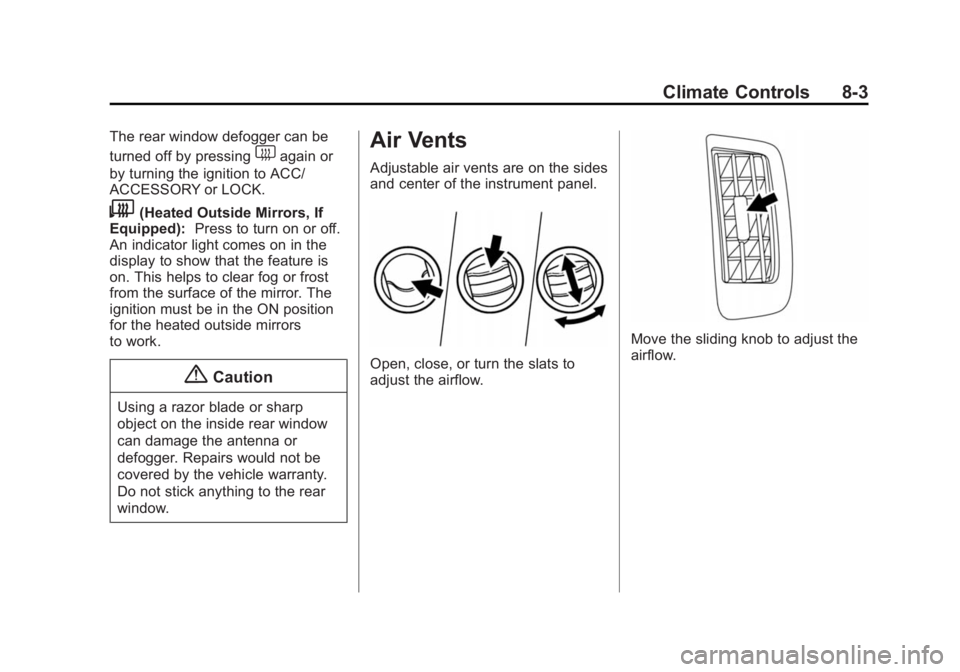
window. Air Vents Adjustable air vents are on the sides
and center of the instrument panel.
Open, close, or turn the slats to
adjust the airflow. Move the sliding knob to adjust the
airflow.
Page 149 of 297
Black plate (8,1)Chevrolet City Express Owner Manual (GMNA-Localizing-U.S./Canada-
7707496) - 2015 - CRC - 11/26/14
9-8 Driving and Operating Warning (Continued)cannot be seen or smelled. It can
cause unconsciousness and even
death.
If the vehicle is stuck in the snow: .
Clear away snow from around
the base of your vehicle,
especially any that is blocking
the exhaust pipe. .
Check again from time to
time to be sure snow does
not collect there. .
Open a window about 5 cm
(2 in) on the side of the
vehicle that is away from the
wind to bring in fresh air. .
Fully open the air outlets on
or under the instrument
panel. .
Adjust the climate control
system to a setting that
circulates the air inside the
(Continued) Warning (Continued) vehicle and set the fan speed
to the highest setting. See
“ Climate Control Systems. ”
For more information about
carbon monoxide, see Engine
Exhaust on page 9-17 .
To save fuel, run the engine for only
short periods as needed to warm
the vehicle and then shut the engine
off and close the window most of
the way to save heat. Repeat this
until help arrives but only when you
feel really uncomfortable from the
cold. Moving about to keep warm
also helps.
If it takes some time for help to
arrive, now and then when you run
the engine, push the accelerator
pedal slightly so the engine runs
faster than the idle speed. This
keeps the battery charged to restart
the vehicle and to signal for help
with the headlamps. Do this as little
as possible to save fuel. If the Vehicle Is Stuck Slowly and cautiously spin the
wheels to free the vehicle when
stuck in sand, mud, ice, or snow.
If stuck too severely for the traction
system to free the vehicle, turn the
traction system off and use the
rocking method. See Traction
Control/Electronic Stability Control
on page 9-25 .
{ WarningIf the vehicle's tires spin at high
speed, they can explode, and you
or others could be injured. The
vehicle can overheat, causing an
engine compartment fire or other
damage. Spin the wheels as little
as possible and avoid going
above 56 km/h (35 mph).
Page 162 of 297
Black plate (21,1)Chevrolet City Express Owner Manual (GMNA-Localizing-U.S./Canada-
7707496) - 2015 - CRC - 11/26/14
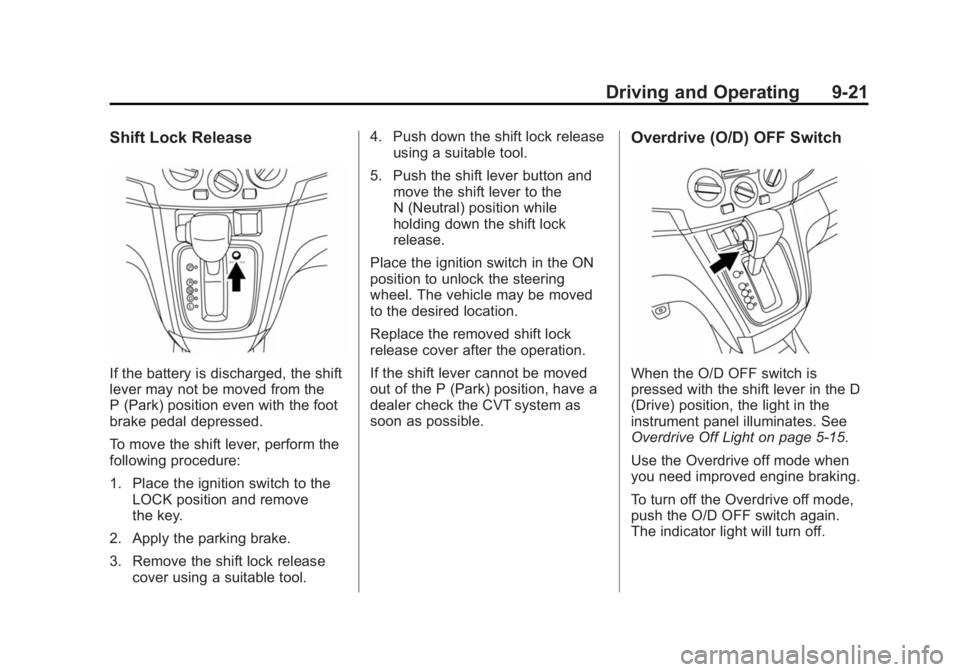
Driving and Operating 9-21Shift Lock Release
If the battery is discharged, the shift
lever may not be moved from the
P (Park) position even with the foot
brake pedal depressed.
To move the shift lever, perform the
following procedure:
1. Place the ignition switch to the
LOCK position and remove
the key.
2. Apply the parking brake.
3. Remove the shift lock release
cover using a suitable tool. 4. Push down the shift lock release
using a suitable tool.
5. Push the shift lever button and
move the shift lever to the
N (Neutral) position while
holding down the shift lock
release.
Place the ignition switch in the ON
position to unlock the steering
wheel. The vehicle may be moved
to the desired location.
Replace the removed shift lock
release cover after the operation.
If the shift lever cannot be moved
out of the P (Park) position, have a
dealer check the CVT system as
soon as possible. Overdrive (O/D) OFF Switch
When the O/D OFF switch is
pressed with the shift lever in the D
(Drive) position, the light in the
instrument panel illuminates. See
Overdrive Off Light on page 5-15 .
Use the Overdrive off mode when
you need improved engine braking.
To turn off the Overdrive off mode,
push the O/D OFF switch again.
The indicator light will turn off.
Page 167 of 297
Black plate (26,1)Chevrolet City Express Owner Manual (GMNA-Localizing-U.S./Canada-
7707496) - 2015 - CRC - 11/26/14
9-26 Driving and Operating .
You may feel a pulsation in the
brake pedal and hear a noise or
vibration from under the hood.
This is normal and indicates that
the traction control system is
working properly. .
Adjust your speed and driving to
the road conditions.
See Traction Control System (TCS)/
Electronic Stability Control Light on
page 5-16 and Electronic Stability
Control (ESC) Off Light on
page 5-16 .
If a malfunction occurs in the
systems, the
d indicator comes on
in the instrument cluster. The TCS
and Electronic Stability Control
systems automatically turn off when
the indicator light is on. Turning the Systems Off
and On
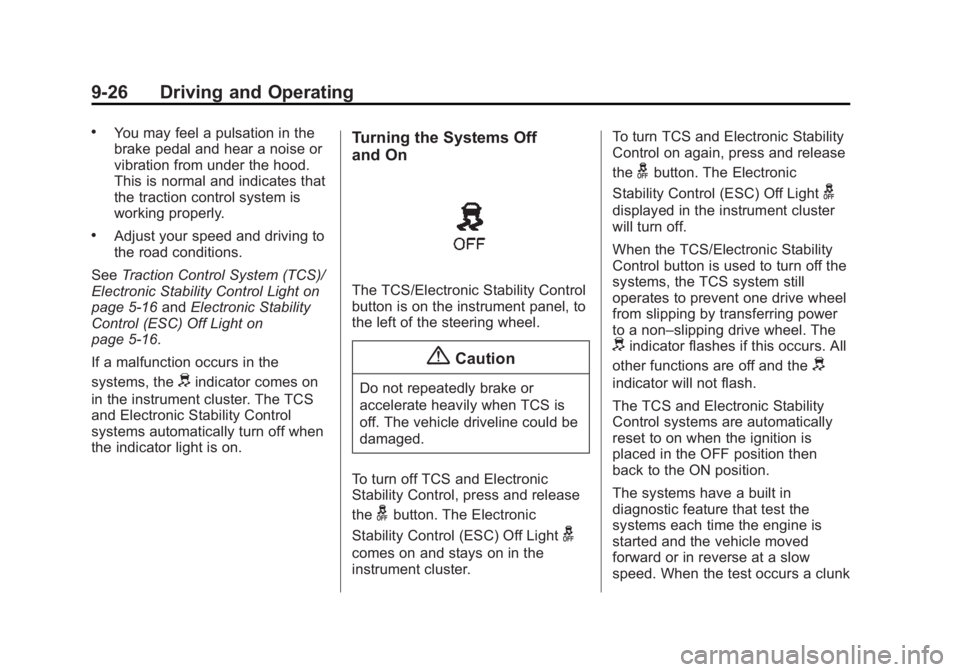
The TCS/Electronic Stability Control
button is on the instrument panel, to
the left of the steering wheel.
{ CautionDo not repeatedly brake or
accelerate heavily when TCS is
off. The vehicle driveline could be
damaged.
To turn off TCS and Electronic
Stability Control, press and release
the
g button. The Electronic
Stability Control (ESC) Off Light
gcomes on and stays on in the
instrument cluster. To turn TCS and Electronic Stability
Control on again, press and release
the
g button. The Electronic
Stability Control (ESC) Off Light
gdisplayed in the instrument cluster
will turn off.
When the TCS/Electronic Stability
Control button is used to turn off the
systems, the TCS system still
operates to prevent one drive wheel
from slipping by transferring power
to a non – slipping drive wheel. The
d indicator flashes if this occurs. All
other functions are off and the
d indicator will not flash.
The TCS and Electronic Stability
Control systems are automatically
reset to on when the ignition is
placed in the OFF position then
back to the ON position.
The systems have a built in
diagnostic feature that test the
systems each time the engine is
started and the vehicle moved
forward or in reverse at a slow
speed. When the test occurs a clunk
Page 172 of 297
Black plate (31,1)Chevrolet City Express Owner Manual (GMNA-Localizing-U.S./Canada-
7707496) - 2015 - CRC - 11/26/14
Driving and Operating 9-31Warning (Continued) or bent, the sensing zone
may be altered causing
inaccurate measurement of
obstacles or false alarms.
The Rear Parking Assist (RPA)
sounds a tone to warn the driver of
obstacles near the rear bumper
when the shift lever is in
R (Reverse). The system may not
detect objects at speeds above
5 km/h (3 mph) and may not detect
certain angular or moving objects.
The RPA detects objects up to 1.8 m
(5.9 ft) from the rear bumper with a
decreased coverage area at the
outer corners of the bumper. As you
move closer to the obstacle, the rate
of the tone increases. When the
obstacle is less than 25 cm (10 in)
away, the tone will sound
continuously. If the RPA detects a
stationary or receding object further
than 25 cm (10 in) from the side of
the vehicle, the tone will sound for only three seconds. Once the
system detects an object
approaching, the tone will sound
again.
The RPA automatically turns on
when the shift lever is placed in
R (Reverse) and the ignition switch
is in ON. The RPA OFF switch on
the instrument panel allows the
driver to turn the RPA on and off. To
turn the RPA off, the ignition switch
must be placed in ON. An indicator
light on the switch will illuminate
when the system is turned off. If the
indicator light illuminates when the
RPA is not turned off, it may indicate
a malfunction in the RPA.
Keep the RPA sensors, located on
the rear bumper, free from snow,
ice, and large accumulations of dirt.
Do not clean the sensors with sharp
objects. If the sensors are covered,
it will affect the accuracy of
the RPA. Rear Vision
Camera (RVC) When the shift lever is shifted into
R (Reverse), the display shows the
view to the rear of the vehicle.
{ Warning .
Failure to follow the warnings
and instructions for proper
use of the Rear Vision
Camera (RVC) could result in
serious injury or death. .
The RVC is a convenience
but it is not a substitute for
proper backing. Always turn
and look out the windows,
and check mirrors to be sure
that it is safe to move before
operating the vehicle. Always
back up slowly. .
The system is designed as an
aid to the driver in showing
large stationary objects
(Continued)
Page 180 of 297
Black plate (39,1)Chevrolet City Express Owner Manual (GMNA-Localizing-U.S./Canada-
7707496) - 2015 - CRC - 11/26/14
Driving and Operating 9-39
Filling the Tank
{ WarningFuel vapors and fuel fires burn
violently and can cause injury or
death. .
To help avoid injuries to you
and others, read and follow
all the instructions on the fuel
pump island. .
Turn off the engine when
refueling. .
Keep sparks, flames, and
smoking materials away
from fuel. .
Do not leave the fuel pump
unattended. .
Do not reenter the vehicle
while pumping fuel. .
Keep children away from the
fuel pump and never let
children pump fuel.
(Continued) Warning (Continued) .
Fuel can spray out if the fuel
cap is opened too quickly.
This spray can happen if the
tank is nearly full, and is
more likely in hot weather.
Open the fuel cap slowly and
wait for any hiss noise to stop
then unscrew the cap all
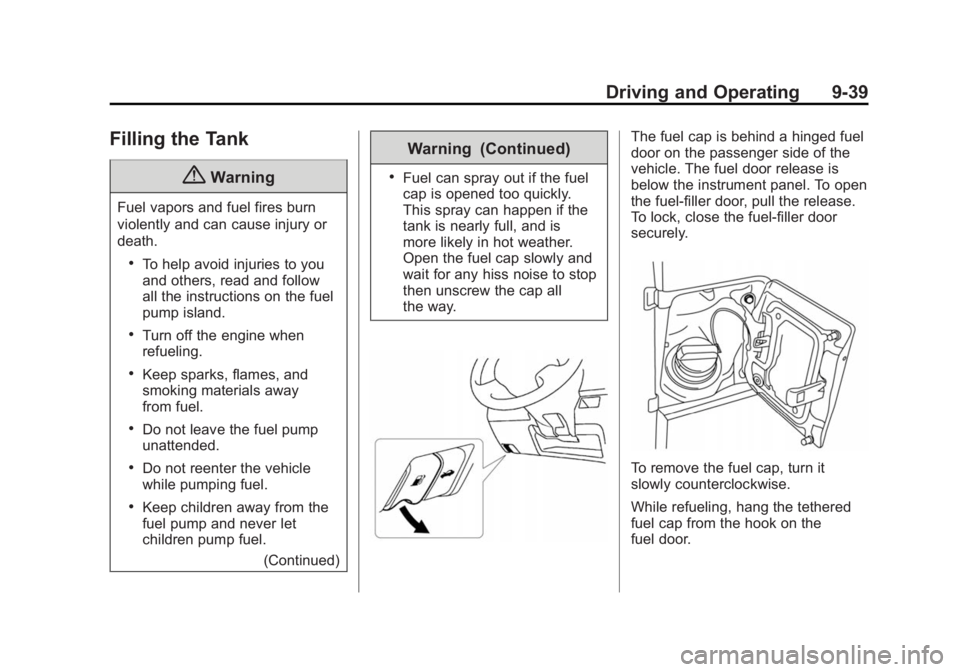
the way. The fuel cap is behind a hinged fuel
door on the passenger side of the
vehicle. The fuel door release is
below the instrument panel. To open
the fuel-filler door, pull the release.
To lock, close the fuel-filler door
securely.
To remove the fuel cap, turn it
slowly counterclockwise.
While refueling, hang the tethered
fuel cap from the hook on the
fuel door.
Page 184 of 297
Black plate (1,1)Chevrolet City Express Owner Manual (GMNA-Localizing-U.S./Canada-
7707496) - 2015 - CRC - 11/26/14
Vehicle Care 10-1
Vehicle Care General Information General Information . . . . . . . . . . 10-2
California Proposition
65 Warning . . . . . . . . . . . . . . . . . 10-2
California Perchlorate
Materials Requirements . . . . 10-2
Accessories and
Modifications . . . . . . . . . . . . . . . 10-3
Vehicle Checks Doing Your Own
Service Work . . . . . . . . . . . . . . . 10-4
Hood . . . . . . . . . . . . . . . . . . . . . . . . 10-5
Engine Compartment
Overview . . . . . . . . . . . . . . . . . . . 10-7
Engine Oil . . . . . . . . . . . . . . . . . . . 10-8
Continuously Variable
Transmission (CVT)
Fluid . . . . . . . . . . . . . . . . . . . . . . 10-11
Engine Air Cleaner/Filter . . . . 10-11
Cooling System . . . . . . . . . . . . 10-13
Engine Coolant . . . . . . . . . . . . . 10-13
Engine Overheating . . . . . . . . 10-16
Overheated Engine
Protection
Operating Mode . . . . . . . . . . . 10-17 Washer Fluid . . . . . . . . . . . . . . . 10-18
Brakes . . . . . . . . . . . . . . . . . . . . . 10-19
Brake Fluid . . . . . . . . . . . . . . . . . 10-19
Battery . . . . . . . . . . . . . . . . . . . . . 10-21
Wiper Blade
Replacement . . . . . . . . . . . . . . 10-22
Headlamp Aiming Headlamp Aiming . . . . . . . . . . 10-23
Bulb Replacement Bulb Replacement . . . . . . . . . . 10-23
Halogen Bulbs . . . . . . . . . . . . . . 10-23
Headlamps, Front Turn
Signal and Parking
Lamps . . . . . . . . . . . . . . . . . . . . 10-23
Replacement Bulbs . . . . . . . . . 10-23
Electrical System Electrical System
Overload . . . . . . . . . . . . . . . . . . 10-24
Fuses and Circuit
Breakers . . . . . . . . . . . . . . . . . . 10-25
Engine Compartment Fuse
Block . . . . . . . . . . . . . . . . . . . . . 10-25
Instrument Panel Fuse
Block . . . . . . . . . . . . . . . . . . . . . 10-26 Wheels and Tires Tires . . . . . . . . . . . . . . . . . . . . . . . . 10-26
All-Season Tires . . . . . . . . . . . . 10-27
Winter Tires . . . . . . . . . . . . . . . . 10-27
Summer Tires . . . . . . . . . . . . . . 10-28
All-Terrain Tires . . . . . . . . . . . . 10-28
Tire Sidewall Labeling . . . . . . 10-28
Tire Designations . . . . . . . . . . . 10-30
Tire Terminology and
Definitions . . . . . . . . . . . . . . . . 10-32
Tire Pressure . . . . . . . . . . . . . . . 10-35
Tire Pressure Monitor
System . . . . . . . . . . . . . . . . . . . 10-36
Tire Pressure Monitor
Operation . . . . . . . . . . . . . . . . . 10-37
Tire Inspection . . . . . . . . . . . . . . 10-39
Tire Rotation . . . . . . . . . . . . . . . 10-39
When It Is Time for New
Tires . . . . . . . . . . . . . . . . . . . . . . 10-41
Buying New Tires . . . . . . . . . . . 10-41
Different Size Tires and
Wheels . . . . . . . . . . . . . . . . . . . 10-43
Uniform Tire Quality
Grading . . . . . . . . . . . . . . . . . . . 10-44
Wheel Alignment and Tire
Balance . . . . . . . . . . . . . . . . . . . 10-45
Wheel Replacement . . . . . . . . 10-45
Tire Chains . . . . . . . . . . . . . . . . . 10-46
Page 188 of 297
Black plate (5,1)Chevrolet City Express Owner Manual (GMNA-Localizing-U.S./Canada-
7707496) - 2015 - CRC - 11/26/14
Vehicle Care 10-5This vehicle has an airbag system.
Before attempting to do your own
service work, see Servicing the
Airbag-Equipped Vehicle on
page 3-28 .
Keep a record with all parts receipts
and list the mileage and the date of
any service work performed. See
Maintenance Records on
page 11-13 .
{ CautionEven small amounts of
contamination can cause damage
to vehicle systems. Do not allow
contaminants to contact the fluids,
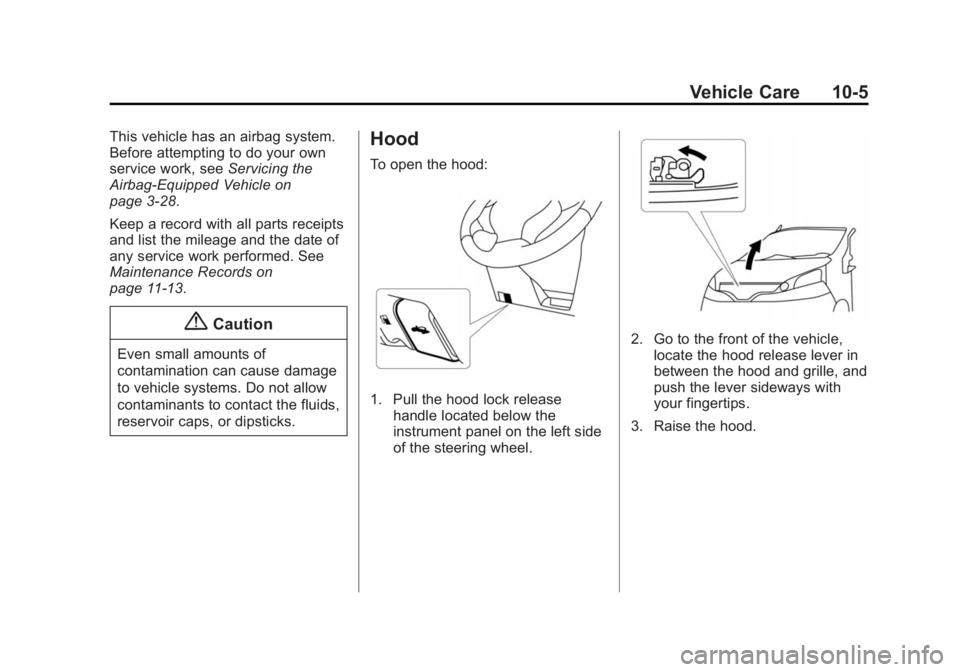
reservoir caps, or dipsticks. Hood To open the hood:
1. Pull the hood lock release
handle located below the
instrument panel on the left side
of the steering wheel. 2. Go to the front of the vehicle,
locate the hood release lever in
between the hood and grille, and
push the lever sideways with
your fingertips.
3. Raise the hood.
Page 209 of 297

Black plate (26,1)Chevrolet City Express Owner Manual (GMNA-Localizing-U.S./Canada-
7707496) - 2015 - CRC - 11/26/14
10-26 Vehicle Care
Instrument Panel Fuse
Block
{ CautionSpilling liquid on any electrical
component on the vehicle may
damage it. Always keep the
covers on any electrical
component.
Pull the fuse box cover to remove.
Push the fuse box cover to install. Wheels and Tires Tires Every new GM vehicle has
high-quality tires made by a
leading tire manufacturer. See
the warranty manual for
information regarding the tire
warranty and where to get
service. For additional
information refer to the tire
manufacturer.
{ Warning .
Poorly maintained and
improperly used tires are
dangerous. .
Overloading the tires can
cause overheating as a
result of too much flexing.
There could be a blowout
(Continued) Warning (Continued)
and a serious crash. See
Vehicle Load Limits on
page 9-9 . .
Underinflated tires pose
the same danger as
overloaded tires. The
resulting crash could
cause serious injury.
Check all tires frequently
to maintain the
recommended pressure.
Tire pressure should be
checked when the tires
are cold. .
Overinflated tires are more
likely to be cut, punctured,
or broken by a sudden
impact — such as when
hitting a pothole. Keep
tires at the recommended
pressure.
(Continued)