lock CHEVROLET COLORADO 2012 1.G Owners Manual
[x] Cancel search | Manufacturer: CHEVROLET, Model Year: 2012, Model line: COLORADO, Model: CHEVROLET COLORADO 2012 1.GPages: 394, PDF Size: 6.38 MB
Page 271 of 394
Black plate (33,1)Chevrolet Colorado Owner Manual - 2012
Vehicle Care 10-33
Park on a fairly steep hill, with the
vehicle facing downhill. Keeping
your foot on the regular brake, set
the parking brake.
.To check the parking brake's
holding ability: With the engine
running and the transmission in
N (Neutral), slowly remove foot
pressure from the regular brake
pedal. Do this until the vehicle is
held by the parking brake only.
.To check the P (Park)
mechanism's holding ability:
With the engine running, shift
to P (Park). Then release the
parking brake followed by the
regular brake.
Contact your dealer if service is
required.
Wiper Blade Replacement
Windshield wiper blades should be
inspected for wear and cracking.
See Maintenance Schedule on
page 11‑3 for more information.
Replacement blades come in
different types and are removed
in different ways. For proper type
and length, see Maintenance
Replacement Parts on page 11‑15.
Allowing the wiper blade arm to
touch the windshield when no wiper
blade is installed could damage the
windshield. Any damage that occurs
would not be covered by the vehicle
warranty. Do not allow the wiper
blade arm to touch the windshield.
1. To remove the old wiper blades, lift the wiper arm until it locks
into a vertical position.
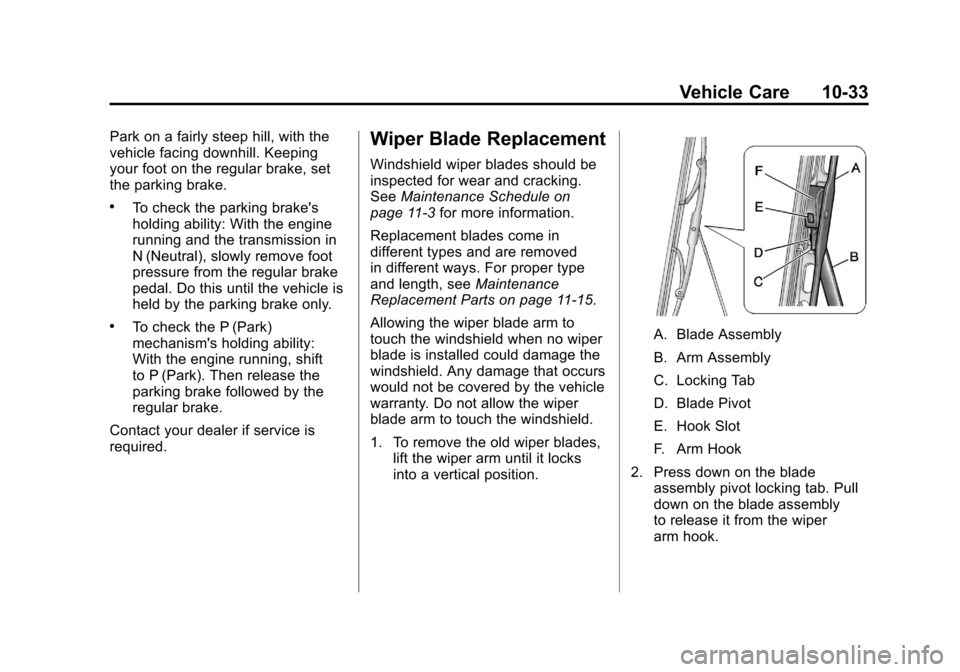
A. Blade Assembly
B. Arm Assembly
C. Locking Tab
D. Blade Pivot
E. Hook Slot
F. Arm Hook
2. Press down on the blade assembly pivot locking tab. Pull
down on the blade assembly
to release it from the wiper
arm hook.
Page 272 of 394
Black plate (34,1)Chevrolet Colorado Owner Manual - 2012
10-34 Vehicle Care
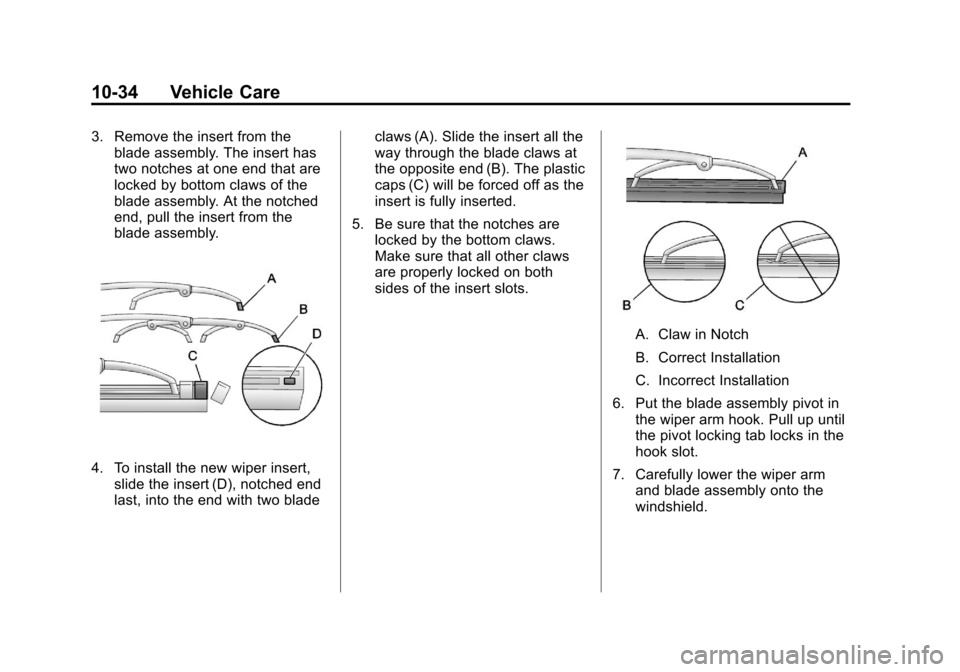
3. Remove the insert from theblade assembly. The insert has
two notches at one end that are
locked by bottom claws of the
blade assembly. At the notched
end, pull the insert from the
blade assembly.
4. To install the new wiper insert,
slide the insert (D), notched end
last, into the end with two blade claws (A). Slide the insert all the
way through the blade claws at
the opposite end (B). The plastic
caps (C) will be forced off as the
insert is fully inserted.
5. Be sure that the notches are locked by the bottom claws.
Make sure that all other claws
are properly locked on both
sides of the insert slots.
A. Claw in Notch
B. Correct Installation
C. Incorrect Installation
6. Put the blade assembly pivot in the wiper arm hook. Pull up until
the pivot locking tab locks in the
hook slot.
7. Carefully lower the wiper arm and blade assembly onto the
windshield.
Page 274 of 394
Black plate (36,1)Chevrolet Colorado Owner Manual - 2012
10-36 Vehicle Care
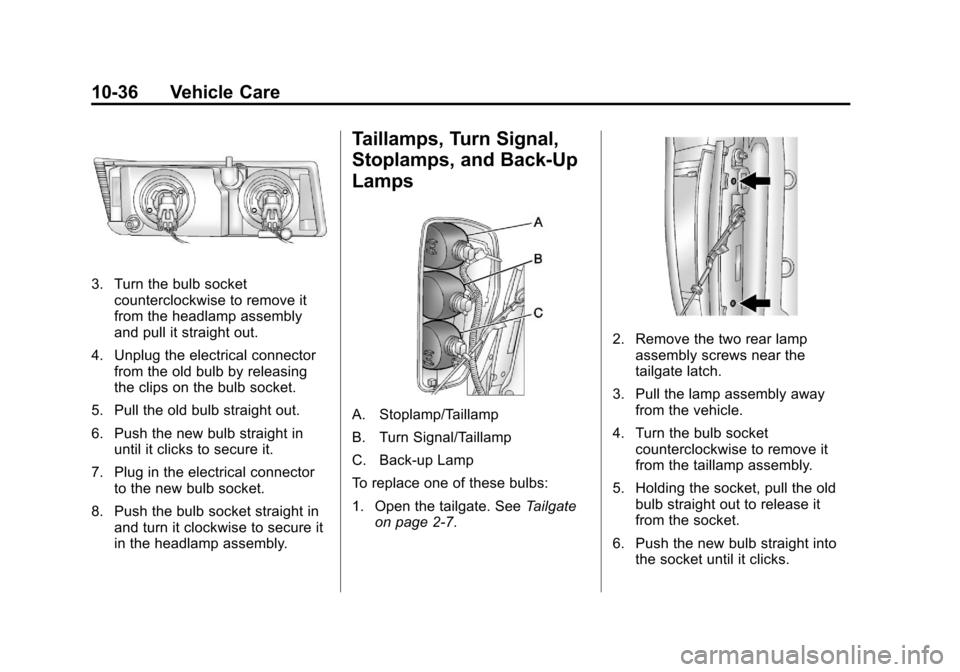
3. Turn the bulb socketcounterclockwise to remove it
from the headlamp assembly
and pull it straight out.
4. Unplug the electrical connector from the old bulb by releasing
the clips on the bulb socket.
5. Pull the old bulb straight out.
6. Push the new bulb straight in until it clicks to secure it.
7. Plug in the electrical connector to the new bulb socket.
8. Push the bulb socket straight in and turn it clockwise to secure it
in the headlamp assembly.
Taillamps, Turn Signal,
Stoplamps, and Back-Up
Lamps
A. Stoplamp/Taillamp
B. Turn Signal/Taillamp
C. Back‐up Lamp
To replace one of these bulbs:
1. Open the tailgate. See Tailgate
on page 2‑7.
2. Remove the two rear lamp assembly screws near the
tailgate latch.
3. Pull the lamp assembly away from the vehicle.
4. Turn the bulb socket counterclockwise to remove it
from the taillamp assembly.
5. Holding the socket, pull the old bulb straight out to release it
from the socket.
6. Push the new bulb straight into the socket until it clicks.
Page 275 of 394
Black plate (37,1)Chevrolet Colorado Owner Manual - 2012
Vehicle Care 10-37
7. Insert the bulb socket into thetaillamp assembly and turn it
clockwise to secure.
8. Reinstall the taillamp assembly and tighten the screws.
Center High-Mounted
Stoplamp (CHMSL)
To replace the CHMSL bulb:
1. Remove the two screws and liftoff the lamp assembly from the
vehicle.
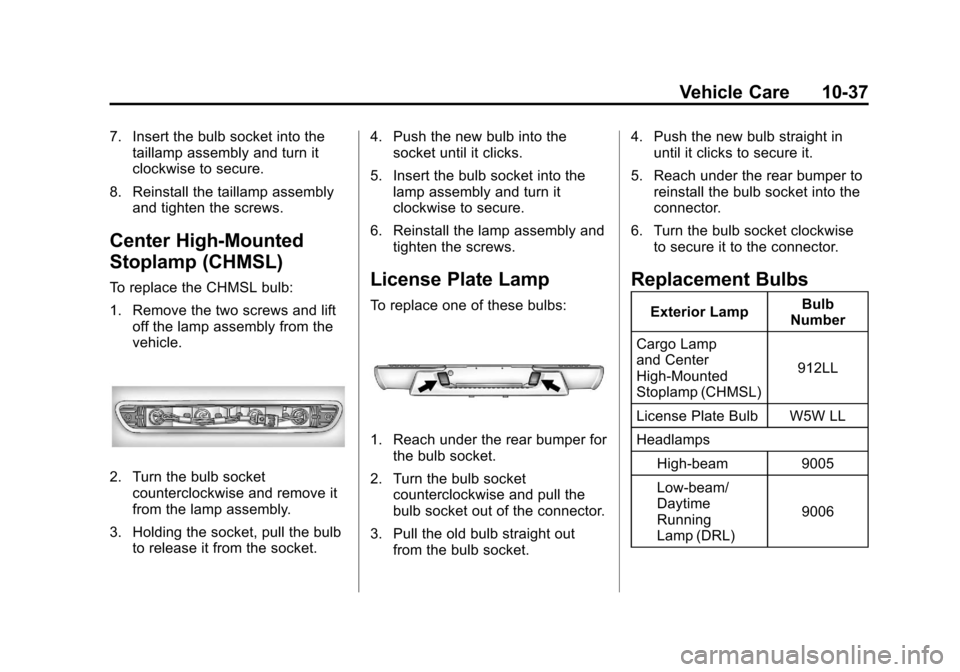
2. Turn the bulb socketcounterclockwise and remove it
from the lamp assembly.
3. Holding the socket, pull the bulb to release it from the socket. 4. Push the new bulb into the
socket until it clicks.
5. Insert the bulb socket into the lamp assembly and turn it
clockwise to secure.
6. Reinstall the lamp assembly and tighten the screws.
License Plate Lamp
To replace one of these bulbs:
1. Reach under the rear bumper forthe bulb socket.
2. Turn the bulb socket counterclockwise and pull the
bulb socket out of the connector.
3. Pull the old bulb straight out from the bulb socket. 4. Push the new bulb straight in
until it clicks to secure it.
5. Reach under the rear bumper to reinstall the bulb socket into the
connector.
6. Turn the bulb socket clockwise to secure it to the connector.
Replacement Bulbs
Exterior Lamp Bulb
Number
Cargo Lamp
and Center
High‐Mounted
Stoplamp (CHMSL) 912LL
License Plate Bulb W5W LL
Headlamps High-beam 9005
Low-beam/
Daytime
Running
Lamp (DRL) 9006
Page 277 of 394
Black plate (39,1)Chevrolet Colorado Owner Manual - 2012
Vehicle Care 10-39
Windshield Wipers
If the wiper motor overheats due to
heavy snow or ice, the windshield
wipers will stop until the motor cools
and will then restart.
Although the circuit is protected
from electrical overload, overload
due to heavy snow or ice may
cause wiper linkage damage.
Always clear ice and heavy snow
from the windshield before using the
windshield wipers.
If the overload is caused by an
electrical problem and not snow or
ice, be sure to get it fixed.
Fuses and Circuit
Breakers
The wiring circuits in the vehicle are
protected from short circuits by a
combination of fuses and circuit
breakers. This greatly reduces the
chance of fires caused by electrical
problems.
Look at the silver-colored band
inside the fuse. If the band is broken
or melted, replace the fuse. Be sure
you replace a bad fuse with a new
one of the identical size and rating.
If you ever have a problem on the
road and do not have a spare fuse,
you can borrow one that has the
same amperage. Just pick some
feature of the vehicle that you can
get along without—like the radio
or cigarette lighter —and use its
fuse, if it is the correct amperage.
Replace it as soon as you can.
Engine Compartment
Fuse Block
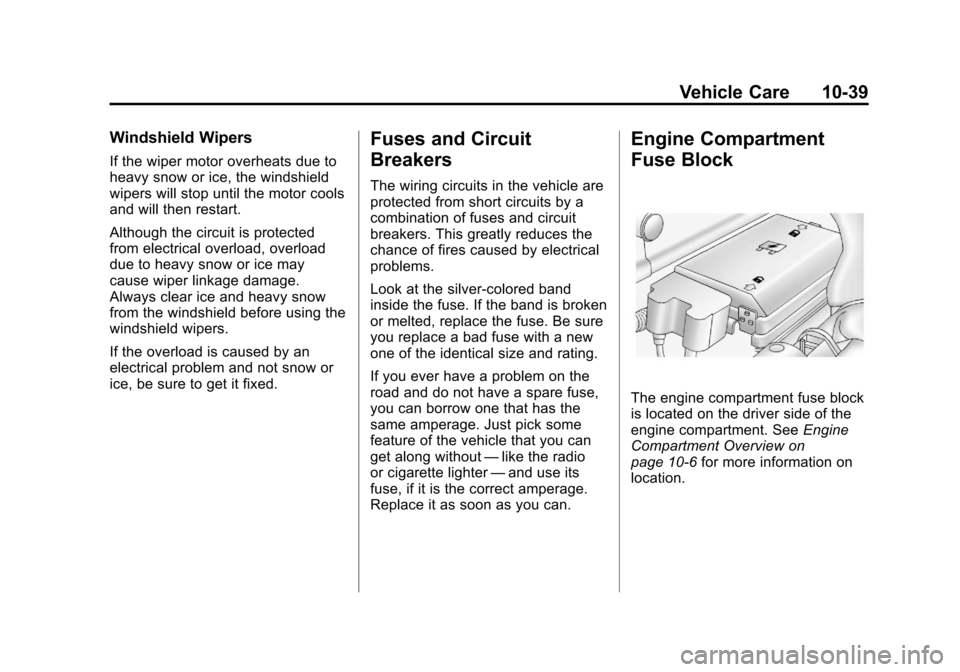
The engine compartment fuse block
is located on the driver side of the
engine compartment. See Engine
Compartment Overview on
page 10‑6 for more information on
location.
Page 279 of 394
Black plate (41,1)Chevrolet Colorado Owner Manual - 2012
Vehicle Care 10-41
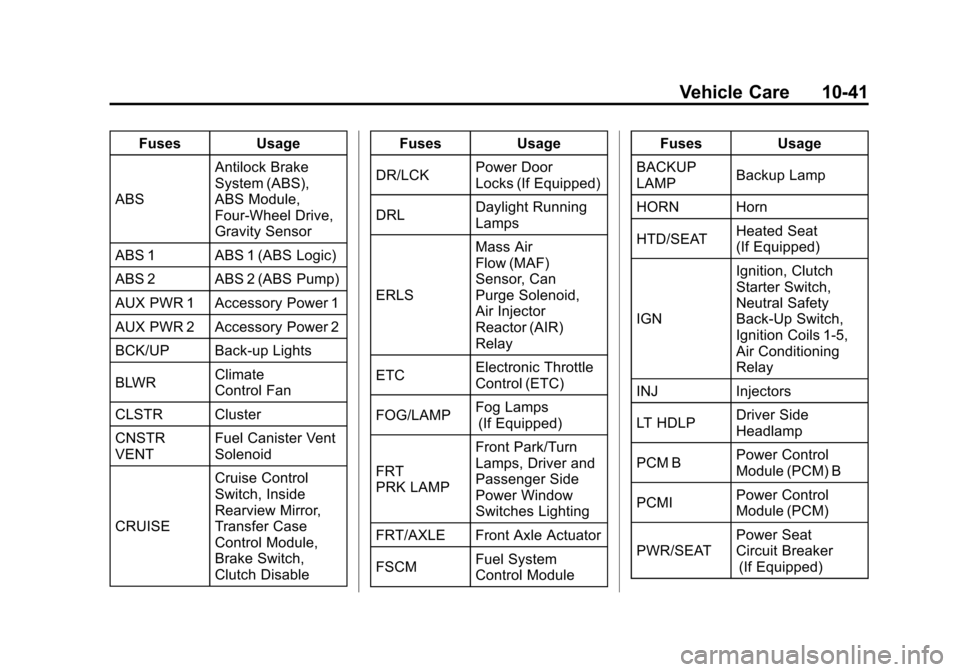
FusesUsage
ABS Antilock Brake
System (ABS),
ABS Module,
Four‐Wheel Drive,
Gravity Sensor
ABS 1 ABS 1 (ABS Logic)
ABS 2 ABS 2 (ABS Pump)
AUX PWR 1 Accessory Power 1
AUX PWR 2 Accessory Power 2
BCK/UP Back-up Lights
BLWR Climate
Control Fan
CLSTR Cluster
CNSTR
VENT Fuel Canister Vent
Solenoid
CRUISE Cruise Control
Switch, Inside
Rearview Mirror,
Transfer Case
Control Module,
Brake Switch,
Clutch Disable Fuses
Usage
DR/LCK Power Door
Locks (If Equipped)
DRL Daylight Running
Lamps
ERLS Mass Air
Flow (MAF)
Sensor, Can
Purge Solenoid,
Air Injector
Reactor (AIR)
Relay
ETC Electronic Throttle
Control (ETC)
FOG/LAMP Fog Lamps
(If Equipped)
FRT
PRK LAMP Front Park/Turn
Lamps, Driver and
Passenger Side
Power Window
Switches Lighting
FRT/AXLE Front Axle Actuator
FSCM Fuel System
Control Module Fuses
Usage
BACKUP
LAMP Backup Lamp
HORN Horn
HTD/SEAT Heated Seat
(If Equipped)
IGN Ignition, Clutch
Starter Switch,
Neutral Safety
Back‐Up Switch,
Ignition Coils 1‐5,
Air Conditioning
Relay
INJ Injectors
LT HDLP Driver Side
Headlamp
PCM B Power Control
Module (PCM) B
PCMI Power Control
Module (PCM)
PWR/SEAT Power Seat
Circuit Breaker
(If Equipped)
Page 296 of 394
Black plate (58,1)Chevrolet Colorado Owner Manual - 2012
10-58 Vehicle Care
The malfunction light and the DIC
message should go off at the next
ignition cycle. The sensors are
matched to the tire/wheel positions,
using a TPMS relearn tool, in the
following order: driver side front tire,
passenger side front tire, passenger
side rear tire, and driver side rear.
See your dealer for service or to
purchase a relearn tool.
There is one minute to match
the first tire/wheel position, and
five minutes overall to match all
four tire/wheel positions. If it takes
longer, the matching process stops
and must be restarted.
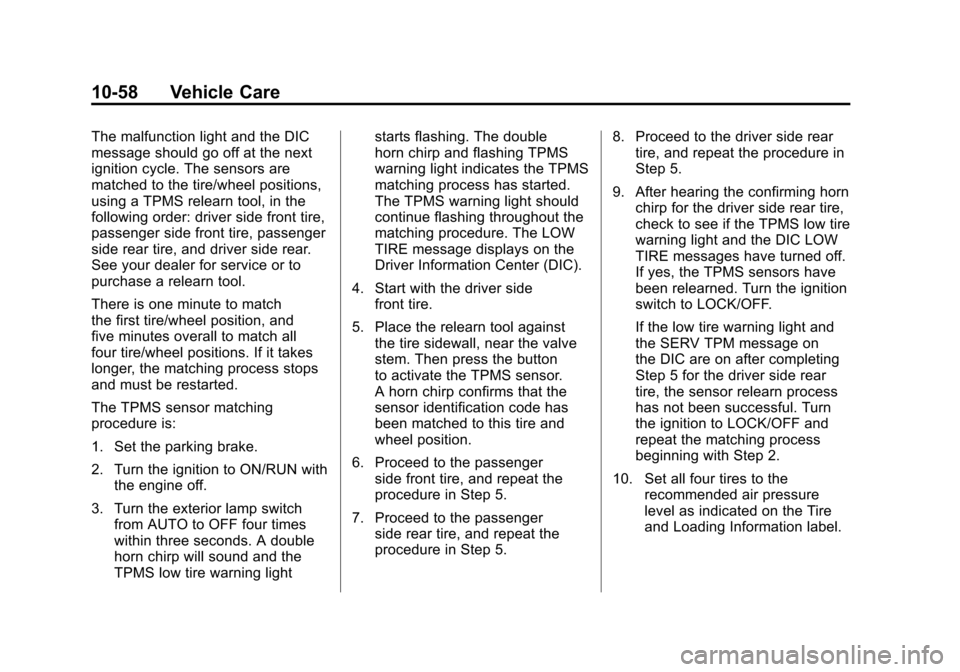
The TPMS sensor matching
procedure is:
1. Set the parking brake.
2. Turn the ignition to ON/RUN withthe engine off.
3. Turn the exterior lamp switch from AUTO to OFF four times
within three seconds. A double
horn chirp will sound and the
TPMS low tire warning light starts flashing. The double
horn chirp and flashing TPMS
warning light indicates the TPMS
matching process has started.
The TPMS warning light should
continue flashing throughout the
matching procedure. The LOW
TIRE message displays on the
Driver Information Center (DIC).
4. Start with the driver side front tire.
5. Place the relearn tool against the tire sidewall, near the valve
stem. Then press the button
to activate the TPMS sensor.
A horn chirp confirms that the
sensor identification code has
been matched to this tire and
wheel position.
6. Proceed to the passenger side front tire, and repeat the
procedure in Step 5.
7. Proceed to the passenger side rear tire, and repeat the
procedure in Step 5. 8. Proceed to the driver side rear
tire, and repeat the procedure in
Step 5.
9. After hearing the confirming horn chirp for the driver side rear tire,
check to see if the TPMS low tire
warning light and the DIC LOW
TIRE messages have turned off.
If yes, the TPMS sensors have
been relearned. Turn the ignition
switch to LOCK/OFF.
If the low tire warning light and
the SERV TPM message on
the DIC are on after completing
Step 5 for the driver side rear
tire, the sensor relearn process
has not been successful. Turn
the ignition to LOCK/OFF and
repeat the matching process
beginning with Step 2.
10. Set all four tires to the recommended air pressure
level as indicated on the Tire
and Loading Information label.
Page 300 of 394
Black plate (62,1)Chevrolet Colorado Owner Manual - 2012
10-62 Vehicle Care
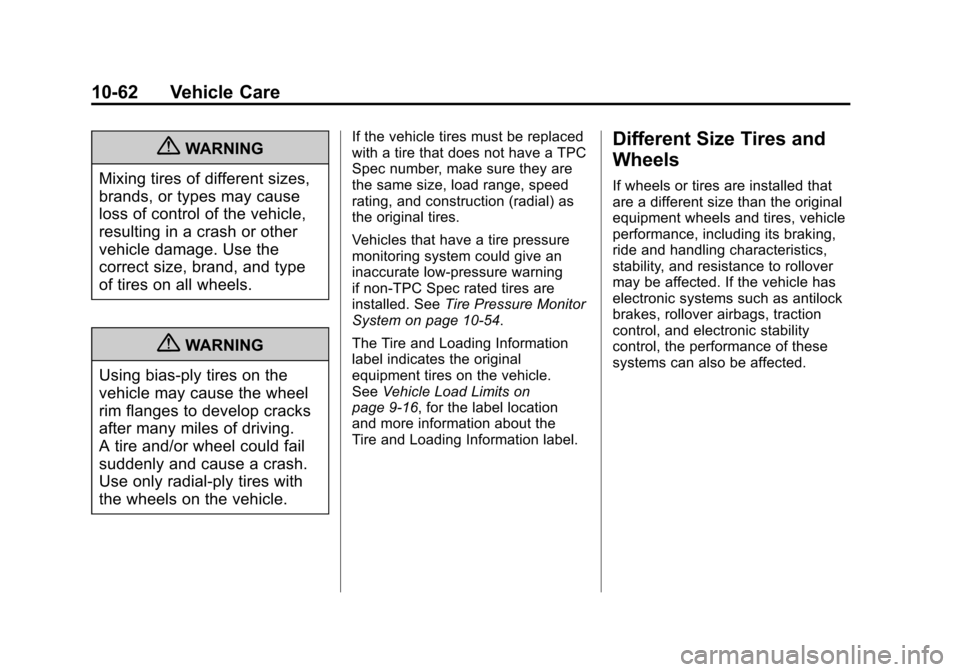
{WARNING
Mixing tires of different sizes,
brands, or types may cause
loss of control of the vehicle,
resulting in a crash or other
vehicle damage. Use the
correct size, brand, and type
of tires on all wheels.
{WARNING
Using bias-ply tires on the
vehicle may cause the wheel
rim flanges to develop cracks
after many miles of driving.
A tire and/or wheel could fail
suddenly and cause a crash.
Use only radial-ply tires with
the wheels on the vehicle.
If the vehicle tires must be replaced
with a tire that does not have a TPC
Spec number, make sure they are
the same size, load range, speed
rating, and construction (radial) as
the original tires.
Vehicles that have a tire pressure
monitoring system could give an
inaccurate low‐pressure warning
if non‐TPC Spec rated tires are
installed. See Tire Pressure Monitor
System on page 10‑54.
The Tire and Loading Information
label indicates the original
equipment tires on the vehicle.
See Vehicle Load Limits on
page 9‑16, for the label location
and more information about the
Tire and Loading Information label.Different Size Tires and
Wheels
If wheels or tires are installed that
are a different size than the original
equipment wheels and tires, vehicle
performance, including its braking,
ride and handling characteristics,
stability, and resistance to rollover
may be affected. If the vehicle has
electronic systems such as antilock
brakes, rollover airbags, traction
control, and electronic stability
control, the performance of these
systems can also be affected.
Page 306 of 394
Black plate (68,1)Chevrolet Colorado Owner Manual - 2012
10-68 Vehicle Care
{WARNING
Lifting a vehicle and getting
under it to do maintenance or
repairs is dangerous without the
appropriate safety equipment and
training. If a jack is provided with
the vehicle, it is designed only for
changing a flat tire. If it is used for
anything else, you or others could
be badly injured or killed if the
vehicle slips off the jack. If a jack
is provided with the vehicle, only
use it for changing a flat tire.
If a tire goes flat, avoid further tire
and wheel damage by driving slowly
to a level place, well off the road,
if possible. Turn on the hazard
warning flashers. See Hazard
Warning Flashers on page 6‑4.
{WARNING
Changing a tire can be
dangerous. The vehicle can slip
off the jack and roll over or fall
causing injury or death. Find a
level place to change the tire. To
help prevent the vehicle from
moving:
1. Set the parking brake firmly.
2. Put an automatic transmission in P (Park)
or a manual transmission
in 1 (First) or R (Reverse).
3. For four-wheel-drive vehicles, be sure the
transfer case is in a drive
gear –not in N (Neutral).
4. Turn off the engine and do not restart while the vehicle
is raised.
5. Do not allow passengers to remain in the vehicle.
(Continued)
WARNING (Continued)
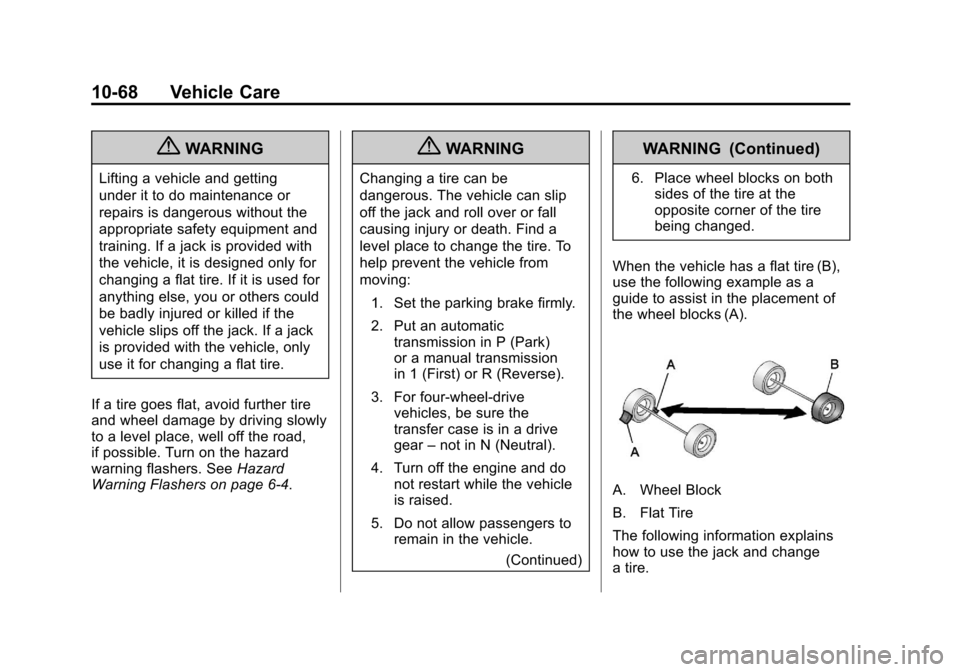
6. Place wheel blocks on bothsides of the tire at the
opposite corner of the tire
being changed.
When the vehicle has a flat tire (B),
use the following example as a
guide to assist in the placement of
the wheel blocks (A).
A. Wheel Block
B. Flat Tire
The following information explains
how to use the jack and change
a tire.
Page 307 of 394

Black plate (69,1)Chevrolet Colorado Owner Manual - 2012
Vehicle Care 10-69
Tire Changing
Removing the Spare Tire and
Tools
A. Wing Nut
B. Storage Bag and Tools
The tools are located under the right
front passenger seat.
1. Move the seat all the wayforward to locate the tool bag.
2. Turn the wing nut (A) counterclockwise to release the
tool bag (B). Put the tools to the side while you
access the jack and wheel blocks.
Regular/Extended Cab
For regular and extended cab
vehicles, the jack and wheel blocks
are located under the cover at the
center of the vehicle behind the
front seats.
1. Turn the wing nut on the cover
counterclockwise to remove it.
A. Jack
B. Wheel Blocks
C. Wing Nut
D. Jack Knob
2. Lower the jack (A) by turning the jack knob (D) counterclockwise
to release the jack (A) from the
bracket.
3. Turn the wing nut (C) counterclockwise to release
the wheel blocks (B).