lock CHEVROLET COLORADO 2012 1.G Manual Online
[x] Cancel search | Manufacturer: CHEVROLET, Model Year: 2012, Model line: COLORADO, Model: CHEVROLET COLORADO 2012 1.GPages: 394, PDF Size: 6.38 MB
Page 226 of 394
Black plate (52,1)Chevrolet Colorado Owner Manual - 2012
9-52 Driving and Operating
When replacing the fuel cap, turn
it clockwise until it clicks. Make
sure the cap is fully installed. The
diagnostic system can determine
if the fuel cap has been left off or
improperly installed. This would
allow fuel to evaporate into the
atmosphere. If the fuel cap is not
properly installed, the FUEL CAP
message appears on the Driver
Information Center (DIC) and the
check engine light will be lit on the
instrument panel cluster. SeeFuel
System Messages on page 5‑24
and Malfunction Indicator Lamp on
page 5‑13 for more information.
{WARNING
If a fire starts while you are
refueling, do not remove the
nozzle. Shut off the flow of fuel
by shutting off the pump or by
notifying the station attendant.
Leave the area immediately. Notice:
If a new fuel cap is
needed, be sure to get the right
type of cap from your dealer. The
wrong type of fuel cap might not
fit properly, might cause the
malfunction indicator lamp to
light, and could damage the fuel
tank and emissions system. See
Malfunction Indicator Lamp on
page 5‑13.
Filling a Portable Fuel
Container
{WARNING
Never fill a portable fuel container
while it is in the vehicle. Static
electricity discharge from the
container can ignite the fuel
vapor. You can be badly burned
(Continued)
WARNING (Continued)
and the vehicle damaged if this
occurs. To help avoid injury to you
and others:
.Dispense fuel only into
approved containers.
.Do not fill a container while
it is inside a vehicle, in a
vehicle's trunk, pickup bed,
or on any surface other than
the ground.
.Bring the fill nozzle in
contact with the inside of the
fill opening before operating
the nozzle. Contact should be
maintained until the filling is
complete.
.Do not smoke while
pumping fuel.
.Do not use a cellular phone
while pumping fuel.
Page 239 of 394
Black plate (1,1)Chevrolet Colorado Owner Manual - 2012
Vehicle Care 10-1
Vehicle Care
General Information
General Information . . . . . . . . . . 10-2
California Proposition 65Warning . . . . . . . . . . . . . . . . . . . . 10-3
California Perchlorate Materials Requirements . . . . 10-3
Accessories and Modifications . . . . . . . . . . . . . . . 10-3
Vehicle Checks
Doing Your OwnService Work . . . . . . . . . . . . . . . 10-4
Hood . . . . . . . . . . . . . . . . . . . . . . . . 10-5
Engine Compartment Overview . . . . . . . . . . . . . . . . . . . 10-6
Engine Oil . . . . . . . . . . . . . . . . . . . 10-9
Engine Oil Life System . . . . . 10-12
Automatic Transmission Fluid . . . . . . . . . . . . . . . . . . . . . . 10-13
Manual Transmission Fluid . . . . . . . . . . . . . . . . . . . . . . 10-15 Hydraulic Clutch . . . . . . . . . . . . 10-16
Engine Air Cleaner/Filter . . . . 10-17
Cooling System . . . . . . . . . . . . 10-18
Engine Coolant . . . . . . . . . . . . . 10-19
Engine Overheating . . . . . . . . 10-22
Engine Fan . . . . . . . . . . . . . . . . . 10-24
Power Steering Fluid . . . . . . . 10-24
Washer Fluid . . . . . . . . . . . . . . . 10-25
Brakes . . . . . . . . . . . . . . . . . . . . . 10-26
Brake Fluid . . . . . . . . . . . . . . . . . 10-27
Battery . . . . . . . . . . . . . . . . . . . . . 10-29
Four-Wheel Drive . . . . . . . . . . . 10-29
Front Axle . . . . . . . . . . . . . . . . . . 10-30
Rear Axle . . . . . . . . . . . . . . . . . . 10-30
Starter Switch Check . . . . . . . 10-31
Automatic Transmission Shift
Lock Control Function
Check . . . . . . . . . . . . . . . . . . . . . 10-32
Ignition Transmission Lock Check . . . . . . . . . . . . . . . . . . . . . 10-32
Park Brake and P (Park) Mechanism Check . . . . . . . . 10-32
Wiper Blade Replacement . . . . . . . . . . . . . . 10-33
Headlamp Aiming
Headlamp Aiming . . . . . . . . . . 10-35
Bulb Replacement
Bulb Replacement . . . . . . . . . . 10-35
Halogen Bulbs . . . . . . . . . . . . . . 10-35
Headlamps . . . . . . . . . . . . . . . . . 10-35
Taillamps, Turn Signal,Stoplamps, and Back-Up
Lamps . . . . . . . . . . . . . . . . . . . . 10-36
Center High-Mounted Stoplamp (CHMSL) . . . . . . . 10-37
License Plate Lamp . . . . . . . . 10-37
Replacement Bulbs . . . . . . . . . 10-37
Electrical System
Electrical System Overload . . . . . . . . . . . . . . . . . . 10-38
Fuses and Circuit Breakers . . . . . . . . . . . . . . . . . . 10-39
Engine Compartment Fuse Block . . . . . . . . . . . . . . . . . . . . . 10-39
Page 241 of 394
Black plate (3,1)Chevrolet Colorado Owner Manual - 2012
Vehicle Care 10-3
California Proposition 65
Warning
Most motor vehicles, including this
one, contain and/or emit chemicals
known to the State of California to
cause cancer and birth defects or
other reproductive harm. Engine
exhaust, many parts and systems,
many fluids, and some component
wear by-products contain and/or
emit these chemicals.
California Perchlorate
Materials Requirements
Certain types of automotive
applications, such as airbag
initiators, seat belt pretensioners,
and lithium batteries contained in
Remote Keyless Entry transmitters,
may contain perchlorate materials.
Special handling may be necessary.
For additional information, see
www.dtsc.ca.gov/hazardouswaste/
perchlorate.
Accessories and
Modifications
Adding non‐dealer accessories or
making modifications to the vehicle
can affect vehicle performance and
safety, including such things as
airbags, braking, stability, ride and
handling, emissions systems,
aerodynamics, durability, and
electronic systems like antilock
brakes, traction control, and stability
control. These accessories or
modifications could even cause
malfunction or damage not covered
by the vehicle warranty.
Page 245 of 394

Black plate (7,1)Chevrolet Colorado Owner Manual - 2012
Vehicle Care 10-7
A. Windshield Washer Fluid. See“Adding Washer Fluid” under
Washer Fluid on page 10‑25.
B. Engine Coolant Recovery Tank. See Engine Coolant on
page 10‑19.
C. Engine Air Cleaner/Filter on
page 10‑17.
D. Power Steering Fluid Reservoir (low in engine compartment).
See Power Steering Fluid on
page 10‑24. E. Automatic Transmission Fluid
Dipstick (If Equipped). See
“Checking the Fluid Level”
under Automatic Transmission
Fluid on page 10‑13.
F. Engine Oil Fill Cap. See “When
to Add Engine Oil” under
Engine Oil on page 10‑9.
G. Radiator Pressure Cap. See Cooling System on page 10‑18.
H. Remote Negative (−) Terminal (GND). See Jump Starting on
page 10‑84. I. Engine Oil Dipstick. See
“Checking Engine Oil” under
Engine Oil on page 10‑9.
J. Remote Positive (+) Terminal. See Jump Starting on
page 10‑84.
K. Brake Fluid Reservoir. See Brake Fluid on page 10‑27.
L. Engine Compartment Fuse
Block on page 10‑39.
M. Battery on page 10‑29.
N. Hydraulic Clutch Fluid Reservoir (If Equipped). See Hydraulic
Clutch on page 10‑16.
Page 247 of 394
Black plate (9,1)Chevrolet Colorado Owner Manual - 2012
Vehicle Care 10-9
A.Engine Air Cleaner/Filter on
page 10‑17.
B. Air Filter Restriction Indicator (If Equipped). See Engine Air
Cleaner/Filter on page 10‑17.
C. Windshield Washer Fluid Reservoir. See “Adding Washer
Fluid” under Washer Fluid on
page 10‑25.
D. Engine Coolant Recovery Tank. See Engine Coolant on
page 10‑19.
E. Automatic Transmission Fluid Dipstick (If Equipped). See
“Checking the Fluid Level”
under Automatic Transmission
Fluid on page 10‑13. F. Engine Oil Dipstick. See
“Checking Engine Oil” under
Engine Oil on page 10‑9.
G. Engine Oil Fill Cap. See “When
to Add Engine Oil” under
Engine Oil on page 10‑9.
H. Brake Fluid Reservoir. See Brake Fluid on page 10‑27.
I. Battery on page 10‑29.
J. Power Steering Fluid Reservoir. See Power Steering Fluid on
page 10‑24.
K. Engine Compartment Fuse
Block on page 10‑39.
L. Radiator Pressure Cap. See Cooling System on page 10‑18.Engine Oil
To ensure proper engine
performance and long life,
careful attention must be paid
to engine oil. Following these
simple, but important steps will
help protect your investment:
.Always use engine oil approved
to the proper specification and of
the proper viscosity grade. See
“Selecting the Right Engine Oil”
in this section.
.Check the engine oil level
regularly and maintain the
proper oil level. See “Checking
Engine Oil” and“When to Add
Engine Oil” in this section.
.Change the engine oil at the
appropriate time. See Engine Oil
Life System on page 10‑12.
.Always dispose of engine oil
properly. See “What to Do with
Used Oil” in this section.
Page 250 of 394
Black plate (12,1)Chevrolet Colorado Owner Manual - 2012
10-12 Vehicle Care
Used oil can be a threat to the
environment. If you change your
own oil, be sure to drain all the oil
from the filter before disposal. Never
dispose of oil by putting it in the
trash or pouring it on the ground,
into sewers, or into streams or
bodies of water. Recycle it by taking
it to a place that collects used oil.
Engine Oil Life System
When to Change Engine Oil
This vehicle has a computer system
that indicates when to change the
engine oil and filter. This is based
on a combination of factors which
include engine revolutions, engine
temperature, and miles driven.
Based on driving conditions, the
mileage at which an oil change is
indicated can vary considerably. For
the oil life system to work properly,
the system must be reset every time
the oil is changed.When the system has calculated
that oil life has been diminished,
it indicates that an oil change
is necessary. A CHANGE OIL
message comes on. See
Engine Oil
Messages on page 5‑24. Change
the oil as soon as possible within
the next 1 000 km (600 mi). It is
possible that, if driving under the
best conditions, the oil life system
might indicate that an oil change
is not necessary for up to a year.
The engine oil and filter must be
changed at least once a year and,
at this time, the system must be
reset. Your dealer has trained
people who will perform this work
and reset the system. It is also
important to check the oil regularly
over the course of an oil drain
interval and keep it at the proper
level.
If the system is ever reset
accidentally, the oil must be
changed at 5 000 km (3,000 mi)
since the last oil change.
Remember to reset the oil life
system whenever the oil is changed.
How to Reset the Engine Oil
Life System
Reset the system whenever the
engine oil is changed so that the
system can calculate the next
engine oil change. To reset the
system:
1. Turn the ignition to ON/RUN,
with the engine off .
2. Press and release the stem in the lower center of the
instrument cluster until the OIL
LIFE message is displayed.
3. Once the alternating OIL LIFE and RESET messages appear,
press and hold the stem until
several beeps sound. This
confirms that the oil life system
has been reset.
4. Turn the key to LOCK/OFF.
If the CHANGE OIL message
comes back on when the vehicle is
started, the engine oil life system
has not been reset. Repeat the
procedure.
Page 252 of 394
Black plate (14,1)Chevrolet Colorado Owner Manual - 2012
10-14 Vehicle Care
Checking the Fluid Level
To prepare the vehicle:
1. Park the vehicle on a levelplace. Keep the engine running.
2. With the parking brake applied, place the shift lever in P (Park).
3. With foot on the brake pedal, move the shift lever through
each gear range, pausing for
about three seconds in each
range. Then, position the shift
lever in P (Park).
4. Let the engine run at idle for three minutes or more.
Then, without shutting off the
engine:
1. Flip the handle up and then pull out the dipstick and wipe it with
a clean rag or paper towel.
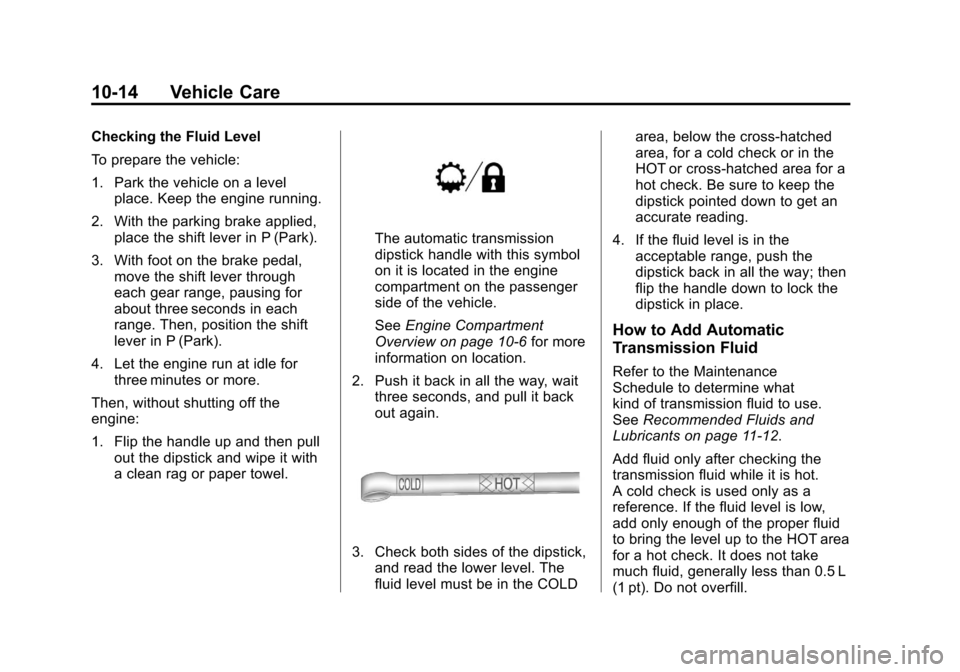
The automatic transmission
dipstick handle with this symbol
on it is located in the engine
compartment on the passenger
side of the vehicle.
See Engine Compartment
Overview on page 10‑6 for more
information on location.
2. Push it back in all the way, wait three seconds, and pull it back
out again.
3. Check both sides of the dipstick,
and read the lower level. The
fluid level must be in the COLD area, below the cross-hatched
area, for a cold check or in the
HOT or cross-hatched area for a
hot check. Be sure to keep the
dipstick pointed down to get an
accurate reading.
4. If the fluid level is in the acceptable range, push the
dipstick back in all the way; then
flip the handle down to lock the
dipstick in place.
How to Add Automatic
Transmission Fluid
Refer to the Maintenance
Schedule to determine what
kind of transmission fluid to use.
See Recommended Fluids and
Lubricants on page 11‑12.
Add fluid only after checking the
transmission fluid while it is hot.
A cold check is used only as a
reference. If the fluid level is low,
add only enough of the proper fluid
to bring the level up to the HOT area
for a hot check. It does not take
much fluid, generally less than 0.5 L
(1 pt). Do not overfill.
Page 253 of 394
Black plate (15,1)Chevrolet Colorado Owner Manual - 2012
Vehicle Care 10-15
Notice:Use of the incorrect
automatic transmission fluid
may damage the vehicle, and the
damages may not be covered by
the vehicle warranty. Always use
the automatic transmission fluid
listed in Recommended Fluids
and Lubricants on page 11‑12.
.After adding fluid, recheck the
fluid level as described under
“How to Check Automatic
Transmission Fluid,” earlier in
this section.
.When the correct fluid level is
obtained, push the dipstick back
in all the way; then flip the
handle down to lock the dipstick
in place.
Manual Transmission
Fluid
When to Check
A good time to check the manual
transmission fluid is when the
engine oil is changed. However, the
fluid in the manual transmission
does not require changing.
How to Check
Because this operation can be a
little difficult, it may be decided to
have this done at the dealer service
department.
If not taken to the dealer, be sure to
follow all the instructions here, or a
false reading on the dipstick could
result.
Notice: Too much or too
little fluid can damage the
transmission. Too little fluid
could cause the transmission
to overheat. Be sure to get an
accurate reading if checking the
transmission fluid. Check the fluid level only when
the engine is off, the vehicle is
parked on a level place and the
transmission is cool enough to
touch the transmission case.
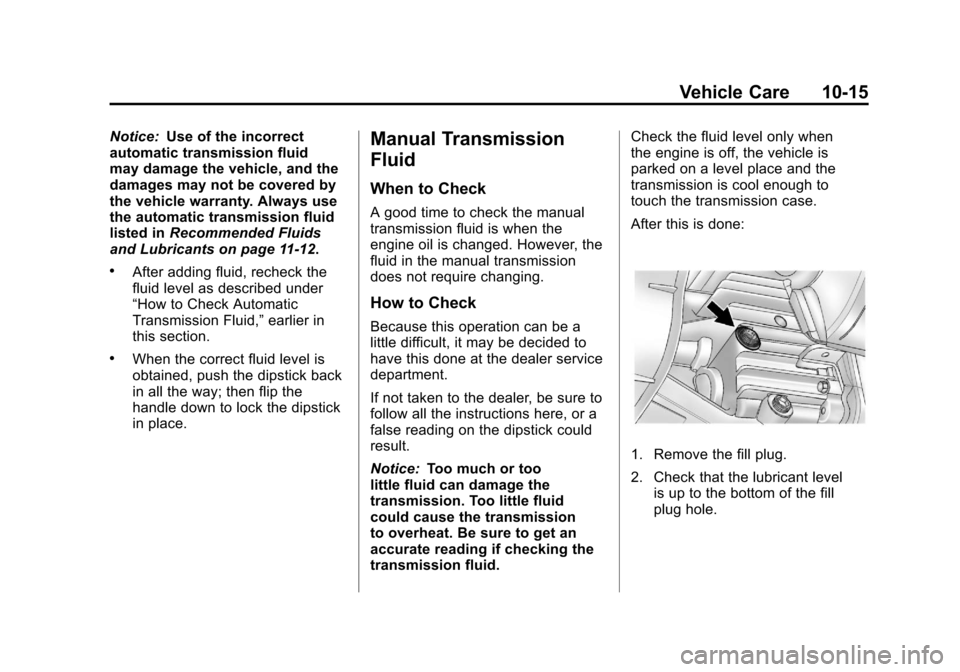
After this is done:
1. Remove the fill plug.
2. Check that the lubricant level
is up to the bottom of the fill
plug hole.
Page 259 of 394
Black plate (21,1)Chevrolet Colorado Owner Manual - 2012
Vehicle Care 10-21
How to Add Coolant to the
Radiator
{WARNING
An electric engine cooling fan
under the hood can start up even
when the engine is not running
and can cause injury. Keep
hands, clothing, and tools away
from any underhood electric fan.
{WARNING
Steam and scalding liquids from
a hot cooling system can blow
out and burn you badly. They
are under pressure, and if you
turn the surge tank pressure
cap—even a little —they can
come out at high speed. Never
turn the cap when the cooling
system, including the surge tank
pressure cap, is hot. Wait for the
(Continued)
WARNING (Continued)
cooling system and surge tank
pressure cap to cool if you ever
have to turn the pressure cap.
If coolant is needed, add the proper
mixture directly to the radiator, but
be sure the cooling system is cool
before this is done.
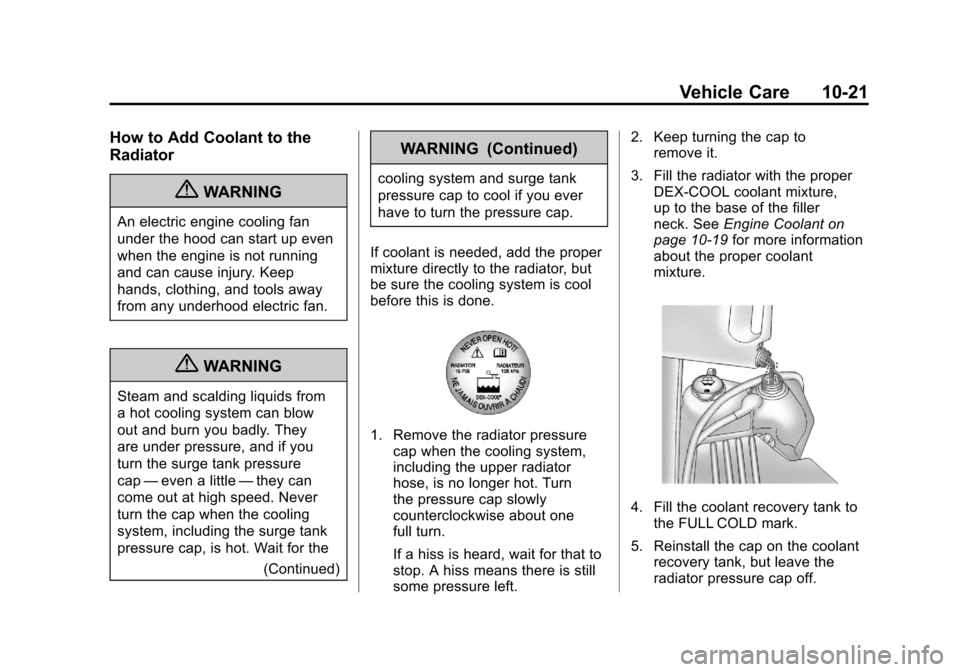
1. Remove the radiator pressure cap when the cooling system,
including the upper radiator
hose, is no longer hot. Turn
the pressure cap slowly
counterclockwise about one
full turn.
If a hiss is heard, wait for that to
stop. A hiss means there is still
some pressure left. 2. Keep turning the cap to
remove it.
3. Fill the radiator with the proper DEX‐COOL coolant mixture,
up to the base of the filler
neck. See Engine Coolant on
page 10‑19 for more information
about the proper coolant
mixture.
4. Fill the coolant recovery tank to the FULL COLD mark.
5. Reinstall the cap on the coolant recovery tank, but leave the
radiator pressure cap off.
Page 270 of 394
Black plate (32,1)Chevrolet Colorado Owner Manual - 2012
10-32 Vehicle Care
Automatic Transmission
Shift Lock Control
Function Check
{WARNING
When you are doing this
inspection, the vehicle could
move suddenly. If the vehicle
moves, you or others could be
injured.
1. Before starting this check, be sure there is enough room
around the vehicle. It should be
parked on a level surface.
2. Firmly apply the parking brake. See Parking Brake on
page 9‑41.
Be ready to apply the regular
brake immediately if the vehicle
begins to move. 3. With the engine off, turn the
ignition on, but do not start the
engine. Without applying the
regular brake, try to move the
shift lever out of P (Park) with
normal effort. If the shift lever
moves out of P (Park), contact
your dealer for service.
Ignition Transmission
Lock Check
While parked, and with the parking
brake set, try to turn the ignition
to LOCK/OFF in each shift lever
position.
.For automatic transmission
vehicles, the ignition should turn
to LOCK/OFF only when the
shift lever is in P (Park).
.For manual transmission
vehicles, the ignition should turn
to LOCK/OFF only when you
press the key release button. On all vehicles, the ignition key
should come out only in LOCK/OFF.
Contact your dealer if service is
required.
Park Brake and P (Park)
Mechanism Check
{WARNING
When you are doing this check,
the vehicle could begin to move.
You or others could be injured
and property could be damaged.
Make sure there is room in front
of the vehicle in case it begins to
roll. Be ready to apply the regular
brake at once should the vehicle
begin to move.