steering CHEVROLET COLORADO 2019 Workshop Manual
[x] Cancel search | Manufacturer: CHEVROLET, Model Year: 2019, Model line: COLORADO, Model: CHEVROLET COLORADO 2019Pages: 387, PDF Size: 5.69 MB
Page 233 of 387
Chevrolet Colorado Owner Manual (GMNA-Localizing-U.S./Canada/Mexico-
12460274) - 2019 - CRC - 10/1/18
232 Driving and Operating
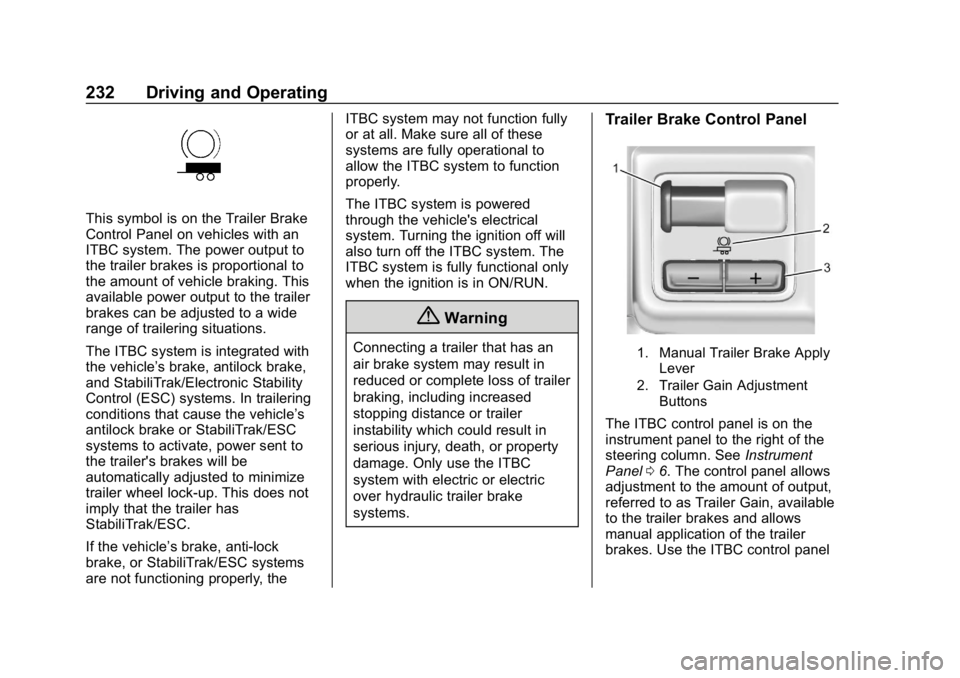
This symbol is on the Trailer Brake
Control Panel on vehicles with an
ITBC system. The power output to
the trailer brakes is proportional to
the amount of vehicle braking. This
available power output to the trailer
brakes can be adjusted to a wide
range of trailering situations.
The ITBC system is integrated with
the vehicle’s brake, antilock brake,
and StabiliTrak/Electronic Stability
Control (ESC) systems. In trailering
conditions that cause the vehicle’s
antilock brake or StabiliTrak/ESC
systems to activate, power sent to
the trailer's brakes will be
automatically adjusted to minimize
trailer wheel lock-up. This does not
imply that the trailer has
StabiliTrak/ESC.
If the vehicle’s brake, anti-lock
brake, or StabiliTrak/ESC systems
are not functioning properly, the ITBC system may not function fully
or at all. Make sure all of these
systems are fully operational to
allow the ITBC system to function
properly.
The ITBC system is powered
through the vehicle's electrical
system. Turning the ignition off will
also turn off the ITBC system. The
ITBC system is fully functional only
when the ignition is in ON/RUN.
{Warning
Connecting a trailer that has an
air brake system may result in
reduced or complete loss of trailer
braking, including increased
stopping distance or trailer
instability which could result in
serious injury, death, or property
damage. Only use the ITBC
system with electric or electric
over hydraulic trailer brake
systems.
Trailer Brake Control Panel
1. Manual Trailer Brake Apply
Lever
2. Trailer Gain Adjustment Buttons
The ITBC control panel is on the
instrument panel to the right of the
steering column. See Instrument
Panel 06. The control panel allows
adjustment to the amount of output,
referred to as Trailer Gain, available
to the trailer brakes and allows
manual application of the trailer
brakes. Use the ITBC control panel
Page 243 of 387
Chevrolet Colorado Owner Manual (GMNA-Localizing-U.S./Canada/Mexico-
12460274) - 2019 - CRC - 10/1/18
242 Vehicle Care
If equipped with remote vehicle
start, open the hood before
performing any service work to
prevent remote starting the vehicle
accidentally. SeeRemote Vehicle
Start 030.
Keep a record with all parts receipts
and list the mileage and the date of
any service work performed. See
Maintenance Records 0344.
Caution
Even small amounts of
contamination can cause damage
to vehicle systems. Do not allow
contaminants to contact the fluids,
reservoir caps, or dipsticks.
Hood
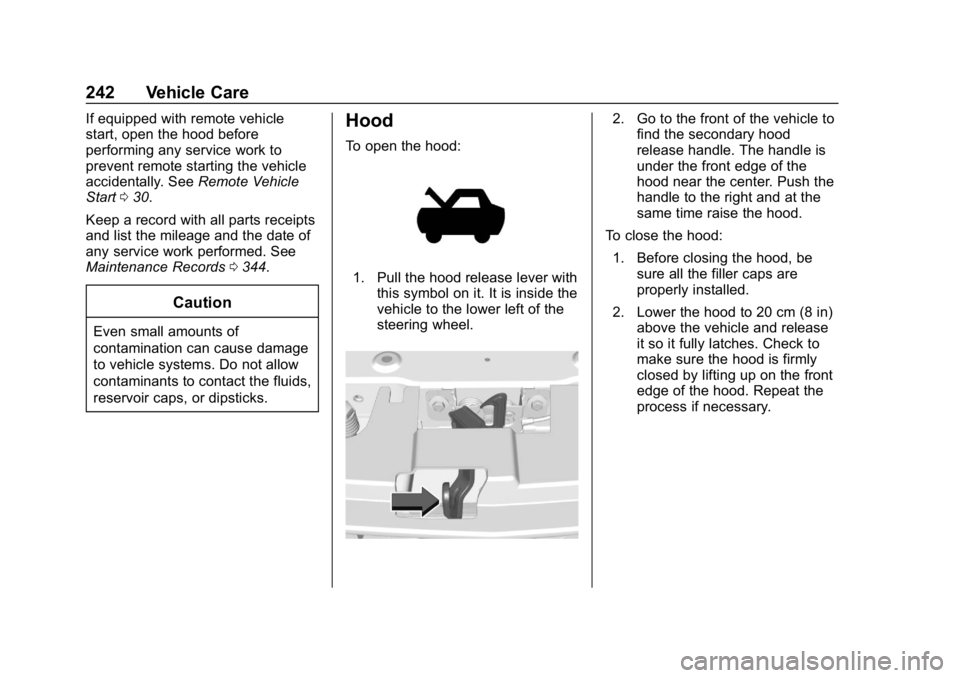
To open the hood:
1. Pull the hood release lever with
this symbol on it. It is inside the
vehicle to the lower left of the
steering wheel.
2. Go to the front of the vehicle tofind the secondary hood
release handle. The handle is
under the front edge of the
hood near the center. Push the
handle to the right and at the
same time raise the hood.
To close the hood: 1. Before closing the hood, be sure all the filler caps are
properly installed.
2. Lower the hood to 20 cm (8 in) above the vehicle and release
it so it fully latches. Check to
make sure the hood is firmly
closed by lifting up on the front
edge of the hood. Repeat the
process if necessary.
Page 276 of 387
Chevrolet Colorado Owner Manual (GMNA-Localizing-U.S./Canada/Mexico-
12460274) - 2019 - CRC - 10/1/18
Vehicle Care 275
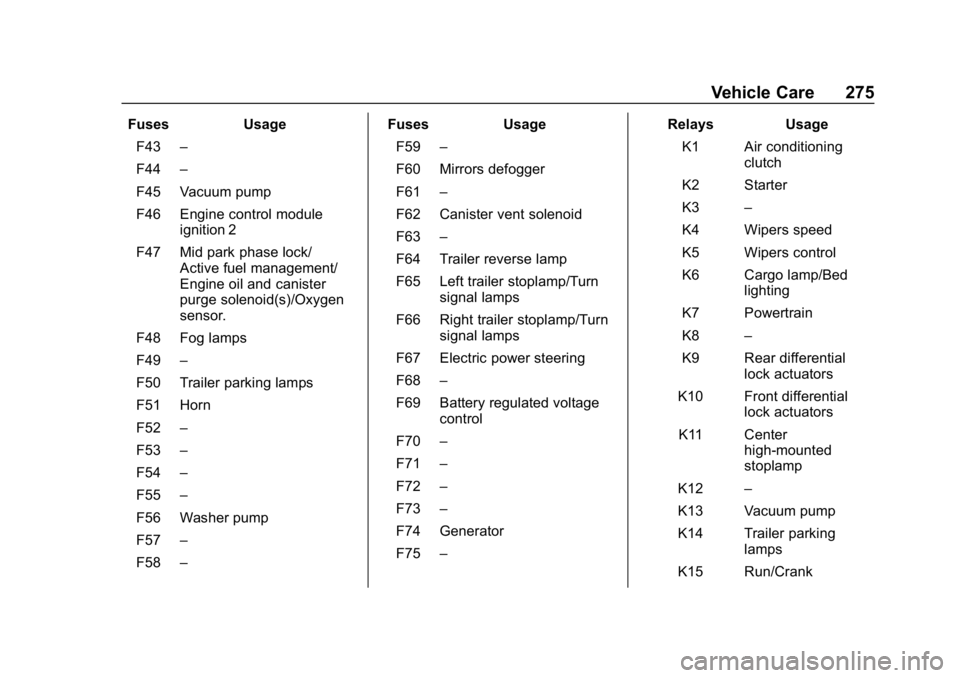
FusesUsage
F43 –
F44 –
F45 Vacuum pump
F46 Engine control module ignition 2
F47 Mid park phase lock/ Active fuel management/
Engine oil and canister
purge solenoid(s)/Oxygen
sensor.
F48 Fog lamps
F49 –
F50 Trailer parking lamps
F51 Horn
F52 –
F53 –
F54 –
F55 –
F56 Washer pump
F57 –
F58 – Fuses
Usage
F59 –
F60 Mirrors defogger
F61 –
F62 Canister vent solenoid
F63 –
F64 Trailer reverse lamp
F65 Left trailer stoplamp/Turn signal lamps
F66 Right trailer stoplamp/Turn signal lamps
F67 Electric power steering
F68 –
F69 Battery regulated voltage control
F70 –
F71 –
F72 –
F73 –
F74 Generator
F75 – Relays
Usage
K1 Air conditioning clutch
K2 Starter
K3 –
K4 Wipers speed
K5 Wipers control
K6 Cargo lamp/Bed lighting
K7 Powertrain
K8 –
K9 Rear differential lock actuators
K10 Front differential lock actuators
K11 Center high-mounted
stoplamp
K12 –
K13 Vacuum pump
K14 Trailer parking lamps
K15 Run/Crank
Page 278 of 387
Chevrolet Colorado Owner Manual (GMNA-Localizing-U.S./Canada/Mexico-
12460274) - 2019 - CRC - 10/1/18
Vehicle Care 277
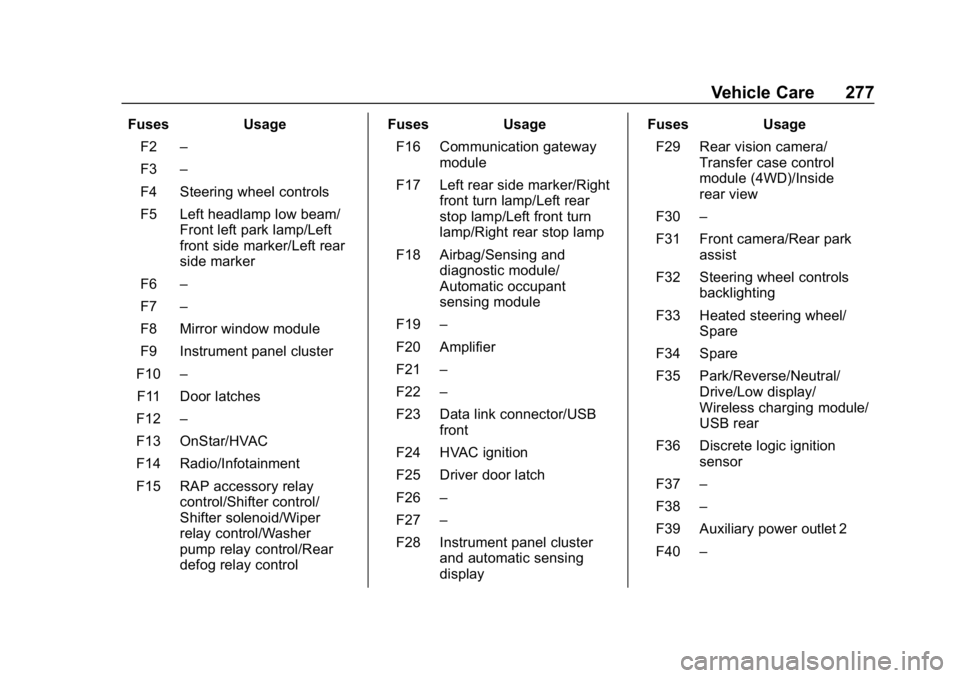
FusesUsage
F2 –
F3 –
F4 Steering wheel controls
F5 Left headlamp low beam/ Front left park lamp/Left
front side marker/Left rear
side marker
F6 –
F7 –
F8 Mirror window module
F9 Instrument panel cluster
F10 –
F11 Door latches
F12 –
F13 OnStar/HVAC
F14 Radio/Infotainment
F15 RAP accessory relay control/Shifter control/
Shifter solenoid/Wiper
relay control/Washer
pump relay control/Rear
defog relay control Fuses
Usage
F16 Communication gateway module
F17 Left rear side marker/Right front turn lamp/Left rear
stop lamp/Left front turn
lamp/Right rear stop lamp
F18 Airbag/Sensing and diagnostic module/
Automatic occupant
sensing module
F19 –
F20 Amplifier
F21 –
F22 –
F23 Data link connector/USB front
F24 HVAC ignition
F25 Driver door latch
F26 –
F27 –
F28 Instrument panel cluster and automatic sensing
display Fuses
Usage
F29 Rear vision camera/ Transfer case control
module (4WD)/Inside
rear view
F30 –
F31 Front camera/Rear park assist
F32 Steering wheel controls backlighting
F33 Heated steering wheel/ Spare
F34 Spare
F35 Park/Reverse/Neutral/ Drive/Low display/
Wireless charging module/
USB rear
F36 Discrete logic ignition sensor
F37 –
F38 –
F39 Auxiliary power outlet 2
F40 –
Page 291 of 387
Chevrolet Colorado Owner Manual (GMNA-Localizing-U.S./Canada/Mexico-
12460274) - 2019 - CRC - 10/1/18
290 Vehicle Care
following order: driver side front tire,
passenger side front tire, passenger
side rear tire, and driver side rear.
See your dealer for service or to
purchase a relearn tool. A TPMS
relearn tool can also be purchased.
See Tire Pressure Monitor Sensor
Activation Tool at
www.gmtoolsandequipment.com or
call 1-800-GM TOOLS
(1-800-468-6657).
There are two minutes to match the
first tire/wheel position, and
five minutes overall to match all four
tire/wheel positions. If it takes
longer, the matching process stops
and must be restarted.
The TPMS sensor matching
process is:1. Set the parking brake.
2. Turn the ignition on without starting the vehicle.
3. If the vehicle has an uplevel DIC, make sure the Tire
Pressure info page option is
turned on. The info pages on
the DIC can be turned on and
off through the Options menu. See
Driver Information Center
(DIC) (Base Level) 0129 or
Driver Information Center (DIC)
(Uplevel) 0131.
4. If the vehicle has an uplevel DIC, use the DIC controls on
the right side of the steering
wheel to scroll to the Tire
Pressure screen under the DIC
info page.
If the vehicle has a base level
DIC, use the MENU button to
select the Vehicle Information
menu in the DIC. Use the
thumbwheel to scroll to the Tire
Pressure Menu item screen.
5. If the vehicle has an uplevel DIC, press and hold
Vin the
center of the DIC controls.
If the vehicle has a base level
DIC, press SET/CLR on the
turn signal lever to begin the
sensor matching process.
A message asking if the
process should begin should
appear. Press SET/CLR again
to confirm the selection. The horn sounds twice to
signal the receiver is in relearn
mode and the TIRE
LEARNING ACTIVE message
displays on the DIC screen.
6. Start with the driver side front tire.
7. Place the relearn tool against the tire sidewall, near the valve
stem. Then press the button to
activate the TPMS sensor.
A horn chirp confirms that the
sensor identification code has
been matched to this tire and
wheel position.
8. Proceed to the passenger side front tire, and repeat the
procedure in Step 7.
9. Proceed to the passenger side rear tire, and repeat the
procedure in Step 7.
10. Proceed to the driver side rear tire, and repeat the procedure
in Step 7. The horn sounds two
times to indicate the sensor
identification code has been
matched to the driver side rear
tire, and the TPMS sensor
Page 299 of 387
Chevrolet Colorado Owner Manual (GMNA-Localizing-U.S./Canada/Mexico-
12460274) - 2019 - CRC - 10/1/18
298 Vehicle Care
Warning (Continued)
vehicle parts. The area damaged
by the tire chains could cause
loss of control and a crash.
Use another type of traction
device only if its manufacturer
recommends it for use on the
vehicle and tire size combination
and road conditions. Follow that
manufacturer's instructions. To
avoid vehicle damage, drive slow
and readjust or remove the
traction device if it contacts the
vehicle. Do not spin the wheels.
If traction devices are used, install
them on the rear tires.
Caution
If the vehicle has a tire size other
than 255/55R20, 255/65R17 AT,
265/60R18, 265/65R17, or
265/70R16, use tire chains only(Continued)
Caution (Continued)
where legal and only when
necessary. Use chains that are
the proper size for the tires. Install
them on the tires of the rear axle.
Do not use chains on the tires of
the front axle. Tighten them as
tightly as possible with the ends
securely fastened. Drive slowly
and follow the chain
manufacturer's instructions. If the
chains contact the vehicle, stop
and retighten them. If the contact
continues, slow down until it
stops. Driving too fast or spinning
the wheels with chains on will
damage the vehicle.
If a Tire Goes Flat
It is unusual for a tire to blowout
while driving, especially if the tires
are maintained properly. If air goes
out of a tire, it is much more likely to
leak out slowly. But if there ever is a
blowout, here are a few tips about
what to expect and what to do: If a front tire fails, the flat tire
creates a drag that pulls the vehicle
toward that side. Take your foot off
the accelerator pedal and grip the
steering wheel firmly. Steer to
maintain lane position, and then
gently brake to a stop, well off the
road, if possible.
A rear blowout, particularly on a
curve, acts much like a skid and
may require the same correction as
used in a skid. Stop pressing the
accelerator pedal and steer to
straighten the vehicle. It may be
very bumpy and noisy. Gently brake
to a stop, well off the road,
if possible.
{Warning
Driving on a flat tire will cause
permanent damage to the tire.
Re-inflating a tire after it has been
driven on while severely
underinflated or flat may cause a
blowout and a serious crash.
Never attempt to re-inflate a tire
(Continued)
Page 318 of 387
Chevrolet Colorado Owner Manual (GMNA-Localizing-U.S./Canada/Mexico-
12460274) - 2019 - CRC - 10/1/18
Vehicle Care 317
5. With the engine off, leave thekey in ACC/ACCESSORY to
prevent the steering column
from locking.
Caution
Failure to disconnect the negative
battery cable or to have it contact
the terminals can cause damage
to the vehicle.
6. Disconnect the negative battery cable at the battery and
secure the nut and bolt. Cover
the negative battery post with a
non-conductive material to
prevent any contact with the
negative battery terminal.
Caution
If the steering column is locked,
vehicle damage may occur.
7. Move the steering wheel to make sure the steering column
is unlocked. 8. With a foot on the brake pedal,
release the parking brake.
Keep the ignition key in the
towed vehicle in ACC/
ACCESSORY to prevent the
steering column from locking.
Disconnecting the Towed Vehicle
Before disconnecting the towed
vehicle: 1. Park on a level surface.
2. Set the parking brake, then shift the transmission to
P (Park), and move the ignition
key to OFF.
3. Connect the battery.
4. With your foot off the brake, turn the ignition on with the
engine off.
5. Shift the transfer case out of N (Neutral) to Two-Wheel Drive
High. See “Shifting out of
N (Neutral)” underFour-Wheel
Drive 0190. See your dealer if
the transfer case cannot be
shifted out of N (Neutral). 6. Start the engine and check that
the vehicle is in Two-Wheel
Drive High by shifting the
transmission to R (Reverse)
and then to D (Drive). There
should be movement of the
vehicle while shifting.
7. Shift the transmission to P (Park) and turn off the
ignition.
8. Disconnect the vehicle from the tow vehicle.
9. Release the parking brake.
10. Reset any lost presets. The outside temperature
display will default to 0 °C
(32 °F) but will reset with
normal usage.
Page 324 of 387
Chevrolet Colorado Owner Manual (GMNA-Localizing-U.S./Canada/Mexico-
12460274) - 2019 - CRC - 10/1/18
Vehicle Care 323
Caution (Continued)
on roads that have been sprayed
with magnesium chloride or
calcium chloride. These are used
on roads for conditions such as
dust and ice. Always wash the
chrome with soap and water after
exposure.
Caution
To avoid surface damage on
wheels and wheel trim, do not
use strong soaps, chemicals,
abrasive polishes, cleaners,
or brushes. Use only GM
approved cleaners. Do not drive
the vehicle through an automatic
car wash that uses silicone
carbide tire/wheel cleaning
brushes. Damage could occur
and the repairs would not be
covered by the vehicle warranty.
Brake System
Visually inspect brake lines and
hoses for proper hook-up, binding,
leaks, cracks, chafing, etc. Inspect
disc brake pads for wear and rotors
for surface condition. Inspect drum
brake linings/shoes for wear or
cracks. Inspect all other brake parts.
Steering, Suspension, and
Chassis Components
Visually inspect steering,
suspension, and chassis
components for damaged, loose,
or missing parts or signs of wear at
least once a year.
Inspect power steering for proper
attachment, connections, binding,
leaks, cracks, chafing, etc.
Visually check constant velocity joint
boots and axle seals for leaks.
Body Component Lubrication
Lubricate all key lock cylinders,
hood hinges, liftgate hinges, steel
fuel door hinge, and power assist
step hinges, unless the components
are plastic. Applying silicone greaseon weatherstrips with a clean cloth
will make them last longer, seal
better, and not stick or squeak
Underbody Maintenance
At least twice a year, spring and fall,
use plain water to flush any
corrosive materials from the
underbody. Take care to thoroughly
clean any areas where mud and
other debris can collect.
Do not directly power wash the
transfer case and/or front/rear axle
output seals. High pressure water
can overcome the seals and
contaminate the fluid. Contaminated
fluid will decrease the life of the
transfer case and/or axles and
should be replaced.
Sheet Metal Damage
If the vehicle is damaged and
requires sheet metal repair or
replacement, make sure the body
repair shop applies anti-corrosion
material to parts repaired or
replaced to restore corrosion
protection.
Page 333 of 387
Chevrolet Colorado Owner Manual (GMNA-Localizing-U.S./Canada/Mexico-
12460274) - 2019 - CRC - 10/1/18
332 Service and Maintenance
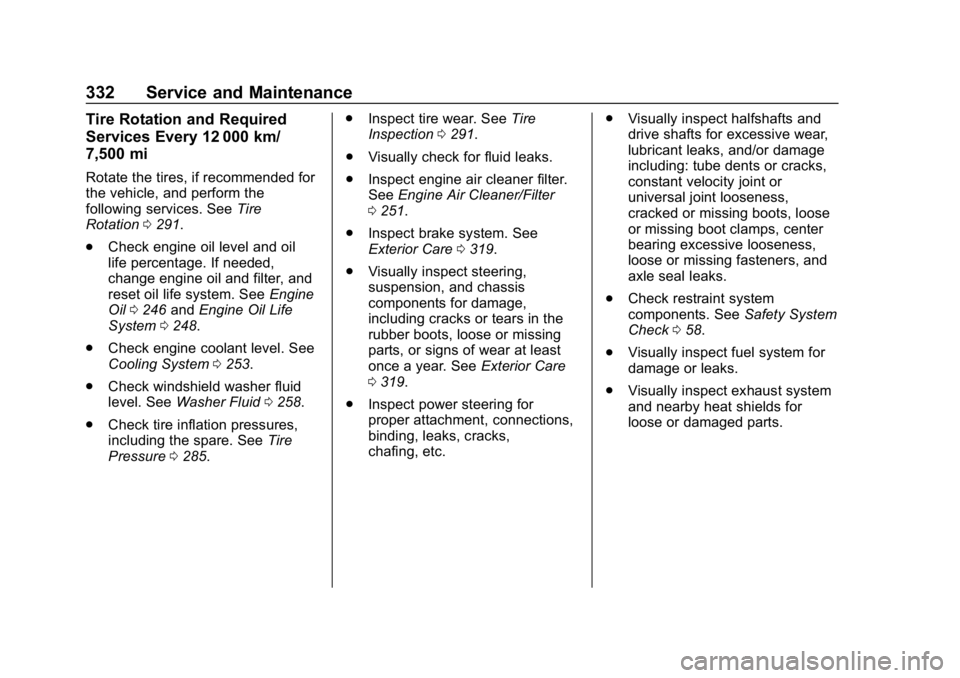
Tire Rotation and Required
Services Every 12 000 km/
7,500 mi
Rotate the tires, if recommended for
the vehicle, and perform the
following services. SeeTire
Rotation 0291.
. Check engine oil level and oil
life percentage. If needed,
change engine oil and filter, and
reset oil life system. See Engine
Oil 0246 andEngine Oil Life
System 0248.
. Check engine coolant level. See
Cooling System 0253.
. Check windshield washer fluid
level. See Washer Fluid 0258.
. Check tire inflation pressures,
including the spare. See Tire
Pressure 0285. .
Inspect tire wear. See Tire
Inspection 0291.
. Visually check for fluid leaks.
. Inspect engine air cleaner filter.
See Engine Air Cleaner/Filter
0 251.
. Inspect brake system. See
Exterior Care 0319.
. Visually inspect steering,
suspension, and chassis
components for damage,
including cracks or tears in the
rubber boots, loose or missing
parts, or signs of wear at least
once a year. See Exterior Care
0 319.
. Inspect power steering for
proper attachment, connections,
binding, leaks, cracks,
chafing, etc. .
Visually inspect halfshafts and
drive shafts for excessive wear,
lubricant leaks, and/or damage
including: tube dents or cracks,
constant velocity joint or
universal joint looseness,
cracked or missing boots, loose
or missing boot clamps, center
bearing excessive looseness,
loose or missing fasteners, and
axle seal leaks.
. Check restraint system
components. See Safety System
Check 058.
. Visually inspect fuel system for
damage or leaks.
. Visually inspect exhaust system
and nearby heat shields for
loose or damaged parts.
Page 340 of 387

Chevrolet Colorado Owner Manual (GMNA-Localizing-U.S./Canada/Mexico-
12460274) - 2019 - CRC - 10/1/18
Service and Maintenance 339
Hoses
Hoses transport fluids and should
be regularly inspected to ensure
that there are no cracks or leaks.
With a multi-point inspection, your
dealer can inspect the hoses and
advise if replacement is needed.
Lamps
Properly working headlamps,
taillamps, and brake lamps are
important to see and be seen on
the road.
.Signs that the headlamps need
attention include dimming, failure
to light, cracking, or damage.
The brake lamps need to be
checked periodically to ensure
that they light when braking.
. With a multi-point inspection,
your dealer can check the lamps
and note any concerns. Shocks and Struts
Shocks and struts help aid in control
for a smoother ride.
.
Signs of wear may include
steering wheel vibration, bounce/
sway while braking, longer
stopping distance, or uneven
tire wear.
. As part of the multi-point
inspection, trained dealer
technicians can visually inspect
the shocks and struts for signs
of leaking, blown seals,
or damage, and can advise
when service is needed.
Tires
Tires need to be properly inflated,
rotated, and balanced. Maintaining
the tires can save money and fuel,
and can reduce the risk of tire
failure.
. Signs that the tires need to be
replaced include three or more
visible treadwear indicators; cord
or fabric showing through the rubber; cracks or cuts in the
tread or sidewall; or a bulge or
split in the tire.
. Trained dealer technicians can
inspect and recommend the right
tires. Your dealer can also
provide tire/wheel balancing
services to ensure smooth
vehicle operation at all speeds.
Your dealer sells and services
name brand tires.
Vehicle Care
To help keep the vehicle looking like
new, vehicle care products are
available from your dealer. For
information on how to clean and
protect the vehicle’s interior and
exterior, see Interior Care 0324 and
Exterior Care 0319.