length CHEVROLET COLORADO 2020 Owner's Manual
[x] Cancel search | Manufacturer: CHEVROLET, Model Year: 2020, Model line: COLORADO, Model: CHEVROLET COLORADO 2020Pages: 368, PDF Size: 5.67 MB
Page 57 of 368
Chevrolet Colorado Owner Manual (GMNA-Localizing-U.S./Canada/Mexico-
13566640) - 2020 - CRC - 9/30/19
56 Seats and Restraints
Replacing Airbag System
Parts after a Crash
{Warning
A crash can damage the airbag
systems in the vehicle.
A damaged airbag system may
not properly protect you and your
passenger(s) in a crash, resulting
in serious injury or even death. To
help make sure the airbag
systems are working properly
after a crash, have them
inspected and any necessary
replacements made as soon as
possible.
If an airbag inflates, you will need to
replace airbag system parts. See
your dealer for service.
If the airbag readiness light stays on
after the vehicle is started or comes
on when you are driving, the airbag
system may not work properly. Have
the vehicle serviced right away. See
Airbag Readiness Light 0104.
Child Restraints
Older Children
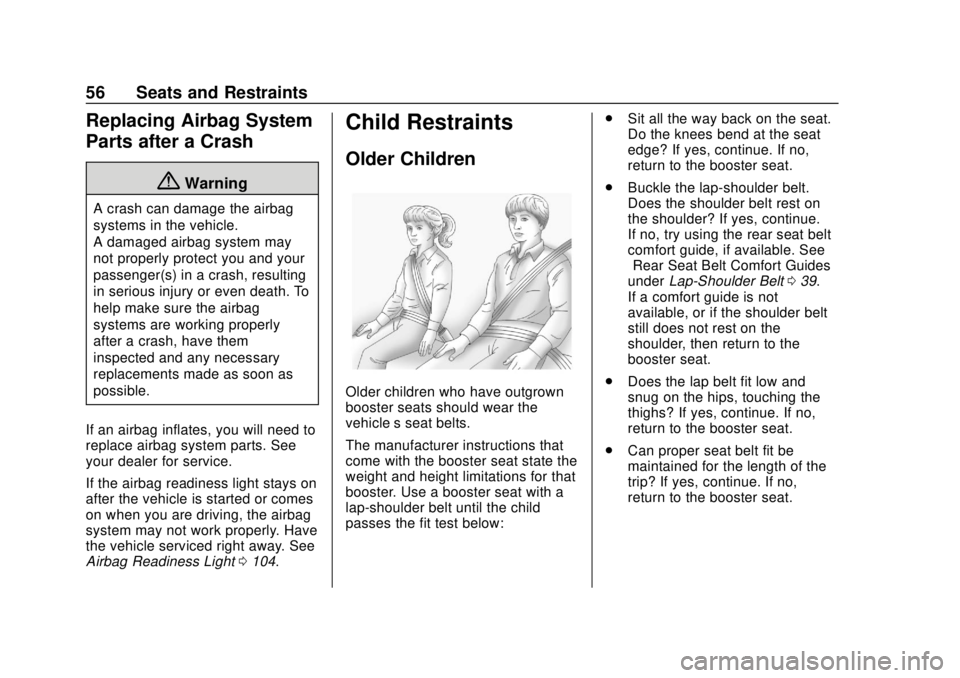
Older children who have outgrown
booster seats should wear the
vehicle’s seat belts.
The manufacturer instructions that
come with the booster seat state the
weight and height limitations for that
booster. Use a booster seat with a
lap-shoulder belt until the child
passes the fit test below: .
Sit all the way back on the seat.
Do the knees bend at the seat
edge? If yes, continue. If no,
return to the booster seat.
. Buckle the lap-shoulder belt.
Does the shoulder belt rest on
the shoulder? If yes, continue.
If no, try using the rear seat belt
comfort guide, if available. See
“Rear Seat Belt Comfort Guides”
under Lap-Shoulder Belt 039.
If a comfort guide is not
available, or if the shoulder belt
still does not rest on the
shoulder, then return to the
booster seat.
. Does the lap belt fit low and
snug on the hips, touching the
thighs? If yes, continue. If no,
return to the booster seat.
. Can proper seat belt fit be
maintained for the length of the
trip? If yes, continue. If no,
return to the booster seat.
Page 72 of 368
Chevrolet Colorado Owner Manual (GMNA-Localizing-U.S./Canada/Mexico-
13566640) - 2020 - CRC - 9/30/19
Seats and Restraints 71
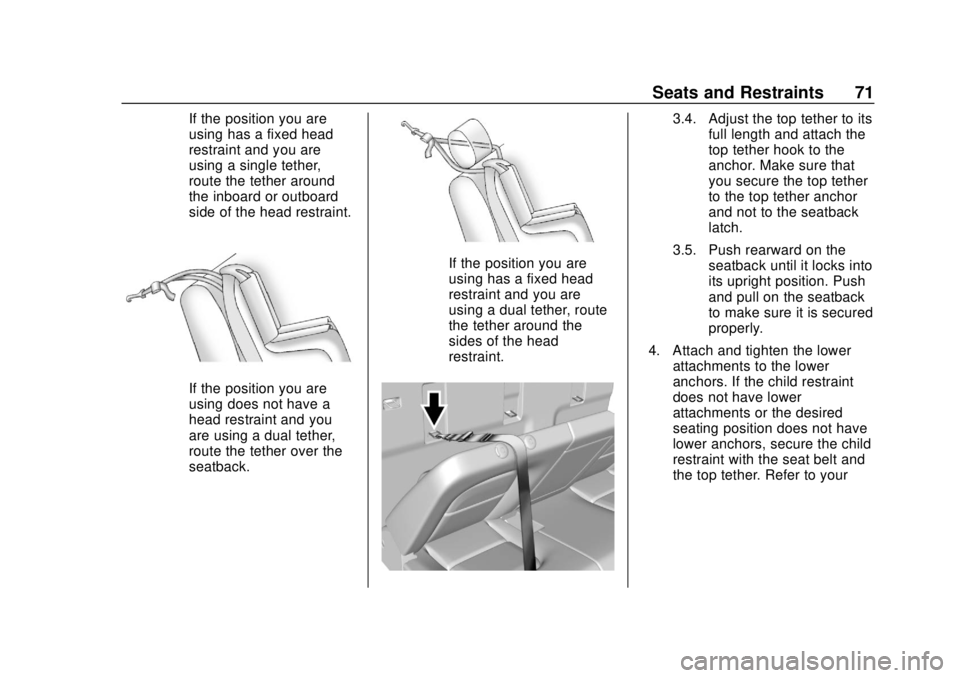
If the position you are
using has a fixed head
restraint and you are
using a single tether,
route the tether around
the inboard or outboard
side of the head restraint.
If the position you are
using does not have a
head restraint and you
are using a dual tether,
route the tether over the
seatback.
If the position you are
using has a fixed head
restraint and you are
using a dual tether, route
the tether around the
sides of the head
restraint.
3.4. Adjust the top tether to itsfull length and attach the
top tether hook to the
anchor. Make sure that
you secure the top tether
to the top tether anchor
and not to the seatback
latch.
3.5. Push rearward on the seatback until it locks into
its upright position. Push
and pull on the seatback
to make sure it is secured
properly.
4. Attach and tighten the lower attachments to the lower
anchors. If the child restraint
does not have lower
attachments or the desired
seating position does not have
lower anchors, secure the child
restraint with the seat belt and
the top tether. Refer to your
Page 75 of 368
Chevrolet Colorado Owner Manual (GMNA-Localizing-U.S./Canada/Mexico-
13566640) - 2020 - CRC - 9/30/19
74 Seats and Restraints
3. Insert the headrest posts intothe holes on the front of the
passenger side seat cushion to
install the seat cushion
extension. The notches on the
posts should face the
passenger side of the vehicle.
Try to move the headrest to
make sure it is locked in place.
4. If the child restraint manufacturer recommends that
the top tether be attached,
adjust the top tether to its full
length and attach the top tether
hook to the anchor. Refer to
the child restraint instructions
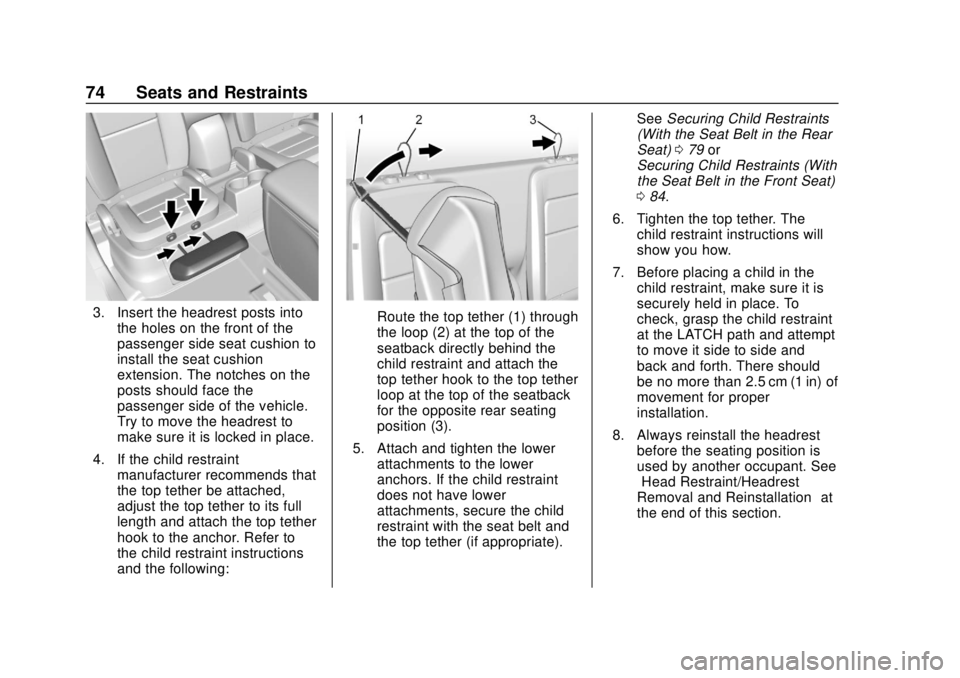
and the following:Route the top tether (1) through
the loop (2) at the top of the
seatback directly behind the
child restraint and attach the
top tether hook to the top tether
loop at the top of the seatback
for the opposite rear seating
position (3).
5. Attach and tighten the lower attachments to the lower
anchors. If the child restraint
does not have lower
attachments, secure the child
restraint with the seat belt and
the top tether (if appropriate). See
Securing Child Restraints
(With the Seat Belt in the Rear
Seat) 079 or
Securing Child Restraints (With
the Seat Belt in the Front Seat)
0 84.
6. Tighten the top tether. The child restraint instructions will
show you how.
7. Before placing a child in the child restraint, make sure it is
securely held in place. To
check, grasp the child restraint
at the LATCH path and attempt
to move it side to side and
back and forth. There should
be no more than 2.5 cm (1 in) of
movement for proper
installation.
8. Always reinstall the headrest before the seating position is
used by another occupant. See
“Head Restraint/Headrest
Removal and Reinstallation” at
the end of this section.
Page 82 of 368
Chevrolet Colorado Owner Manual (GMNA-Localizing-U.S./Canada/Mexico-
13566640) - 2020 - CRC - 9/30/19
Seats and Restraints 81
3. Insert the headrest posts intothe holes on the front of the
passenger side seat cushion to
install the seat cushion
extension. The notches on the
post should face the passenger
side of the vehicle. Try to move
the headrest to make sure it is
locked in place.
4. Put the child restraint on the seat.
When installing a rear-facing
child restraint, move the front
seat all the way forward and tilt
the seatback forward to
properly install the child
restraint per the child restraint
manufacturer instructions. See
Seat Adjustment 029 and
Reclining Seatbacks 031.
When a rear-facing child
restraint is installed properly,
the front passenger seat
cannot be used.
5. If the child restraint manufacturer recommends
using a top tether, adjust the
top tether to its full length and
attach it to the top tether anchor. Refer to the
instructions that came with the
child restraint and see
Lower
Anchors and Tethers for
Children (LATCH System) 063.
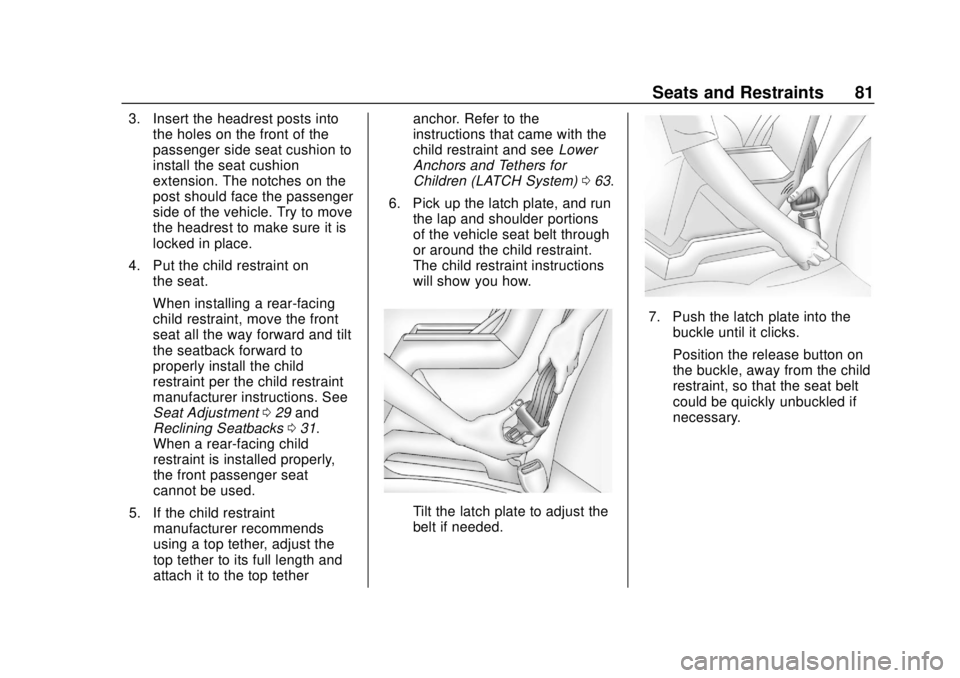
6. Pick up the latch plate, and run the lap and shoulder portions
of the vehicle seat belt through
or around the child restraint.
The child restraint instructions
will show you how.
Tilt the latch plate to adjust the
belt if needed.
7. Push the latch plate into thebuckle until it clicks.
Position the release button on
the buckle, away from the child
restraint, so that the seat belt
could be quickly unbuckled if
necessary.
Page 84 of 368
Chevrolet Colorado Owner Manual (GMNA-Localizing-U.S./Canada/Mexico-
13566640) - 2020 - CRC - 9/30/19
Seats and Restraints 83
Crew Cab
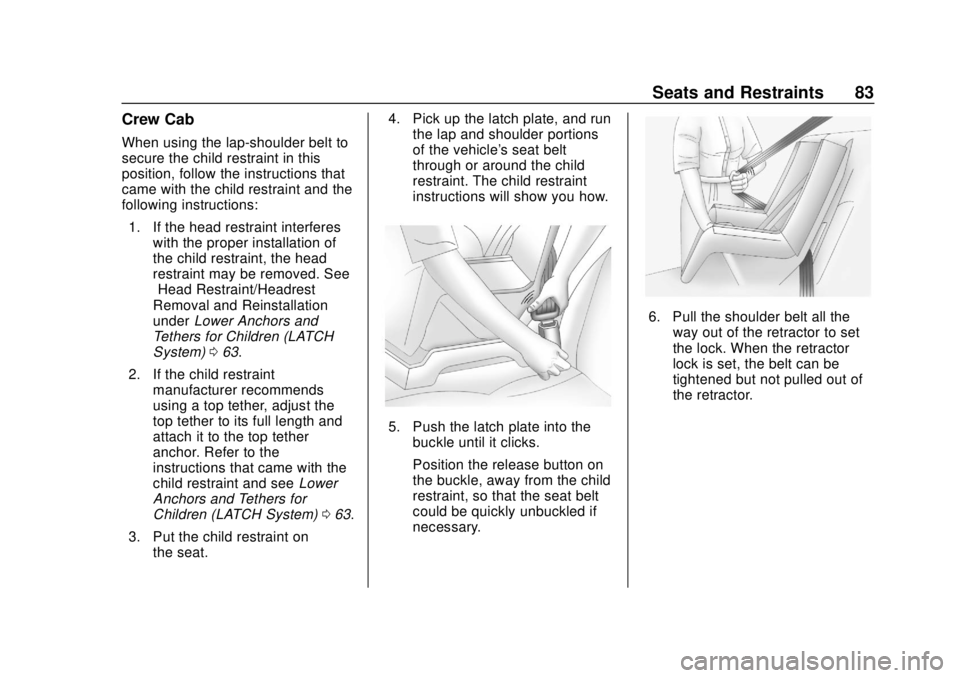
When using the lap-shoulder belt to
secure the child restraint in this
position, follow the instructions that
came with the child restraint and the
following instructions:1. If the head restraint interferes with the proper installation of
the child restraint, the head
restraint may be removed. See
“Head Restraint/Headrest
Removal and Reinstallation”
under Lower Anchors and
Tethers for Children (LATCH
System) 063.
2. If the child restraint manufacturer recommends
using a top tether, adjust the
top tether to its full length and
attach it to the top tether
anchor. Refer to the
instructions that came with the
child restraint and see Lower
Anchors and Tethers for
Children (LATCH System) 063.
3. Put the child restraint on the seat. 4. Pick up the latch plate, and run
the lap and shoulder portions
of the vehicle's seat belt
through or around the child
restraint. The child restraint
instructions will show you how.
5. Push the latch plate into thebuckle until it clicks.
Position the release button on
the buckle, away from the child
restraint, so that the seat belt
could be quickly unbuckled if
necessary.
6. Pull the shoulder belt all theway out of the retractor to set
the lock. When the retractor
lock is set, the belt can be
tightened but not pulled out of
the retractor.
Page 165 of 368
Chevrolet Colorado Owner Manual (GMNA-Localizing-U.S./Canada/Mexico-
13566640) - 2020 - CRC - 9/30/19
164 Driving and Operating
Warning (Continued)
Failure to use the
recommended extension
cord in good operating
condition, or using a
damaged heater or
extension cord, could make
it overheat and cause a fire,
property damage, electric
shock, and injury.
. Do not operate the vehicle
with the heater cord
permanently attached to the
vehicle. Possible heater
cord and thermostat
damage could occur.
. While in use, do not let the
heater cord touch vehicle
parts or sharp edges. Never
close the hood on the
heater cord.
. Before starting the vehicle,
unplug the cord, reattach
the cover to the plug, and
securely fasten the cord.
Keep the cord away from
any moving parts. 4. Before starting the engine, be
sure to unplug and store the
cord as it was before to keep it
away from moving engine
parts. If you do not, it could be
damaged.
The length of time the heater should
remain plugged in depends on
several factors. Ask a dealer in the
area where you will be parking the
vehicle for the best advice on this.
Retained Accessory
Power (RAP)
When the ignition is turned from on
to off, the following features (if
equipped) will continue to function
for up to 10 minutes, or until the
driver door is opened. These
features will also work when the
ignition is in RUN or ACC/
ACCESSORY:
. Infotainment System
. Power Windows (during RAP
this functionality will be lost
when any door is opened) .
Sunroof (during RAP this
functionality will be lost when
any door is opened)
. Auxiliary Power Outlet
. Audio System
. OnStar System
Shifting Into Park
{Warning
It can be dangerous to get out of
the vehicle if the shift lever is not
fully in P (Park) with the parking
brake firmly set. The vehicle can
roll. If you have left the engine
running, the vehicle can move
suddenly. You or others could be
injured. To be sure the vehicle will
not move, even when you are on
fairly level ground, use the steps
that follow. With four-wheel drive,
if the transfer case is in
N (Neutral), the vehicle will be
free to roll, even if the shift lever
is in P (Park). Be sure the transfer
(Continued)
Page 248 of 368

Chevrolet Colorado Owner Manual (GMNA-Localizing-U.S./Canada/Mexico-
13566640) - 2020 - CRC - 10/4/19
Vehicle Care 247
pressure from the regular brake
pedal. Do this until the vehicle is
held by the parking brake only.
. To check the P (Park)
mechanism's holding ability:
With the engine running, shift to
P (Park). Then release the
parking brake followed by the
regular brake.
Contact your dealer if service is
required.
Wiper Blade Replacement
Windshield wiper blades should be
inspected for wear or cracking.
Replacement blades come in
different types and are removed in
different ways. For proper
windshield wiper blade length and
type, see Maintenance
Replacement Parts 0326.
Caution
Allowing the wiper arm to touch
the windshield when no wiper
blade is installed could damage
the windshield. Any damage that
occurs would not be covered by
the vehicle warranty. Do not allow
the wiper arm to touch the
windshield.
To replace the windshield wiper
blade: 1. Pull the windshield wiper assembly away from the
windshield.
2. Press the release lever in themiddle of the wiper blade
where the wiper blade
attaches.
3. Remove the wiper blade.
4. Reverse Steps 1–3 for wiper blade replacement.
Windshield Replacement
Driver Assistance Systems
If the windshield needs to be
replaced and the vehicle is
equipped with a front camera sensor
for the Driver Assistance Systems, a
GM replacement windshield is