steering CHEVROLET CORVAIR 1965 2.G Owners Manual
[x] Cancel search | Manufacturer: CHEVROLET, Model Year: 1965, Model line: CORVAIR, Model: CHEVROLET CORVAIR 1965 2.GPages: 56, PDF Size: 22.29 MB
Page 10 of 56
Downloaded from www.Manualslib.com manuals search engine TOWING
• Place selector lever in neutral.
• If transmission or axle are malfunctioning, tow with
rear wheels raised.
• When towing any vehicle on its front wheels, the
steering wheel should be secured to maintain a
straight forward position .
• Never tow faster than 50 mph.
ROCKING CAR
When stuck in mud, sand or snow, you may rock
the car by depressing the accelerator slightly and shift
ing the selector lever between Rand D. Avoid excessive
engine speed while performing this operation.
PARKING CAR
It is important that when your Corvair is parked the
parking brake be fully engaged. Do not count on the
transmission to hold the car. Always engage the parking
brake when parked.
POWERGLIDE DRIVING CAUTIONS
• Always engage parking brake when parked.
• Do not accelerate engine in L, 0, or R with
the brakes engaged. This can cause damage
by overheating transmission.
• Do not hold car on an upgrade by accelerat
ing engine. Use brakes.
• Use low position for hard pulls at low
speed, climbing or descending steep grades
and for push starting.
• Always stop car before shifting to reverse.
DRIVING WITH POSITRACTION REAR AXLE
The Positraction rear axle gives you constant driv
ing force on both r~ar wheels; especially helpful in the
winter and during other slippery driving conditions.
In normal use, light throttle application will supply
7
maximum traction. When starting with one rear wheel
on an excessively slippery surface, slight application of
the parking brake may be necessary to gain maximum
traction.
Page 15 of 56
Downloaded from www.Manualslib.com manuals search engine FOOT CONTROLS
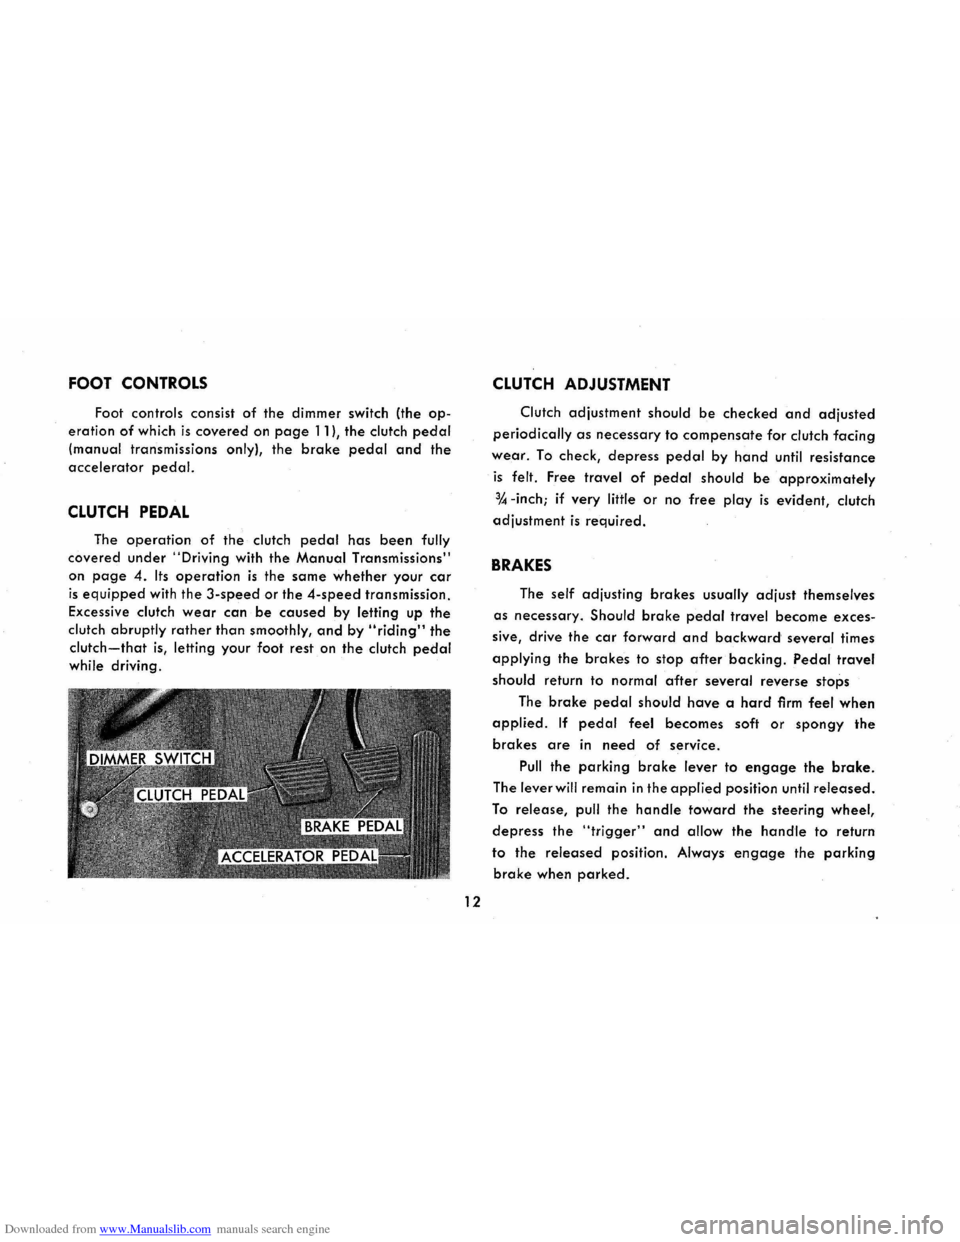
Foot controls consist of the dimmer switch (the op
eration of which is covered on page 11), the clutch pedal
(manual transmissions only), the brake pedal and the
accelerator pedal.
CLUTCH PEDAL
The operation of the clutch pedal has been fully
covered under "Driving with the Manual Transmissions"
on
page 4. Its operation is the same whether your car
is equipped with the 3-speed or the 4-speed transmission.
Excessive clutch
wear can be caused by letting up the
clutch abruptly rather than smoothly, and by "riding" the
clutch-that is, letting your foot rest on the clutch pedal
while driving.
12
CLUTCH ADJUSTMENT
Clutch adjustment should be checked and adjusted
periodically as necessary to compensate for clutch facing
wear. To check, depress pedal by hand until resistance
is felt. Free travel of pedal should be approximately
% -inch; if very little or no free play is evident, clutch
adjustment
is required.
BRAKES
The self adjusting brakes usually adjust themselves
as necessary. Should brake pedal travel become exces
sive, drive
the car forward and backward several times
applying the brakes to stop after backing. Pedal travel
should
return to normal after several reverse stops
The
brake pedal should have a hard firm feel when
applied. If pedal feel becomes soft or spongy the
brakes are in need of service.
Pull the parking brake lever to engage the brake.
The lever will remain in the applied position until released.
To release, pull the handle toward the steering wheel,
depress the "trigger" and allow the handle to return
to the released position. Always engage the parking
brake when parked.
Page 20 of 56
Downloaded from www.Manualslib.com manuals search engine TELESCOPING STEERING COLUMN
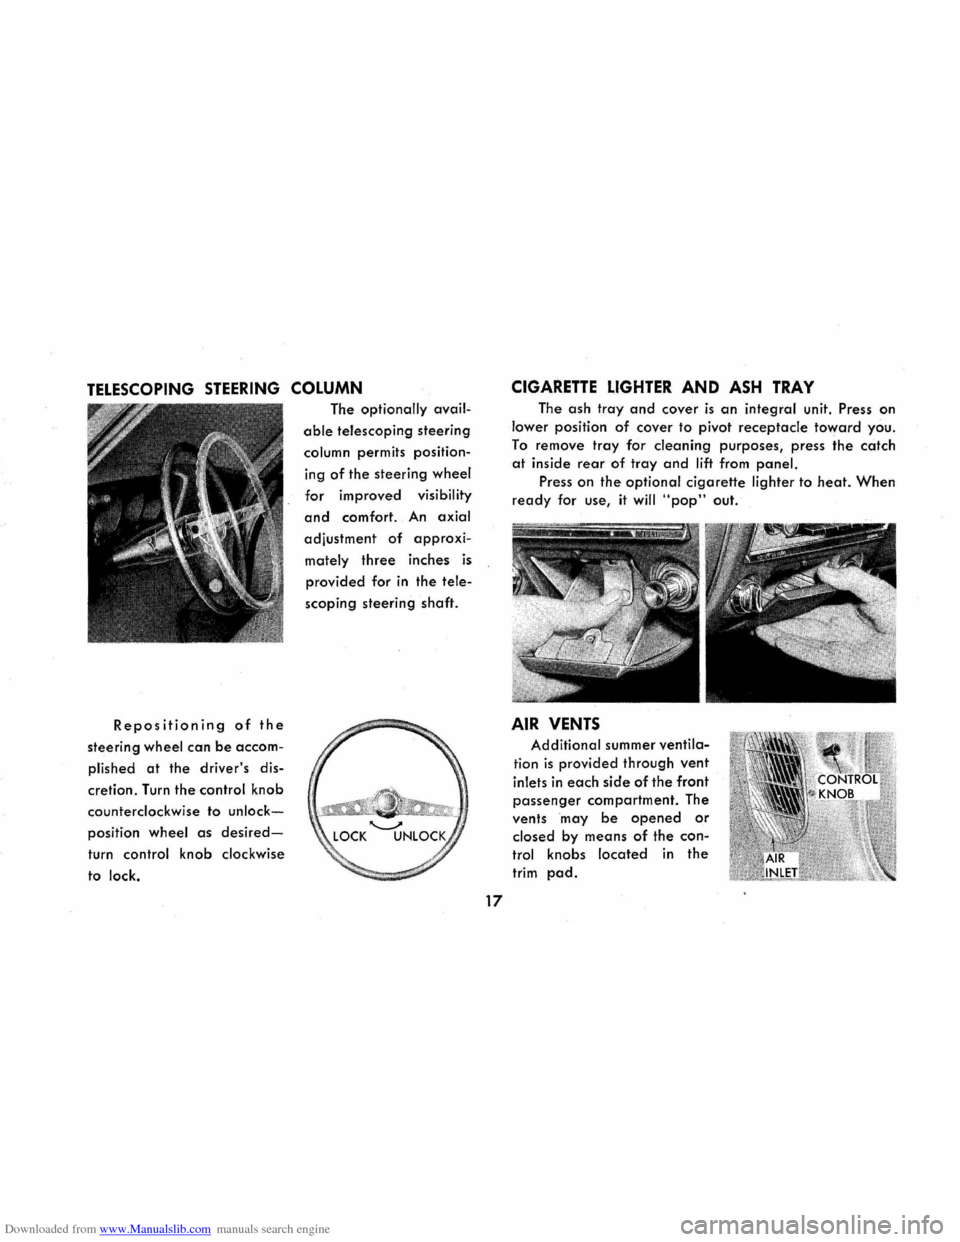
Repositioning of the
steering wheel can be accom
plished at the driver's dis
cretion.
Turn the control knob
counterclockwise to
unlock
position wheel as desired
turn control knob clockwise
to
lock.
The optionally avail
able telescoping steering
column permits position
ing
of the steering wheel
for improved visibility
and comfort. An axial
adiustment of approxi
mately three inches is
provided for in the tele
scoping steering shaft.
17
CIGARETTE LIGHTER AND ASH TRAY
The ash tray and cover is an integral unit. Press on
lower position of cover to pivot receptacle toward you.
To remove tray for cleaning purposes, press the catch
at inside rear of tray and lift from panel.
Press on the optional cigarette lighter to heat. When
ready for use, it will "pop" out.
AIR VENTS
Additional summer ventila
tion is provided through vent
inlets in each side of the front
passenger compartment. The
vents may
be opened or
closed by means of the con
trol knobs located in the
trim pad.
Page 26 of 56
Downloaded from www.Manualslib.com manuals search engine YOUR CORVAIR CORSA INSTRUMENT PANEL
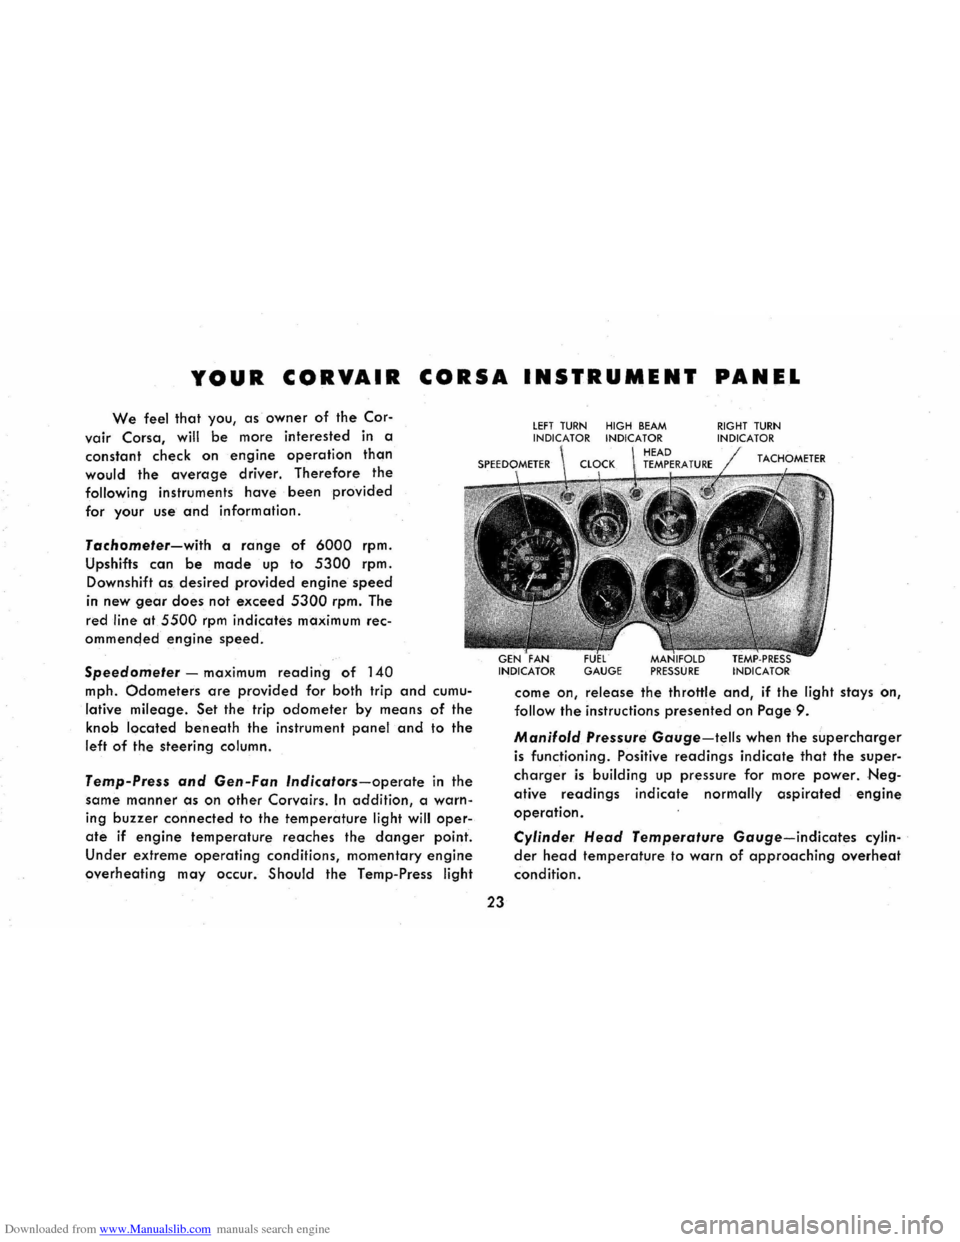
We feel that you, as owner of the Cor-
vair Corsa, will be more interested in a
constant check on
engine operation than
would the average driver. Therefore the
following instruments have been provided
for your use and information.
Tachometer-with a range of 6000 rpm.
Upshifts can
be made up to 5300 rpm.
Downshift as desired provided engine speed
in
new gear does not exceed 5300 rpm. The
red
line at 5500 rpm indicates maximum rec
ommencled
engine speed.
Speedometer -maximum reading of 140
mph. Odometers are provided for both trip and cumu
lative mileage. Set the trip odometer by means of the
knob located beneath the instrument panel and to the
left of the steering column.
Temp-Press and Gen-Fan Indicators-operate in the
same
manner as on other Corvairs. In addition, a warn
ing buzzer connected to the temperature light will oper
ate if engine temperature reaches the danger point.
Under extreme operating conditions, momentary engine
overheating may occur. Should the Temp-Press light
23
lEFT TURN HIGH BEAM INDICATOR INDICATOR
GAUGE PRESSURE
RIGHT TURN INDICATOR
come on, release the throttle and, if the light stays on,
follow the instructions presented on Page 9 .
Manifold Pressure Gauge-tells when the supercharger
is functioning. Positive readings indicate that the super
charger is building up pressure for more power. Neg
ative readings indicate normally aspirated engine
operation.
Cylinder Head Temperature Gauge-indicates cylin
der head temperature to warn of approaching overheat
condition.
Page 37 of 56
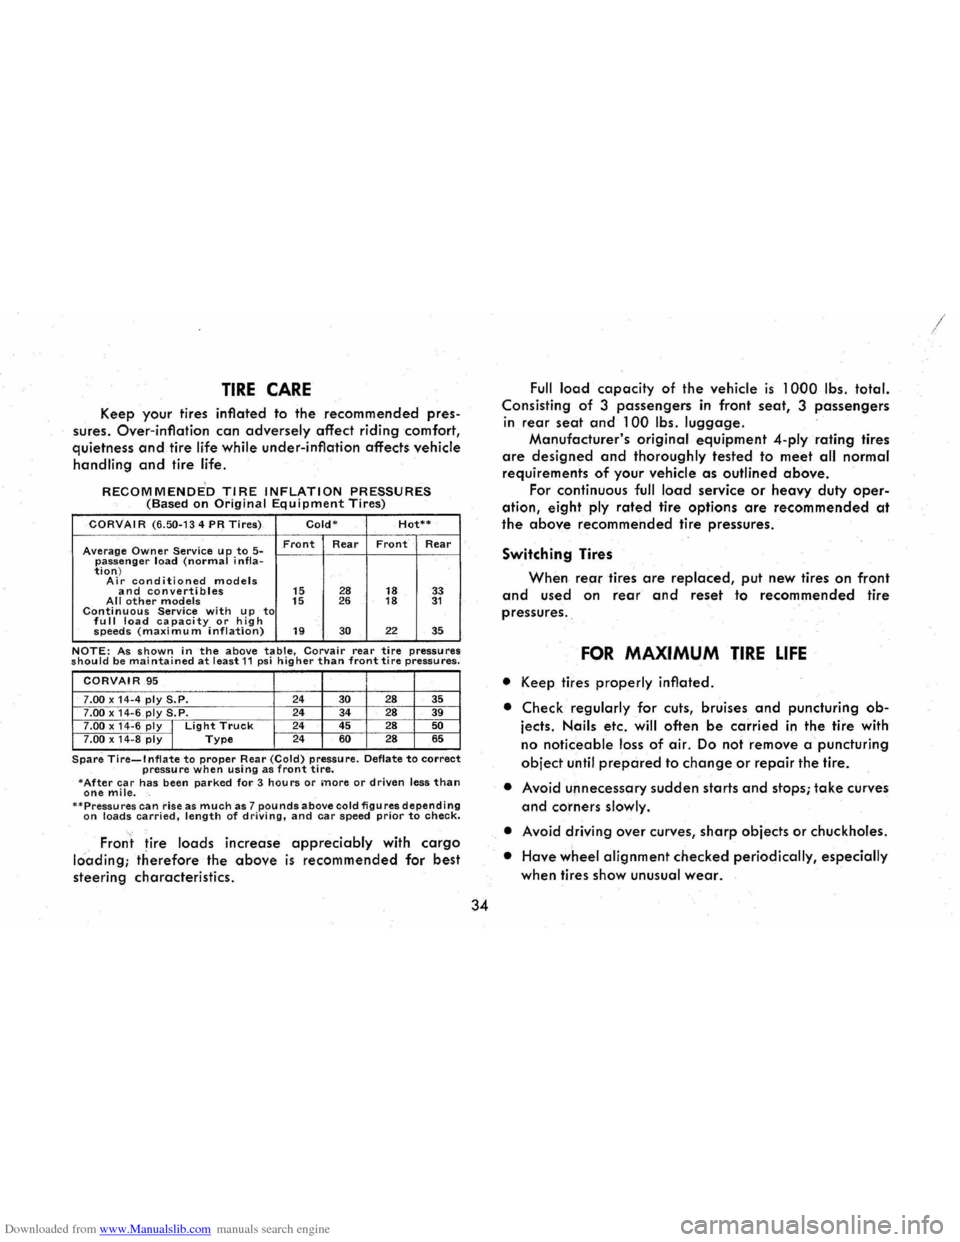
Downloaded from www.Manualslib.com manuals search engine TIRE CARE
Keep your tires inflated to the recommended pres
sures.
Over-inflation can adversely affect riding comfort,
quietness and tire life while under-inflation affects vehicle
handling and tire life.
RECOMMENDED TIRE INFLATION PRESSURES (Based on Original Equipment Tires)
CORVAIR (6.50-134 PR Tires) Cold-Hot**
Average Owner Service up to 5-Front Rear Front Rear
passenger load (normal i nfla-tion) Air conditioned models and convertibles 15 28 18 33 All other models 15 26 18 31 Continuous Service with up to fu II load ca pacity or h ig h speeds (maximu m inflation) 19 30 22 35
NOTE: As shown in the above table, Corvair rear tire pressures should be maintained at least 11 psi higher than front tire pressures;
CORVAIR .95
7.00 x 14"4 ply S.P. 24 30 28 35 7.00 x 14-6 ply S.P. 24
34 28 39 7.00 x 14-6 ply I Light Truck 24
45 28 50
7 .00 x 14 -8 ply I Type 24 60 28 65
Spare Tire...,.lnflate to proper Rear (Cold) pressure. Deflate to correct pressure when using as front tire. -After car has been parked for 3 hours or more or driven less than one mile. --Pressures can riseas much as 7 pounds above cold figures depending on loads carried, length of driving, and car speed prior to check.
, Fron t tire loads increase appreciably with cargo
lci'ading; therefore the above is recommended for best
steering characteristics.
34
Full load capacity of the vehicle is 1 OOOlbs. total.
Consisting of 3 passengers in front seat, 3 passengers
in
rear seat and 100 Ibs . luggage.
Manufacturer's original equipment 4-plyrating tires
are designed and thoroughly tested to meet all normal
requirements of your vehicle as outlined above.
For continuous full load service or heavy duty oper
ation, eight ply rated tire options are recommended at
the above recommended tire pressures.
Switching Tires
When rear tires are replaced, put new tires on front
and used on rear and reset to recommended tire
pressures. ,
FOR MAXIMUM TIRE LIFE
• Ke.ep tires properly inflated.
• Check regularly for cuts, bruises and puncturing ob
jects. Nails etc. will often be carried in the tire with
no noticeable loss of air. Do not remove a puncturing
object until prepared to change or repair the tire.
• Avoid unnecessary sudden starts and stops; take curves
and corners slowly.
•
Avoid driving over curves, sharp objects or chuckholes.
•
Have wheel alignment checked periodically, especially
when tires show unusual wear.
Page 40 of 56
Downloaded from www.Manualslib.com manuals search engine PERIODIC MAINTENANCE AND LUBRICATION
The time or mileage intervals on the following pages
are intended as a general guide for establishing regular
maintenance and lubrication periods for your Corvair.
Sustained heavy duty or high speed operations or oper
ation under adverse conditions may necessitate more
frequent servicing. For specific recommendations for con
ditions under which you use your vehicle, consult your
authorized Chevrolet Dealer.
37
ENGINE OIL CHANGE*
See "Engine Lubrication" in previous pages.
OIL FILTER*
Change the filter element every 6000 miles or every
six months, whichever occurs first.
CRANKCASE VENTILA T10N*
Valve Type (Air Conditioned Models)-Test at every
oil change, replace as required.
Fixed Orifice Type-Check at every oil change,
clean every
12,000 miles.
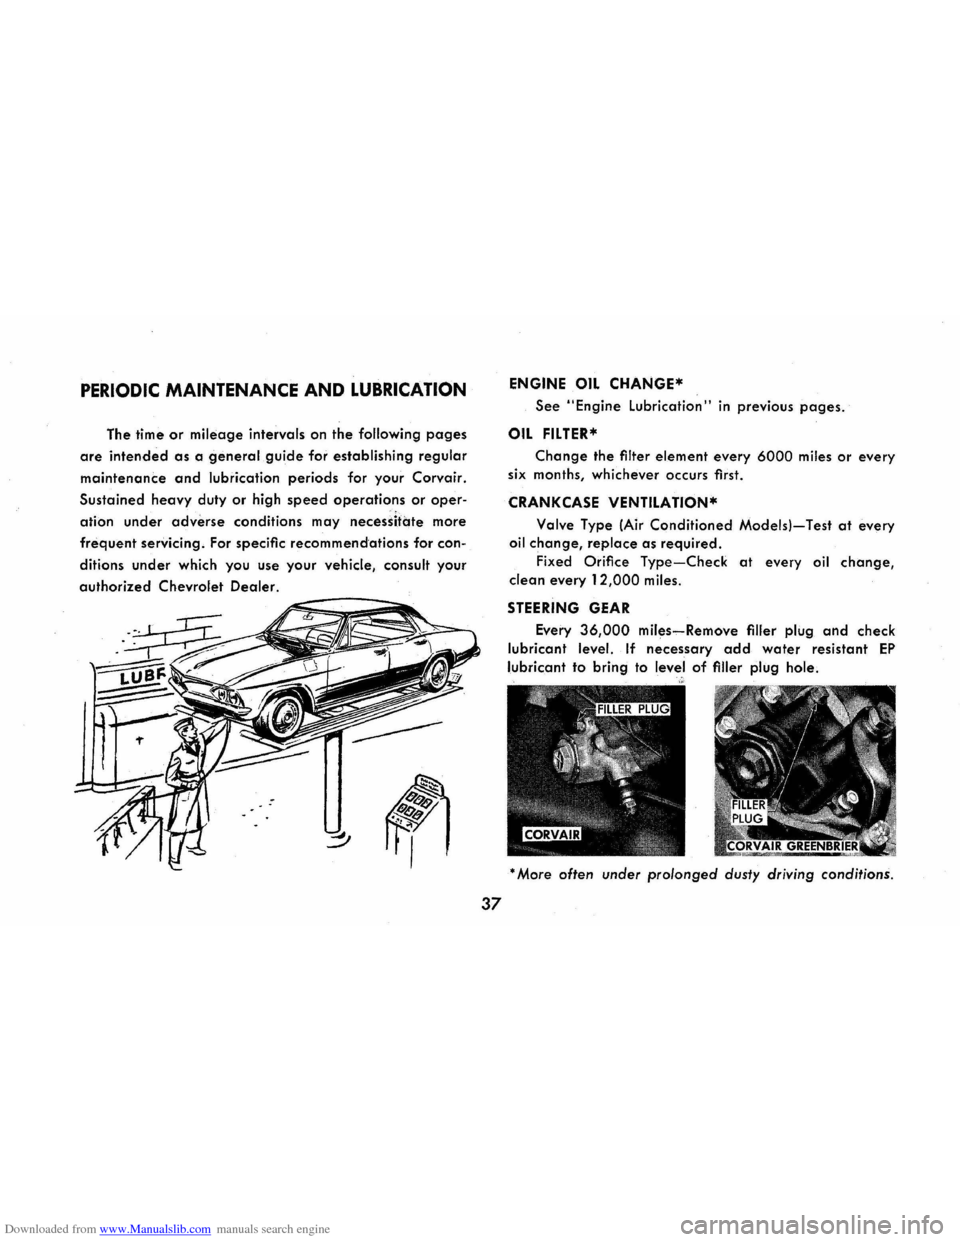
STEERING GEAR
Every 36,000 miles-Remove filler plug and check
lubricant level. If necessary add water resistant EP
lubricant to bring to level of filler plug hole.
* More often under prolonged dusty driving conditions.
Page 41 of 56
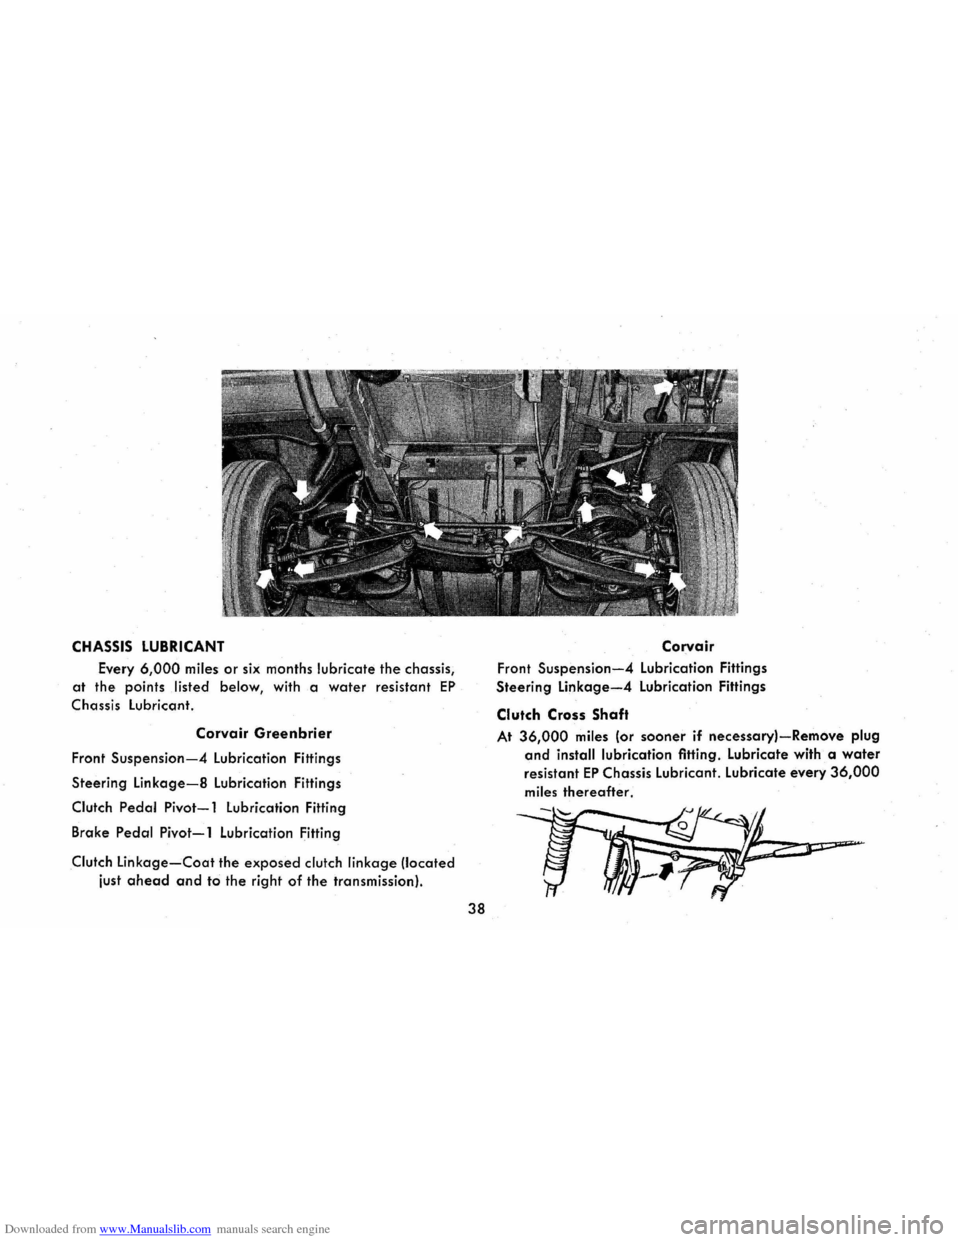
Downloaded from www.Manualslib.com manuals search engine CHASSIS LUBRICANT
Every 6,000 miles or six months lubricate the chassis,
at the points listed below, with a water resistant EP
Chassis lubricant.
Corvair Greenbrier
Front Suspension-4 lubrication Fittings
Steering
Linkage-8 Lubrication Fittings
Clutch Pedal Pivot-1 Lubrication Fitting
Brake
Pedal Pivot-1 Lubrication Fitting
Clutch Linkage-Coat the exposed clutch linkage !located
iust
ahead and to the right of the transmission}.
38
Cor:vair
Front Suspension-4 lubrication Fittings
Steering
Linkage-4 Lubrication Fittings
Clutch Cross Shaft
At 36,000 miles (or sooner if necessary}-Remove plug
and install lubrication fitting. Lubricate with a water
resistant EP Chassis lubricant. lubricate every 36,000
miles thereafter.
~ ..... o.J .. .~-
--,.
Page 49 of 56
Downloaded from www.Manualslib.com manuals search engine Corvair passenger cars are designed primarily for
passenger conveyance. However, it is well known that
many owners do use the Corvair to pull trailers, and
when available trailer hauling options have been used,
the owners
have experienced very satisfactory service.
When a trailer is attached to a car, the car becomes
not only a load-carrying vehicle, but a load-pulling
vehicle. The demands of this type of operation are very
different from those for which the automobile is pri
marily designed and may present problems, such as
spring
and tire loading, braking, cooling, lighting, and
steering. However, careful driving practices and the use
of factory-recommended options will better satisfy the
requirements
of trailer hauling.
If in the opinion of the manufacturer a part or com
ponent of a motor vehicle has been adversely affected
46
by misuse of the vehicle with trailer loads, such part or
component will not be covered by the manufacturer's
warranty.
The size of and equipment for trailers, including
such items as hitches and safety chains, brakes, lights,
power-weight ratios and over-all length, are generally
subject to safety regulations in all states, and it is the
responsibility of the user to make certain that he is in
full
compliance with the regulations of the states in
which he plans to operate with a trailer of the Interstate
Commerce Commission,
if applicable, before doing so.
Further, when
operating a car with a trailer attached,
the driver must realize that the performance, steering
characteristics,
and braking distance of his car have
been altered, and that he must exercise greater caution
to safely handle his car and trailer.
Page 55 of 56
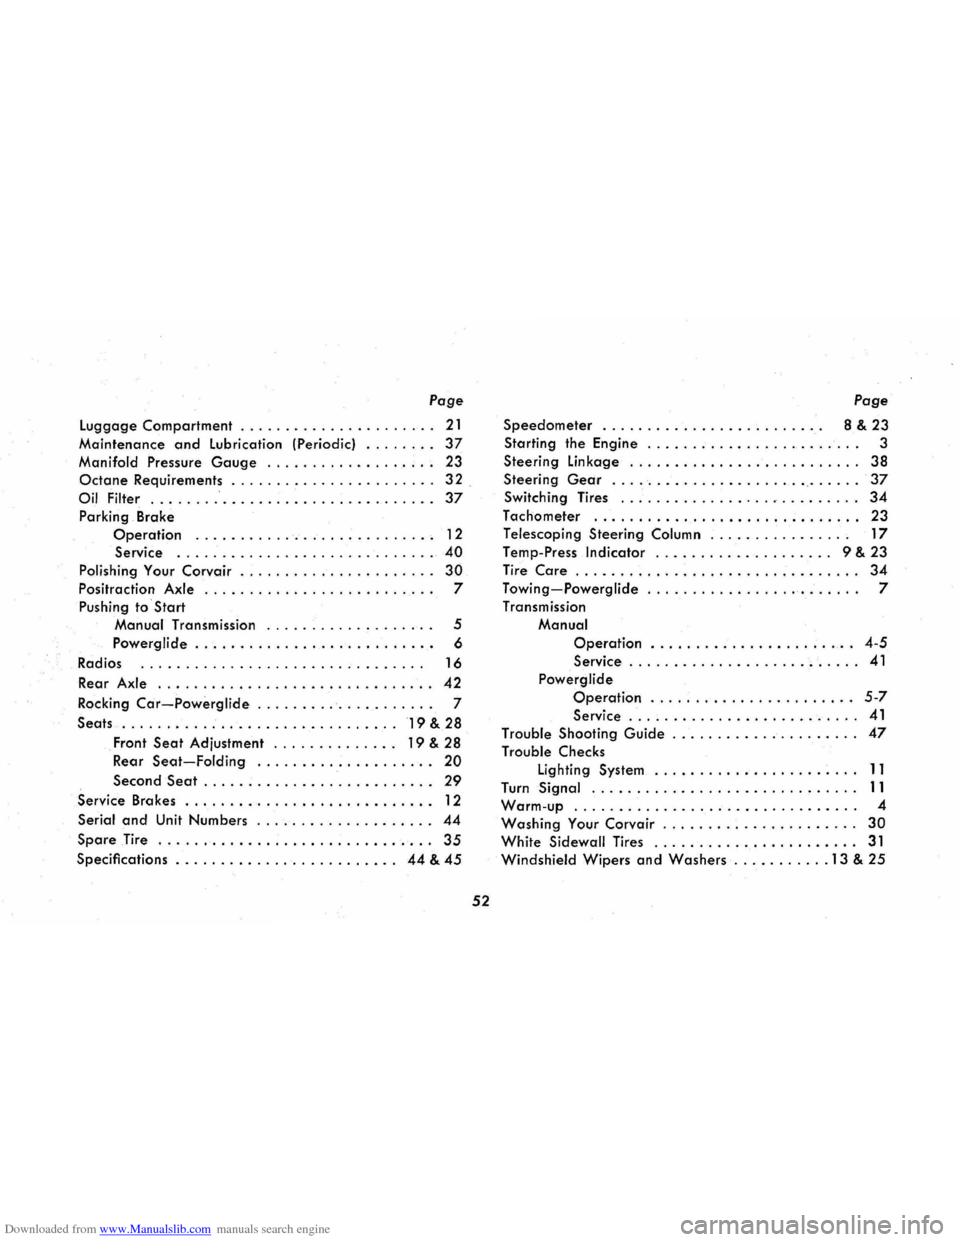
Downloaded from www.Manualslib.com manuals search engine Page
luggage Compartment . . . . . . . . . . . . . . . . . . . . .. 21
Maintenance and lubrication (Periodic) ........ 37
Manifold Pressure Gauge ................... 23
Octane Requirements ....................... 32.
Oil Filter ................................. 37
Parking Brake
Operation ........................... 12
Service
..... ......................... 40
Polishing Your Corvair . . . . . . . . . . . . . . . . . . . . .. 30
Positraction Axle .......................... 7
Pushing to
Start
Manual Transmission ............. .... .. 5
Powerglide . . . . . . . . . . . . . . . . . . . . . . . . .
.. 6
Radios
................................ 16
Rear Axle ............................... 42
Rocking Car-Powerglide . . . . . . . . .. . . . . . . . . .. 7
Seats
......................... " .... 19 & 28
Front Seat Adjustment . . . . . . . . . . . . .. 19 & 28
Rear
Seat-Folding .................... 20
Second Seat . . . . . . . . . . . . . . . . . . . . . . . . .. 29
Service Brakes ............. . . . . . . . . . . . . . .. 12
Serial
and Unit Numbers . . . . . . . . . . . . . . . . . . .. 44
Spare Tire ............................... 35
Specifications . . . . . . . . . . . . .. . . . . . . . . . .. 44 & 45
52
Page
Speedometer ......................... 8 & 23
Starting the Engine ....... . . . . . . . . . . . . . . . . . 3
Steering
linkage .......................... 38
Steering Gear .... ' ................. ' .' . . . .. 37
Switching Tires .................•......... 34
Tachometer .............................. 23
Telescoping Steering Column ............... , 17
Temp-Press Indicator .................... 9 & 23
Tire
Care . . . . . . . . . . . . . . . . . . . . . . . . . . . . . . .. 34
Towing-Powerglide . . . . . . . . . . . . . . . . . . . . . . .. 7
Transmission Manual
Operation ..................... ,. 4-5
Service .......................... 41
Powerglide
Operation . . . . . . . . . . . . . . . . . . . . . .. 5-7
Service ........................ " 41
Trouble Shooting Guide . . . . . . . . . . . . . . . . . . . .. 47
Trouble Checks
lighting System
...................... .11
Turn Signal .............................. 11
Warm-up. . . . . . . . . . . . . . . . .. . . . . . . . .. . . . .. 4
Washing Your Corvair . . . . . . . . . . . . . . . . . . . . .. 30
White Sidewall Tires ....................... 31
Windshield Wipers and Washers ........... 13 & 25