low oil pressure CHEVROLET CORVETTE 1994 4.G Owners Manual
[x] Cancel search | Manufacturer: CHEVROLET, Model Year: 1994, Model line: CORVETTE, Model: CHEVROLET CORVETTE 1994 4.GPages: 274, PDF Size: 15.61 MB
Page 92 of 274
Downloaded from www.Manualslib.com manuals search engine SERVICE
SOON
0
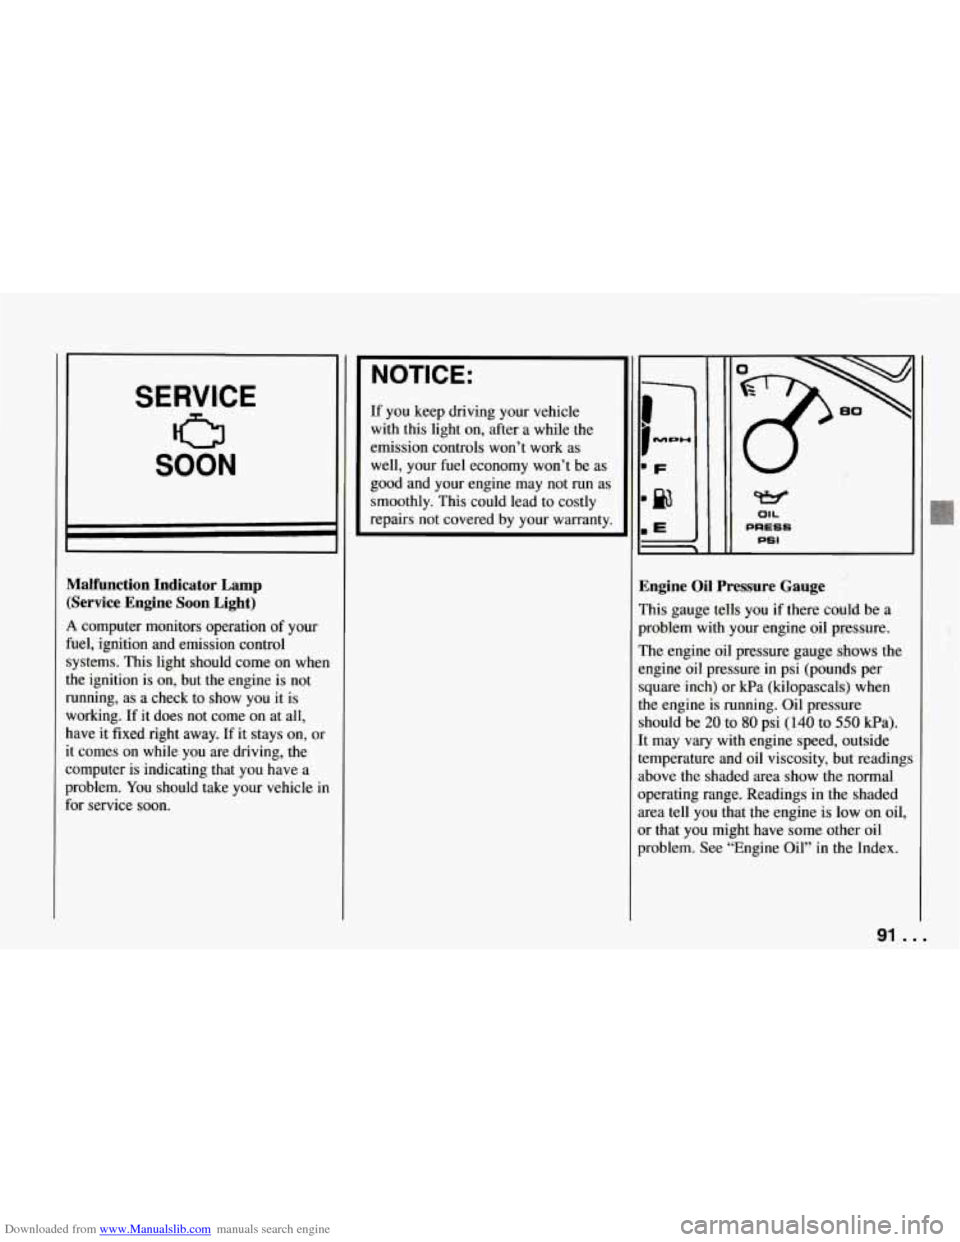
Malfunction Indicator Lamp (Service Engine Soon Light)
A computer monitors operation of your
fuel, ignition and emission control
systems. This light should come on when
the ignition is on,
but the engine is not
running, as a check to show you it is
working. If it does not come on at all,
have it fixed right away. If it stays on, or
it comes on while you are driving, the
computer is indicating that you have a
problem.
You should take your vehicle in
for service soon.
NOTICE:
If you keep driving your vehicle
with this light on, after a while the
emission controls won’t work as
well, your fuel economy won’t be as
good and your engine may not
run as
smoothly. This could lead to costly
repairs not covered by your warranty.
W
OIL
PRESS
PSI
. .,
Engine Oil Pressure Gauge
This gauge tells you if there could be a
problem with your engine oil pressure.
The engine oil pressure gauge shows the
engine oil pressure
in psi (pounds per
square inch) or kPa (kilopascals) when
the engine is running. Oil pressure
should be
20 to 80 psi (140 to 550 kPa).
It may
vary with engine speed, outside
temperature and oil viscosity, but readings
above the shaded area show the normal
operating range. Readings in the shaded
area tell you that the engine
is low on oil,
or that you might have some other oil
problem. See “Engine Oil” in the Index.
91 ...
Page 94 of 274
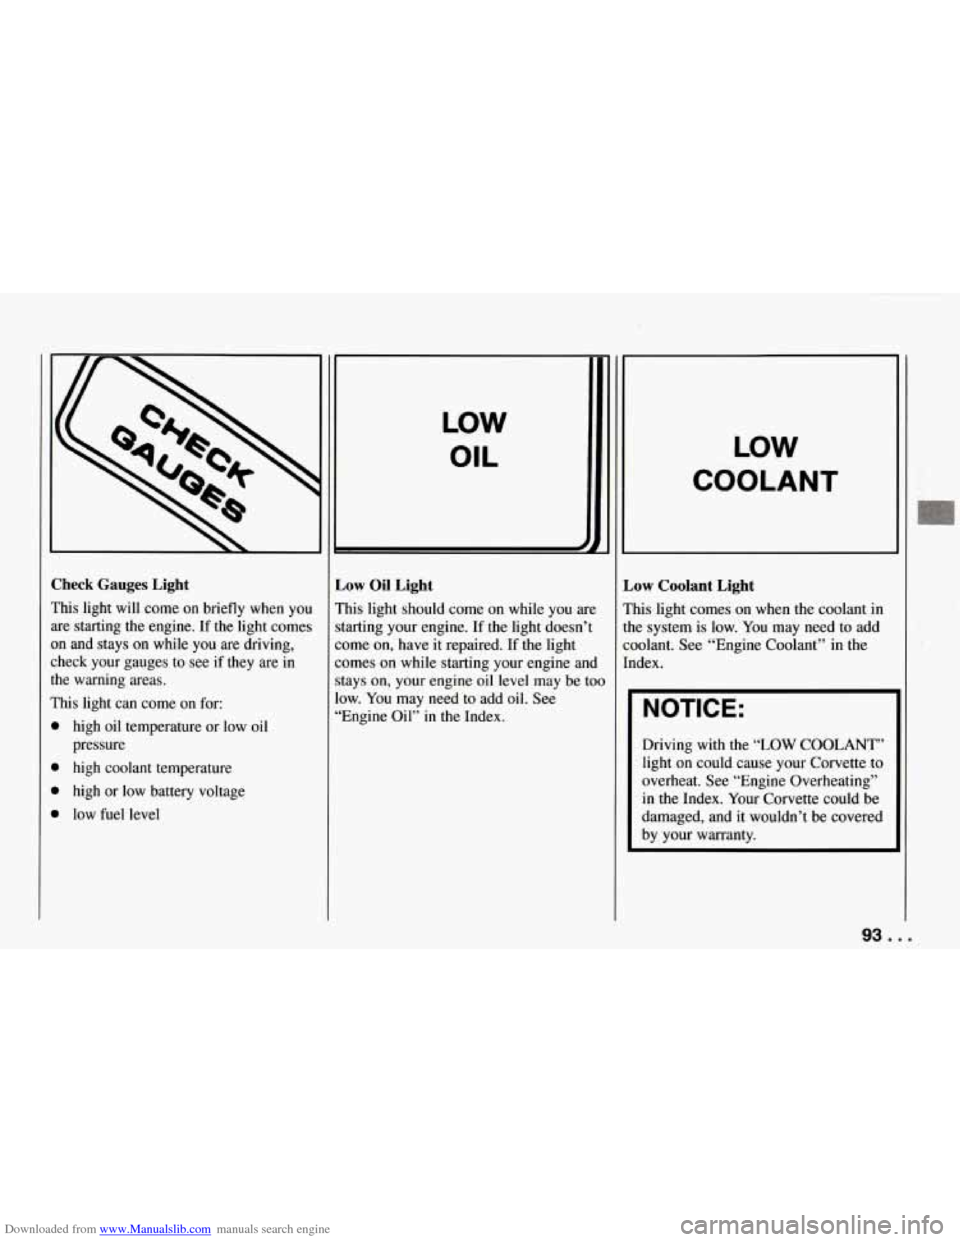
Downloaded from www.Manualslib.com manuals search engine Check Gauges Light
This light will come on briefly when you are starting
the engine. If the light comes
on and stays on while you are driving,
check your gauges to see if they are in
the warning areas.
This light can come on for:
high oil temperature or low oil
pressure
high coolant temperature
high or low battery voltage
low fuel level
LOW
OIL
L
Low Oil Light
This light should come on while you are
starting your engine. If
the light doesn’t
come on, have it repaired.
If the light
comes on while starting your engine and
stays on, your engine oil level may be too
low. You may need to add oil. See
“Engine Oil” in the Index.
LOW
COOLANT
Low Coolant Light
This light comes on when the coolant in
the system is low. You may need to add
coolant. See “Engine Coolant” in the
Index.
NOTICE:
Driving with the “LOW COOLANT”
light on could cause your Corvette to
overheat. See “Engine Overheating”
in the Index. Your Corvette could be
damaged, and it wouldn’t be covered
by your warranty.
93 ...
Page 136 of 274
Downloaded from www.Manualslib.com manuals search engine begin to check traffic. Try to determine
where you expect to blend with the flow.
Try to merge into the gap
at close to the
prevailing speed. Switch on your turn
signal, check your mirrors and glance
over your shoulder as often as necessary.
Try to blend smoothly with the traffic
flow.
Once you are on the freeway, adjust your
speed to the posted limit or to the
prevailing rate if it’s slower. Stay in the
right lane unless you want to pass.
Before changing lanes, check your
mirrors. Then use your turn signal. Just
before you leave the lane, glance quickly
over your shoulder to make sure there
isn’t another vehicle in your “blind” spot.
Once you are moving on the freeway,
make certain you allow a reasonable
following distance. Expect to move
slightly slower at night.
When you want to leave the freeway,
move to the proper lane well
in advance.
If you miss your exit do not, under any
circumstances, stop and back up. Drive on
to the next exit.
The exit ramp can be curved, sometimes
quite sharply. The exit speed is usually
posted. Reduce your speed according to your speedometer, not
to your sense of
motion. After driving for any distance at
higher speeds, you may tend to think you
are going slower than you actually are.
Before Leaving on a Long Trip
Make sure you’re ready. Try to be well
rested. If you must start when you’re not
fresh
- such as after a day’s work -
don’t plan to ,make too many miles that
first part
of the journey. Wear comfortable
clothing and shoes you can easily drive
in.
Is your vehicle ready for a long trip? If
you keep it serviced and maintained, it’s
ready to go. If it needs service, have it
done before starting out. Of course, you’ll
find experienced and able service experts
in Chevrolet dealerships all across North
America. They’ll be ready and willing to
help if you need
it.
Here are some things you can check
before a trip:
Windshield Washer Fluid: Is the
reservoir full? Are all windows clean
inside and outside?
0 Wiper Blades: Are they in good
shape?
0
0
Fuel, Engine Oil, Other Fluids:
Have you checked all levels?
Lights: Are they all working? Are the
lenses clean?
Tires: They are vitally important to a
safe, trouble-free trip.
Is the wead
good enough for long-distance
driving? Are the tires all inflated to
the recommended pressure?
Weather Forecasts: What’s the
weather outlook along your route?
Should you delay your trip
a short
time to avoid a major storm system?
Maps: Do you have up-to-date maps?
Highway Hypnosis
Is there actually such a condition as
“highway hypnosis”? Or is it jugt plain
falling asleep at the wheel? Call it
highway hypnosis, lack of awareness, or
whatever.
There is something about an easy stretch
of road with the same scenery, along with
the hum of the tires on the road, the drone
of the engine, and the rush of the wind
against the vehicle that can make you
sleepy. Don’t let it happen to you! If it
does, your vehicle can leave the road in
less than a second, and you could crash
and be injured.
135
Page 212 of 274
Downloaded from www.Manualslib.com manuals search engine 0 Use solvent-type cleaners in a
well-ventilated area only. If you use
them, don’t saturate the stained area.
If a ring forms after spot cleaning,
clean the entire area immediately or it
will set.
Using Foam-Type Cleaner on Fabric
Vacuum and brush the area to remove
any loose dirt.
Always clean a whole trim panel or
section. Mask surrounding trim along
stitch or welt lines.
Mix Multi-Purpose Powdered Cleaner
following the directions on the
container label.
Use suds only and apply with a clean
sponge.
Don’t saturate the material.
Don’t rub it roughly.
As soon as you’ve cleaned the section,
use a sponge to remove the suds.
Rinse the section with a clean, wet
sponge.
Wipe
off what’s left with a slightly
damp paper towel or cloth.
Then dry it immediately with a blow
dryer or a heat lamp.
I NOTICE:
I
Be careful with a hair dryer or heat
lamp. You could scorch the fabric.
Wipe with a clean cloth.
Using Solvent-Type Cleaner on Fabric
First, see if you have to use solvent-type
cleaner at all. Some spots and stains will
clean
off better with just water and mild
soap.
If you need to use a solvent:
0
0 Gently scrape excess soil from the
trim material with a clean, dull knife
or scraper. Use very little cleaner, light
pressure and clean cloths (preferably
cheesecloth). Cleaning should start at
the outside of the stain, “feathering”
toward the center. Keep changing to a
clean section of the cloth.
When you clean a stain from fabric,
immediately dry the area with an air
hose, hair dryer, or heat lamp to help
prevent a cleaning ring. (See the
previous NOTICE.)
Fabric Protection
Your Corvette has upholstery and carpet
that has been treated with Scotchgard”
Fabric Protector, a 3M product.
Scotchgard
” protects fabrics by repelling
oil and water, which are the carriers of
most stains. Even with this protection,
you still need to clean your upholstery
often to keep it looking new.
Further information on cleaning is
available by calling 1-800-433-3296
(in Minnesota, 1-800-642-6167).
Special Cleaning Problems
Greasy or oily stains:
Such as grease,
oil, butter, margarine, shoe polish, coffee
with cream, chewing gum, cosmetic
creams, vegetable oils, wax crayon, tar
and asphalt.
Carefully scrape
off excess stain.
Follow the solvent-type instructions
described earlier.
Shoe polish, wax crayon, tar and
asphalt will stain if left on a vehicle
seat fabric. They should be removed
as soon as possible. Be careful,
because the cleaner will dissolve them
and may cause them to spread.
211 ...
Page 222 of 274
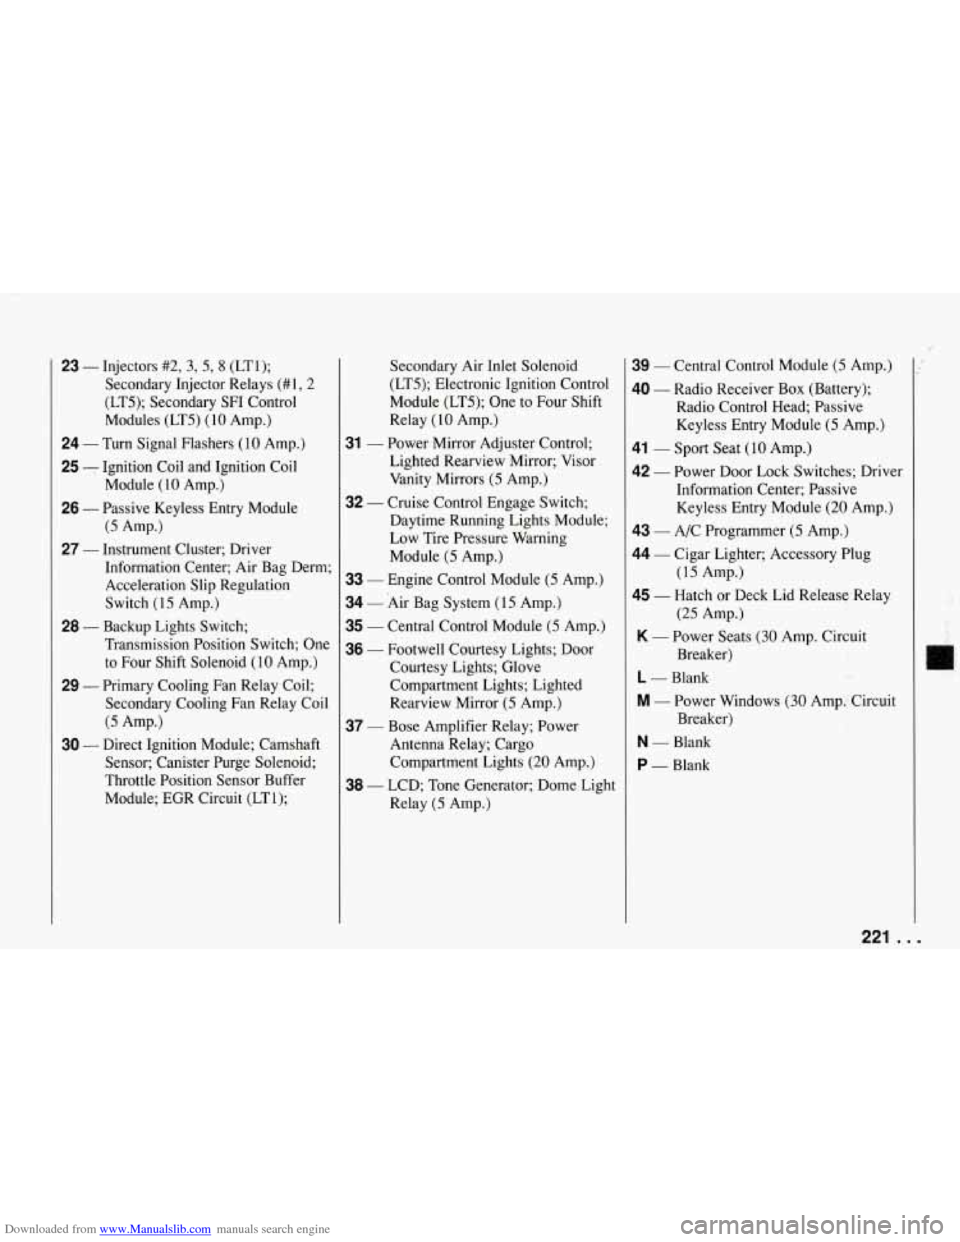
Downloaded from www.Manualslib.com manuals search engine 23 - Injectors #2, 3, 5, 8 (LTI);
Secondary Injector Relays (#1,2
(LT5); Secondary SF1 Control
Modules (LT5)
(10 Amp.)
24 - Turn Signal Flashers (10 Amp.)
25 - Ignition Coil and Ignition Coil
26 - Passive Keyless Entry Module
27 - Instrument Cluster; Driver Module (10 Amp.)
(5 Amp.)
Information Center; Air Bag Derm; Acceleration Slip Regulation
Switch
(15 Amp.)
Transmission Position Switch; One
to Four Shift Solenoid
(10 Amp.)
29 - Primary Cooling Fan Relay Coil;
Secondary Cooling Fan Relay Coil
28 - Backup Lights Switch;
(5 Amp.)
30 - Direct Ignition Module; Camshaft Sensor; Canister Purge Solenoid;
Throttle Position Sensor Buffer
Module; EGR Circuit (LT1);
31
32
Secondary Air Inlet Solenoid
(LT5); Electronic Ignition Control
Module (LT5); One to Four Shift
Relay
( 10 Amp.)
Power Mirror Adjuster Control;
Lighted Rearview Mirror; Visor
Vanity Mirrors
(5 Amp.)
Cruise Control Engage Switch;
Daytime Running Lights Module;
Low Tire Pressure Warning
Module
(5 Amp.)
33 - Engine Control Module (5 Amp.)
34 - Air Bag System (15 Amp.)
35 - Central Control Module (5 Amp.)
36 - Footwell Courtesy Lights; Door
Courtesy Lights; Glove
Compartment Lights; Lighted
Rearview Mirror
(5 Amp.)
37 - Bose Amplifier Relay; Power
Antenna Relay; Cargo
Compartment Lights
(20 Amp.)
Relay
(5 Amp.)
38 - LCD; Tone Generator; Dome Light
39 - Central Control Module (5 Amp.)
40 - Radio Receiver Box (Battery);
Radio Control Head; Passive
Keyless Entry Module
(5 Amp.)
41 - Sport Seat (10 Amp.)
42 - Power Door Lock Switches; Driver
Information Center; Passive
Keyless Entry Module
(20 Amp.)
43 - A/C Programmer (5 Amp.)
44 - Cigar Lighter; Accessory Plug
45 - Hatch or Deck Lid Release Relay
K - Power Seats (30 Amp. Circuit
L - Blank
M - Power Windows (30 Amp: Circuit
N - Blank
P - Blank
(15 Amp.)
(25 Amp.)
Breaker)
Breaker)
221 . I
Page 239 of 274
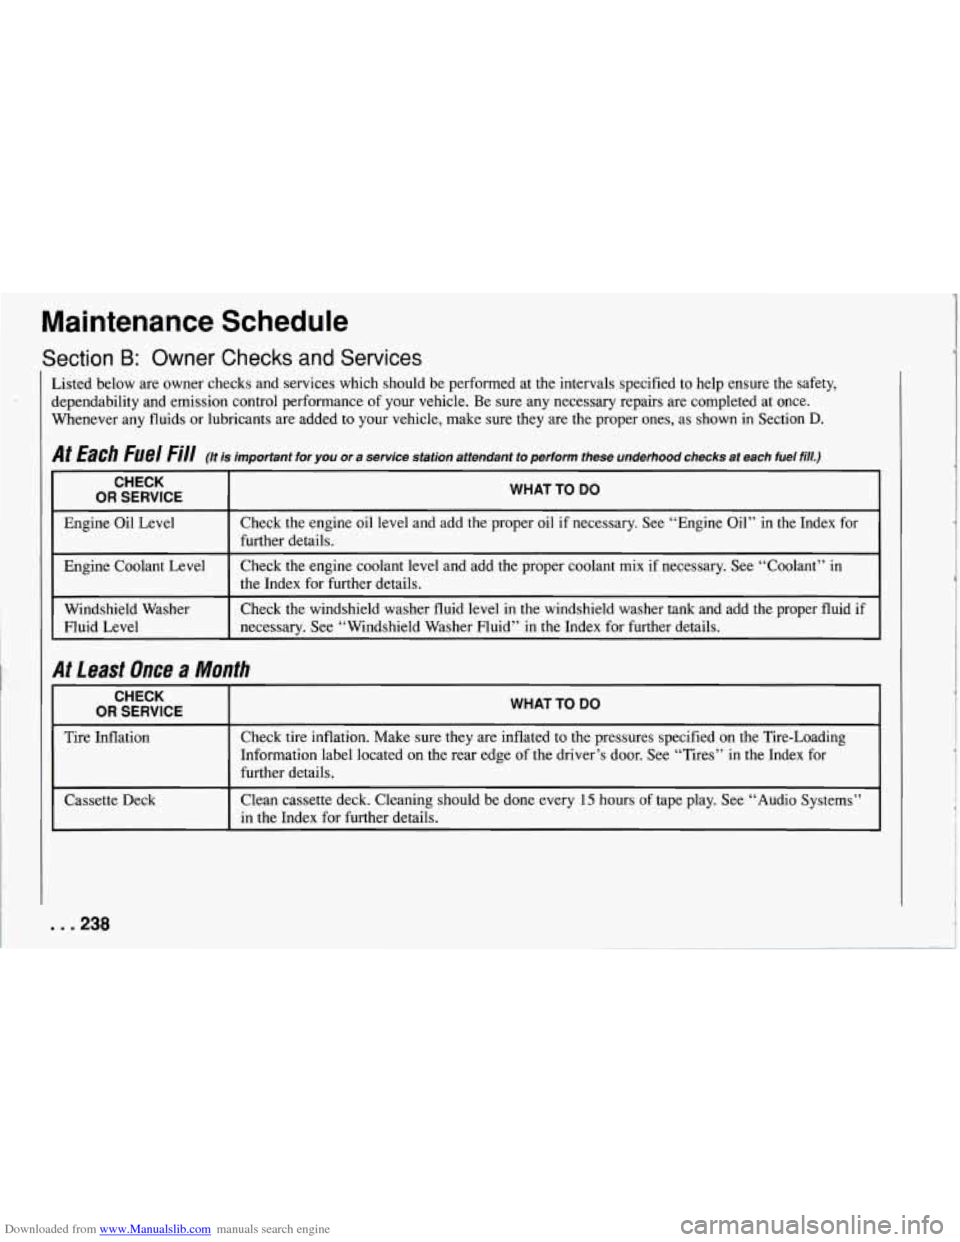
Downloaded from www.Manualslib.com manuals search engine Maintenance Schedule
Section B: Owner Checks and Services
isted below are owner checks and services which should be performed at the intervals specified to help ensure the safety,
ependability and emission control performance of your vehicle. Be sure any necessary repairs are completed at once.
Vhenever any fluids or lubricants are added
to your vehicle, make sure they are the proper ones, as shown in Section D.
If Each Fuel Fill (/t is important for you or a service station attendant to perform these underhood checks at each fuel fill.)
i CHECK
OR SERVICE I WHAT TO DO
Engine Oil Level
Check the windshield washer fluid level in the windshield washer
tank and add the proper fluid if
Windshield Washer Check
the engine coolant level and add the proper coolant mix if necessary. See “Coolant” in
Engine Coolant Level Check the
engine oil level and add the proper oil if necessary. See “Engine Oil” in the Index for
Fluid Level necessary.
See “Windshield Washer Fluid” in the Index for further details.
further details.
the
Index for further details.
It Least Once a Month
CHECK
OR SERVICE
Tire Inflation
Cassette Deck
WHAT TO DO
Check tire inflation. Make sure they are inflated to the pressures specified on the Tire-Loading
Information label located on the rear edge
of the driver’s door. See “Tires” in the Index for
further details.
Clean cassette deck. Cleaning should be done every
15 hours of tape play. See “Audio Systems”
in the Index for further details.
. .238
Page 265 of 274
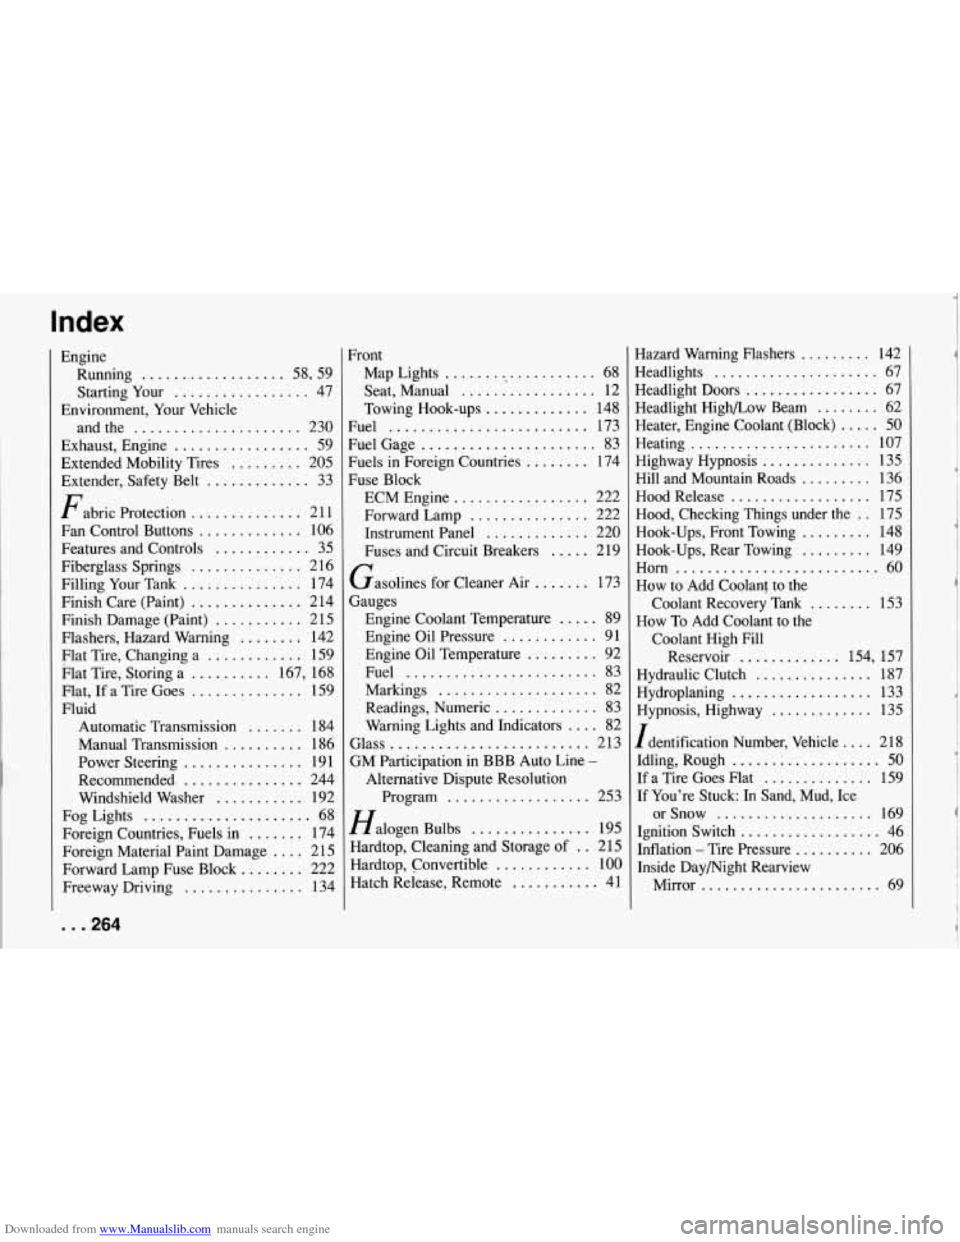
Downloaded from www.Manualslib.com manuals search engine Index
Engine Running
.................. 58. 59
Starting Your
................. 47
andthe
..................... 230
Extended Mobility Tires
......... 205
Extender. Safety Belt
............. 33
Fabric Protection
.............. 21 1
Fan Control Buttons
............. 106
Features and Controls ............ 35
Fiberglass Springs
.............. 2 16
Filling Your Tank
............... 174
Finish Care (Paint)
.............. 214
Finish Damage (Paint)
........... 2 15
Flashers. Hazard Warning
........ 142
Flat Tire. Changing a ............ 159
Flat Tire. Storing a
.......... 167. 168
Flat. If a Tire Goes
.............. 159
Fluid
Automatic Transmission
....... 184
Manual Transmission
.......... 186
Power Steering
............... 191
Recommended
............... 244
Windshield Washer
........... 192
Fog Lights
..................... 68
Foreign Countries. Fuels in
....... 174
Foreign Material Paint Damage
.... 21 5
Forward Lamp Fuse Block ........ 222
Freeway Driving
............... 134
... 264
Environment. Your Vehicle
Exhaust. Engine
................. 59 Front
Map Lights
................... 68
Seat. Manual
................. 12
Towing Hook-ups
............. 148
Fuel
......................... 173
Fuels in Foreign Countries
........ 174
Fuse Block FuelGage
...................... 83
ECM Engine
................. 222
Forward Lamp
............... 222
Instrument Panel
............. 220
Fuses and Circuit Breakers
..... 219
Gasolines for Cleaner Air
....... 173
Gauges Engine Coolant Temperature
..... 89
Engine Oil Pressure
............ 91
Engine Oil Temperature
......... 92
Fuel
........................ 83
Readings. Numeric
............. 83
Warning Lights and Indicators
.... 82
Glass ......................... 213
GM Participation in BBB Auto Line
-
Markings .................... 82
Alternative Dispute Resolution
Program
.................. 253
Halogen Bulbs
............... 195
Hardtop. Cleaning and Storage of
. . 215
Hardtop. Convertible
............ 100
Hatch Release. Remote ........... 41 Hazard Warning Flashers
......... 142
Headlights
..................... 67
Headlight Doors
................. 67
Headlight High/Low Beam
........ 62
Heater. Engine Coolant (Block)
..... 50
Heating ....................... 107
Highway Hypnosis
.............. 135
Hill and Mountain Roads ......... 136
Hood Release
.................. 175
Hood. Checking Things under the
. . 175
Hook.Ups. Front Towing
......... 148
Hook.Ups. Rear Towing
......... 149
Horn
.......................... 60
How to Add Coolant to the
Coolant Recovery Tank
........ 153
How To Add Coolant to the
Coolant High Fill Reservoir
............. 154. 157
Hydraulic Clutch
............... 187
Hydroplaning
.................. 133
Hypnosis. Highway
............. 135
Identification Number. Vehicle
.... 218
Idling. Rovgh
...... : ............ 50
If a Tire Goes Flat .............. 159
If You’re Stuck: In Sand. Mud. Ice or Snow
.................... 169
Ignition Switch
.................. 46
Inflation
- Tire Pressure .......... 206
Inside Daymight Rearview
Mirror
....................... 69
Page 266 of 274
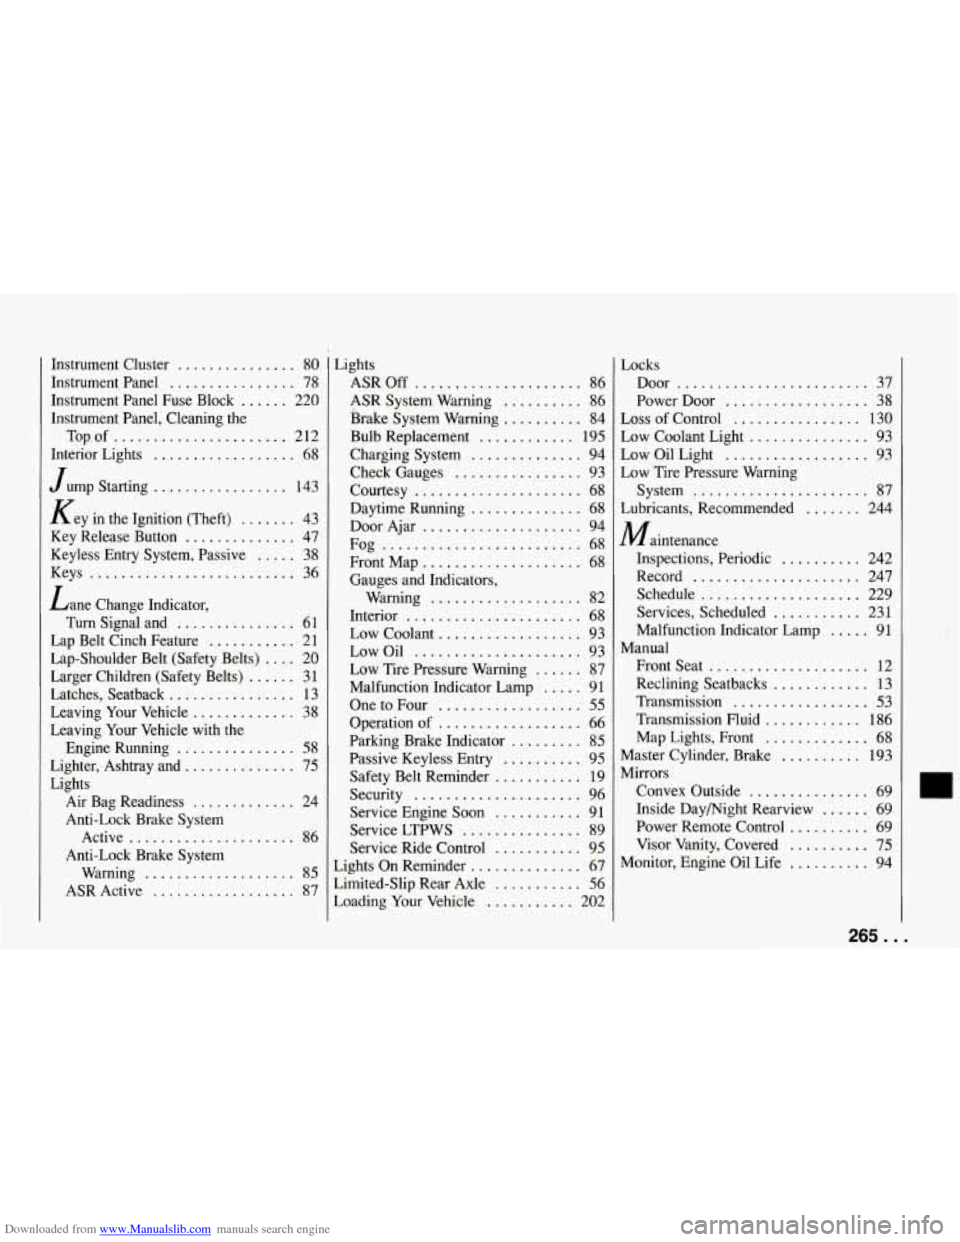
Downloaded from www.Manualslib.com manuals search engine Instrumeqt Cluster ............... 80
Instrument Panel ................ 78
Instrument Panel Fuse Block
...... 220
Topof
...................... 212
Interior Lights
.................. 68
Jump Starting
................. 143
1 Instrument Panel. Cleaning the
Key in the Ignition (Theft)
....... 43 .
Key Release Button .............. 47
Keyless Entry System. Passive
..... 38
Keys
.......................... 36
Lane Change Indicator.
Turn Signal and
............... 61
Lap Belt Cinch Feature
........... 21
Lap-Shoulder Belt (Safety Belts) .... 20
Larger Children (Safety Belts)
...... 31
Latches. Seatback ................ 13
Leaving Your Vehicle ............. 38
Leaving Your Vehicle with the
Engine Running
............... 58
Lighter. Ashtray and .............. 75
Lights
Air Bag Readiness ............. 24
Anti-Lock Brake System
Active
..................... 86
Anti-Lock Brake System Warning
................... 85
ASR Active .................. 87 Lights
ASR
Off ..................... 86
ASR System Warning
.......... 86
Brake System Warning
.......... 84
Bulb Replacement
............ 195
Charging System
.............. 94
Check Gauges
................ 93
Courtesy
..................... 68
Daytime Running
.............. 68
Door Ajar .................... 94
Fog
......................... 68
Front Map
.................... 68
Gauges and Indicators. Warning
................... 82
Interior
...................... 68
Low Coolant
.................. 93
Low Oil
..................... 93
Low Tire Pressure Warning
...... 87
Malfunction Indicator Lamp
..... 91
Parking Brake Indicator
......... 85
One to Four .................. 55
Operation of .................. 66
Passive Keyless Entry
.......... 95
Safety Belt Reminder
........... 19
Security
..................... 96
Service Engine Soon
........... 91
Service LTPWS
............... 89
Service Ride Control
........... 95
Lights On Reminder
.............. 67
Limited-Slip Rear Axle
........... 56
Loading Your Vehicle ........... 202 Locks
Door
........................ 37
Power Door
.................. 38
Loss of Control
................ 130
Low Coolant Light
............... 93
Low Oil Light
.................. 93
Low Tire Pressure Warning
System
...................... 87
Lubricants. Recommended
....... 244
Maintenance Inspections. Periodic
.......... 242
Record
..................... 247
Schedule
.................... 229
Services. Scheduled
........... 231
Malfunction Indicator Lamp
..... 91
Front Seat
.................... 12
Reclining Seatbacks
............ 13
Transmission
................. 53
Transmission Fluid
............ 186
Map Lights. Front
............. 68
Master Cylinder. Brake
.......... 193
Mirrors
Convex Outside
............... 69
Inside Daymight Rearview
...... 69
Power Remote Control
.......... 69
Visor Vanity. Covered
.......... 75
Monitor. Engine
Oil Life .......... 94
Manual
265 .
.