CHEVROLET CORVETTE 1997 5.G Owners Manual
Manufacturer: CHEVROLET, Model Year: 1997, Model line: CORVETTE, Model: CHEVROLET CORVETTE 1997 5.GPages: 356, PDF Size: 18.43 MB
Page 271 of 356
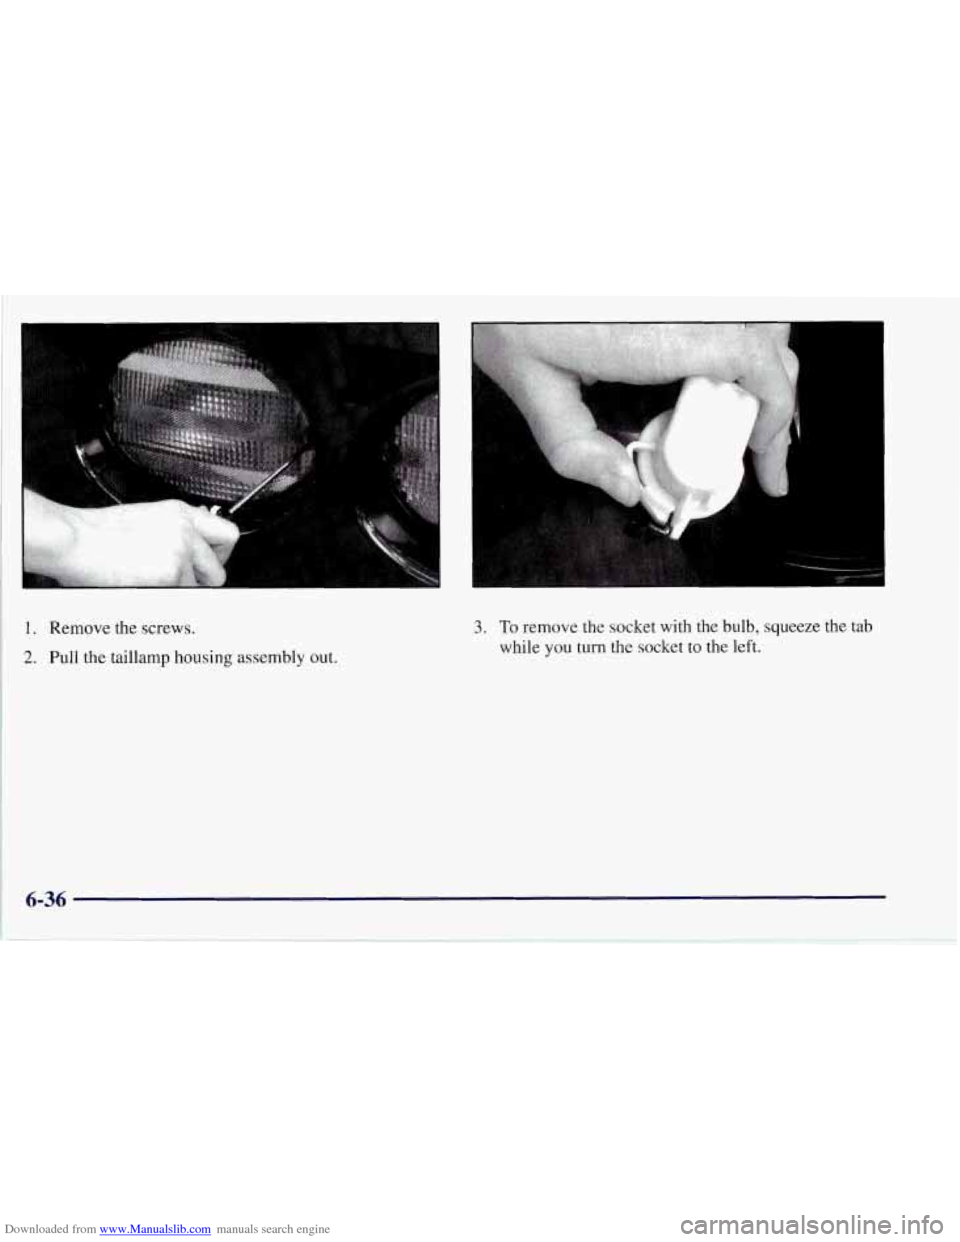
Downloaded from www.Manualslib.com manuals search engine 1. Remove the screws.
2. Pull the taillamp housing assembly out.
3. To remove the socket with the bulb, squeeze the tab
while
you turn the socket to the left.
Page 272 of 356
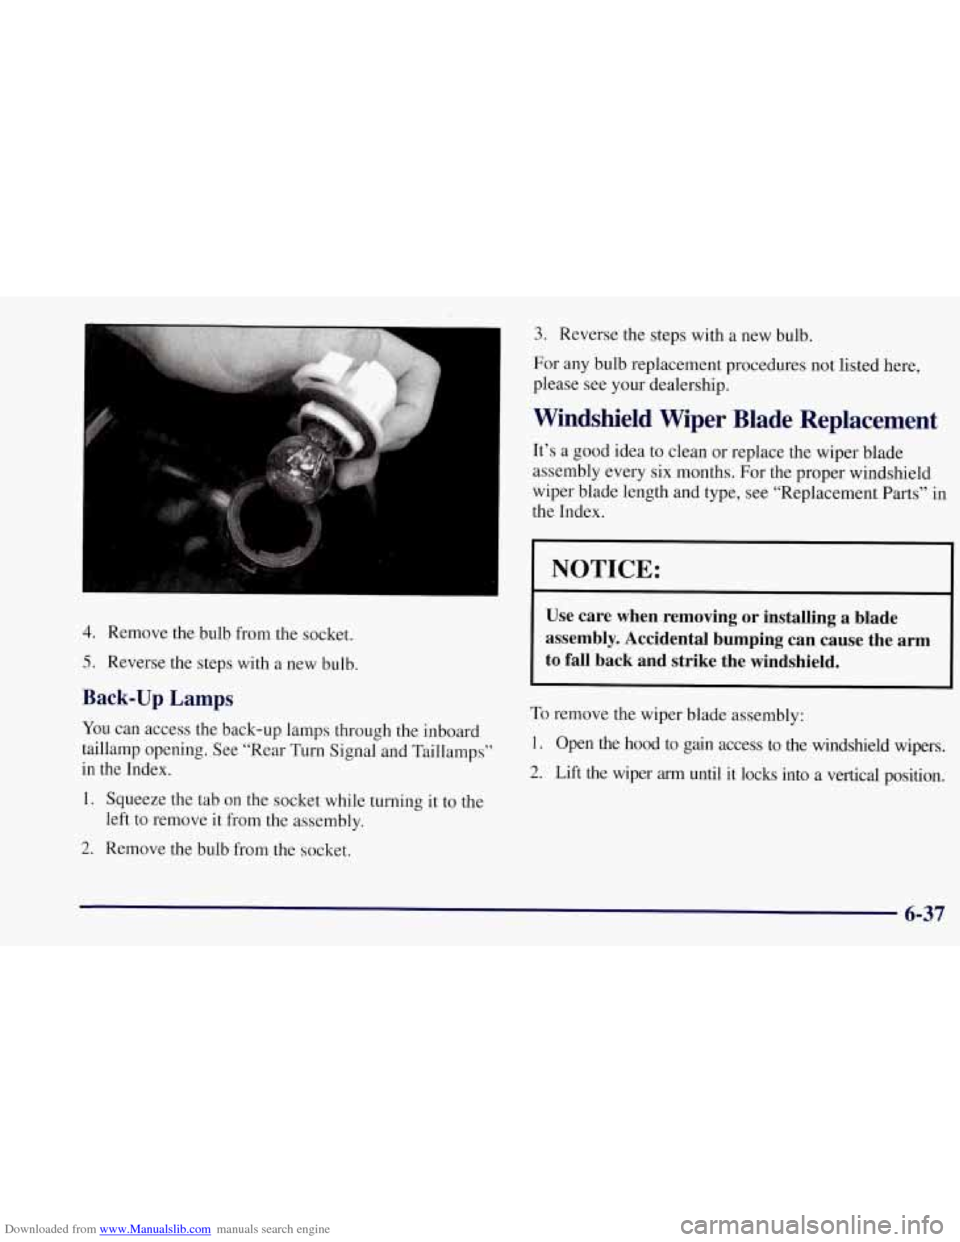
Downloaded from www.Manualslib.com manuals search engine 4. Remove the bulb from the socket.
5. Reverse the steps with a new bulb.
Back-up Lamps
YOU can access the back-up lamps through the inboard
taillamp opening. See “Rear Turn Signal and Taillamps”
in the Index.
1. Squeeze the tab on the socket while turning
it to the
2. Remove the bulb from the socket.
left
to remove it from the assembly.
3. Reverse the steps with a new bulb.
For any bulb replacement procedures not listed here,
please see your dealership.
Windshield Wiper Blade Replacement
It’s a good idea to clean or replace the wiper blade
assembly every six months. For the proper windshield
wiper blade length and type, see “Replacement Parts” in
the Index.
NOTICE:
Use care when removing or installing a blade
assembly. Accidental bumping can cause the
arm
to fall back and strike the windshield.
To remove the wiper blade assembly:
I. Open the hood to gain access to the windshield wipers.
2. Lift the wiper arm until it locks into a vertical position.
6-37
Page 273 of 356
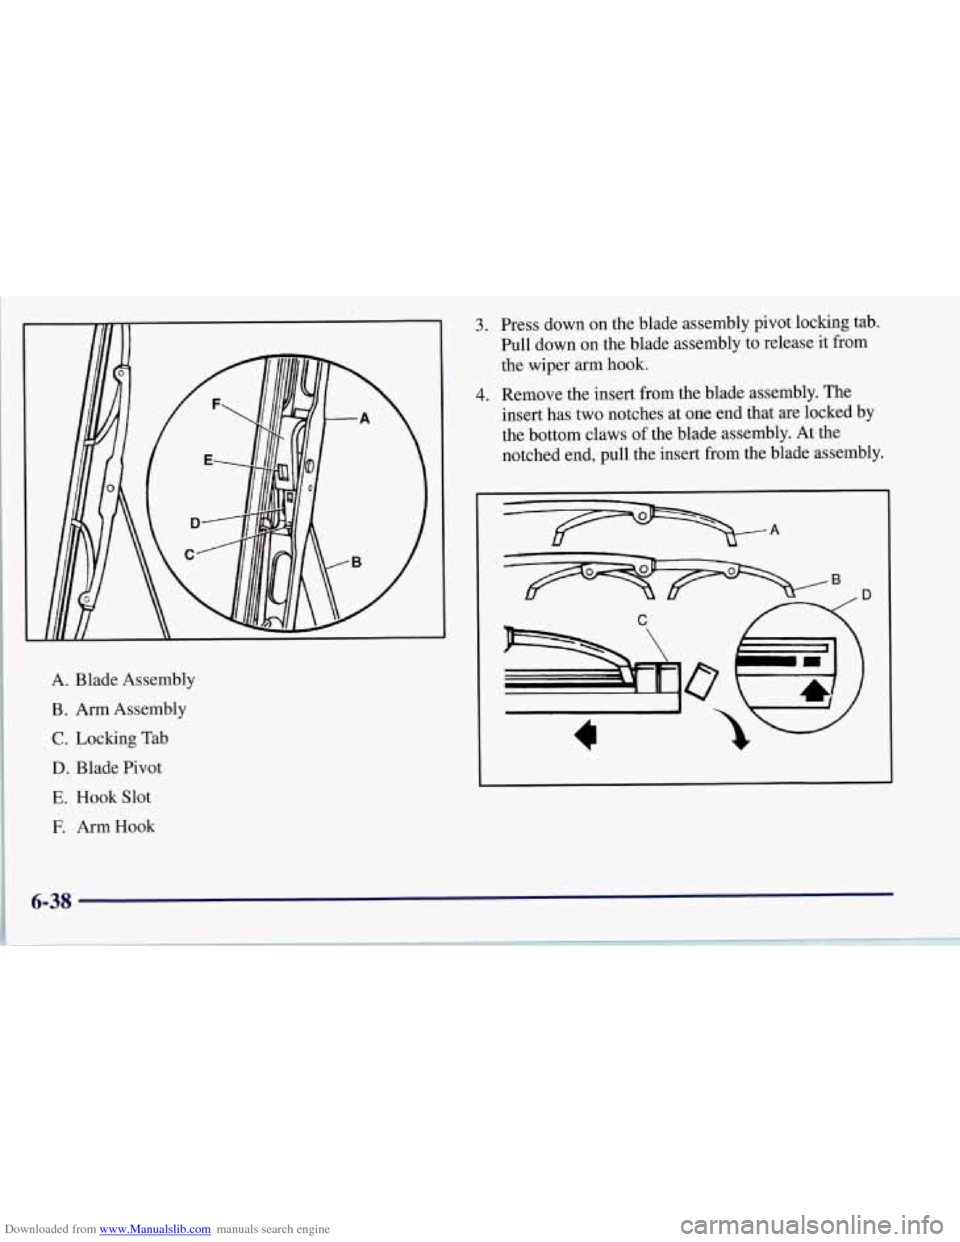
Downloaded from www.Manualslib.com manuals search engine A. Blade Assembly
B. Arm Assembly
C. Locking Tab
D. Blade Pivot
E. Hook Slot
E ArmHook
3.
4.
Press down on the blade assembly pivot locking tab.
Pull down on the blade assembly to release it from
the wiper arm hook.
Remove the insert from the blade assembly. The
insert has two notches at one end that are locked by
the bottom claws of the blade assembly. At the
notched end, pull the insert from the blade assembly.
4 \-
Page 274 of 356
Downloaded from www.Manualslib.com manuals search engine To install the new wiper insert:
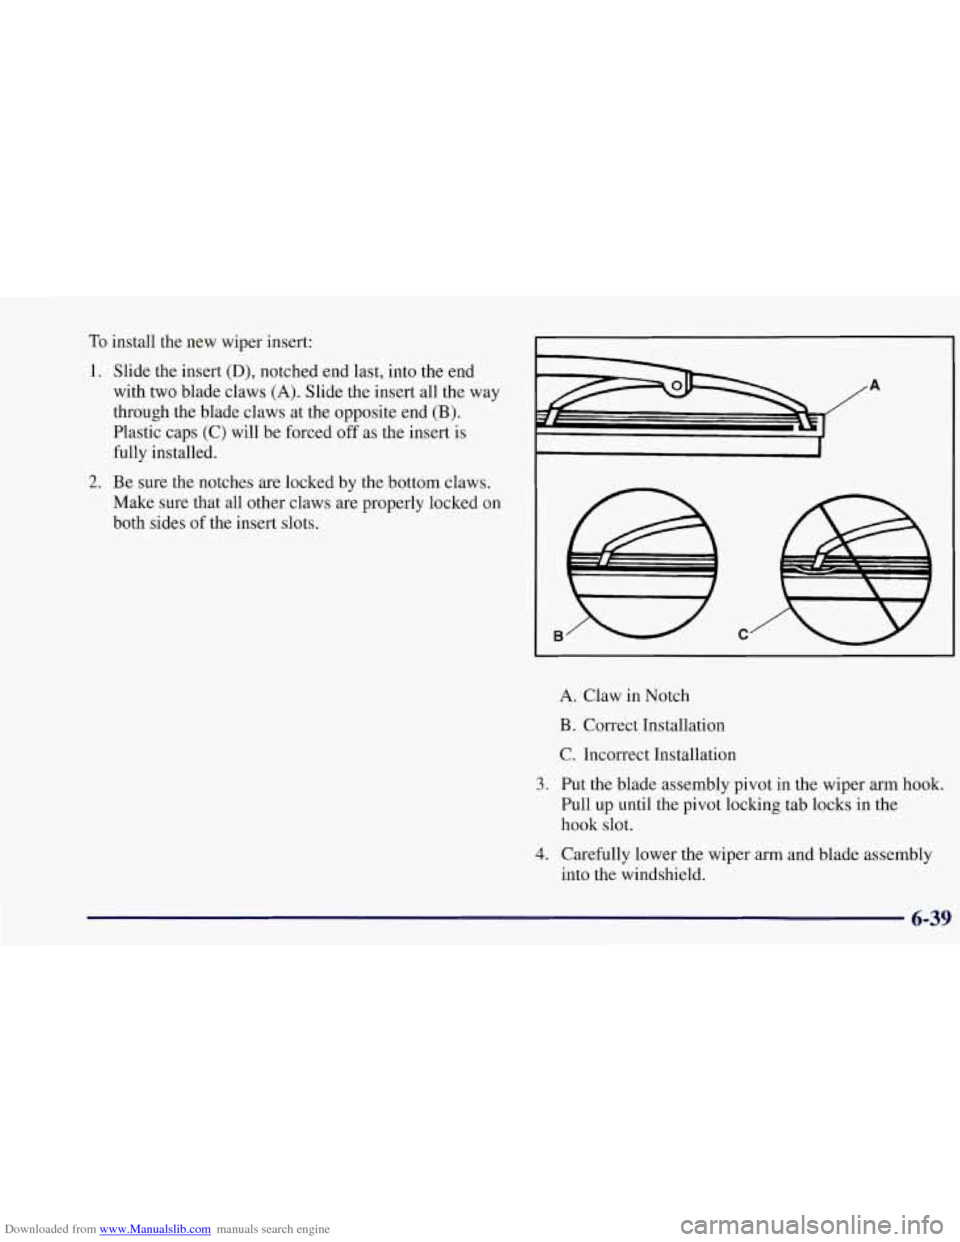
1. Slide the insert
(D), notched end last, into the end
with two blade claws
(A). Slide the insert all the way
through the blade claws at the opposite end
(B).
Plastic caps (C) will be forced off as the insert is
fully installed.
2. Be sure the notches are locked by the bottom claws.
Make sure that all other claws are properly locked on
both sides of the insert slots.
A
B w C
A. Claw in Notch
B. Correct Installation
C. Incorrect Installation
3. Put the blade assembly pivot in the wiper arm hook.
Pull up until the pivot locking tab locks in the
hook slot.
4. Carefully lower the wiper arm and blade assembly
into the windshield.
Page 275 of 356
Downloaded from www.Manualslib.com manuals search engine Tires
Your new Corvette comes with high-quality tires made
by a leading tire manufacturer. If you ever have
questions about your tire warranty and where to obtain
service, see your Corvette Warranty booklet for details.
Poorly maintained and improperly used tires are
dangerous.
0 Overloading your tires can cause
overheating as a result of too much friction.
You could have an air-out and a serious
accident. See “Loading Your Vehicle”
in the Index.
CAUTION: (Continued)
0
0
0
See “Inflation
Underinflated tires
pose the same danger as
overloaded tires. The resulting accident could cause serious injury. Check all tires
frequently to maintain the recommended
pressure. Tire pressure should be checked
when your tires are cold.
Overinflated tires are more likely to be
cut, punctured or broken by a sudden
impact
-- such as when you hit a pothole.
Keep tires
at the recommended pressure.
Worn, old tires can cause accidents.
If your
tread is badly worn, or if your tires have
been damaged, replace them.
-- Tire Pressure” in this section
the correct inflation pressure for competitive or
high-speed driving.
Page 276 of 356
Downloaded from www.Manualslib.com manuals search engine Extended Mobility Tires
Your Corvette, when new, had Goodyear Extended
Mobility Tires (EMT). There’s no spare tire, no tire
changing equipment and no place to store a tire in the
vehicle. Extended Mobility Tires perform
so well
without any air that a Tire Pressure Monitor (TPM) is
used to alert you if a tire has lost pressure.
The Tire Pressure Monitor (TPM) has a sensor on
each road wheel that transmits to a receiver on the
instrument panel.
The system operates on a radio frequency subject to
Federal Communications Commission (FCC) Rules and with Industry and Science Canada.
This device complies with Part 15 of the FCC Rules.
Operation is subject to the following two conditions:
(1)
this device may not cause harmful interference, and
(2) this device must accept any interference received,
including interference that may cause undesired operation.
This device complies with RSS-210 of Industry and
Science Canada. Operation is subject to the following
two conditions:
(1) this device may not cause
interference, and (2) this device must accept any
interference received, including interference that may
cause undesired operation of the device. Changes
or modifications to this system by other than an
authorized service facility could void authorization to
use this equipment.
If a tire’s inflation pressure is between
5 psi (35 kPa)
and 25 psi
(170 kPa), you will see a message on the
Driver Information Center. This message will show
which tire is underinflated and two chimes will sound.
An example would be LOW TIRE PRESSURE-LR.
This would mean that the inflation pressure in your left
rear tire is between
5 psi (35 Pa) and 25 psi (170 Wa).
If the inflation pressure in the tire drops below
5 psi
(35 kPa), the message would read FLAT TIRE-LR and
four chimes will sound. See “Driver Information
Center” in the Index.
The TPM will also alert you if a tire’s pressure is higher
than 42 psi (290 kPa). The message will show which tire
is overinflated and two chimes will sound. An example
would be
HIGH PRESSURE-LR. This would mean that
the inflation pressure in your left rear tire is higher than
42 psi
(290 Wa). See “Driver Information Center” in
the Index.
If a tire pressure message appears
on the Driver
Information Center, stop as soon as you can. Have the
tire pressures checked and set to those shown on your
Tire Loading Information label.
6-41
Page 277 of 356
Downloaded from www.Manualslib.com manuals search engine I
9 CAUTION:
When the LOW TIRE PRESSURE or FLAT TIRE message is displayed on the Driver
Information Center, your vehicle’s handling
capabilities
will be reduced during severe
maneuvers. If you drive too fast, you could lose
control
of your vehicle. You or others could be
injured. Don’t drive over
55 mph (90 km/h) when
the LOW TIRE PRESSURE or FLAT TIRE
message is displayed. Drive cautiously, and check
your tire pressures as soon as you can.
If a tire goes flat, you won’t need to stop on the side of
the road to change the tire.
You can just keep on driving.
The shorter the distance you drive and the slower the
speed, the greater the chance that the tire will not
have to be replaced.
If you drive on a deflated EMT
for
50 miles (80 km) or less and at speeds of 55 mph
(90 km/h) or less, there is a good chance that the tire can
be repaired. The tire can operate effectively with no air
pressure for up to 200 miles (320
km) at speeds up to
55 mph (90 kdh), but the tire would then have to be
replaced. When a tire is filled with air,
it provides a
cushion between the road and the wheel. Because you
won’t have this cushion when driving on a deflated tire,
try to avoid potholes that could damage your wheel and
require replacement of it.
Some road hazards can damage a tire beyond repair.
This damage could occur even before you’ve driven
on the tire in a deflated condition. When a tire has
been damaged, or if you’ve driven any distance on
a
deflated EMT, check with an authorized Goodyear
EMT Service Center to determine whether the tire can
be repaired or should be replaced. To maintain your
vehicle’s extended mobility feature, all replacement tires
must be Extended Mobility Tires.
As soon as possible,
contact the nearest authorized Chevrolet or Goodyear
EMT servicing facility for inspection and repair or
replacement. Call Chevrolet at 1-800-CHEV-USA
(1-800-243-8872) or Goodyear at 1-800-789-9878
24-hours a day for information on the location of the
nearest EMT servicing facility. In Canada, contact the
Customer Communication Center at 1-800-263-3777, or
Canadian Roadside Assistance at 1-800-268-6800. You
can also use the Goodyear number listed above to locate
an authorized EMT servicing facility.
Page 278 of 356
Downloaded from www.Manualslib.com manuals search engine Extended mobility tires are constructed
differently than other tires and could explode
during improper service. You or others could be
injured or killed
if you attempt to repair, replace,
dismount,
or mount an extended mobility tire.
Let only an authorized Goodyear
EMT Service
Center repair, replace, dismount and mount
extended mobility tires.
If you feel that winter tires are needed for your driving
conditions, Goodyear Eagle
M+S EMT tires are available
in your original equipment sizes fi-om an authorized
Goodyear EMT retailer. These tires will improve snow traction while maintaining your Corvette’s extended
mobility feature. See
the Goodyear Extended Mobility Tire
Owner’s Manual and Limited Warranty supplied with your
Corvette for additional information.
Inflation -- Tire Pressure
The Tire-Loading Information label, which is on the
rear edge
of the driver’s door,shows the correct inflation
pressures for
your tires when they’re cold. “Cold”
means your vehicle has been sitting for at least
three hours
or driven no more than 1 mile (1.6 km).
6-43
Page 279 of 356
Downloaded from www.Manualslib.com manuals search engine NOTICE:
Don’t let anyone tell you that underinflation or
overinflation
is all right. It’s not. If your tires
don’t have enough air (underinflation), you can
get the following:
0 Too much flexing
0 Too much heat
0 Tire overloading
0 Bad wear
Bad handling
0 Bad fuel economy.
If your tires have too much air (overinflation),
you can get the following:
Unusual wear
0 Bad handling
Rough ride
0 Needless damage from road hazards. When to Check
Check your tires
once a month or more.
How to Check
Use a good quality pocket-type gage to check tire
pressure.
You can’t tell if your tires are properly inflated
simply by looking at them. Radial tires may look
properly inflated even when they’re underinflated.
Be sure
to put the valve caps back on the valve stems.
They help prevent leaks by keeping out
dirt and moisture.
Tire Rotation
The tires on your Corvette are directional and are
different sizes front to rear. Due to this, your tires should
not be rotated. Each tire and wheel should be used only
in the position it is in.
6-44
Page 280 of 356

Downloaded from www.Manualslib.com manuals search engine When It’s Time for New Tires
One way to tell when it’s
time for new tires is to
check the treadwear
indicators, which will
appear when your tires have
only 1/16 inch (1.6 mm) or
less of tread remaining.
You need
a new tire if any of the following statements
are true:
You can see the indicators at three or more places
You can see cord or fabric showing through the
around the tire.
tire’s rubber.
The tread or sidewall is cracked, cut or snagged deep
enough to show cord or fabric.
The tire has a bump, bulge or split.
The tire has a puncture, cut or other damage that
can’t be repaired well because of the size or location
of the damage.
Buying New Tires
To find out what kind and size of tires you need, look at
the Tire-Loading Information label.
The tires installed on your vehicle when it was new had
a Tire Performance Criteria Specification (TPC Spec)
number on each tire’s sidewall. When you get new tires,
get ones with that same TPC Spec number. That way
your vehicle will continue to have tires that are designed
to give proper endurance, handling, speed rating,
traction, ride and other things during normal service on
your vehicle.
If your tires have an all-season tread
design, the TPC number will be followed by an
“MS”
(for mud and snow).
6-45