CHEVROLET CORVETTE 2003 5.G Owners Manual
CORVETTE 2003 5.G
CHEVROLET
CHEVROLET
https://www.carmanualsonline.info/img/24/8118/w960_8118-0.png
CHEVROLET CORVETTE 2003 5.G Owners Manual
Trending: stop start, wheel alignment, oil filter, air suspension, hood release, clutch, weight
Page 271 of 368
5. Check that the jumper cables don't have loose or
missing insulation. If they do, you could get a
shock. The vehicles could be damaged, too.
Before you connect the cables, here are some
basic things you should know. Positive (+) will go to
positive (+) or to a remote positive (+) terminal if
the vehicle has one. Negative (-) will go to a heavy,
unpainted metal engine part or to a remote
negative (-) terminal if the vehicle has one.
Don't connect positive (+) to negative (-) or you'll
get a short that would damage the battery and
maybe other parts, too. And don't connect
the negative (-) cable to the negative (-) terminal
on the dead battery because this can cause sparks.
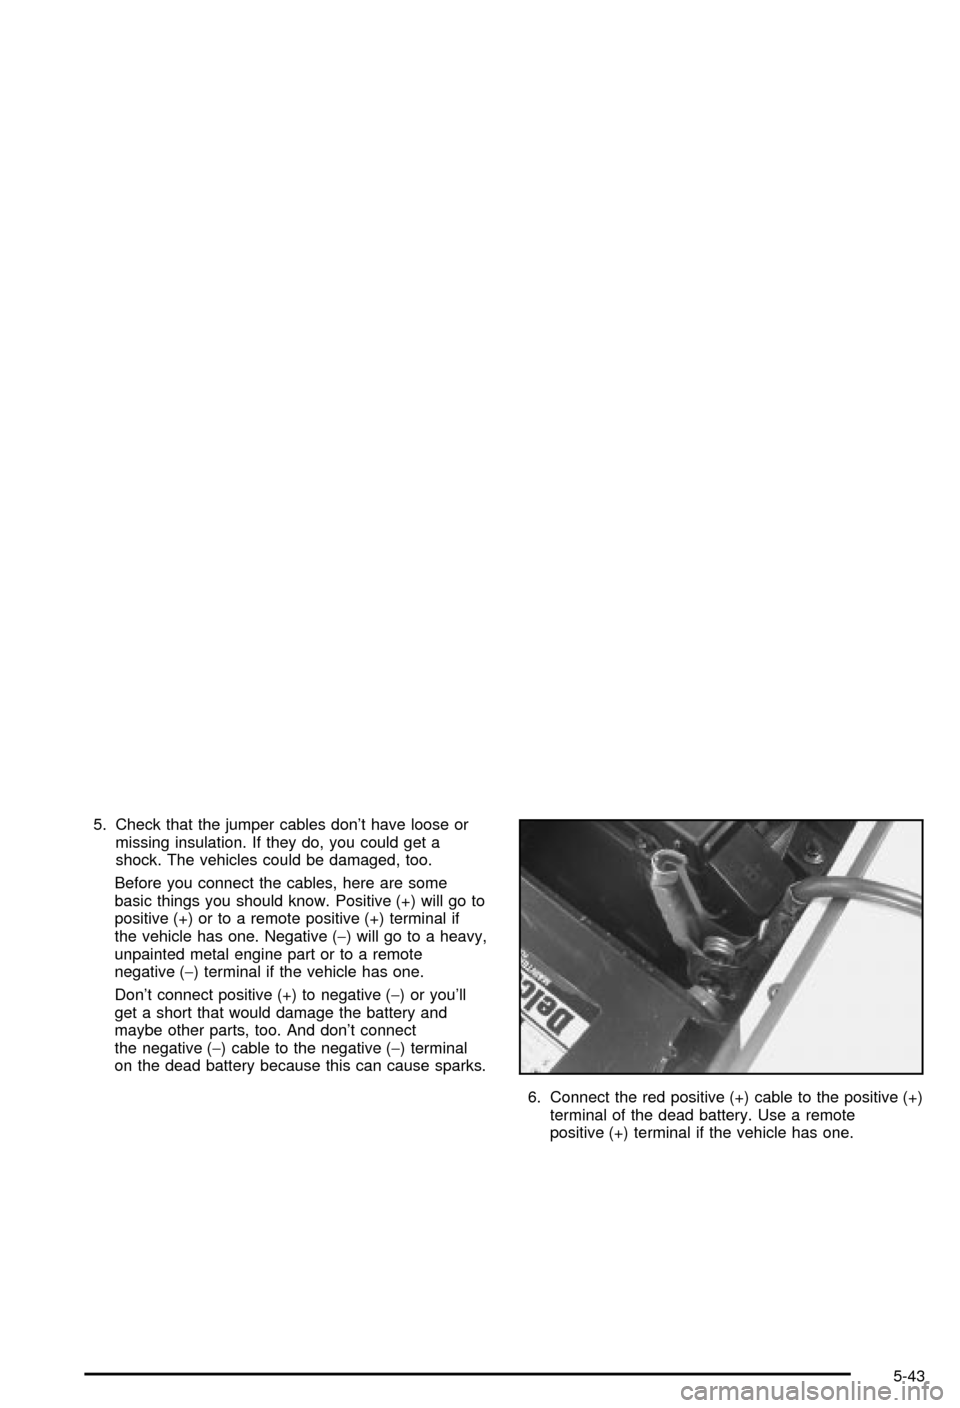
6. Connect the red positive (+) cable to the positive (+)
terminal of the dead battery. Use a remote
positive (+) terminal if the vehicle has one.
5-43
Page 272 of 368
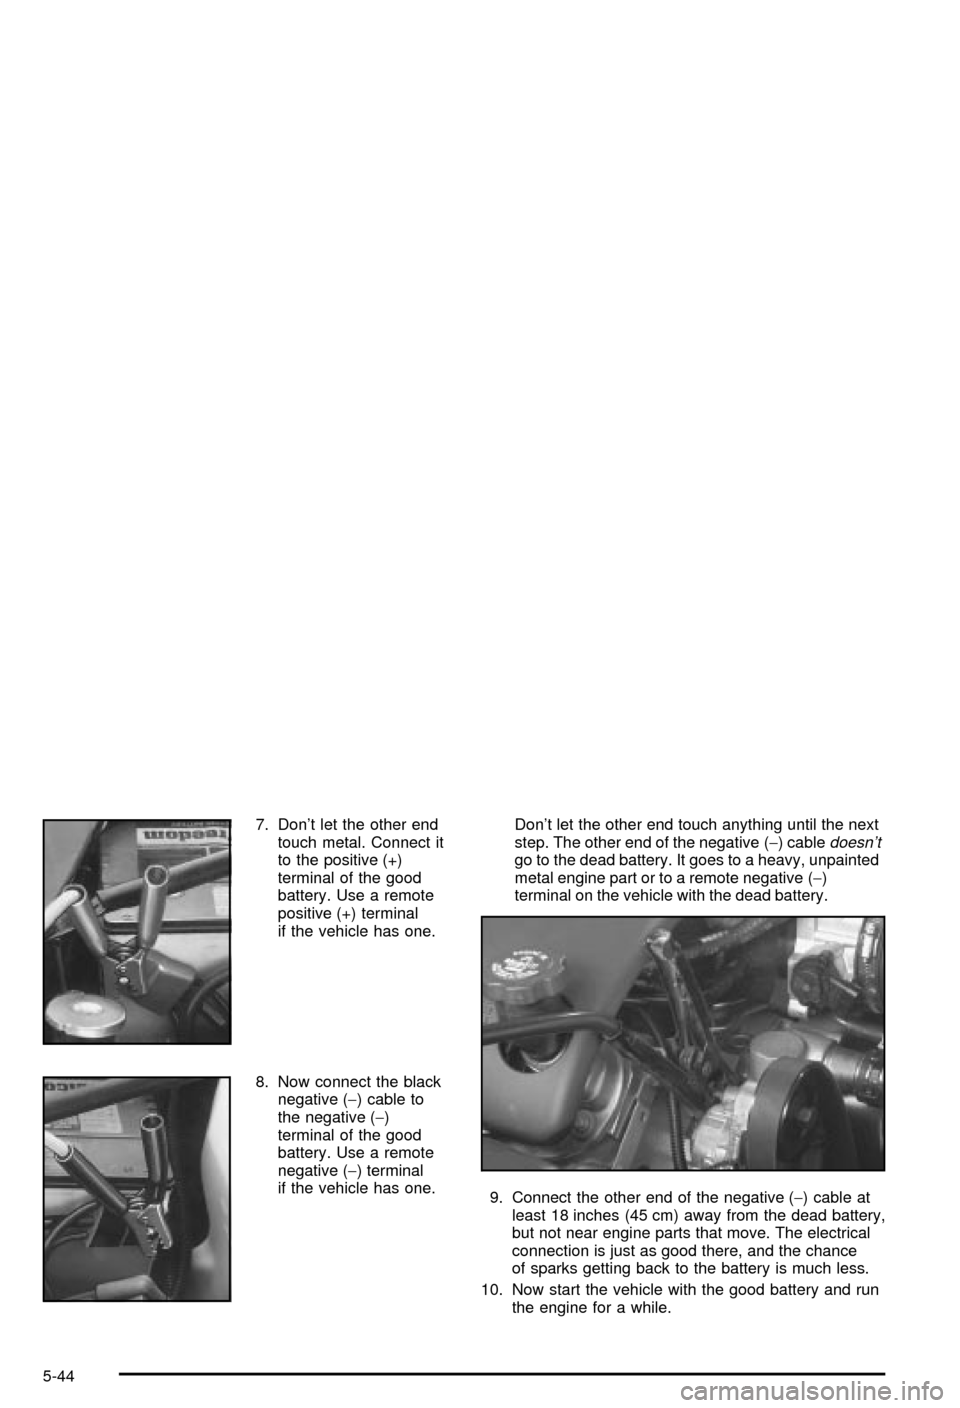
7. Don't let the other end
touch metal. Connect it
to the positive (+)
terminal of the good
battery. Use a remote
positive (+) terminal
if the vehicle has one.
8. Now connect the black
negative (-) cable to
the negative (-)
terminal of the good
battery. Use a remote
negative (-) terminal
if the vehicle has one.Don't let the other end touch anything until the next
step. The other end of the negative (-) cabledoesn'tgo to the dead battery. It goes to a heavy, unpainted
metal engine part or to a remote negative (-)
terminal on the vehicle with the dead battery.
9. Connect the other end of the negative (-) cable at
least 18 inches (45 cm) away from the dead battery,
but not near engine parts that move. The electrical
connection is just as good there, and the chance
of sparks getting back to the battery is much less.
10. Now start the vehicle with the good battery and run
the engine for a while.
5-44
Page 273 of 368
11. Try to start the vehicle that had the dead battery. If
it won't start after a few tries, it probably needs
service.
Notice:Damage to your vehicle may result from
electrical shorting if jumper cables are removed
incorrectly. To prevent electrical shorting, take care
that the cables don't touch each other or any
other metal. The repairs wouldn't be covered by
your warranty.
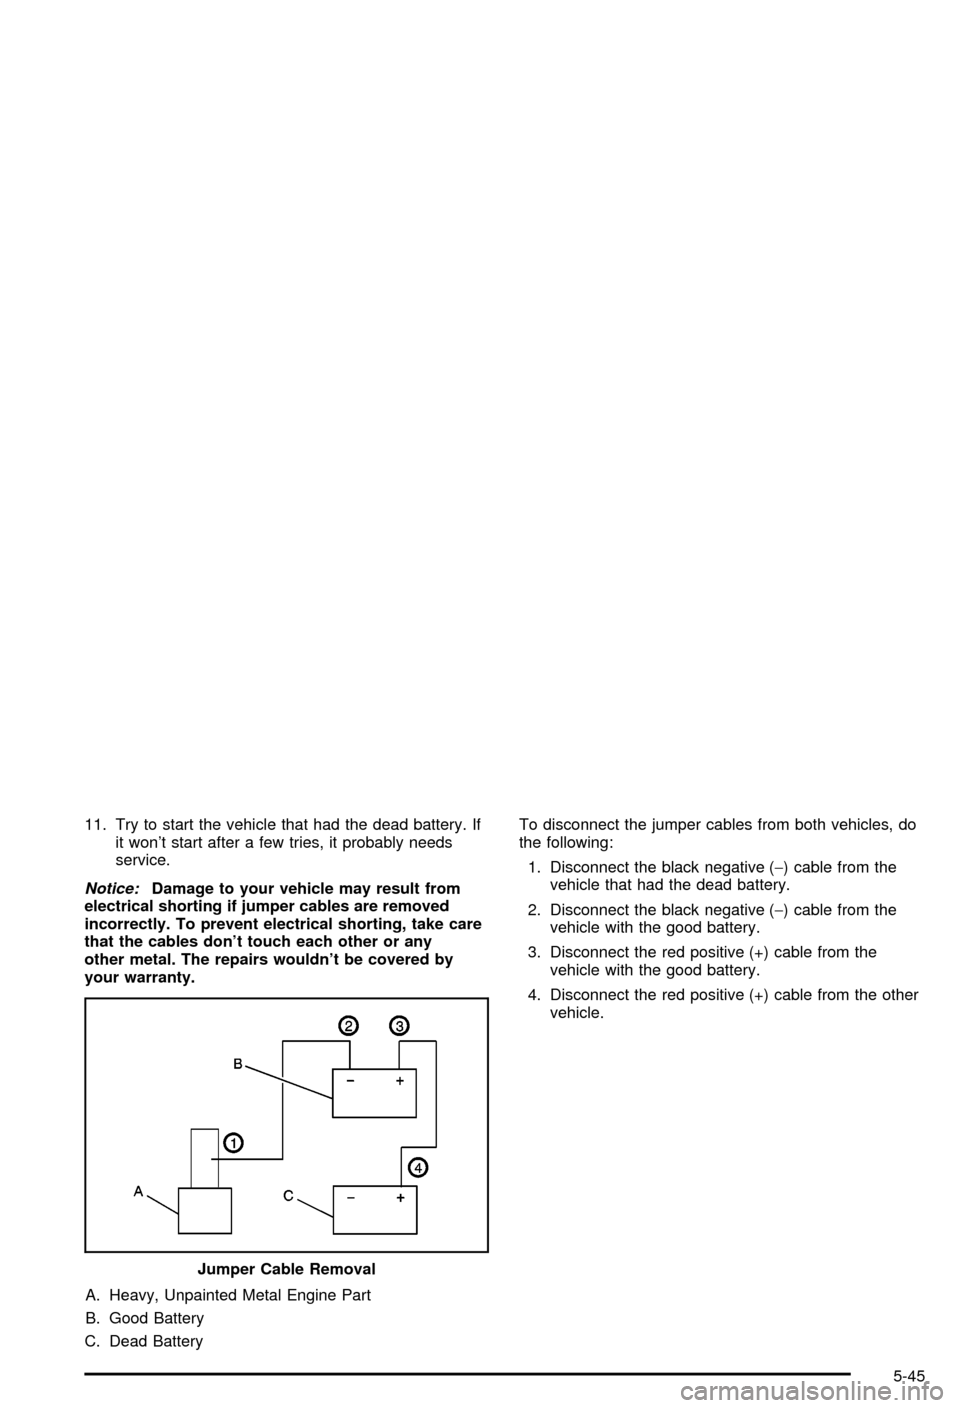
A. Heavy, Unpainted Metal Engine Part
B. Good Battery
C. Dead BatteryTo disconnect the jumper cables from both vehicles, do
the following:
1. Disconnect the black negative (-) cable from the
vehicle that had the dead battery.
2. Disconnect the black negative (-) cable from the
vehicle with the good battery.
3. Disconnect the red positive (+) cable from the
vehicle with the good battery.
4. Disconnect the red positive (+) cable from the other
vehicle.
Jumper Cable Removal
5-45
Page 274 of 368
Rear Axle
When to Check Lubricant
Refer to the Maintenance Schedule to determine how
often to check the lubricant. SeePart C: Periodic
MaintenanceInspections on page 6-12.
How to Check Lubricant
To get an accurate reading, the vehicle should be on a
level surface.
If the level is below the bottom of the ®ller plug hole,
you'll need to add some lubricant. Add enough lubricant
to raise the level to the bottom of the ®ller plug hole.
What to Use
To add lubricant when the level is low, use
SAE 75W±90 Synthetic Gear Lubricant (GM Part
No. 12378261) or equivalent meeting GM
Speci®cation 9986115. To completely re®ll after draining,
add 4 ounces (118 ml) of Limited-Slip Differential
Lubricant Additive (GM Part No. 1052358) or equivalent.
Then ®ll to the bottom of the ®ller plug hole with the
Synthetic Gear Lubricant.
5-46
Page 275 of 368
Bulb Replacement
For the proper type of replacement bulb, seeBulb
Replacement on page 5-47.
For any bulb changing procedure not listed in this
section, contact your dealer's service department.
Halogen Bulbs
{CAUTION:
Halogen bulbs have pressurized gas inside
and can burst if you drop or scratch the bulb.
You or others could be injured. Be sure to read
and follow the instructions on the bulb
package.
Headlamps
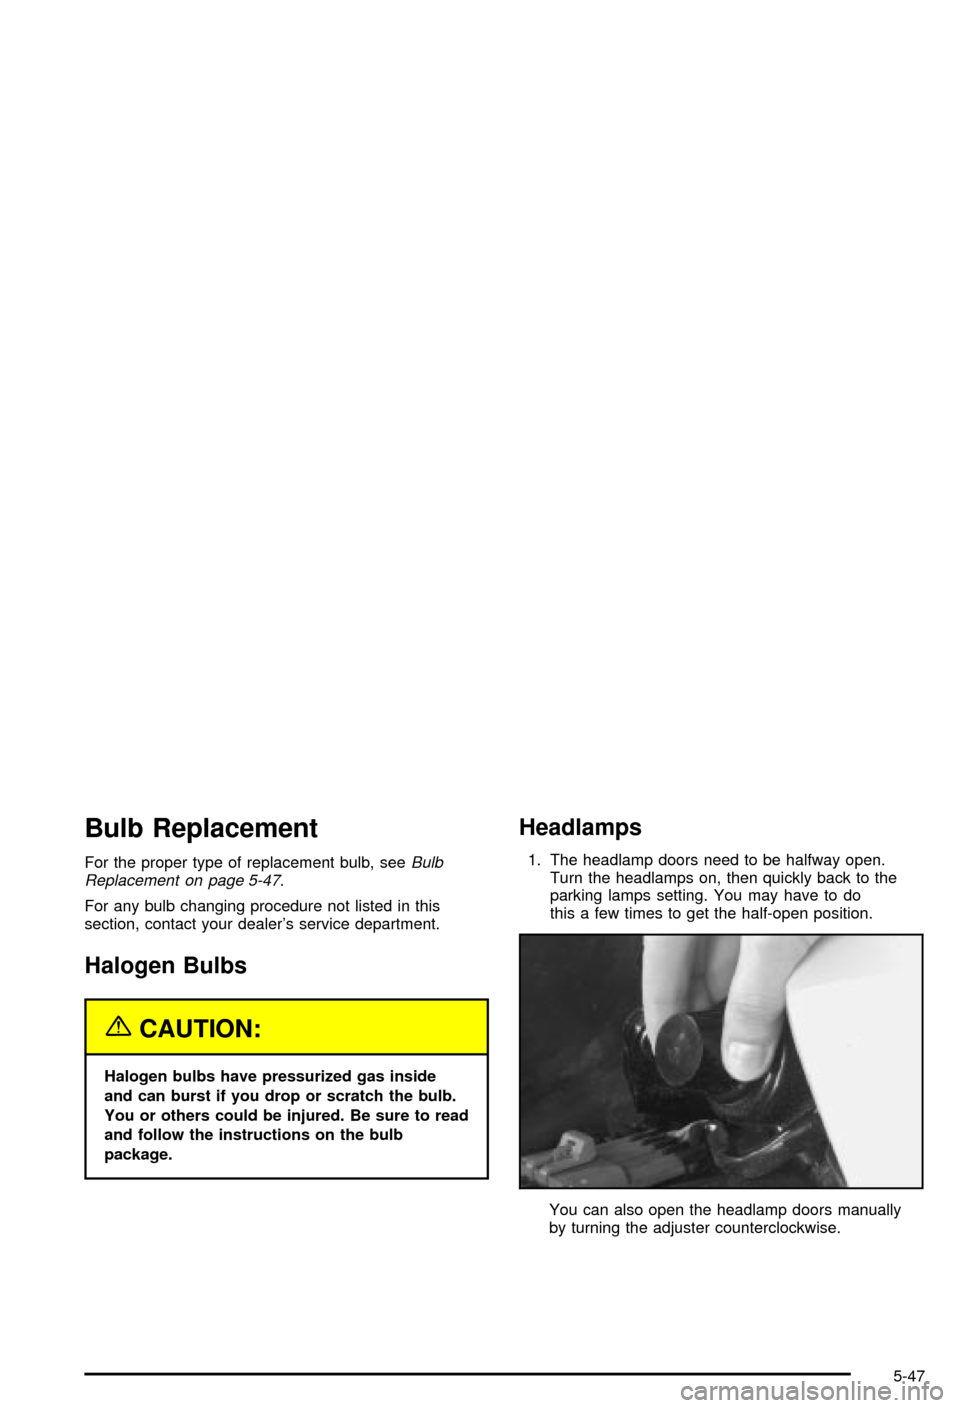
1. The headlamp doors need to be halfway open.
Turn the headlamps on, then quickly back to the
parking lamps setting. You may have to do
this a few times to get the half-open position.
You can also open the headlamp doors manually
by turning the adjuster counterclockwise.
5-47
Page 276 of 368
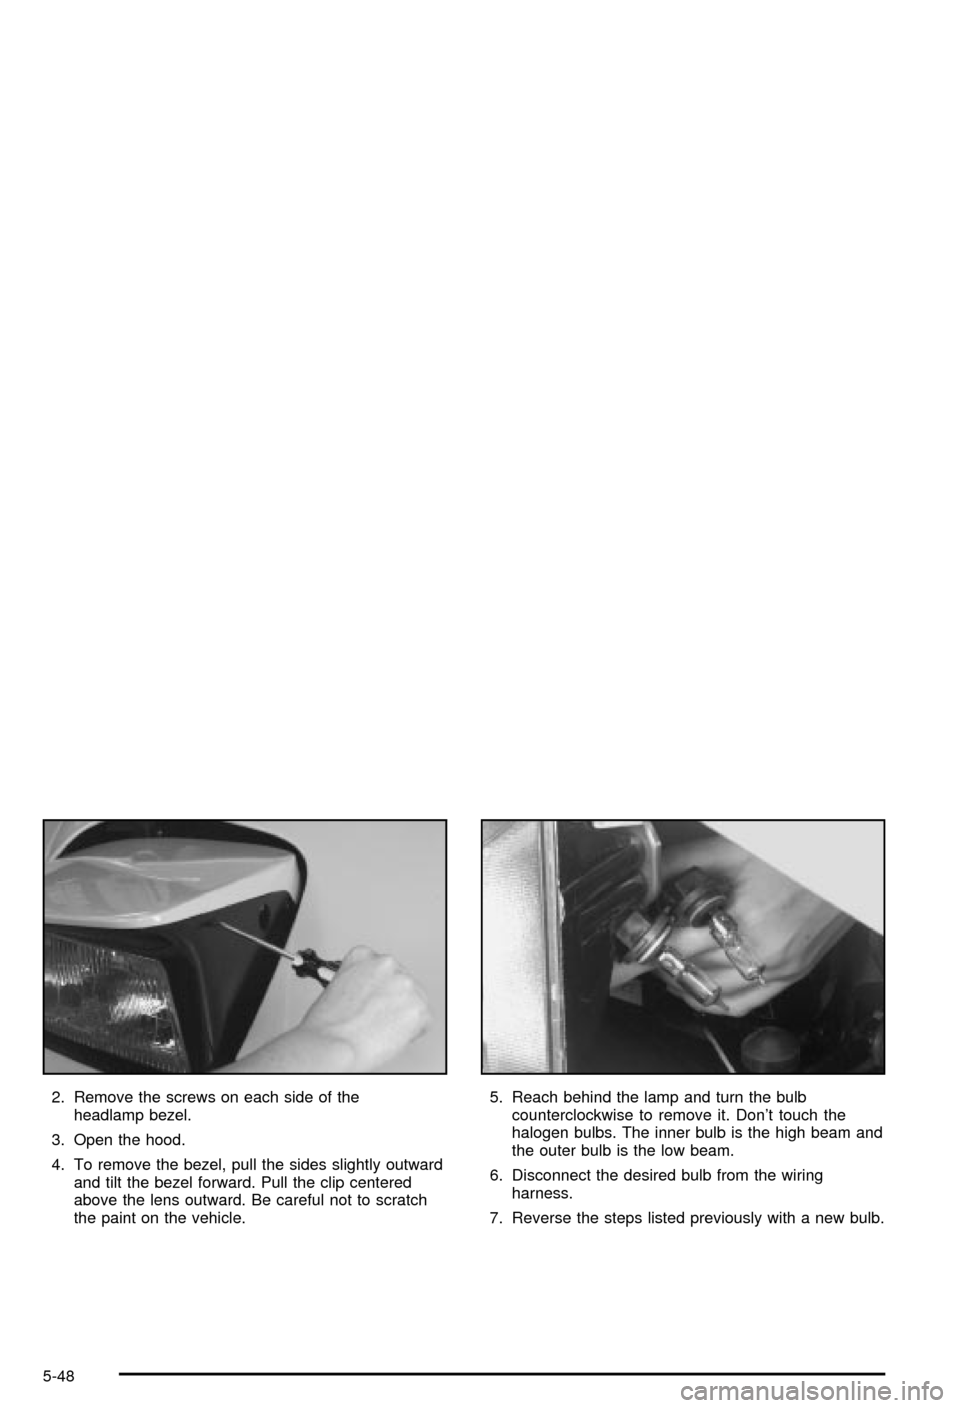
2. Remove the screws on each side of the
headlamp bezel.
3. Open the hood.
4. To remove the bezel, pull the sides slightly outward
and tilt the bezel forward. Pull the clip centered
above the lens outward. Be careful not to scratch
the paint on the vehicle.5. Reach behind the lamp and turn the bulb
counterclockwise to remove it. Don't touch the
halogen bulbs. The inner bulb is the high beam and
the outer bulb is the low beam.
6. Disconnect the desired bulb from the wiring
harness.
7. Reverse the steps listed previously with a new bulb.
5-48
Page 277 of 368
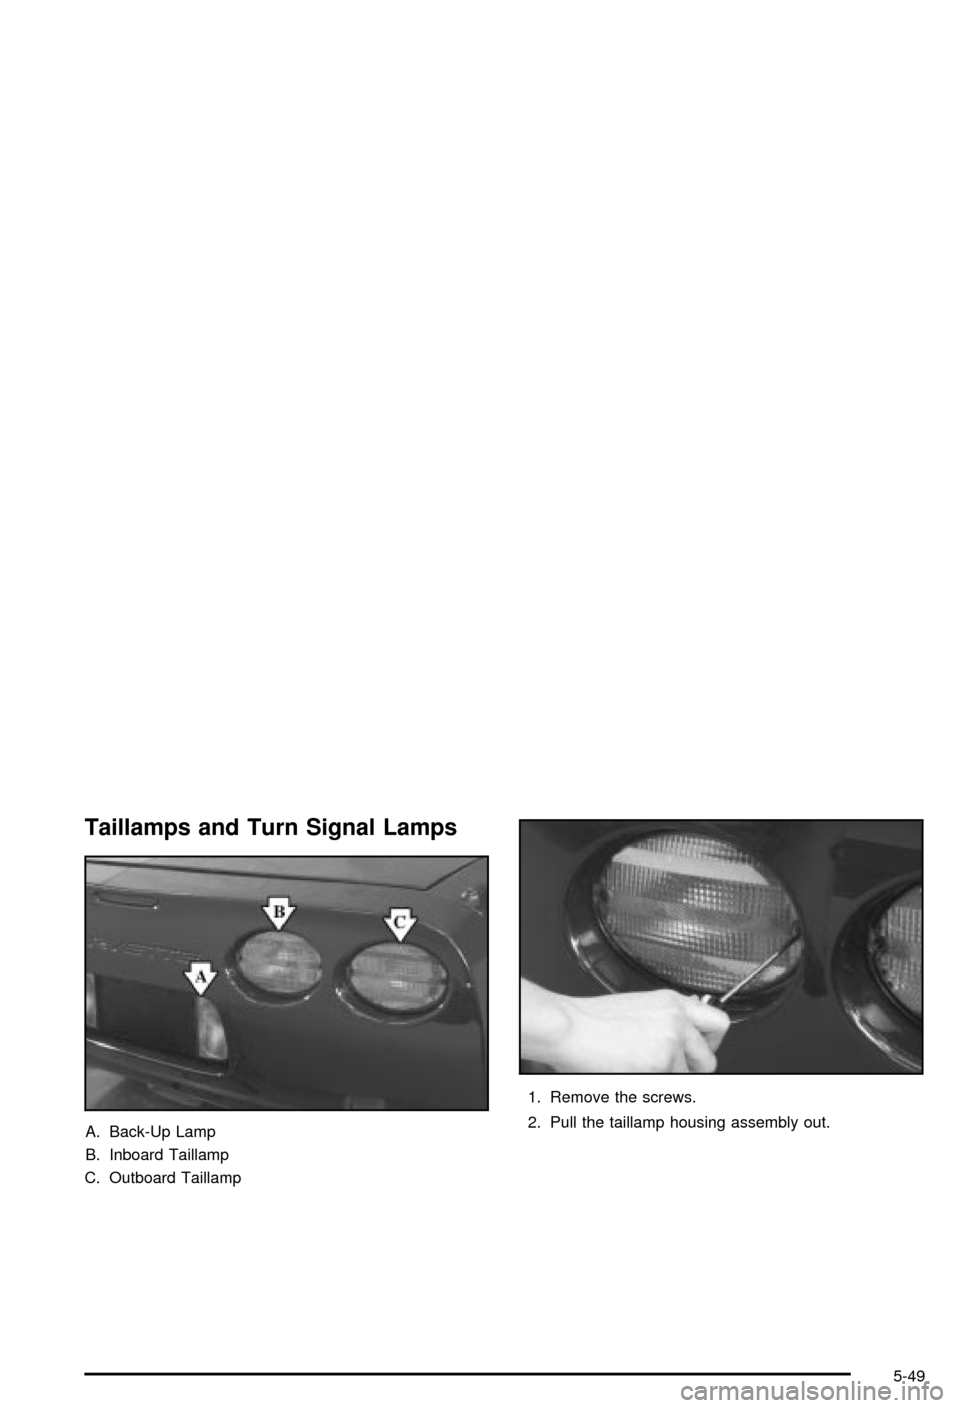
Taillamps and Turn Signal Lamps
A. Back-Up Lamp
B. Inboard Taillamp
C. Outboard Taillamp1. Remove the screws.
2. Pull the taillamp housing assembly out.
5-49
Page 278 of 368
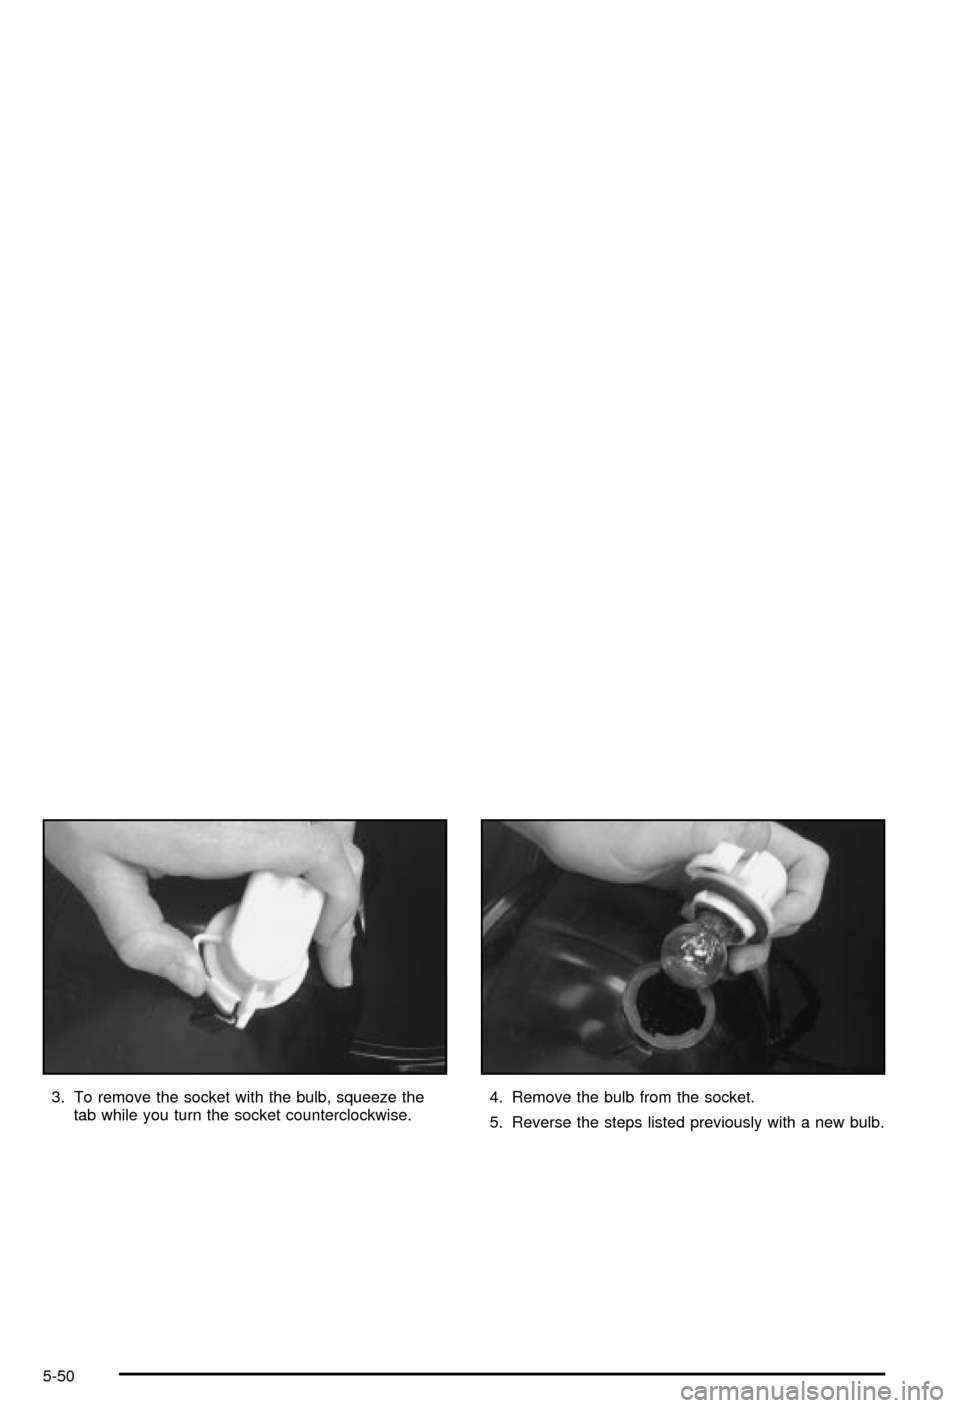
3. To remove the socket with the bulb, squeeze the
tab while you turn the socket counterclockwise.4. Remove the bulb from the socket.
5. Reverse the steps listed previously with a new bulb.
5-50
Page 279 of 368
Back-Up Lamps
You can access the back-up lamps through the inboard
taillamp opening. SeeTaillamps and Turn Signal
Lamps on page 5-49.
1. Squeeze the tab on the socket while turning it
counterclockwise to remove it from the assembly.
2. Remove the bulb from the socket.
3. Reverse the steps listed previously with a new bulb.
Replacement Bulbs
Exterior Lamp Bulb Number
High-Beam Headlamp 9005
Low-Beam Headlamp 9006
Back-Up 2057
Rear Stop/Tail and Turn Signal 3057
For any bulb replacements or procedures not listed
here, please consult your dealer.
Windshield Wiper Blade
Replacement
Windshield wiper blades should be inspected at least
twice a year for wear or cracking. See ªWiper Blade
Checkº under
Part B: Owner Checks and Services on
page 6-8for more information.
Replacement blades come in different types and are
removed in different ways. For the proper type and
length, see
Normal Maintenance Replacement Parts on
page 5-94.
It's a good idea to clean or replace the wiper blade
assembly every six months.
Notice:Use care when removing or installing a
blade assembly. Accidental bumping can cause the
arm to fall back and strike the windshield.
To remove the wiper blade assembly, do the following:
1. Open the hood to gain access to the windshield
wipers.
2. Lift the wiper arm until it locks into a vertical
position.
5-51
Page 280 of 368
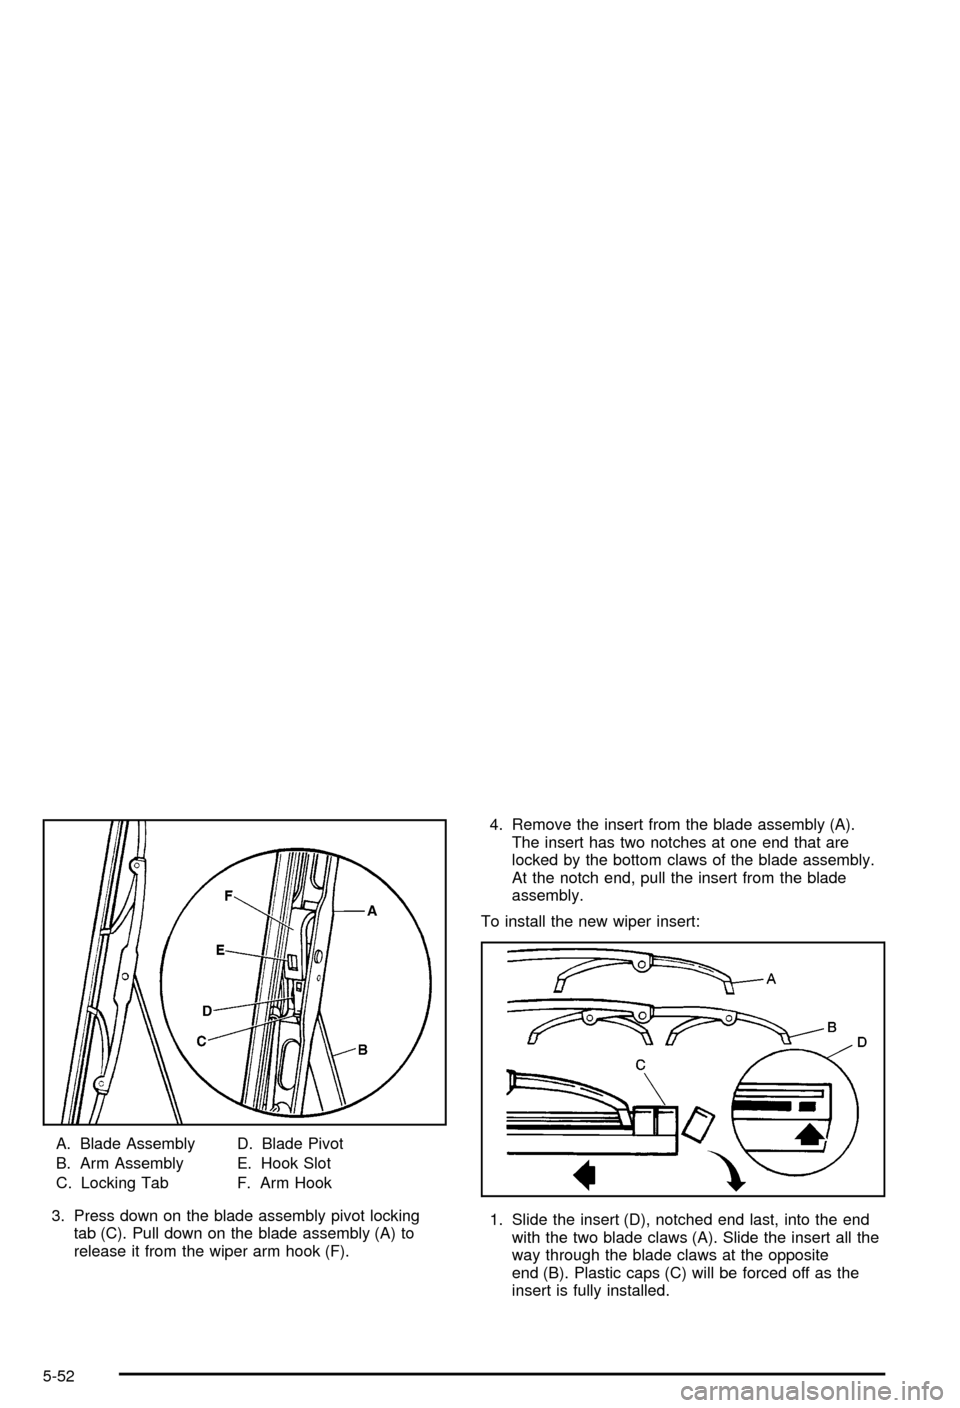
A. Blade Assembly
B. Arm Assembly
C. Locking TabD. Blade Pivot
E. Hook Slot
F. Arm Hook
3. Press down on the blade assembly pivot locking
tab (C). Pull down on the blade assembly (A) to
release it from the wiper arm hook (F).4. Remove the insert from the blade assembly (A).
The insert has two notches at one end that are
locked by the bottom claws of the blade assembly.
At the notch end, pull the insert from the blade
assembly.
To install the new wiper insert:
1. Slide the insert (D), notched end last, into the end
with the two blade claws (A). Slide the insert all the
way through the blade claws at the opposite
end (B). Plastic caps (C) will be forced off as the
insert is fully installed.
5-52
Trending: diagnostic menu, tire pressure reset, MPG, keyless, hood open, seats, clock setting
