cooling CHEVROLET CORVETTE 2010 6.G Owners Manual
[x] Cancel search | Manufacturer: CHEVROLET, Model Year: 2010, Model line: CORVETTE, Model: CHEVROLET CORVETTE 2010 6.GPages: 472, PDF Size: 11.44 MB
Page 21 of 472
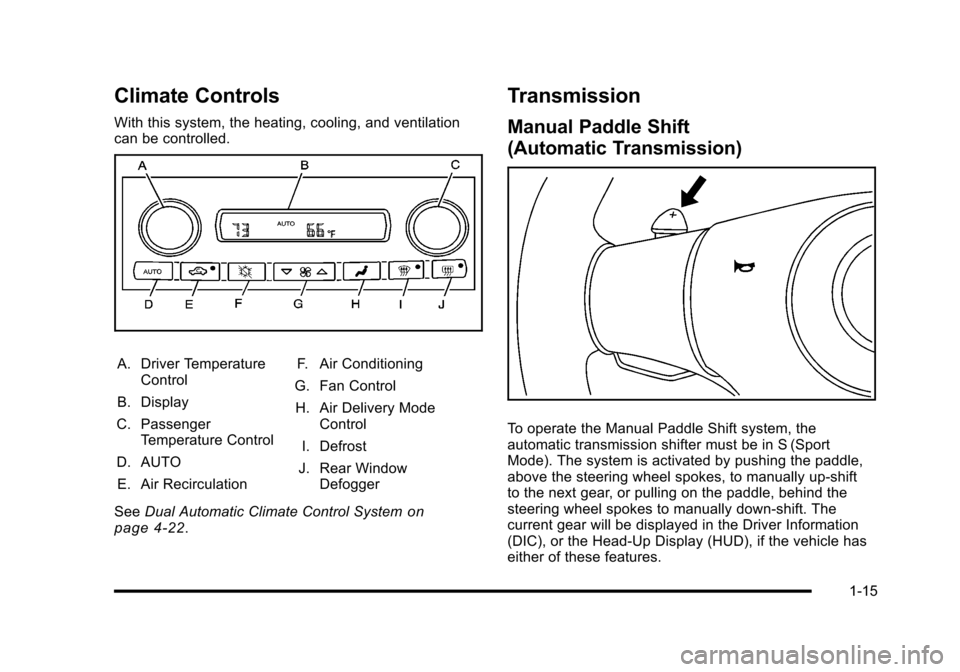
Climate Controls
With this system, the heating, cooling, and ventilation
can be controlled.
A. Driver Temperature Control
B. Display
C. Passenger Temperature Control
D. AUTO E. Air Recirculation F. Air Conditioning
G. Fan Control H. Air Delivery Mode Control
I. Defrost
J. Rear Window Defogger
See Dual Automatic Climate Control System
on
page 4‑22.
Transmission
Manual Paddle Shift
(Automatic Transmission)
To operate the Manual Paddle Shift system, the
automatic transmission shifter must be in S (Sport
Mode). The system is activated by pushing the paddle,
above the steering wheel spokes, to manually up-shift
to the next gear, or pulling on the paddle, behind the
steering wheel spokes to manually down-shift. The
current gear will be displayed in the Driver Information
(DIC), or the Head-Up Display (HUD), if the vehicle has
either of these features.
1-15
Page 190 of 472

Climate Controls
Dual Automatic Climate
Control System
With this system the heating, cooling, and ventilation
can be controlled.
A. Driver Temperature Controls
B. Display
C. Passenger Temperature Control
D. AUTO E. Recirculation F. Air Conditioning
G. Fan Control H. Air Delivery Mode Control
I. Defrost
J. Rear Window Defogger When the vehicle is first started, the display shows the
driver's temperature setting, the outside temperature,
the fan speed and the air delivery, for about
10 seconds.
The outside temperature is shown in the center of the
display. The digital display will show the readings in
Fahrenheit or Celsius. See
“Personal Options”under
DIC Vehicle Personalization
on page 4‑71for
information on changing your display.
Automatic Operation
AUTO (Automatic) : Press the AUTO button to
place the entire system in the automatic mode. When
automatic operation is active, the system automatically
controls the inside temperature, the air delivery mode,
and the fan speed.
After a ten second display of the current settings,
the word AUTO, the driver's temperature setting
and the outside temperature will be shown.
4-22
Page 223 of 472
CHECK COOLANT LEVEL
This message displays when the engine coolant level is
low. Have the cooling system serviced by your dealer/
retailer as soon as possible. See Engine Coolant
on
page 6‑34.
CHECK GAS CAP
This message displays if the fuel cap has not been fully
tightened. Check the fuel cap to make sure that it is on
properly. Once tightened, it takes at least one overnight
park to reset or clear this message. If both the CHECK
GAS CAP message and the malfunction indicator lamp
in the instrument panel cluster are on, you may need to
see your dealer/retailer for service. See Malfunction
Indicator Lamp
on page 4‑41for more information.
CHECK OIL LEVEL
On some vehicles, this message displays and two
chimes sound if the oil level in the vehicle is low. Once
the vehicle senses a change in the engine oil level, the
light remains off.
If this message appears after starting the engine, the
engine oil level may be too low. You may need to add
oil. See Engine Overheating on page 6‑38.
To acknowledge the message, press the RESET button.
The message reappears every 10 minutes until this
condition changes.
CLOSE TRUNK TO MOVE TOP
This message displays and a sound will be heard if
the trunk is open while you are trying to operate the
convertible top. Make sure the trunk is closed before
operating the convertible top. See Convertible Top
(Manual)
on page 3‑59or Convertible Top (Power)on
page 3‑66.
COMPETITIVE DRIVING MODE
This message displays and a sound will be heard
when the Competitive Driving mode is selected.
The instrument panel cluster light will be on when
the Competitive Driving mode is selected. If your
vehicle is equipped with a manual transmission,
Launch Control is available when this mode selected.
The Traction Control System (TCS) will not be operating
while in the Competitive Driving mode. Adjust your
driving accordingly. This system is available on all
models except ZR1. See Competitive Driving Mode
on
page 5‑9, including the “Launch Control” information,
and Racing or Other Competitive Drivingon page 5‑19for more information.
4-55
Page 302 of 472
Highway Hypnosis
Always be alert and pay attention to your surroundings
while driving. If you become tired or sleepy, find a safe
place to park your vehicle and rest.
Other driving tips include:
.Keep the vehicle well ventilated.
.Keep interior temperature cool.
.Keep your eyes moving —scan the road ahead
and to the sides.
.Check the rearview mirror and vehicle
instruments often.
Hill and Mountain Roads
Driving on steep hills or through mountains is different
than driving on flat or rolling terrain. Tips for driving in
these conditions include:
.Keep the vehicle serviced and in good shape.
.Check all fluid levels and brakes, tires, cooling
system, and transmission.
.Going down steep or long hills, shift to a
lower gear.
{WARNING:
If you do not shift down, the brakes could get so
hot that they would not work well. You would then
have poor braking or even none going down a hill.
You could crash. Shift down to let the engine
assist the brakes on a steep downhill slope.
5-24
Page 313 of 472
Section 6 Service and Appearance Care
Service. . . . . . . . . . . . . . . . . . . . . . . . . . . . . . . . . . . . . . . . . . . . . 6-3
Accessories and Modifications . . . . . . . . . . . . . . . . . . 6-3
California Proposition 65 Warning . . . . . . . . . . . . . . . 6-4
California Perchlorate Materials Requirements . . . . . . . . . . . . . . . . . . . . . . . . . . . . . . . . . 6-4
Doing Your Own Service Work . . . . . . . . . . . . . . . . . . 6-5
Adding Equipment to the Outside of the Vehicle . . . . . . . . . . . . . . . . . . . . . . . . . . . . . . . . . . . . . . . . 6-5
Fuel . . . . . . . . . . . . . . . . . . . . . . . . . . . . . . . . . . . . . . . . . . . . . . . . . 6-6
Gasoline Octane . . . . . . . . . . . . . . . . . . . . . . . . . . . . . . . . 6-7
Gasoline Specifications . . . . . . . . . . . . . . . . . . . . . . . . . 6-7
California Fuel . . . . . . . . . . . . . . . . . . . . . . . . . . . . . . . . . . 6-7
Additives . . . . . . . . . . . . . . . . . . . . . . . . . . . . . . . . . . . . . . . . 6-8
Fuels in Foreign Countries . . . . . . . . . . . . . . . . . . . . . . 6-9
Filling the Tank . . . . . . . . . . . . . . . . . . . . . . . . . . . . . . . . . . 6-9
Filling a Portable Fuel Container . . . . . . . . . . . . . . . 6-12
Checking Things Under the Hood . . . . . . . . . . . . . . . 6-12
Hood Release . . . . . . . . . . . . . . . . . . . . . . . . . . . . . . . . . 6-13
Engine Compartment Overview . . . . . . . . . . . . . . . . 6-14
Engine Oil . . . . . . . . . . . . . . . . . . . . . . . . . . . . . . . . . . . . . 6-19
Engine Oil Life System . . . . . . . . . . . . . . . . . . . . . . . . 6-25
Engine Air Cleaner/Filter . . . . . . . . . . . . . . . . . . . . . . . 6-27
Automatic Transmission Fluid . . . . . . . . . . . . . . . . . . 6-31
Manual Transmission Fluid . . . . . . . . . . . . . . . . . . . . 6-31
Hydraulic Clutch . . . . . . . . . . . . . . . . . . . . . . . . . . . . . . . 6-31
Cooling System (Engine) . . . . . . . . . . . . . . . . . . . . . . 6-32 Cooling System (Intercooler) . . . . . . . . . . . . . . . . . . . 6-33
Engine Coolant . . . . . . . . . . . . . . . . . . . . . . . . . . . . . . . . 6-34
Engine Overheating . . . . . . . . . . . . . . . . . . . . . . . . . . . 6-38
Overheated Engine Protection
Operating Mode . . . . . . . . . . . . . . . . . . . . . . . . . . . . . 6-41
Power Steering Fluid . . . . . . . . . . . . . . . . . . . . . . . . . . 6-41
Windshield Washer Fluid . . . . . . . . . . . . . . . . . . . . . . 6-42
Brakes . . . . . . . . . . . . . . . . . . . . . . . . . . . . . . . . . . . . . . . . . 6-43
Battery . . . . . . . . . . . . . . . . . . . . . . . . . . . . . . . . . . . . . . . . . 6-49
Jump Starting . . . . . . . . . . . . . . . . . . . . . . . . . . . . . . . . . . 6-50
Rear Axle . . . . . . . . . . . . . . . . . . . . . . . . . . . . . . . . . . . . . . . . . 6-55
Headlamp Aiming . . . . . . . . . . . . . . . . . . . . . . . . . . . . . . . . 6-55
Bulb Replacement . . . . . . . . . . . . . . . . . . . . . . . . . . . . . . . . 6-56
High Intensity Discharge (HID) Lighting . . . . . . . . 6-56
Halogen Bulbs . . . . . . . . . . . . . . . . . . . . . . . . . . . . . . . . . 6-56
Headlamps, Front Turn Signal, and Parking Lamps . . . . . . . . . . . . . . . . . . . . . . . . . . . . . . . . . . . . . . . 6-56
Taillamps, Turn Signal, and Stoplamps . . . . . . . . 6-58
Replacement Bulbs . . . . . . . . . . . . . . . . . . . . . . . . . . . . 6-58
Windshield Replacement . . . . . . . . . . . . . . . . . . . . . . . . . 6-59
Windshield Wiper Blade Replacement . . . . . . . . . . . 6-59
Tires . . . . . . . . . . . . . . . . . . . . . . . . . . . . . . . . . . . . . . . . . . . . . . . 6-62
Winter Tires . . . . . . . . . . . . . . . . . . . . . . . . . . . . . . . . . . . . 6-63
Tire Sidewall Labeling . . . . . . . . . . . . . . . . . . . . . . . . . 6-64
Tire Terminology and Definitions . . . . . . . . . . . . . . . 6-66
6-1
Page 329 of 472
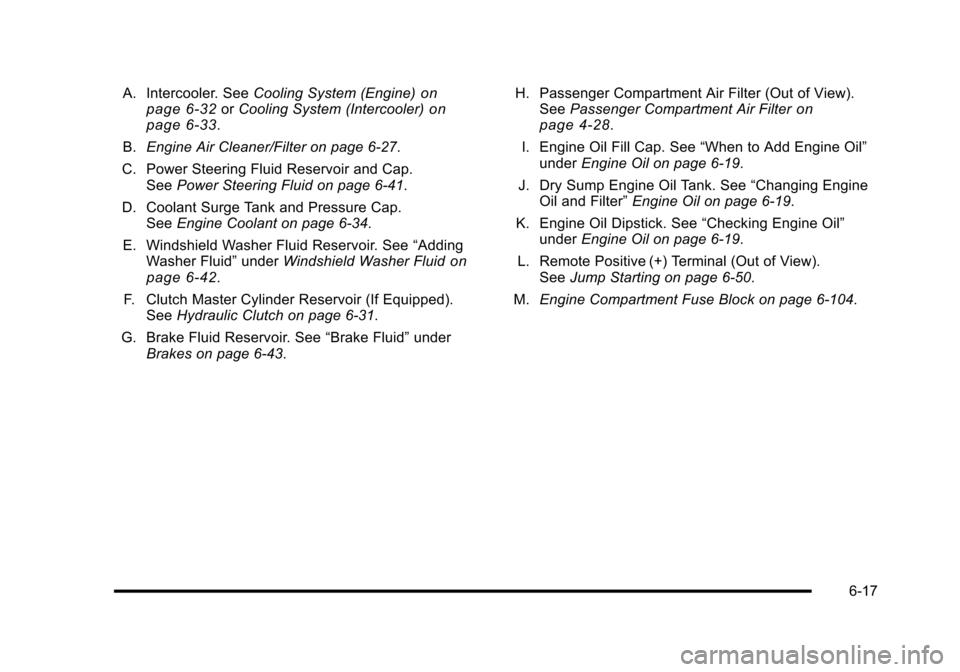
A. Intercooler. SeeCooling System (Engine)on
page 6‑32or Cooling System (Intercooler)on
page 6‑33.
B. Engine Air Cleaner/Filter on page 6‑27.
C. Power Steering Fluid Reservoir and Cap. See Power Steering Fluid on page 6‑41.
D. Coolant Surge Tank and Pressure Cap. See Engine Coolant on page 6‑34.
E. Windshield Washer Fluid Reservoir. See “Adding
Washer Fluid” underWindshield Washer Fluid
on
page 6‑42.
F. Clutch Master Cylinder Reservoir (If Equipped). See Hydraulic Clutch on page 6‑31.
G. Brake Fluid Reservoir. See “Brake Fluid”under
Brakes on page 6‑43. H. Passenger Compartment Air Filter (Out of View).
See Passenger Compartment Air Filter
on
page 4‑28.
I. Engine Oil Fill Cap. See “When to Add Engine Oil”
under Engine Oil on page 6‑19.
J. Dry Sump Engine Oil Tank. See “Changing Engine
Oil and Filter” Engine Oil on page 6‑19.
K. Engine Oil Dipstick. See “Checking Engine Oil”
under Engine Oil on page 6‑19.
L. Remote Positive (+) Terminal (Out of View). See Jump Starting on page 6‑50.
M. Engine Compartment Fuse Block on page 6‑104.
6-17
Page 344 of 472
When to Check and What to Use
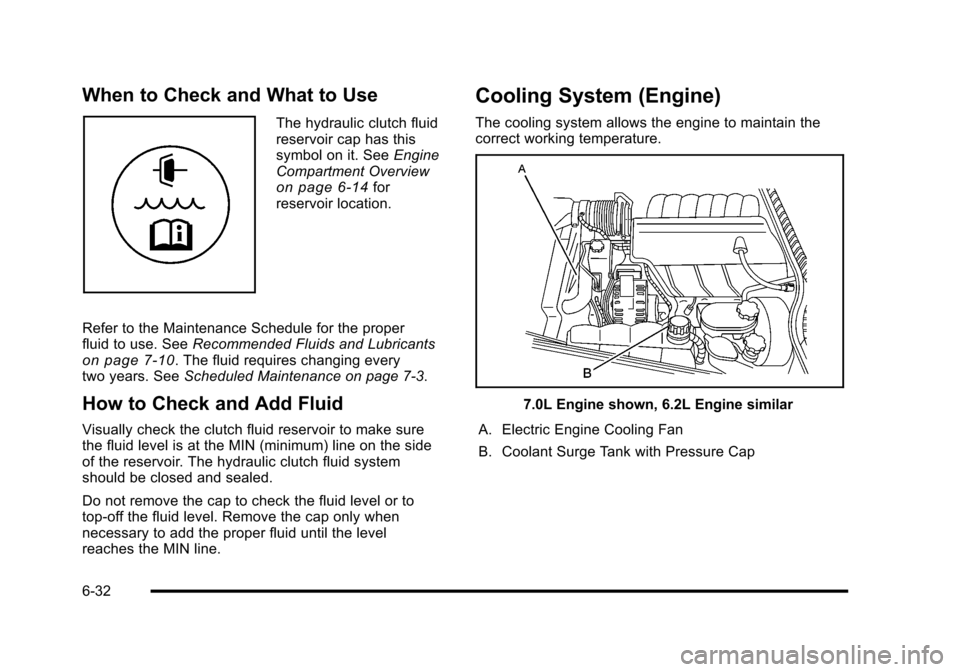
The hydraulic clutch fluid
reservoir cap has this
symbol on it. See Engine
Compartment Overview
on page 6‑14for
reservoir location.
Refer to the Maintenance Schedule for the proper
fluid to use. See Recommended Fluids and Lubricants
on page 7‑10. The fluid requires changing every
two years. See Scheduled Maintenance on page 7‑3.
How to Check and Add Fluid
Visually check the clutch fluid reservoir to make sure
the fluid level is at the MIN (minimum) line on the side
of the reservoir. The hydraulic clutch fluid system
should be closed and sealed.
Do not remove the cap to check the fluid level or to
top‐off the fluid level. Remove the cap only when
necessary to add the proper fluid until the level
reaches the MIN line.
Cooling System (Engine)
The cooling system allows the engine to maintain the
correct working temperature.
7.0L Engine shown, 6.2L Engine similar
A. Electric Engine Cooling Fan
B. Coolant Surge Tank with Pressure Cap
6-32
Page 345 of 472
{WARNING:
An electric engine cooling fan under the hood can
start up even when the engine is not running and
can cause injury. Keep hands, clothing, and tools
away from any underhood electric fan.
{WARNING:
Heater and radiator hoses, and other engine
parts, can be very hot. Do not touch them.
If you do, you can be burned.
Do not run the engine if there is a leak. If you run
the engine, it could lose all coolant. That could
cause an engine fire, and you could be burned.
Get any leak fixed before you drive the vehicle. Notice:
Using coolant other than DEX-COOL
®can
cause premature engine, heater core, or radiator
corrosion. In addition, the engine coolant could
require changing sooner, at 50 000 km (30,000 miles)
or 24 months, whichever occurs first. Any repairs
would not be covered by the vehicle warranty.
Always use DEX-COOL
®(silicate-free) coolant
in the vehicle.
Cooling System (Intercooler)
The 6.2L LS9 supercharged V8 engine has an
intercooler cooling system. See Engine Compartment
Overview
on page 6‑14for location of the intercooler.
The intercooler cooling system has a special procedure
for draining and adding coolant. Because this procedure
is difficult, see your dealer/retailer for service if the
intercooler is low on coolant. The procedure can also
be found in the service manual. To purchase a service
manual, see Service Publications Ordering Information
on page 8‑16.
6-33
Page 346 of 472
Checking Coolant
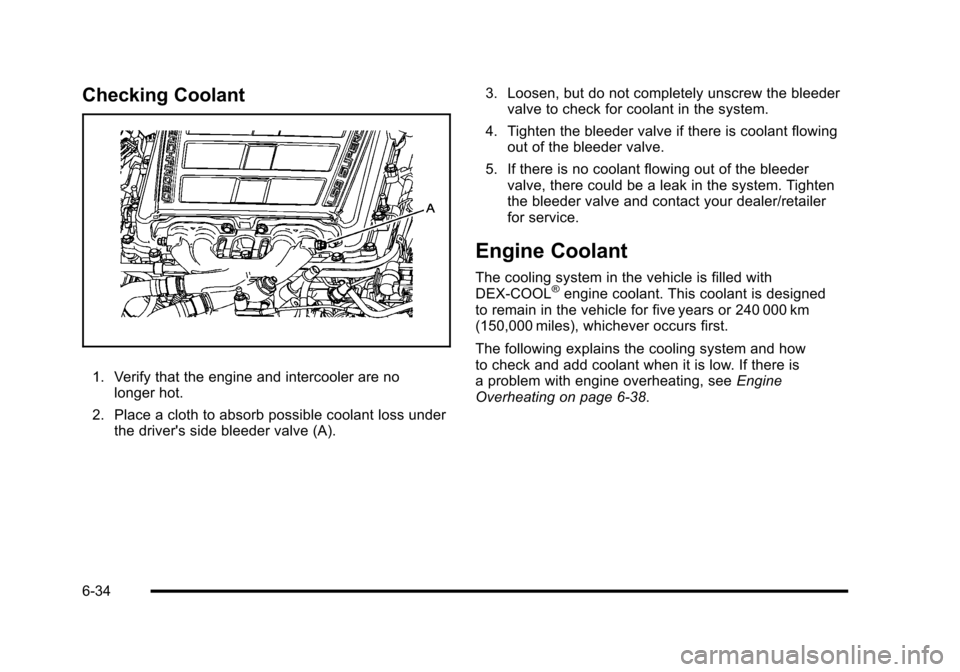
1. Verify that the engine and intercooler are no longer hot.
2. Place a cloth to absorb possible coolant loss under the driver's side bleeder valve (A). 3. Loosen, but do not completely unscrew the bleeder
valve to check for coolant in the system.
4. Tighten the bleeder valve if there is coolant flowing out of the bleeder valve.
5. If there is no coolant flowing out of the bleeder valve, there could be a leak in the system. Tighten
the bleeder valve and contact your dealer/retailer
for service.
Engine Coolant
The cooling system in the vehicle is filled with
DEX-COOL®engine coolant. This coolant is designed
to remain in the vehicle for five years or 240 000 km
(150,000 miles), whichever occurs first.
The following explains the cooling system and how
to check and add coolant when it is low. If there is
a problem with engine overheating, see Engine
Overheating on page 6‑38.
6-34
Page 347 of 472
What to Use
{WARNING:
Adding only plain water to the cooling system
can be dangerous. Plain water, or some other
liquid such as alcohol, can boil before the proper
coolant mixture will. The vehicle's coolant warning
system is set for the proper coolant mixture.
With plain water or the wrong mixture, the engine
could get too hot but would not get the overheat
warning. The engine could catch fire and you or
others could be burned. Use a 50/50 mixture of
clean, drinkable water and DEX-COOL
®coolant.
Use a 50/50 mixture of clean, drinkable water and
DEX-COOL
®coolant. If using this mixture, nothing else
needs to be added. This mixture:
.Gives freezing protection down to −37°C (−34°F),
outside temperature.
.Gives boiling protection up to 129°C (265°F),
engine temperature.
.Protects against rust and corrosion.
.Will not damage aluminum parts.
.Helps keep the proper engine temperature. Notice:
If an improper coolant mixture is used,
the engine could overheat and be badly damaged.
The repair cost would not be covered by the vehicle
warranty. Too much water in the mixture can freeze
and crack the engine, radiator, heater core, and
other parts.
Notice: If extra inhibitors and/or additives are used
in the vehicle's cooling system, the vehicle could be
damaged. Use only the proper mixture of the engine
coolant listed in this manual for the cooling system.
See Recommended Fluids and Lubricants
on
page 7‑10for more information.
Checking Coolant
The vehicle must be on a level surface when checking
the coolant level.
Check to see if coolant is visible in the coolant surge
tank. If the coolant inside the coolant surge tank is
boiling, do not do anything else until it cools down.
If coolant is visible but the coolant level is not at or
above the FULL COLD mark, add a 50/50 mixture of
clean, drinkable water and DEX-COOL coolant at the
coolant recovery tank, but be sure the cooling system
is cool before this is done. See Engine Coolant
on
page 6‑34for more information.
6-35