lights CHEVROLET CORVETTE 2010 6.G Owners Manual
[x] Cancel search | Manufacturer: CHEVROLET, Model Year: 2010, Model line: CORVETTE, Model: CHEVROLET CORVETTE 2010 6.GPages: 472, PDF Size: 11.44 MB
Page 19 of 472
Interior Lighting
Courtesy Lamps
When any door or the hatch/trunk lid is opened, the
interior lamps will go on, unless it is bright outside.
The courtesy lamps can also be turned on and off by
pressing the instrument panel brightness knob.
Reading Lamps
The inside rearview mirror includes two reading lamps.
The lamps go on when a door is opened. When the
doors are closed, press the lamp buttons to turn on
each lamp.
Interior Light Control
To adjust the brightness of the interior lights, turn and
hold the instrument panel brightness control knob
located on the left side of the instrument panel.
Push the knob in to turn the lights on or off.
For more information on interior lighting, see:
.Instrument Panel Brightness on page 4‑15.
.Entry/Exit Lighting on page 4‑15.
Exterior Lighting
Exterior Lamps
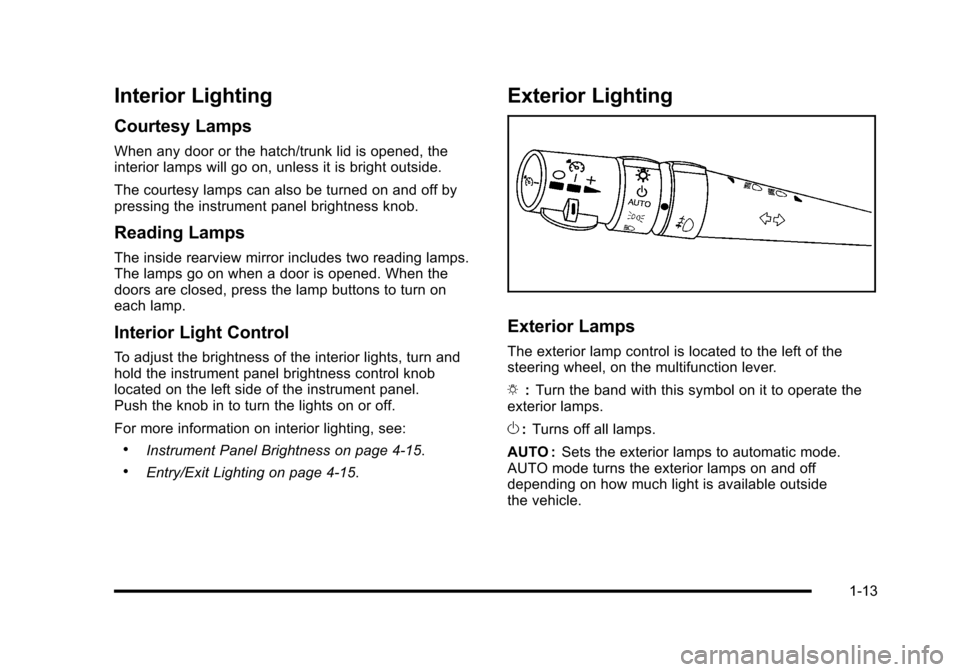
The exterior lamp control is located to the left of the
steering wheel, on the multifunction lever.
O :Turn the band with this symbol on it to operate the
exterior lamps.
O :Turns off all lamps.
AUTO : Sets the exterior lamps to automatic mode.
AUTO mode turns the exterior lamps on and off
depending on how much light is available outside
the vehicle.
1-13
Page 102 of 472
Keyless Trunk Opening
Press the hatch/trunk release button located on the rear
of the hatch/trunk lid above the license plate to open the
trunk if the keyless access transmitter is within range.
See Hatch
on page 3‑14for additional information.
There are other conditions that can affect the
performance of the transmitter. See Keyless Access
System
on page 3‑5Keyless Access System.
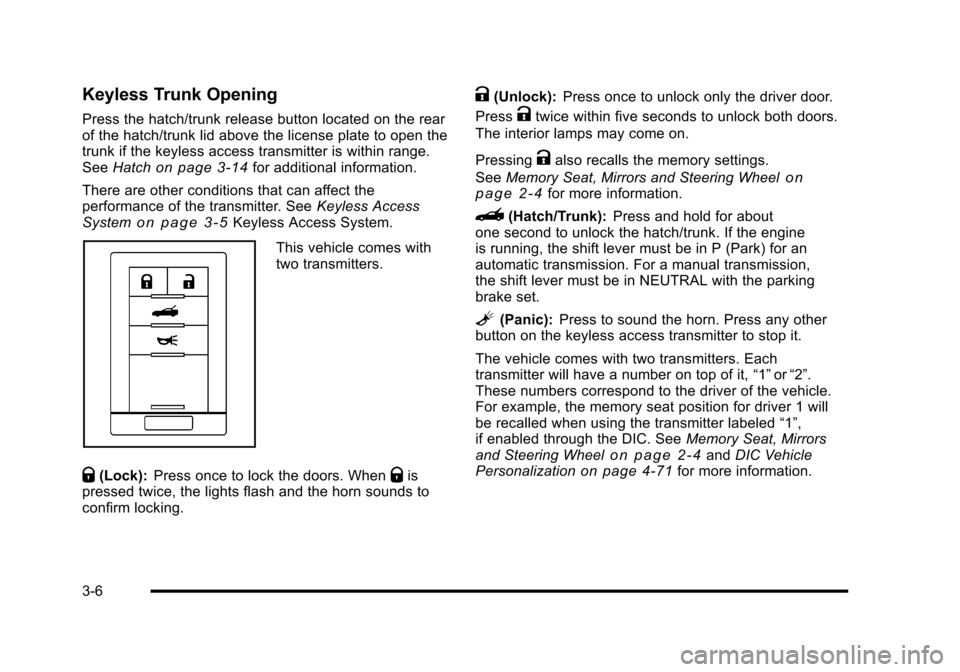
This vehicle comes with
two transmitters.
Q(Lock): Press once to lock the doors. WhenQis
pressed twice, the lights flash and the horn sounds to
confirm locking.
K(Unlock): Press once to unlock only the driver door.
Press
Ktwice within five seconds to unlock both doors.
The interior lamps may come on.
Pressing
Kalso recalls the memory settings.
See Memory Seat, Mirrors and Steering Wheel
on
page 2‑4for more information.
}(Hatch/Trunk): Press and hold for about
one second to unlock the hatch/trunk. If the engine
is running, the shift lever must be in P (Park) for an
automatic transmission. For a manual transmission,
the shift lever must be in NEUTRAL with the parking
brake set.
L(Panic): Press to sound the horn. Press any other
button on the keyless access transmitter to stop it.
The vehicle comes with two transmitters. Each
transmitter will have a number on top of it, “1”or“2”.
These numbers correspond to the driver of the vehicle.
For example, the memory seat position for driver 1 will
be recalled when using the transmitter labeled “1”,
if enabled through the DIC. See Memory Seat, Mirrors
and Steering Wheel
on page 2‑4and DIC Vehicle
Personalizationon page 4‑71for more information.
3-6
Page 135 of 472
Mirrors
Automatic Dimming Rearview Mirror
The vehicle may have an automatic dimming inside
rearview mirror with a compass display and/or map
lamps, and OnStar
®. The mirror automatically changes
to reduce glare from headlamps behind you. A time
delay feature prevents rapid changing from the day to
night positions while driving under lights and through
traffic.
If the vehicle has OnStar, there are three control buttons
located at the bottom of the mirror. See the OnStar
®
owner's guide for more information on the services
OnStar®provides.
P(On/Off): The automatic dimming feature is
activated when the vehicle is started. Press and hold
this button for up to six seconds to turn this feature on
or off.
T(Indicator Light): This light turns on when the
automatic dimming feature is active.
Map Lamps
If the mirror has map lamps, they are located at the
bottom of the mirror. To manually turn the lamps on
or off, press the button next to each lamp.
Cleaning the Mirror
Do not spray glass cleaner directly on the mirror.
Use a soft towel dampened with water.
Compass
Compass Operation
With the compass feature on, each time the vehicle is
started, the compass will take a few seconds to adjust
and display the current compass heading. For example,
NE is displayed for north-east.
3-39
Page 139 of 472
Universal Home Remote System
Operation
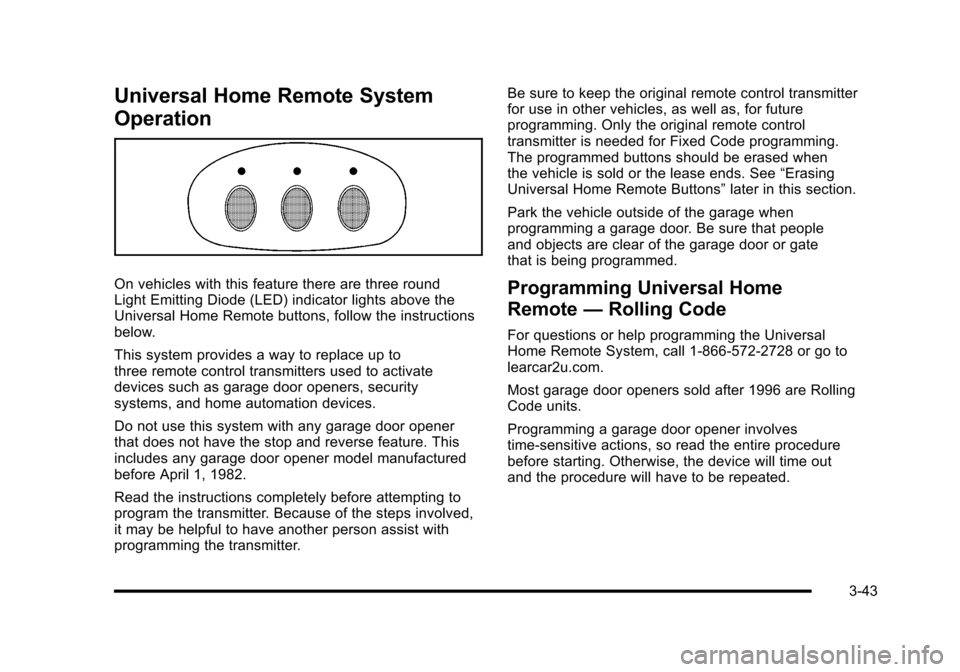
On vehicles with this feature there are three round
Light Emitting Diode (LED) indicator lights above the
Universal Home Remote buttons, follow the instructions
below.
This system provides a way to replace up to
three remote control transmitters used to activate
devices such as garage door openers, security
systems, and home automation devices.
Do not use this system with any garage door opener
that does not have the stop and reverse feature. This
includes any garage door opener model manufactured
before April 1, 1982.
Read the instructions completely before attempting to
program the transmitter. Because of the steps involved,
it may be helpful to have another person assist with
programming the transmitter. Be sure to keep the original remote control transmitter
for use in other vehicles, as well as, for future
programming. Only the original remote control
transmitter is needed for Fixed Code programming.
The programmed buttons should be erased when
the vehicle is sold or the lease ends. See
“Erasing
Universal Home Remote Buttons” later in this section.
Park the vehicle outside of the garage when
programming a garage door. Be sure that people
and objects are clear of the garage door or gate
that is being programmed.Programming Universal Home
Remote —Rolling Code
For questions or help programming the Universal
Home Remote System, call 1-866-572-2728 or go to
learcar2u.com.
Most garage door openers sold after 1996 are Rolling
Code units.
Programming a garage door opener involves
time-sensitive actions, so read the entire procedure
before starting. Otherwise, the device will time out
and the procedure will have to be repeated.
3-43
Page 144 of 472
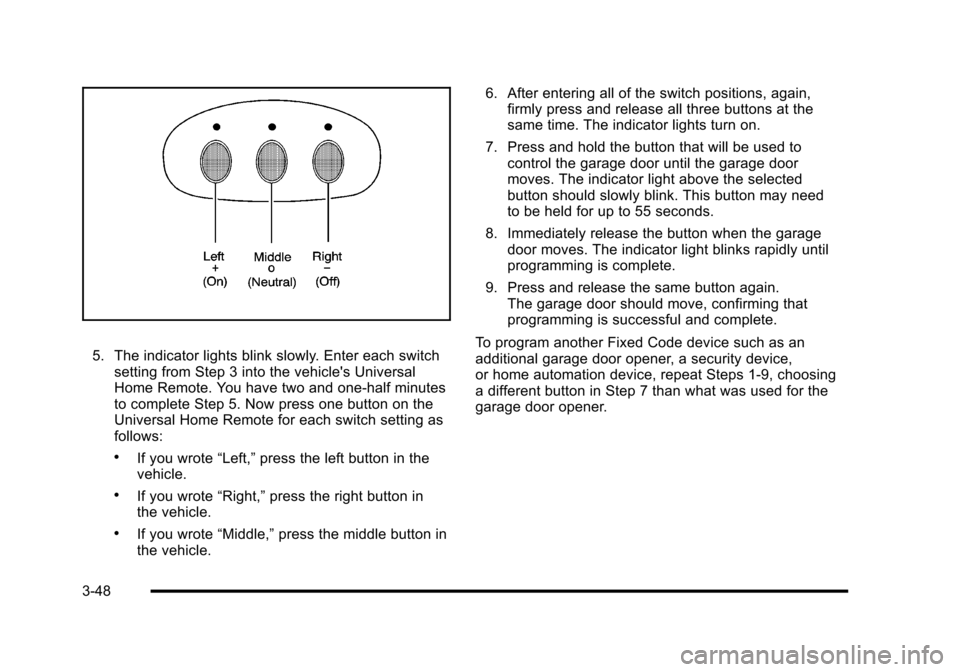
5. The indicator lights blink slowly. Enter each switch setting from Step 3 into the vehicle's Universal
Home Remote. You have two and one-half minutes
to complete Step 5. Now press one button on the
Universal Home Remote for each switch setting as
follows:
.If you wrote “Left,”press the left button in the
vehicle.
.If you wrote “Right,”press the right button in
the vehicle.
.If you wrote “Middle,”press the middle button in
the vehicle. 6. After entering all of the switch positions, again,
firmly press and release all three buttons at the
same time. The indicator lights turn on.
7. Press and hold the button that will be used to control the garage door until the garage door
moves. The indicator light above the selected
button should slowly blink. This button may need
to be held for up to 55 seconds.
8. Immediately release the button when the garage door moves. The indicator light blinks rapidly until
programming is complete.
9. Press and release the same button again. The garage door should move, confirming that
programming is successful and complete.
To program another Fixed Code device such as an
additional garage door opener, a security device,
or home automation device, repeat Steps 1-9, choosing
a different button in Step 7 than what was used for the
garage door opener.
3-48
Page 145 of 472
Using Universal Home Remote
Press and hold the appropriate button for at least
half of a second. The indicator light comes on while
the signal is being transmitted.
Operation can occur:
.If the vehicle is in accessory mode.
.If the vehicle is in running.
.If the vehicle is in Retained Accessory Mode
(RAP). See Retained Accessory Power (RAP)on
page 3‑24for more information.
.Up to an additional 10 minutes after RAP finishes.
.Up to 10 minutes after any door is opened.
Reprogramming Universal Home
Remote Buttons
Any of the three buttons can be reprogrammed by
repeating the instructions.
Erasing Universal Home Remote
Buttons
The programmed buttons should be erased when the
vehicle is sold or the lease ends.
To erase either Rolling Code or Fixed Code on the
Universal Home Remote device:
1. Press and hold the two outside buttons at the same time for approximately 20 seconds, until the
indicator lights, located directly above the buttons,
begin to blink rapidly.
2. Once the indicator lights begin to blink, release both buttons. The codes from all buttons are
erased.
For help or information on the Universal Home Remote
System, call the customer assistance phone number
under Customer Assistance Offices on page 8‑6.
3-49
Page 169 of 472
Section 4 Instrument Panel
Instrument Panel Overview. . . . . . . . . . . . . . . . . . . . . . . . 4-3
Hazard Warning Flashers . . . . . . . . . . . . . . . . . . . . . . . 4-3
Horn . . . . . . . . . . . . . . . . . . . . . . . . . . . . . . . . . . . . . . . . . . . . 4-3
Tilt Wheel . . . . . . . . . . . . . . . . . . . . . . . . . . . . . . . . . . . . . . . 4-3
Turn Signal/Multifunction Lever . . . . . . . . . . . . . . . . . . 4-4
Turn and Lane-Change Signals (Auto Signal) . . . 4-5
Headlamp High/Low-Beam Changer . . . . . . . . . . . . 4-5
Flash-to-Pass . . . . . . . . . . . . . . . . . . . . . . . . . . . . . . . . . . . 4-5
Windshield Wipers . . . . . . . . . . . . . . . . . . . . . . . . . . . . . . 4-6
Windshield Washer . . . . . . . . . . . . . . . . . . . . . . . . . . . . . 4-6
Cruise Control . . . . . . . . . . . . . . . . . . . . . . . . . . . . . . . . . . 4-7
Exterior Lamps . . . . . . . . . . . . . . . . . . . . . . . . . . . . . . . . . 4-11
Wiper Activated Headlamps . . . . . . . . . . . . . . . . . . . 4-12
Headlamps on Reminder . . . . . . . . . . . . . . . . . . . . . . 4-12
Daytime Running Lamps (DRL) . . . . . . . . . . . . . . . . 4-12
Fog Lamps . . . . . . . . . . . . . . . . . . . . . . . . . . . . . . . . . . . . 4-13
Twilight Sentinel
®. . . . . . . . . . . . . . . . . . . . . . . . . . . . . . 4-14
Exterior Lighting Battery Saver . . . . . . . . . . . . . . . . . 4-15
Instrument Panel Brightness . . . . . . . . . . . . . . . . . . . 4-15
Courtesy Lamps . . . . . . . . . . . . . . . . . . . . . . . . . . . . . . . 4-15
Entry/Exit Lighting . . . . . . . . . . . . . . . . . . . . . . . . . . . . . 4-15
Reading Lamps . . . . . . . . . . . . . . . . . . . . . . . . . . . . . . . . 4-15
Battery Run-Down Protection . . . . . . . . . . . . . . . . . . 4-16
Head-Up Display (HUD) . . . . . . . . . . . . . . . . . . . . . . . 4-16
Accessory Power Outlet(s) . . . . . . . . . . . . . . . . . . . . . 4-20
Ashtray(s) and Cigarette Lighter . . . . . . . . . . . . . . . 4-21 Climate Controls
. . . . . . . . . . . . . . . . . . . . . . . . . . . . . . . . . . 4-22
Dual Automatic Climate Control System . . . . . . . 4-22
Outlet Adjustment . . . . . . . . . . . . . . . . . . . . . . . . . . . . . . 4-27
Passenger Compartment Air Filter . . . . . . . . . . . . . 4-28
Warning Lights, Gauges, and Indicators . . . . . . . . 4-29
Instrument Panel Cluster . . . . . . . . . . . . . . . . . . . . . . . 4-30
Speedometer and Odometer . . . . . . . . . . . . . . . . . . . 4-32
Tachometer . . . . . . . . . . . . . . . . . . . . . . . . . . . . . . . . . . . . 4-32
Safety Belt Reminders . . . . . . . . . . . . . . . . . . . . . . . . . 4-32
Airbag Readiness Light . . . . . . . . . . . . . . . . . . . . . . . . 4-33
Passenger Airbag Status Indicator . . . . . . . . . . . . . 4-34
Voltmeter Gauge . . . . . . . . . . . . . . . . . . . . . . . . . . . . . . . 4-35
One-to-Four Shift Light (Manual Transmission) . . . . . . . . . . . . . . . . . . . . . . . . . . . . . . . 4-36
Brake System Warning Light . . . . . . . . . . . . . . . . . . . 4-36
Antilock Brake System (ABS) Warning Light . . . . . . . . . . . . . . . . . . . . . . . . . . . . . . . 4-37
Traction Control System (TCS) Warning Light . . . . . . . . . . . . . . . . . . . . . . . . . . . . . . . . 4-38
Active Handling System Light . . . . . . . . . . . . . . . . . . 4-39
Engine Coolant Temperature Gauge . . . . . . . . . . . 4-40
Tire Pressure Light . . . . . . . . . . . . . . . . . . . . . . . . . . . . 4-40
Malfunction Indicator Lamp . . . . . . . . . . . . . . . . . . . . 4-41
Engine Oil Pressure Gauge . . . . . . . . . . . . . . . . . . . . 4-44
Security Light . . . . . . . . . . . . . . . . . . . . . . . . . . . . . . . . . . 4-45
4-1
Page 170 of 472
Section 4 Instrument Panel
Fog Lamp Light . . . . . . . . . . . . . . . . . . . . . . . . . . . . . . . . 4-45
Lights On Reminder . . . . . . . . . . . . . . . . . . . . . . . . . . . 4-45
Highbeam On Light . . . . . . . . . . . . . . . . . . . . . . . . . . . . 4-45
Fuel Gauge . . . . . . . . . . . . . . . . . . . . . . . . . . . . . . . . . . . . 4-46
Boost Gauge (ZR1 Only) . . . . . . . . . . . . . . . . . . . . . . 4-47
Driver Information Center (DIC) . . . . . . . . . . . . . . . . . . 4-47
DIC Operation and Displays . . . . . . . . . . . . . . . . . . . 4-47
DIC Warnings and Messages . . . . . . . . . . . . . . . . . . 4-52
Other Messages . . . . . . . . . . . . . . . . . . . . . . . . . . . . . . . 4-70
DIC Vehicle Personalization . . . . . . . . . . . . . . . . . . . 4-71 Audio System(s)
. . . . . . . . . . . . . . . . . . . . . . . . . . . . . . . . . . 4-80
Setting the Clock . . . . . . . . . . . . . . . . . . . . . . . . . . . . . . 4-80
Radio(s) . . . . . . . . . . . . . . . . . . . . . . . . . . . . . . . . . . . . . . . 4-81
Using an MP3 . . . . . . . . . . . . . . . . . . . . . . . . . . . . . . . . . 4-92
XM Radio Messages . . . . . . . . . . . . . . . . . . . . . . . . . . . 4-95
Navigation/Radio System . . . . . . . . . . . . . . . . . . . . . . 4-96
Bluetooth
®. . . . . . . . . . . . . . . . . . . . . . . . . . . . . . . . . . . . . 4-96
Theft-Deterrent Feature . . . . . . . . . . . . . . . . . . . . . . 4-106
Audio Steering Wheel Controls . . . . . . . . . . . . . . . 4-107
Radio Reception . . . . . . . . . . . . . . . . . . . . . . . . . . . . . . 4-108
Diversity Antenna System . . . . . . . . . . . . . . . . . . . . 4-109
XM™ Satellite Radio Antenna System . . . . . . . . 4-109
4-2
Page 179 of 472
Exterior Lamps
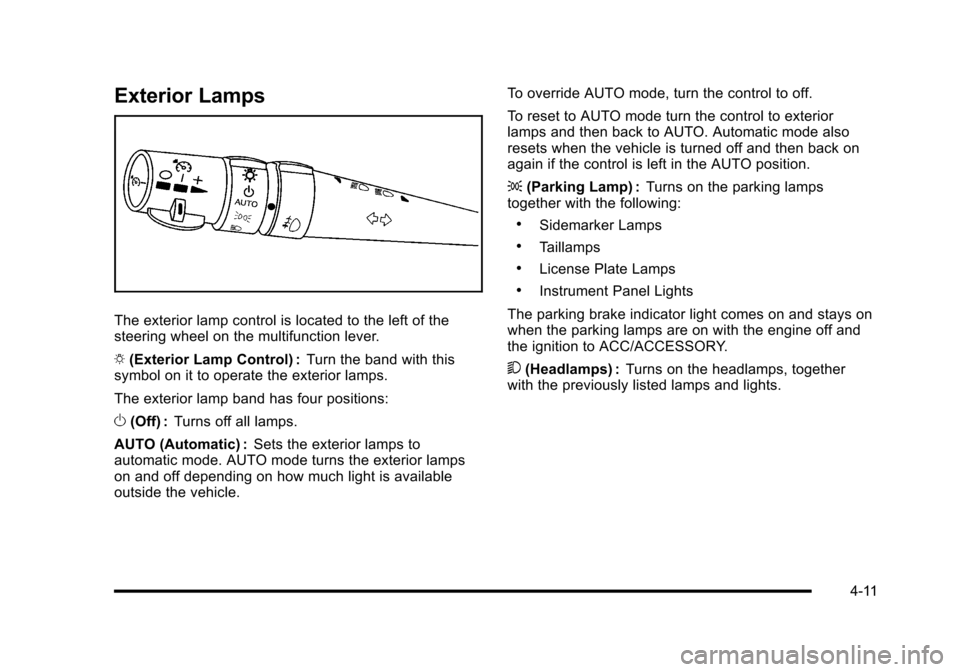
The exterior lamp control is located to the left of the
steering wheel on the multifunction lever.
O (Exterior Lamp Control) : Turn the band with this
symbol on it to operate the exterior lamps.
The exterior lamp band has four positions:
O (Off) : Turns off all lamps.
AUTO (Automatic) : Sets the exterior lamps to
automatic mode. AUTO mode turns the exterior lamps
on and off depending on how much light is available
outside the vehicle. To override AUTO mode, turn the control to off.
To reset to AUTO mode turn the control to exterior
lamps and then back to AUTO. Automatic mode also
resets when the vehicle is turned off and then back on
again if the control is left in the AUTO position.
;
(Parking Lamp) : Turns on the parking lamps
together with the following:
.Sidemarker Lamps
.Taillamps
.License Plate Lamps
.Instrument Panel Lights
The parking brake indicator light comes on and stays on
when the parking lamps are on with the engine off and
the ignition to ACC/ACCESSORY.
5 (Headlamps) : Turns on the headlamps, together
with the previously listed lamps and lights.
4-11
Page 180 of 472
Wiper Activated Headlamps
This feature activates the headlamps and parking
lamps after the windshield wipers have been in use for
approximately 15 seconds and deactivates and returns
to ambient lighting conditions 15 seconds after the
wipers are turned off.
If the exterior lamp control has been turned off or is in
the parking lamp position while the wiper control is
active in any position, the HEADLAMPS SUGGESTED
message appears on the Driver Information Center
(DIC). See DIC Warnings and Messages on page 4‑52.
When the ignition is turned off, the wiper-activated
headlamps will immediately turn off.
Headlamps on Reminder
A warning chime will sound if the exterior lamp control
is left on in either the headlamp or parking lamp position
and the driver's door is opened with the ignition off.
Daytime Running Lamps (DRL)
Daytime Running Lamps (DRL) can make it easier for
others to see the front of your vehicle during the day.
Fully functional daytime running lamps are required on
all vehicles first sold in Canada.
The DRL system makes the front turn signal lamps
come on when the following conditions are met:
.It is still daylight and the ignition is on.
.The exterior lamp control is in the AUTO position.
.The transmission is not in P (Park) or the parking
brake is off.
.The parking brake is off or the vehicle speed is
greater than 8 mph (13 km/h).
When DRL are on, only the front turn signal lamps will
be on. The parking lamps, taillamps, instrument panel
lights, or other exterior lamps will not be on when the
DRL are being used.
When it is dark enough outside, the front turn signal
lamps turn off and the normal low-beam headlamps
turn on.
4-12