transmission CHEVROLET CORVETTE 2012 6.G Owners Manual
[x] Cancel search | Manufacturer: CHEVROLET, Model Year: 2012, Model line: CORVETTE, Model: CHEVROLET CORVETTE 2012 6.GPages: 434, PDF Size: 6.96 MB
Page 2 of 434

Black plate (2,1)Chevrolet Corvette Owner Manual - 2012
2012 Chevrolet Corvette Owner ManualM
Driving and Operating. . . . . . . . 9-1
Driving Information . . . . . . . . . . . . . 9-2
Starting and Operating . . . . . . . 9-18
Engine Exhaust . . . . . . . . . . . . . . 9-26
Automatic Transmission . . . . . . 9-27
Manual Transmission . . . . . . . . . 9-32
Brakes . . . . . . . . . . . . . . . . . . . . . . . 9-35
Ride Control Systems . . . . . . . . 9-36
Cruise Control . . . . . . . . . . . . . . . . 9-45
Fuel . . . . . . . . . . . . . . . . . . . . . . . . . . 9-48
Towing . . . . . . . . . . . . . . . . . . . . . . . 9-54
Conversions and Add-Ons . . . 9-54 Vehicle Care
. . . . . . . . . . . . . . . . . 10-1
General Information . . . . . . . . . . 10-3
Vehicle Checks . . . . . . . . . . . . . . . 10-8
Headlamp Aiming . . . . . . . . . . . 10-48
Bulb Replacement . . . . . . . . . . 10-48
Electrical System . . . . . . . . . . . . 10-50
Wheels and Tires . . . . . . . . . . . 10-58
Jump Starting . . . . . . . . . . . . . . . 10-82
Towing . . . . . . . . . . . . . . . . . . . . . . 10-86
Appearance Care . . . . . . . . . . . 10-86
Service and Maintenance . . . 11-1
General Information . . . . . . . . . . 11-1
Maintenance Schedule . . . . . . . 11-3
Special Application
Services . . . . . . . . . . . . . . . . . . . . 11-8
Additional Maintenance
and Care . . . . . . . . . . . . . . . . . . . . 11-8
Recommended Fluids, Lubricants, and Parts . . . . . . 11-12
Maintenance Records . . . . . . . 11-15 Technical Data
. . . . . . . . . . . . . . . 12-1
Vehicle Identification . . . . . . . . . 12-1
Vehicle Data . . . . . . . . . . . . . . . . . . 12-2
Customer Information . . . . . . . 13-1
Customer Information . . . . . . . . 13-1
Reporting Safety Defects . . . . 13-18
Vehicle Data Recording and
Privacy . . . . . . . . . . . . . . . . . . . . 13-20
OnStar . . . . . . . . . . . . . . . . . . . . . . . 14-1
OnStar Overview . . . . . . . . . . . . . 14-1
OnStar Services . . . . . . . . . . . . . . 14-2
OnStar Additional Information . . . . . . . . . . . . . . . . . . 14-5
Index . . . . . . . . . . . . . . . . . . . . . i-1
Page 7 of 434
Black plate (1,1)Chevrolet Corvette Owner Manual - 2012
In Brief 1-1
In Brief
Instrument Panel
Instrument Panel . . . . . . . . . . . . . . 1-2
Initial Drive Information
Initial Drive Information . . . . . . . . 1-4
Remote Keyless Entry (RKE)System . . . . . . . . . . . . . . . . . . . . . . 1-4
Door Locks . . . . . . . . . . . . . . . . . . . 1-5
Trunk Release . . . . . . . . . . . . . . . . 1-6
Windows . . . . . . . . . . . . . . . . . . . . . . 1-7
Seat Adjustment . . . . . . . . . . . . . . 1-8
Memory Features . . . . . . . . . . . . . 1-9
Safety Belts . . . . . . . . . . . . . . . . . . 1-11
Passenger Sensing System . . . . . . . . . . . . . . . . . . . . . 1-11
Mirror Adjustment . . . . . . . . . . . . 1-12 Steering Wheel
Adjustment . . . . . . . . . . . . . . . . . 1-12
Interior Lighting . . . . . . . . . . . . . . 1-13
Exterior Lighting . . . . . . . . . . . . . 1-14
Windshield Wiper/Washer . . . . 1-14
Climate Controls . . . . . . . . . . . . . 1-15
Transmission . . . . . . . . . . . . . . . . 1-16Vehicle Features
Radio(s) . . . . . . . . . . . . . . . . . . . . . 1-17
Satellite Radio . . . . . . . . . . . . . . . 1-18
Portable Audio Devices . . . . . . 1-18
Bluetooth
®. . . . . . . . . . . . . . . . . . . 1-18
Steering Wheel Controls . . . . . 1-19
Cruise Control . . . . . . . . . . . . . . . 1-19
Navigation System . . . . . . . . . . . 1-19
Driver Information Center (DIC) . . . . . . . . . . . . . . . 1-20
Power Outlets . . . . . . . . . . . . . . . 1-21
Roof Panel . . . . . . . . . . . . . . . . . . 1-21
Convertible . . . . . . . . . . . . . . . . . . 1-21
Performance and Maintenance
Traction Control System (TCS) . . . . . . . . . . . . . . 1-21
Tire Pressure Monitor . . . . . . . . 1-22
Z06, Z16, and ZR1 Features . . . . . . . . . . . . . . . . . . . 1-22
Engine Oil Life System . . . . . . 1-23
Driving for Better Fuel Economy . . . . . . . . . . . . . . . . . . . 1-24
Battery . . . . . . . . . . . . . . . . . . . . . . . 1-24
Roadside Assistance Program . . . . . . . . . . . . . . . . . . . . 1-25
OnStar
®. . . . . . . . . . . . . . . . . . . . . 1-25
Page 9 of 434

Black plate (3,1)Chevrolet Corvette Owner Manual - 2012
In Brief 1-3
A.Air Vents on page 8‑6.
B. Head‐Up Display Controls (If Equipped). See Head-Up
Display (HUD) on page 5‑32.
C. Turn and Lane‐Change Lever. See Turn and Lane-Change
Signals on page 6‑4.
Cruise Control on page 9‑45.
Fog Lamps on page 6‑5.
Exterior Lamp Controls on
page 6‑1.
D. Manual Shift Paddles (If Equipped). See Automatic
Transmission on page 9‑27.
E. Driver Information Center (DIC)
on page 5‑28.
F. Instrument Cluster on page 5‑9.
G. Windshield Wiper/Washer on
page 5‑4.
H. Driver Information Center (DIC) Buttons. See Driver Information
Center (DIC) on page 5‑28. I.
Hazard Warning Flashers on
page 6‑4.
J. Infotainment on page 7‑1.
K. Dual Automatic Climate Control
System on page 8‑1.
L. Fuel Door Release Button. See Filling the Tank on page 9‑51.
Hatch/Trunk Release Button.
See “Hatch/Trunk Lid Release”
under Hatch on page 2‑11.
M. Instrument Panel Illumination
Control on page 6‑5.
N. Power Folding Top Switch (If Equipped). See Convertible
Top on page 2‑24.
O. Data Link Connector (DLC) (Out of View). See Malfunction
Indicator Lamp on page 5‑19.
P. Bluetooth Controls (If Equipped). See Bluetooth on
page 7‑18.
Steering Wheel Controls on
page 5‑3 (If Equipped). Q.
Steering Wheel Adjustment on
page 5‑2.
R. Horn on page 5‑4.
S. Telescopic Steering Column Control (If Equipped). See
Steering Wheel Adjustment on
page 5‑2.
T. Ignition Positions on page 9‑19.
U. Heated Front Seats on page 3‑8
(If Equipped).
V. Shift Lever (Automatic Shown). See Automatic Transmission on
page 9‑27 orManual
Transmission on page 9‑32.
W. Active Handling System on
page 9‑38.
X. Power Outlets on page 5‑6.
Y. Selective Ride Control on
page 9‑43 (If Equipped).
Z. Parking Brake on page 9‑36.
Page 12 of 434
Black plate (6,1)Chevrolet Corvette Owner Manual - 2012
1-6 In Brief
Outside the Vehicle
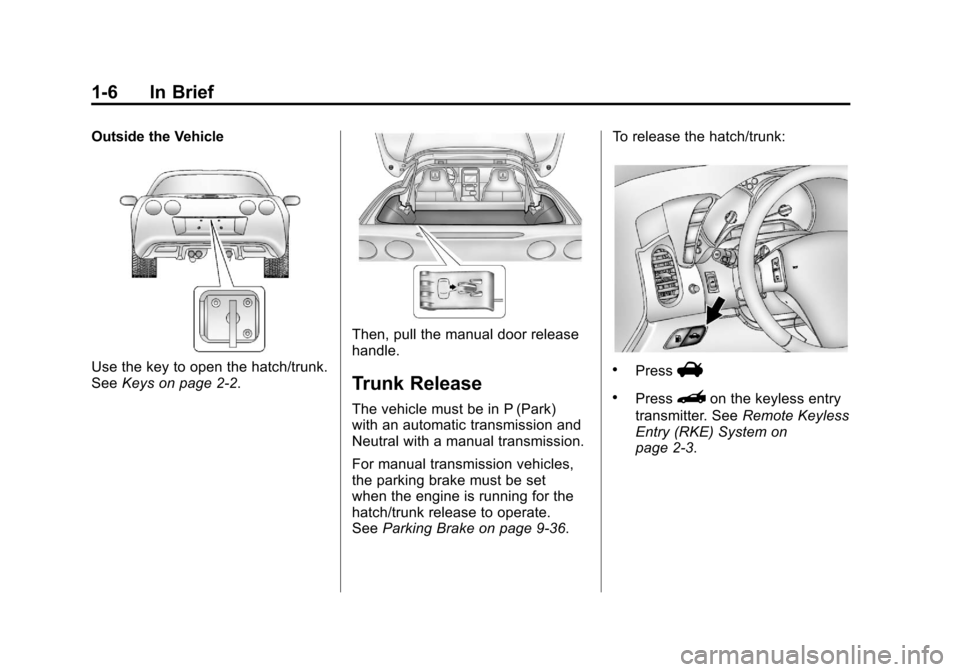
Use the key to open the hatch/trunk.
SeeKeys on page 2‑2.
Then, pull the manual door release
handle.
Trunk Release
The vehicle must be in P (Park)
with an automatic transmission and
Neutral with a manual transmission.
For manual transmission vehicles,
the parking brake must be set
when the engine is running for the
hatch/trunk release to operate.
SeeParking Brake on page 9‑36. To release the hatch/trunk:
.PressV
.Press}on the keyless entry
transmitter. See Remote Keyless
Entry (RKE) System on
page 2‑3.
Page 16 of 434
Black plate (10,1)Chevrolet Corvette Owner Manual - 2012
1-10 In Brief
Storing Memory Positions
To save into memory:
1. Adjust the driver seat, bothoutside mirrors, and the
telescopic steering column.
2. Press and hold “1”until
two beeps sound.
3. Repeat for a second driver position using “2.”
To recall:
.On vehicles with an automatic
transmission, press and
release “1”or“2.”
If the vehicle is in P (Park), a
single beep sounds and the
memory position is recalled after
a brief delay.
If the vehicle is not in P (Park),
three beeps sound and the
memory position is not recalled.
.On vehicles with a manual
transmission, when the vehicle
is on, the parking brake must be
set to recall a memory position.
Press and release “1”or“2.”
A single beep sounds and the
memory position is recalled after
a brief delay.
If the vehicle is on and the
parking brake is not set,
three beeps sound and the
memory position is not recalled.
See Memory Seats on page 3‑5 for
more information.
Easy Exit Driver Seat
This feature can move the seat
rearward and the telescopic steering
column out of the way to allow extra
room to exit the vehicle.
B: Press to save and recall the
easy exit seat position. To save into memory:
1. Recall the desired driving
position by pressing “1.”
2. Adjust the seat and the telescopic steering column to
the desired exit position.
3. Press and hold Buntil
two beeps sound.
4. Repeat for a second driver position using “2.”
To recall, press and release B.
The vehicle must be in P (Park) for
an automatic transmission or the
parking brake must be set for a
manual transmission. A single beep
sounds. The seat and telescopic
steering column will move to the
position previously stored for the
identified driver.
See Memory Seats on page 3‑5 for
more information.
Page 22 of 434
Black plate (16,1)Chevrolet Corvette Owner Manual - 2012
1-16 In Brief
Transmission
Manual Paddle Shift
(Automatic Transmission)
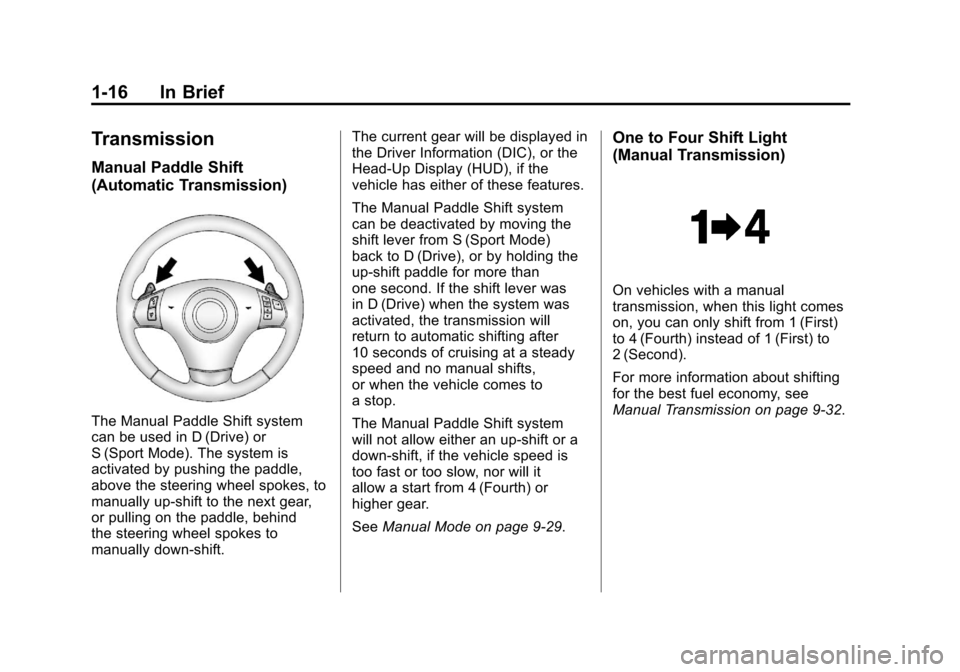
The Manual Paddle Shift system
can be used in D (Drive) or
S (Sport Mode). The system is
activated by pushing the paddle,
above the steering wheel spokes, to
manually up-shift to the next gear,
or pulling on the paddle, behind
the steering wheel spokes to
manually down-shift.The current gear will be displayed in
the Driver Information (DIC), or the
Head-Up Display (HUD), if the
vehicle has either of these features.
The Manual Paddle Shift system
can be deactivated by moving the
shift lever from S (Sport Mode)
back to D (Drive), or by holding the
up‐shift paddle for more than
one second. If the shift lever was
in D (Drive) when the system was
activated, the transmission will
return to automatic shifting after
10 seconds of cruising at a steady
speed and no manual shifts,
or when the vehicle comes to
a stop.
The Manual Paddle Shift system
will not allow either an up-shift or a
down-shift, if the vehicle speed is
too fast or too slow, nor will it
allow a start from 4 (Fourth) or
higher gear.
See
Manual Mode on page 9‑29.
One to Four Shift Light
(Manual Transmission)
On vehicles with a manual
transmission, when this light comes
on, you can only shift from 1 (First)
to 4 (Fourth) instead of 1 (First) to
2 (Second).
For more information about shifting
for the best fuel economy, see
Manual Transmission on page 9‑32.
Page 26 of 434
Black plate (20,1)Chevrolet Corvette Owner Manual - 2012
1-20 In Brief
Driver Information
Center (DIC)
The DIC display is located at the
bottom of the instrument panel
cluster. It shows the status of
many vehicle systems and enables
access to the personalization menu.
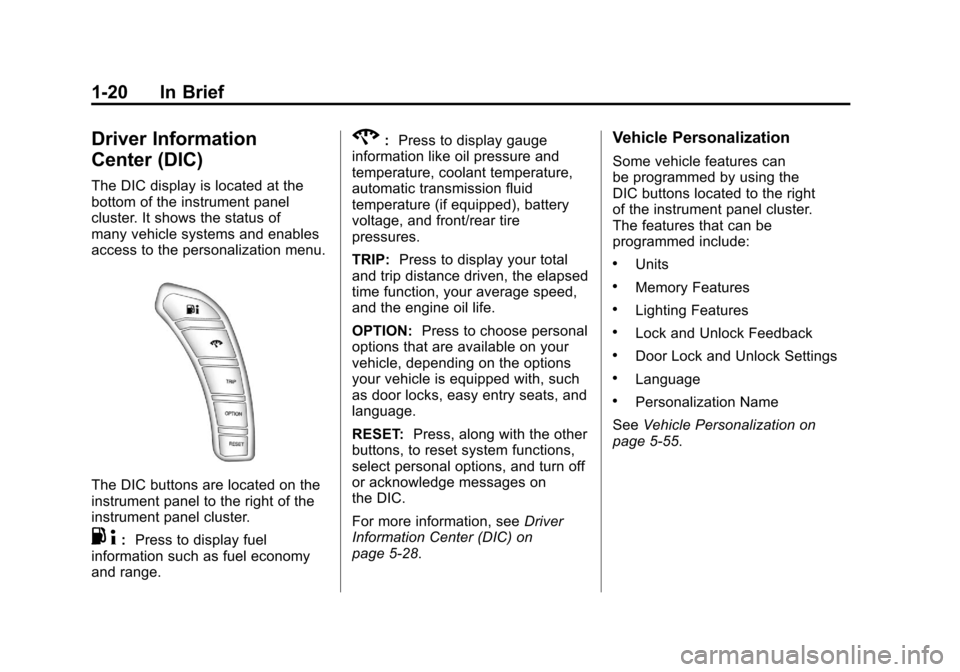
The DIC buttons are located on the
instrument panel to the right of the
instrument panel cluster.
.4:Press to display fuel
information such as fuel economy
and range.
2: Press to display gauge
information like oil pressure and
temperature, coolant temperature,
automatic transmission fluid
temperature (if equipped), battery
voltage, and front/rear tire
pressures.
TRIP: Press to display your total
and trip distance driven, the elapsed
time function, your average speed,
and the engine oil life.
OPTION: Press to choose personal
options that are available on your
vehicle, depending on the options
your vehicle is equipped with, such
as door locks, easy entry seats, and
language.
RESET: Press, along with the other
buttons, to reset system functions,
select personal options, and turn off
or acknowledge messages on
the DIC.
For more information, see Driver
Information Center (DIC) on
page 5‑28.Vehicle Personalization
Some vehicle features can
be programmed by using the
DIC buttons located to the right
of the instrument panel cluster.
The features that can be
programmed include:
.Units
.Memory Features
.Lighting Features
.Lock and Unlock Feedback
.Door Lock and Unlock Settings
.Language
.Personalization Name
See Vehicle Personalization on
page 5‑55.
Page 28 of 434
Black plate (22,1)Chevrolet Corvette Owner Manual - 2012
1-22 In Brief
The vehicle has an Active Handling
System that helps maintain
directional control of the vehicle in
difficult driving conditions. See
Active Handling System on
page 9‑38.
The vehicle may have Competitive
Driving Mode (except ZR1),
Performance Traction
Management (Z06, ZR1), and
Launch Control systems designed to
allow increased performance while
accelerating and cornering. See
Competitive Driving Mode on
page 9‑39.Tire Pressure Monitor
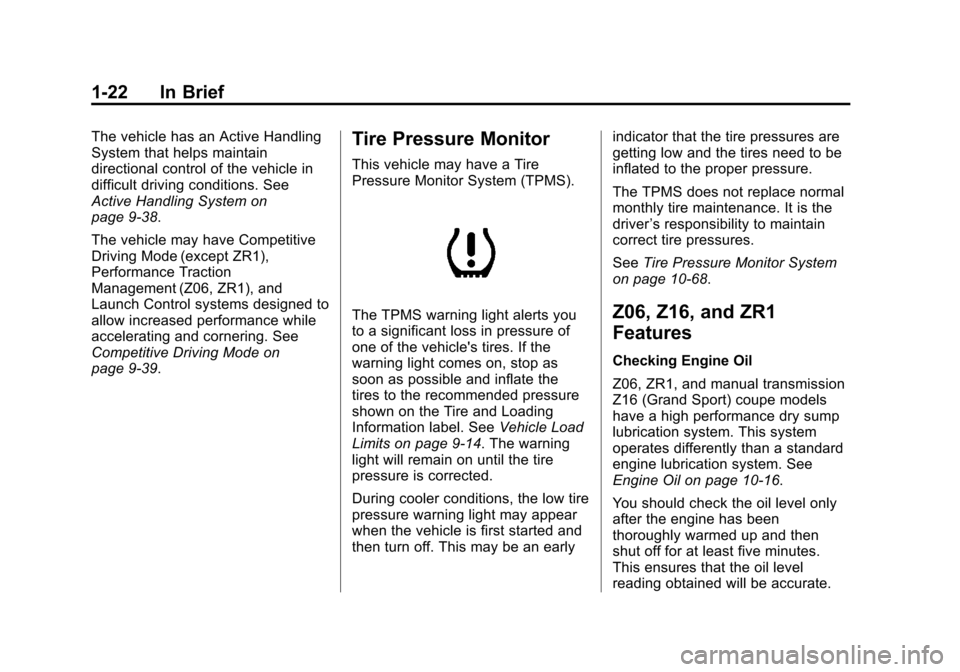
This vehicle may have a Tire
Pressure Monitor System (TPMS).
The TPMS warning light alerts you
to a significant loss in pressure of
one of the vehicle's tires. If the
warning light comes on, stop as
soon as possible and inflate the
tires to the recommended pressure
shown on the Tire and Loading
Information label. SeeVehicle Load
Limits on page 9‑14. The warning
light will remain on until the tire
pressure is corrected.
During cooler conditions, the low tire
pressure warning light may appear
when the vehicle is first started and
then turn off. This may be an early indicator that the tire pressures are
getting low and the tires need to be
inflated to the proper pressure.
The TPMS does not replace normal
monthly tire maintenance. It is the
driver
’s responsibility to maintain
correct tire pressures.
See Tire Pressure Monitor System
on page 10‑68.Z06, Z16, and ZR1
Features
Checking Engine Oil
Z06, ZR1, and manual transmission
Z16 (Grand Sport) coupe models
have a high performance dry sump
lubrication system. This system
operates differently than a standard
engine lubrication system. See
Engine Oil on page 10‑16.
You should check the oil level only
after the engine has been
thoroughly warmed up and then
shut off for at least five minutes.
This ensures that the oil level
reading obtained will be accurate.
Page 29 of 434
Black plate (23,1)Chevrolet Corvette Owner Manual - 2012
In Brief 1-23
Jump Starting the Battery
The battery of Z06, ZR1, and
manual transmission Z16 (Grand
Sport) coupe models is in the rear of
the vehicle. You do not need to
access the battery for jump starting.
There are remote positive (+) and
negative (−) terminals under the
hood for this purpose. SeeBattery
on page 10‑43 andJump Starting
on page 10‑82.
Brake Noise
Under certain weather or operating
conditions, occasional brake noise
might be heard with the vehicle's
performance braking system. This
brake system is designed for
superior fade resistance and
consistent operation using high
performance brake pads. Brake
noise is normal and does not affect
system performance. See Braking
on page 9‑4. Car Wash Guidelines
Automatic car washes are not
recommended for this vehicle.
Some car washes cause damage to
the vehicle, the wheels, and the
convertible top, if the vehicle is
so equipped.
If you drive the vehicle through an
automatic car wash that does not
have enough clearance for the
undercarriage and/or wide rear tires
and wheels, you could damage the
vehicle. Verify with the manager of
the car wash that the vehicle will fit
before entering the car wash or use
a touchless car wash. See
“Washing
Your Vehicle” underExterior Care
on page 10‑86.Engine Oil Life System
The engine oil life system calculates
engine oil life based on vehicle use
and displays a DIC message when
it is necessary to change the engine
oil and filter. The oil life system
should be reset to 100% only
following an oil change.
Resetting the Oil Life System
1. Press the TRIP button so the OIL LIFE percentage is
displayed.
2. Press RESET and hold for two seconds. OIL LIFE
REMAINING 100% will appear.
See Engine Oil Life System on
page 10‑22.
Page 30 of 434
Black plate (24,1)Chevrolet Corvette Owner Manual - 2012
1-24 In Brief
Driving for Better Fuel
Economy
Driving habits can affect fuel
mileage. Here are some driving tips
to get the best fuel economy
possible.
.Avoid fast starts and accelerate
smoothly.
.Brake gradually and avoid
abrupt stops.
.Avoid idling the engine for long
periods of time.
.When road and weather
conditions are appropriate, use
cruise control, if equipped.
.Always follow posted speed
limits or drive more slowly when
conditions require.
.Keep vehicle tires properly
inflated.
.Combine several trips into a
single trip.
.Replace the vehicle's tires with
the same TPC Spec number
molded into the tire's sidewall
near the size.
.Follow recommended scheduled
maintenance.
Premium Fuel
This vehicle's engine was designed
to use premium unleaded gasoline.
See Recommended Fuel on
page 9‑48.
Battery
This vehicle has a maintenance free
battery. See Battery on page 10‑43
and Jump Starting on page 10‑82.
For Z06, ZR1, and manual
transmission Z16 (Grand Sport)
coupe models the battery is located
in the rear hatch/trunk area. Access
to the battery is not necessary to
jump start the vehicle. There are
positive (+) and negative (−)
terminals in the engine
compartment.