inflation pressure CHEVROLET CORVETTE 2015 7.G User Guide
[x] Cancel search | Manufacturer: CHEVROLET, Model Year: 2015, Model line: CORVETTE, Model: CHEVROLET CORVETTE 2015 7.GPages: 393, PDF Size: 5.4 MB
Page 301 of 393
Black plate (62,1)Chevrolet Corvette Owner Manual (GMNA-Localizing-U.S./Canada/Mexico-
7576293) - 2015 - crc - 10/31/14
10-62 Vehicle Care
TPMS Sensor Matching
Process—Auto Learn
Function
Each TPMS sensor has a unique
identification code. The identification
code needs to be matched to a new
tire/wheel position after rotating the
tires or replacing one or more of the
TPMS sensors. When a tire is
installed, the vehicle must be
stationary for about 20 minutes
before the system recalculates. The
following relearn process takes up
to 10 minutes, driving at a minimum
speed of 19 km/h (12 mph).
A dash (-) or pressure value will
display in the DIC. See Driver
Information Center (DIC) on
page 5-26 andTire Messages on
page 5-43. A warning message
displays in the DIC if a problem
occurs during the relearn process.
Tire Inspection
We recommend that the tires,
including the spare tire, if the
vehicle has one, be inspected
for signs of wear or damage at
least once a month.
Replace the tire if:
.The indicators at three or
more places around the tire
can be seen.
.There is cord or fabric
showing through the tire's
rubber.
.The tread or sidewall is
cracked, cut, or snagged
deep enough to show cord or
fabric.
.The tire has a bump, bulge,
or split.
.The tire has a puncture, cut,
or other damage that cannot
be repaired well because of
the size or location of the
damage.
Tire Rotation
The tires should be rotated
every 12 000 km/7,500 mi. See
Maintenance Schedule on
page 11-2.
Tires are rotated to achieve
uniform wear for all tires. The
first rotation is the most
important.
Anytime unusual wear is
noticed, rotate the tires as soon
as possible, check for proper tire
inflation pressure, and check for
damaged tires or wheels. If the
unusual wear continues after the
rotation, check the wheel
Page 302 of 393
Black plate (63,1)Chevrolet Corvette Owner Manual (GMNA-Localizing-U.S./Canada/Mexico-
7576293) - 2015 - crc - 10/31/14
Vehicle Care 10-63
alignment. SeeWhen It Is Time
for New Tires on page 10-63
and Wheel Replacement on
page 10-68.
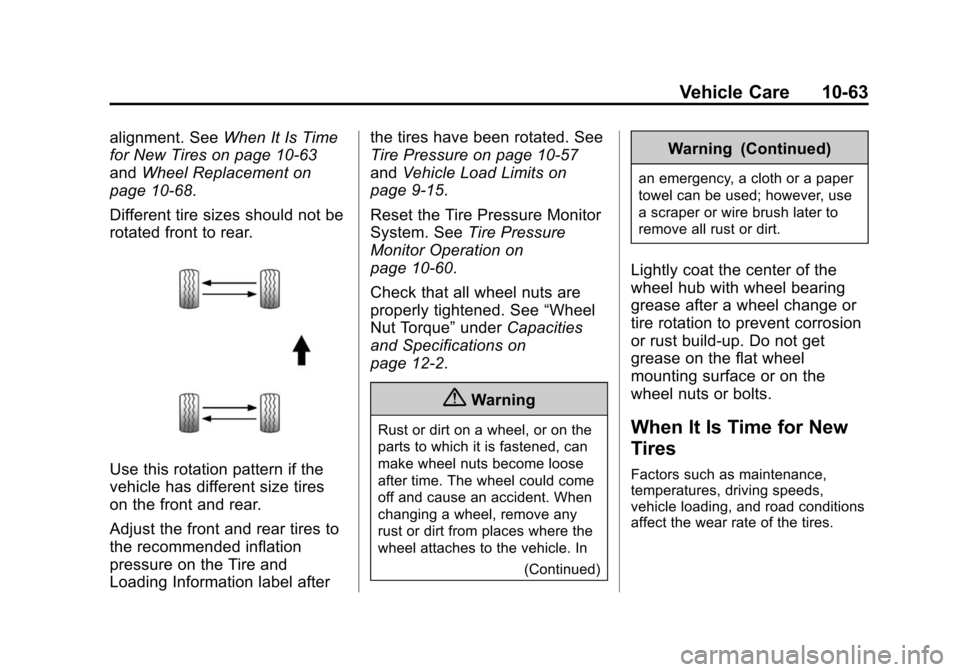
Different tire sizes should not be
rotated front to rear.
Use this rotation pattern if the
vehicle has different size tires
on the front and rear.
Adjust the front and rear tires to
the recommended inflation
pressure on the Tire and
Loading Information label after the tires have been rotated. See
Tire Pressure on page 10-57
and
Vehicle Load Limits on
page 9-15.
Reset the Tire Pressure Monitor
System. See Tire Pressure
Monitor Operation on
page 10-60.
Check that all wheel nuts are
properly tightened. See “Wheel
Nut Torque” underCapacities
and Specifications on
page 12-2.
{Warning
Rust or dirt on a wheel, or on the
parts to which it is fastened, can
make wheel nuts become loose
after time. The wheel could come
off and cause an accident. When
changing a wheel, remove any
rust or dirt from places where the
wheel attaches to the vehicle. In
(Continued)
Warning (Continued)
an emergency, a cloth or a paper
towel can be used; however, use
a scraper or wire brush later to
remove all rust or dirt.
Lightly coat the center of the
wheel hub with wheel bearing
grease after a wheel change or
tire rotation to prevent corrosion
or rust build-up. Do not get
grease on the flat wheel
mounting surface or on the
wheel nuts or bolts.
When It Is Time for New
Tires
Factors such as maintenance,
temperatures, driving speeds,
vehicle loading, and road conditions
affect the wear rate of the tires.
Page 303 of 393
Black plate (64,1)Chevrolet Corvette Owner Manual (GMNA-Localizing-U.S./Canada/Mexico-
7576293) - 2015 - crc - 10/31/14
10-64 Vehicle Care
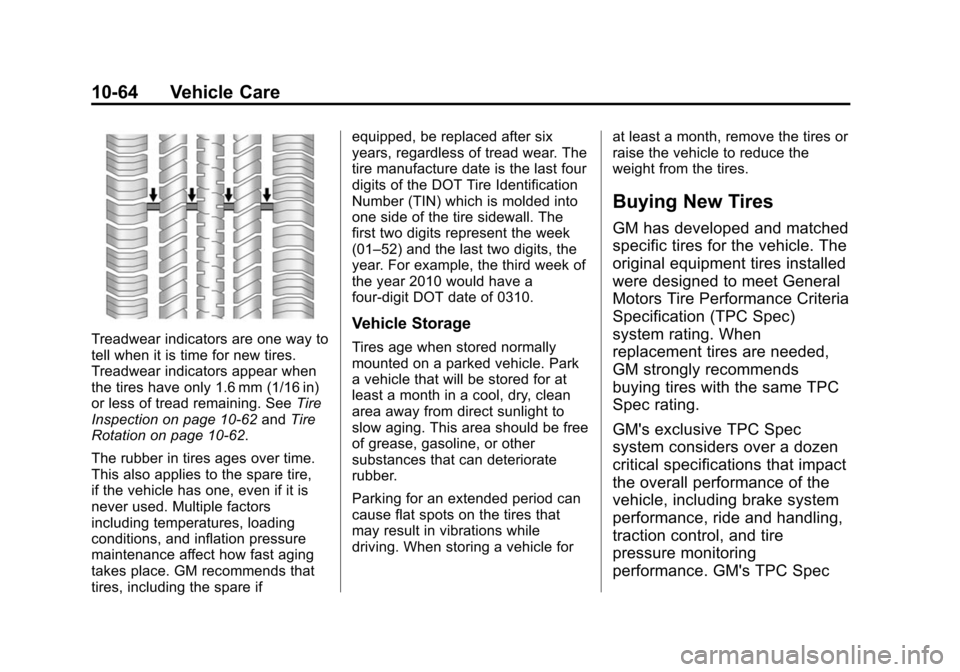
Treadwear indicators are one way to
tell when it is time for new tires.
Treadwear indicators appear when
the tires have only 1.6 mm (1/16 in)
or less of tread remaining. SeeTire
Inspection on page 10-62 andTire
Rotation on page 10-62.
The rubber in tires ages over time.
This also applies to the spare tire,
if the vehicle has one, even if it is
never used. Multiple factors
including temperatures, loading
conditions, and inflation pressure
maintenance affect how fast aging
takes place. GM recommends that
tires, including the spare if equipped, be replaced after six
years, regardless of tread wear. The
tire manufacture date is the last four
digits of the DOT Tire Identification
Number (TIN) which is molded into
one side of the tire sidewall. The
first two digits represent the week
(01–52) and the last two digits, the
year. For example, the third week of
the year 2010 would have a
four-digit DOT date of 0310.Vehicle Storage
Tires age when stored normally
mounted on a parked vehicle. Park
a vehicle that will be stored for at
least a month in a cool, dry, clean
area away from direct sunlight to
slow aging. This area should be free
of grease, gasoline, or other
substances that can deteriorate
rubber.
Parking for an extended period can
cause flat spots on the tires that
may result in vibrations while
driving. When storing a vehicle for
at least a month, remove the tires or
raise the vehicle to reduce the
weight from the tires.
Buying New Tires
GM has developed and matched
specific tires for the vehicle. The
original equipment tires installed
were designed to meet General
Motors Tire Performance Criteria
Specification (TPC Spec)
system rating. When
replacement tires are needed,
GM strongly recommends
buying tires with the same TPC
Spec rating.
GM's exclusive TPC Spec
system considers over a dozen
critical specifications that impact
the overall performance of the
vehicle, including brake system
performance, ride and handling,
traction control, and tire
pressure monitoring
performance. GM's TPC Spec
Page 314 of 393
Black plate (75,1)Chevrolet Corvette Owner Manual (GMNA-Localizing-U.S./Canada/Mexico-
7576293) - 2015 - crc - 10/31/14
Vehicle Care 10-75
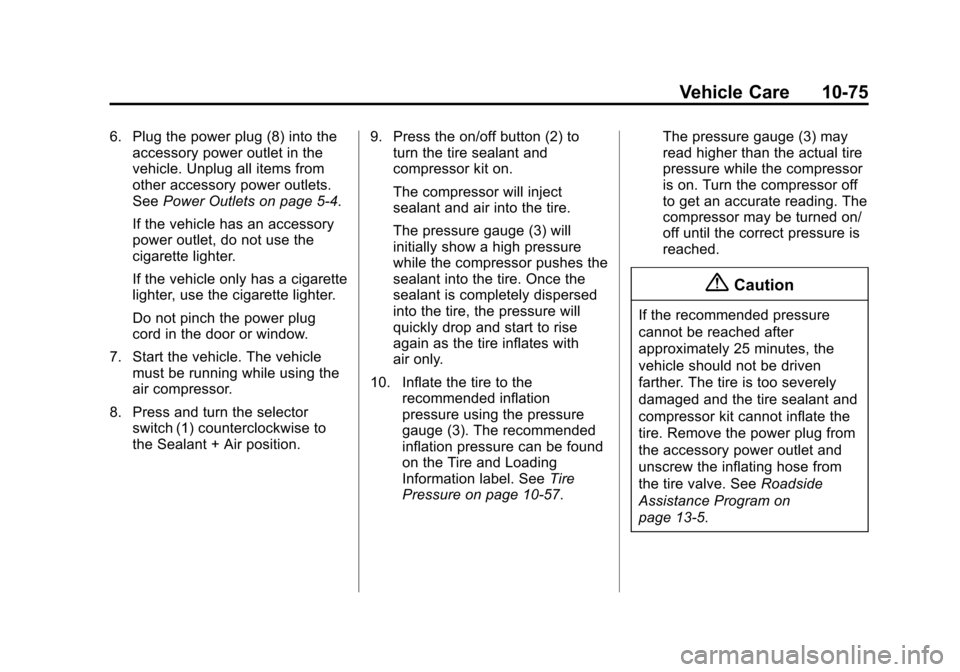
6. Plug the power plug (8) into theaccessory power outlet in the
vehicle. Unplug all items from
other accessory power outlets.
See Power Outlets on page 5-4.
If the vehicle has an accessory
power outlet, do not use the
cigarette lighter.
If the vehicle only has a cigarette
lighter, use the cigarette lighter.
Do not pinch the power plug
cord in the door or window.
7. Start the vehicle. The vehicle must be running while using the
air compressor.
8. Press and turn the selector switch (1) counterclockwise to
the Sealant + Air position. 9. Press the on/off button (2) to
turn the tire sealant and
compressor kit on.
The compressor will inject
sealant and air into the tire.
The pressure gauge (3) will
initially show a high pressure
while the compressor pushes the
sealant into the tire. Once the
sealant is completely dispersed
into the tire, the pressure will
quickly drop and start to rise
again as the tire inflates with
air only.
10. Inflate the tire to the recommended inflation
pressure using the pressure
gauge (3). The recommended
inflation pressure can be found
on the Tire and Loading
Information label. See Tire
Pressure on page 10-57. The pressure gauge (3) may
read higher than the actual tire
pressure while the compressor
is on. Turn the compressor off
to get an accurate reading. The
compressor may be turned on/
off until the correct pressure is
reached.
{Caution
If the recommended pressure
cannot be reached after
approximately 25 minutes, the
vehicle should not be driven
farther. The tire is too severely
damaged and the tire sealant and
compressor kit cannot inflate the
tire. Remove the power plug from
the accessory power outlet and
unscrew the inflating hose from
the tire valve. See
Roadside
Assistance Program on
page 13-5.
Page 315 of 393
Black plate (76,1)Chevrolet Corvette Owner Manual (GMNA-Localizing-U.S./Canada/Mexico-
7576293) - 2015 - crc - 10/31/14
10-76 Vehicle Care
11. Press the on/off button (2) toturn the tire sealant and
compressor kit off.
The tire is not sealed and will
continue to leak air until the
vehicle is driven and the
sealant is distributed in the tire,
therefore, Steps 12–18 must be
done immediately after
Step 11.
Be careful while handling the
tire sealant and compressor kit
as it could be warm after
usage.
12. Unplug the power plug (8) from the accessory power outlet in
the vehicle.
13. Turn the sealant/air hose (6) counterclockwise to remove it
from the tire valve stem.
14. Replace the tire valve stem cap.
15. Replace the sealant/air hose (6), and the power plug (8)
back in their original location.
16. If the flat tire was able to inflate
to the recommended inflation
pressure, remove the
maximum speed label from the
sealant canister (5) and place it
in a highly visible location. Do
not exceed the speed on this
label until the damaged tire is
repaired or replaced.
17. Return the equipment to its original storage location in the
vehicle.
18. Immediately drive the vehicle 8 km (5 mi) to distribute the
sealant in the tire. 19. Stop at a safe location and
check the tire pressure. Refer
to Steps 1–11 under “Using the
Tire Sealant and Compressor
Kit without Sealant to Inflate a
Tire (Not Punctured).”
If the tire pressure has fallen
more than 68 kPa (10 psi)
below the recommended
inflation pressure, stop driving
the vehicle. The tire is too
severely damaged and the tire
sealant cannot seal the tire.
See Roadside Assistance
Program on page 13-5.
If the tire pressure has not
dropped more than 68 kPa
(10 psi) from the recommended
inflation pressure, inflate the
tire to the recommended
inflation pressure.
20. Wipe off any sealant from the wheel, tire, and vehicle.
Page 317 of 393
Black plate (78,1)Chevrolet Corvette Owner Manual (GMNA-Localizing-U.S./Canada/Mexico-
7576293) - 2015 - crc - 10/31/14
10-78 Vehicle Care
3. Pressure Gauge
4. Pressure Deflation Button
5. Tire Sealant Canister
6. Sealant/Air Hose (Clear)
7. Air Only Hose (Black)
8. Power Plug
9. Canister Release Button(Under Sealant/Air Hose)
If a tire goes flat, avoid further tire
and wheel damage by driving slowly
to a level place. Turn on the hazard
warning flashers. See Hazard
Warning Flashers on page 6-4.
See If a Tire Goes Flat on
page 10-70 for other important
safety warnings.
1. Remove the tire sealant and
compressor kit from its storage
location. See Storing the Tire
Sealant and Compressor Kit on
page 10-79.
2. Unwrap the air only hose (7) and the power plug (8). 3. Place the kit on the ground.
Make sure the tire valve stem is
positioned close to the ground
so the hose will reach it.
4. Remove the tire valve stem cap from the flat tire by turning it
counterclockwise.
5. Attach the air only hose (7) onto the tire valve stem by turning it
clockwise until it is tight.
6. Plug the power plug (8) into the accessory power outlet in the
vehicle. Unplug all items from
other accessory power outlets.
See Power Outlets on page 5-4.
If the vehicle has an accessory
power outlet, do not use the
cigarette lighter.
If the vehicle only has a cigarette
lighter, use the cigarette lighter.
Do not pinch the power plug
cord in the door or window.
7. Start the vehicle. The vehicle must be running while using the
air compressor. 8. Press and turn the selector
switch (1) clockwise to the Air
Only position.
9. Press the on/off button (2) to turn the compressor on.
The compressor will inflate the
tire with air only.
10. Inflate the tire to the recommended inflation
pressure using the pressure
gauge (3). The recommended
inflation pressure can be found
on the Tire and Loading
Information label. See Tire
Pressure on page 10-57.
The pressure gauge (3) may
read higher than the actual tire
pressure while the compressor
is on. Turn the compressor off
to get an accurate reading. The
compressor may be turned on/
off until the correct pressure is
reached.
If you inflate the tire higher
than the recommended
pressure you can adjust the
Page 335 of 393
Black plate (2,1)Chevrolet Corvette Owner Manual (GMNA-Localizing-U.S./Canada/Mexico-
7576293) - 2015 - crc - 10/31/14
11-2 Service and Maintenance
Because of the way people use
vehicles, maintenance needs vary.
There may need to be more
frequent checks and services. The
Additional Required Services -
Normal are for vehicles that:
.Carry passengers and cargo
within recommended limits on
the Tire and Loading Information
label. SeeVehicle Load Limits
on page 9-15.
.Are driven on reasonable road
surfaces within legal driving
limits.
.Use the recommended fuel. See
Fuel on page 9-54.
Refer to the information in the
Maintenance Schedule Additional
Required Services - Normal chart.
The Additional Required Services -
Severe are for vehicles that are:
.Mainly driven in heavy city traffic
in hot weather.
.Mainly driven in hilly or
mountainous terrain.
.Frequently towing a trailer.
.Used for high speed or
competitive driving.
.Used for taxi, police, or delivery
service.
Refer to the information in the
Maintenance Schedule Additional
Required Services - Severe chart.
{Warning
Performing maintenance work can
be dangerous and can cause
serious injury. Perform
maintenance work only if the
required information, proper tools,
and equipment are available.
If they are not, see your dealer to
have a trained technician do the
work. See Doing Your Own
Service Work on page 10-5.
Maintenance
Schedule
Owner Checks and Services
At Each Fuel Stop
.Check the engine oil level. See
Engine Oil on page 10-12.
Once a Month
.Check the tire inflation
pressures. See Tire Pressure on
page 10-57.
.Inspect the tires for wear. See
Tire Inspection on page 10-62.
.Check the windshield washer
fluid level. See Washer Fluid on
page 10-29.
Engine Oil Change
When the CHANGE ENGINE OIL
SOON message displays, have the
engine oil and filter changed within
the next 1 000 km/600 mi. If driven
under the best conditions, the
engine oil life system may not
indicate the need for vehicle service
Page 336 of 393
Black plate (3,1)Chevrolet Corvette Owner Manual (GMNA-Localizing-U.S./Canada/Mexico-
7576293) - 2015 - crc - 10/31/14
Service and Maintenance 11-3
for up to a year. The engine oil and
filter must be changed at least once
a year and the oil life system must
be reset. Your trained dealer
technician can perform this work.
If the engine oil life system is reset
accidentally, service the vehicle
within 5 000 km/3,000 mi since the
last service. Reset the oil life
system when the oil is changed.
SeeEngine Oil Life System on
page 10-18.
Dry Sump Engine Break-In Oil
Change
If equipped with a dry sump engine,
the initial oil and filter change must
be performed at 800 km/500 mi.
Follow the engine oil life system for
every oil change thereafter.Required Services Every
12 000 km/7,500 mi
.Check engine oil level and oil
life percentage. If needed,
change engine oil and filter, and
reset oil life system. See Engine
Oil on page 10-12 andEngine
Oil Life System on page 10-18.
.Check engine coolant level. See
Engine Coolant on page 10-25.
.Check windshield washer fluid
level. See Washer Fluid on
page 10-29.
.Visually inspect windshield wiper
blades for wear, cracking,
or contamination. See Exterior
Care on page 10-84. Replace
worn or damaged wiper blades.
See Wiper Blade Replacement
on page 10-37.
.Check tire inflation pressures.
See Tire Pressure on
page 10-57.
.Inspect tire wear. See Tire
Inspection on page 10-62.
.Visually check for fluid leaks.
.Inspect engine air cleaner filter.
See Engine Air Cleaner/Filter on
page 10-20.
.Inspect brake system. See
Exterior Care on page 10-84.
.Visually inspect steering,
suspension, and chassis
components for damaged, loose,
or missing parts or signs of
wear. See Exterior Care on
page 10-84.
.Check restraint system
components. See Safety System
Check on page 3-14.
.Visually inspect fuel system for
damage or leaks.
.Visually inspect exhaust system
and nearby heat shields for
loose or damaged parts.
.Lubricate body components. See
Exterior Care on page 10-84.
.Check starter switch. See Starter
Switch Check on page 10-35.
Page 391 of 393
Black plate (10,1)Chevrolet Corvette Owner Manual (GMNA-Localizing-U.S./Canada/Mexico-
7576293) - 2015 - crc - 10/31/14
i-10 INDEX
ServicesSpecial Application . . . . . . . . . . . 11-8
Servicing the Airbag . . . . . . . . . . . 3-25
Shift Lock Control Function Check, Automatic
Transmission . . . . . . . . . . . . . . . . 10-36
Shifting
Into Park . . . . . . . . . . . . . . . . . . . . . . 9-24
Out of Park . . . . . . . . . . . . . . . . . . . 9-25
Signals, Turn and Lane-Change . . . . . . . . . . . . . . . . . 6-5
Special Application Services . . . 11-8
Specifications and Capacities . . . . . . . . . . . . . . . . . . . . 12-2
Speedometer . . . . . . . . . . . . . . . . . . 5-12
StabiliTrak OFF Light . . . . . . . . . . . . . . . . . . . . . 5-23
Start Assist, Hills . . . . . . . . . . . . . . 9-38
Start Vehicle, Remote . . . . . . . . . . 2-9
Starter Switch Check . . . . . . . . . 10-35
Starting the Engine . . . . . . . . . . . . 9-22
Starting the Vehicle Messages . . . . . . . . . . . . . . . . . . . . 5-43
Steering . . . . . . . . . . . . . . . . . . . . . . . . 9-3 Wheel Adjustment . . . . . . . . . . . . . 5-2
Wheel Controls . . . . . . . . . . . . . . . . 5-2 Storage
Rear . . . . . . . . . . . . . . . . . . . . . . . . . . . 4-2
Storage Areas Cargo Cover . . . . . . . . . . . . . . . . . . . 4-4
Center Console . . . . . . . . . . . . . . . . 4-3
Convenience Net . . . . . . . . . . . . . . 4-5
Glove Box . . . . . . . . . . . . . . . . . . . . . 4-2
Instrument Panel . . . . . . . . . . . . . . 4-1
Storage Compartments . . . . . . . . . 4-1
Storing the Tire Sealant and Compressor Kit . . . . . . . . . 10-79
Stuck Vehicle . . . . . . . . . . . . . . . . . . 9-14
Summer Tires . . . . . . . . . . . . . . . . 10-51
Sun Visors . . . . . . . . . . . . . . . . . . . . . 2-23
Symbols . . . . . . . . . . . . . . . . . . . . . . . . . . iv
System Infotainment . . . . . . . . . . . . 7-1, 13-15
T
Tachometer . . . . . . . . . . . . . . . . . . . . 5-12
Text Telephone (TTY) Users . . . 13-4
Theft-Deterrent Systems . . . . . . . 2-18Immobilizer . . . . . . . . . . . . . . . . . . . 2-18
Time . . . . . . . . . . . . . . . . . . . . . . . . . . . . 5-4 Tires . . . . . . . . . . . . . . . . . . . . . . . . . . 10-47
Buying New Tires . . . . . . . . . . . 10-64
Chains . . . . . . . . . . . . . . . . . . . . . . 10-70
Competition Oriented . . . . . . . 10-50
Designations . . . . . . . . . . . . . . . 10-53
Different Size . . . . . . . . . . . . . . . 10-66
If a Tire Goes Flat . . . . . . . . . . 10-70
Inflation Monitor System . . . . 10-60
Inspection . . . . . . . . . . . . . . . . . . 10-62
Lifting the Vehicle . . . . . . . . . . . . . 10-3
Low Profile . . . . . . . . . . . . . . . . . 10-50
Messages . . . . . . . . . . . . . . . . . . . . 5-43
Pressure . . . . . . . . . . . . . . . . . . . . 10-58
Pressure Light . . . . . . . . . . . . . . . . 5-24
Pressure Monitor System . . . 10-59
Rotation . . . . . . . . . . . . . . . . . . . . 10-62
Run-Flat . . . . . . . . . . . . . . . . . . . . 10-49
Sealant and
Compressor Kit . . . . . . . . . . . 10-71
Sealant and Compressor Kit, Storing . . . . . . . . . . . . . . . . 10-79
Sidewall Labeling . . . . . . . . . . . 10-52
Terminology and Definitions . . . . . . . . . . . . . . . . . 10-54
Uniform Tire Quality
Grading . . . . . . . . . . . . . . . . . . . 10-66