jump start CHEVROLET CORVETTE GRAND SPORT 2015 Owners Manual
[x] Cancel search | Manufacturer: CHEVROLET, Model Year: 2015, Model line: CORVETTE GRAND SPORT, Model: CHEVROLET CORVETTE GRAND SPORT 2015Pages: 391, PDF Size: 5.36 MB
Page 3 of 391
Black plate (2,1)Chevrolet Corvette Owner Manual (GMNA-Localizing-U.S./Canada/Mexico-
7576293) - 2015 - crc - 6/17/14
2015 Chevrolet Corvette Owner ManualM
Jump Starting . . . . . . . . . . . . . . . 10-79
Towing the Vehicle . . . . . . . . . . 10-82
Appearance Care . . . . . . . . . . . 10-82
Service and Maintenance . . . 11-1
General Information . . . . . . . . . . 11-1
Maintenance Schedule . . . . . . . 11-2
Special Application Services . . . . . . . . . . . . . . . . . . . . 11-8
Additional Maintenance and Care . . . . . . . . . . . . . . . . . . . . 11-9
Recommended Fluids, Lubricants, and Parts . . . . . . 11-12
Maintenance Records . . . . . . . 11-15
Technical Data . . . . . . . . . . . . . . . 12-1
Vehicle Identification . . . . . . . . . 12-1
Vehicle Data . . . . . . . . . . . . . . . . . . 12-2
Customer Information . . . . . . . 13-1
Customer Information . . . . . . . . 13-1
Reporting Safety Defects . . . . 13-12
Vehicle Data Recording and Privacy . . . . . . . . . . . . . . . . . . . . 13-14 OnStar
. . . . . . . . . . . . . . . . . . . . . . . 14-1
OnStar Overview . . . . . . . . . . . . . 14-1
OnStar Services . . . . . . . . . . . . . . 14-3
OnStar Additional
Information . . . . . . . . . . . . . . . . . . 14-6
Index . . . . . . . . . . . . . . . . . . . . . i-1
Page 59 of 391
Black plate (30,1)Chevrolet Corvette Owner Manual (GMNA-Localizing-U.S./Canada/Mexico-
7576293) - 2015 - crc - 6/17/14
2-30 Keys, Doors, and Windows
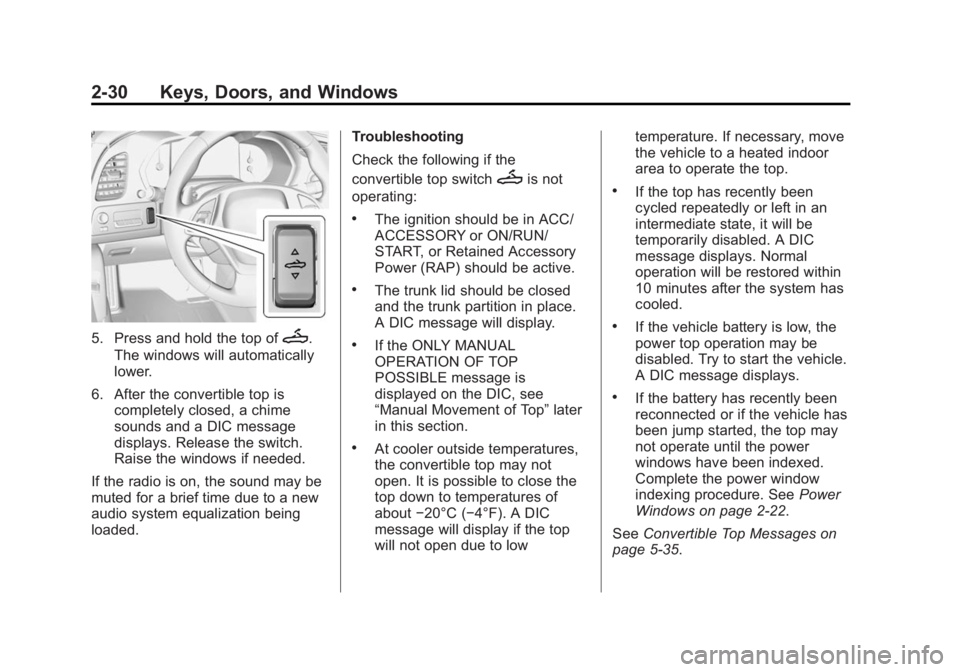
5. Press and hold the top ofM.
The windows will automatically
lower.
6. After the convertible top is completely closed, a chime
sounds and a DIC message
displays. Release the switch.
Raise the windows if needed.
If the radio is on, the sound may be
muted for a brief time due to a new
audio system equalization being
loaded. Troubleshooting
Check the following if the
convertible top switch
Mis not
operating:
.The ignition should be in ACC/
ACCESSORY or ON/RUN/
START, or Retained Accessory
Power (RAP) should be active.
.The trunk lid should be closed
and the trunk partition in place.
A DIC message will display.
.If the ONLY MANUAL
OPERATION OF TOP
POSSIBLE message is
displayed on the DIC, see
“Manual Movement of Top” later
in this section.
.At cooler outside temperatures,
the convertible top may not
open. It is possible to close the
top down to temperatures of
about −20°C (−4°F). A DIC
message will display if the top
will not open due to low temperature. If necessary, move
the vehicle to a heated indoor
area to operate the top.
.If the top has recently been
cycled repeatedly or left in an
intermediate state, it will be
temporarily disabled. A DIC
message displays. Normal
operation will be restored within
10 minutes after the system has
cooled.
.If the vehicle battery is low, the
power top operation may be
disabled. Try to start the vehicle.
A DIC message displays.
.If the battery has recently been
reconnected or if the vehicle has
been jump started, the top may
not operate until the power
windows have been indexed.
Complete the power window
indexing procedure. See
Power
Windows on page 2-22.
See Convertible Top Messages on
page 5-35.
Page 60 of 391
Black plate (31,1)Chevrolet Corvette Owner Manual (GMNA-Localizing-U.S./Canada/Mexico-
7576293) - 2015 - crc - 6/17/14
Keys, Doors, and Windows 2-31
Other features may be affected
while operating the convertible top:
.The trunk can only be opened
with the key until the convertible
top is completely opened or
closed.
.Do not try to start the vehicle
while opening the top with the
RKE transmitter. A DIC message
may display. Release both
buttons and wait a few seconds
before starting the vehicle
normally.
.The passive door unlock feature
may not operate properly while
using the RKE transmitter to
open the convertible top.
.The windows cannot close while
the top is moving.
.When driving with the top not
fully secured, chimes can be
heard above 80 km/h (50 mph).
If the vehicle battery has been
disconnected and reconnected, the
fuses were pulled or replaced, or a
jump start was performed, the TOP NOT SECURE message may
display. Press and hold
Mto
open/close the top until this
message is cleared.
See Convertible Top Messages on
page 5-35.
Partial Top Cycling
If the convertible top operation is
stopped before completion, the top
will temporarily hold its position.
If the ignition is in ACC/
ACCESSORY or ON/RUN/START,
the top will be held for up to
five minutes. If the vehicle is moving
or off, the amount of time will vary
from a few seconds to about a
minute.
Beeps and DIC messages will be
displayed before the top will move.
When this occurs, immediately finish
the convertible top operation by
pressing the button again until it
completes. If the top cannot be secured, keep
clear of the top components. In
some conditions the top may move
quickly.
Do not drive with the convertible top
in an unsecured position. The top
components may move
unexpectedly. In some cases the
top may not be able to be power
operated. If this occurs, follow the
DIC messages displayed.
If the tonneau cover is not secured
and latched, and the vehicle is
moving above 10 km/h (6 mph), the
tonneau cover may automatically
move to a stable position.
See
Convertible Top Messages on
page 5-35.
Page 206 of 391
Black plate (25,1)Chevrolet Corvette Owner Manual (GMNA-Localizing-U.S./Canada/Mexico-
7576293) - 2015 - crc - 6/17/14
Driving and Operating 9-25
The shift lock release is always
functional except in the case of an
uncharged or low voltage (less than
9-volt) battery. SeeJump Starting
on page 10-79.
To shift out of P (Park):
1. Apply the brake pedal.
2. Release the parking brake. See Electric Parking Brake on
page 9-35.
3. Press the shift lever button.
4. Move the shift lever to the desired position.
If you still are unable to shift out of
P (Park):
1. Fully release the shift lever button, and let go of the
shift knob.
2. While holding down the brake pedal, press the shift lever
button again.
3. Move the shift lever to the desired position. If you still cannot move the shift
lever from P (Park), consult your
dealer or a professional towing
service.
Parking (Manual
Transmission)
Before exiting the vehicle, move the
shift lever into 1 (First) or
R (Reverse), and apply the parking
brake. Once the shift lever has been
placed into 1 (First) or R (Reverse)
with the clutch pedal pressed in,
turn the ignition off and release the
clutch.
Parking over Things
That Burn
{Warning
Things that can burn could touch
hot exhaust parts under the
vehicle and ignite. Do not park
over papers, leaves, dry grass,
or other things that can burn.
Active Fuel Management®
This system allows the engine to
operate on either all or half of its
cylinders, depending on the driving
conditions. With a manual
transmission, the system is only
active in Eco mode. With an
automatic transmission, the system
is available in all modes, but is more
aggressive in Eco mode. See
Driver
Mode Control on page 9-39.
When less power is required, such
as cruising at a constant vehicle
speed, the system will operate in
the half cylinder mode, allowing the
vehicle to achieve better fuel
economy. When greater power
demands are required, such as
accelerating from a stop, passing,
or merging onto a freeway, the
system will maintain full-cylinder
operation.
Page 241 of 391
Black plate (2,1)Chevrolet Corvette Owner Manual (GMNA-Localizing-U.S./Canada/Mexico-
7576293) - 2015 - crc - 6/17/14
10-2 Vehicle Care
Tire Rotation . . . . . . . . . . . . . . . 10-61
When It Is Time for NewTires . . . . . . . . . . . . . . . . . . . . . . 10-62
Buying New Tires . . . . . . . . . . . 10-63
Different Size Tires and Wheels . . . . . . . . . . . . . . . . . . . 10-65
Uniform Tire Quality Grading . . . . . . . . . . . . . . . . . . . 10-65
Wheel Alignment and Tire Balance . . . . . . . . . . . . . . . . . . . 10-67
Wheel Replacement . . . . . . . . 10-67
Tire Chains . . . . . . . . . . . . . . . . . 10-68
If a Tire Goes Flat . . . . . . . . . . 10-69
Tire Sealant and Compressor Kit . . . . . . . . . . . 10-70
Storing the Tire Sealant and Compressor Kit . . . . . . . . . . . 10-78
Jump Starting
Jump Starting . . . . . . . . . . . . . . 10-79
Towing the Vehicle
Towing the Vehicle . . . . . . . . . 10-82
Recreational VehicleTowing . . . . . . . . . . . . . . . . . . . . 10-82
Appearance Care
Exterior Care . . . . . . . . . . . . . . . 10-82
Interior Care . . . . . . . . . . . . . . . . 10-87
Floor Mats . . . . . . . . . . . . . . . . . . 10-91
General Information
For service and parts needs, visit
your dealer. You will receive
genuine GM parts and GM-trained
and supported service people.
Genuine GM parts have one of
these marks:
California Proposition
65 Warning
Most motor vehicles, including this
one, contain and/or emit chemicals
known to the State of California to cause cancer and birth defects or
other reproductive harm. Engine
exhaust, many parts and systems,
many fluids, and some component
wear by-products contain and/or
emit these chemicals.
California Perchlorate
Materials Requirements
Certain types of automotive
applications, such as airbag
initiators, safety belt pretensioners,
and lithium batteries contained in
Remote Keyless Entry transmitters,
may contain perchlorate materials.
Special handling may be necessary.
For additional information, see
www.dtsc.ca.gov/hazardouswaste/
perchlorate.
Accessories and
Modifications
Adding non‐dealer accessories or
making modifications to the vehicle
can affect vehicle performance and
safety, including such things as
airbags, braking, stability, ride and
Page 273 of 391
Black plate (34,1)Chevrolet Corvette Owner Manual (GMNA-Localizing-U.S./Canada/Mexico-
7576293) - 2015 - crc - 6/17/14
10-34 Vehicle Care
Warning (Continued)
not careful. SeeJump Starting on
page 10-79 for tips on working
around a battery without
getting hurt.
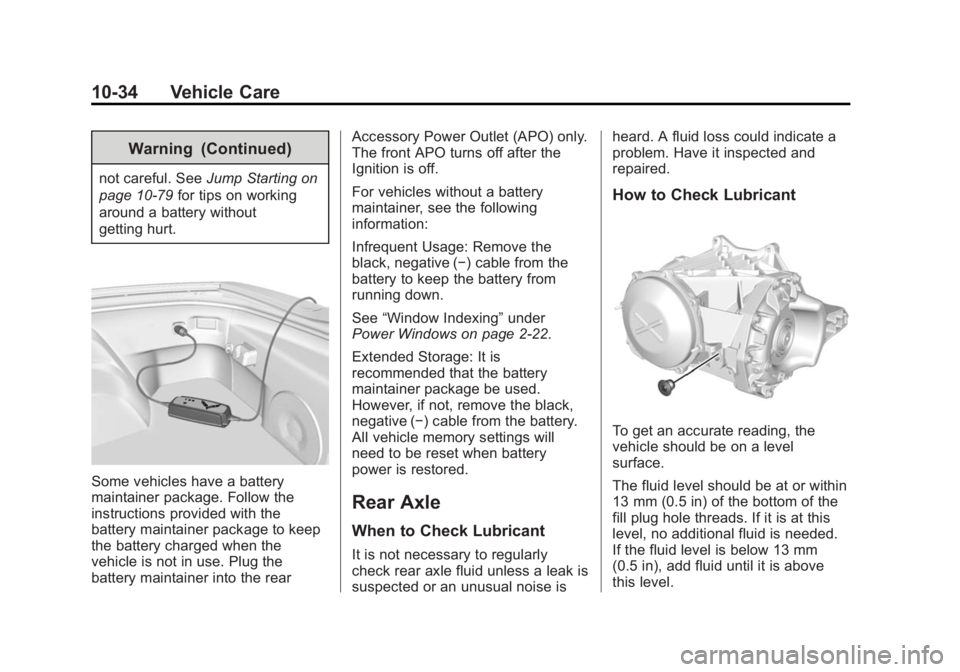
Some vehicles have a battery
maintainer package. Follow the
instructions provided with the
battery maintainer package to keep
the battery charged when the
vehicle is not in use. Plug the
battery maintainer into the rear Accessory Power Outlet (APO) only.
The front APO turns off after the
Ignition is off.
For vehicles without a battery
maintainer, see the following
information:
Infrequent Usage: Remove the
black, negative (−) cable from the
battery to keep the battery from
running down.
See
“Window Indexing” under
Power Windows on page 2-22.
Extended Storage: It is
recommended that the battery
maintainer package be used.
However, if not, remove the black,
negative (−) cable from the battery.
All vehicle memory settings will
need to be reset when battery
power is restored.
Rear Axle
When to Check Lubricant
It is not necessary to regularly
check rear axle fluid unless a leak is
suspected or an unusual noise is heard. A fluid loss could indicate a
problem. Have it inspected and
repaired.
How to Check Lubricant
To get an accurate reading, the
vehicle should be on a level
surface.
The fluid level should be at or within
13 mm (0.5 in) of the bottom of the
fill plug hole threads. If it is at this
level, no additional fluid is needed.
If the fluid level is below 13 mm
(0.5 in), add fluid until it is above
this level.
Page 318 of 391
Black plate (79,1)Chevrolet Corvette Owner Manual (GMNA-Localizing-U.S./Canada/Mexico-
7576293) - 2015 - crc - 6/17/14
Vehicle Care 10-79
Jump Starting
For more information about the
vehicle battery, seeBattery on
page 10-33.
If the battery has run down, use
another vehicle and some jumper
cables to start the vehicle. Be sure
to use the following steps to do it
safely.
{Warning
Batteries can hurt you. They can
be dangerous because:
.They contain acid that can
burn you.
.They contain gas that can
explode or ignite.
.They contain enough
electricity to burn you.
If you do not follow these steps
exactly, some or all of these
things can hurt you.
{Caution
Ignoring these steps could result
in costly damage to the vehicle
that would not be covered by the
vehicle warranty. Trying to start
the vehicle by pushing or pulling it
will not work, and it could damage
the vehicle.
The battery is under a battery cover
in the hatch/trunk area on the
passenger side under the carpet.
Before you connect the cables, here
are some basic things you should
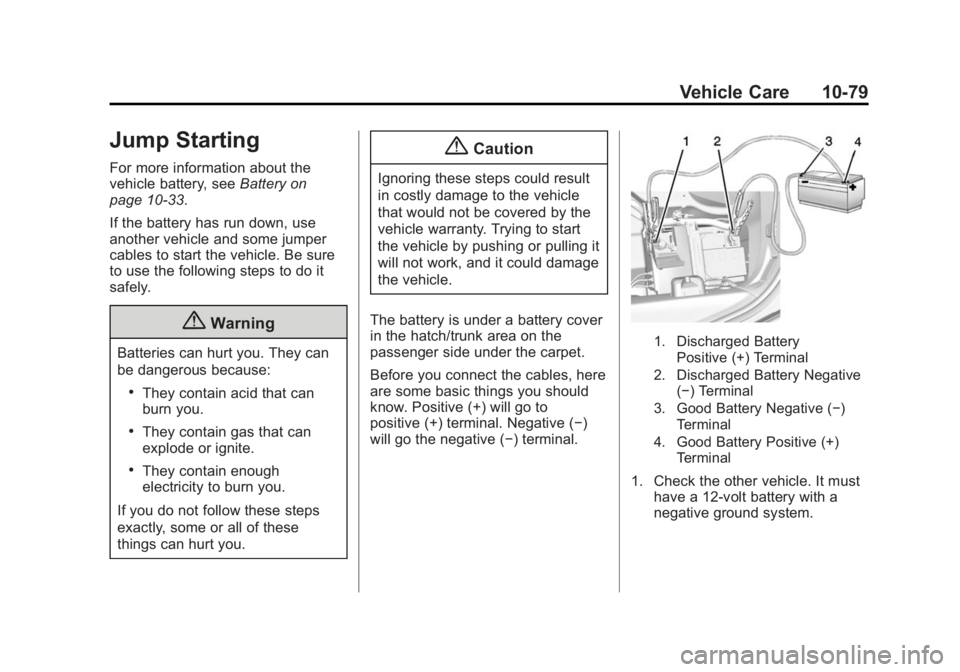
know. Positive (+) will go to
positive (+) terminal. Negative (−)
will go the negative (−) terminal.
1. Discharged Battery Positive (+) Terminal
2. Discharged Battery Negative (−) Terminal
3. Good Battery Negative (−) Terminal
4. Good Battery Positive (+) Terminal
1. Check the other vehicle. It musthave a 12-volt battery with a
negative ground system.
Page 319 of 391
Black plate (80,1)Chevrolet Corvette Owner Manual (GMNA-Localizing-U.S./Canada/Mexico-
7576293) - 2015 - crc - 6/17/14
10-80 Vehicle Care
{Caution
If the other vehicle does not have
a 12-volt system with a negative
ground, both vehicles can be
damaged. Only use a vehicle that
has a 12-volt system with a
negative ground for jump starting.
2. Get the vehicles close enough so the jumper cables can reach,
but be sure the vehicles are not
touching each other. If they are,
it could cause a ground
connection you do not want. You
would not be able to start the
vehicle, and the bad grounding
could damage the electrical
systems.
To avoid the possibility of the
vehicles rolling, set the parking
brake firmly on both vehicles
involved in the jump start
procedure. Put an automatic
transmission in P (Park) or a manual transmission in Neutral
before setting the parking
brakes.
{Caution
If any accessories are left on or
plugged in during the jump
starting procedure, they could be
damaged. The repairs would not
be covered by the vehicle
warranty. Whenever possible, turn
off or unplug all accessories on
either vehicle when jump starting.
3. Turn off the ignition on both vehicles. Unplug unnecessary
accessories plugged into the
cigarette lighter or the accessory
power outlet. Turn off the radio
and all lamps that are not
needed. This will avoid sparks
and help save both batteries.
And it could save the radio!
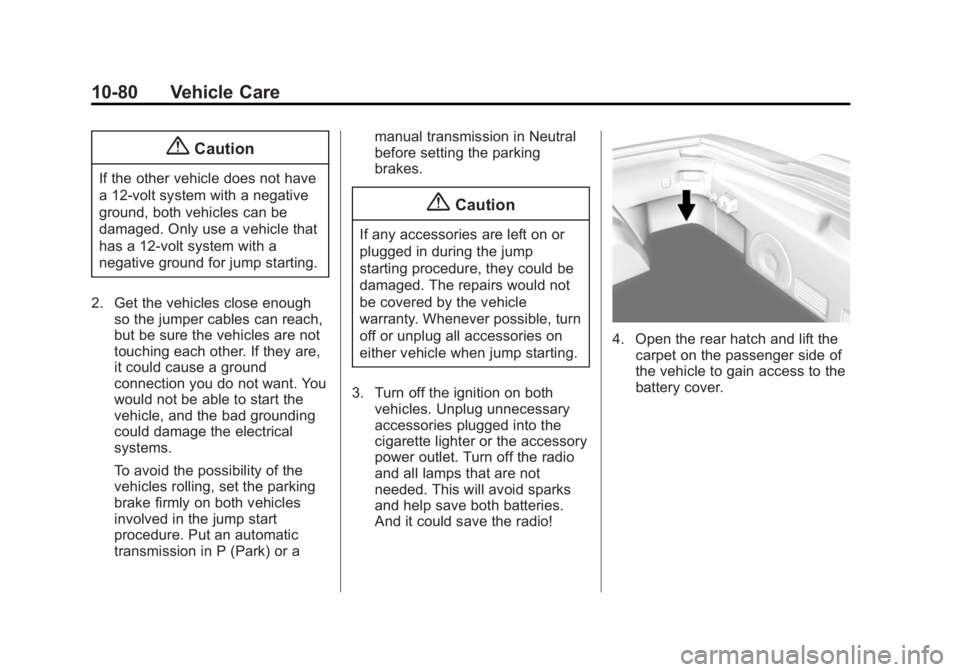
4. Open the rear hatch and lift thecarpet on the passenger side of
the vehicle to gain access to the
battery cover.
Page 320 of 391
Black plate (81,1)Chevrolet Corvette Owner Manual (GMNA-Localizing-U.S./Canada/Mexico-
7576293) - 2015 - crc - 6/17/14
Vehicle Care 10-81
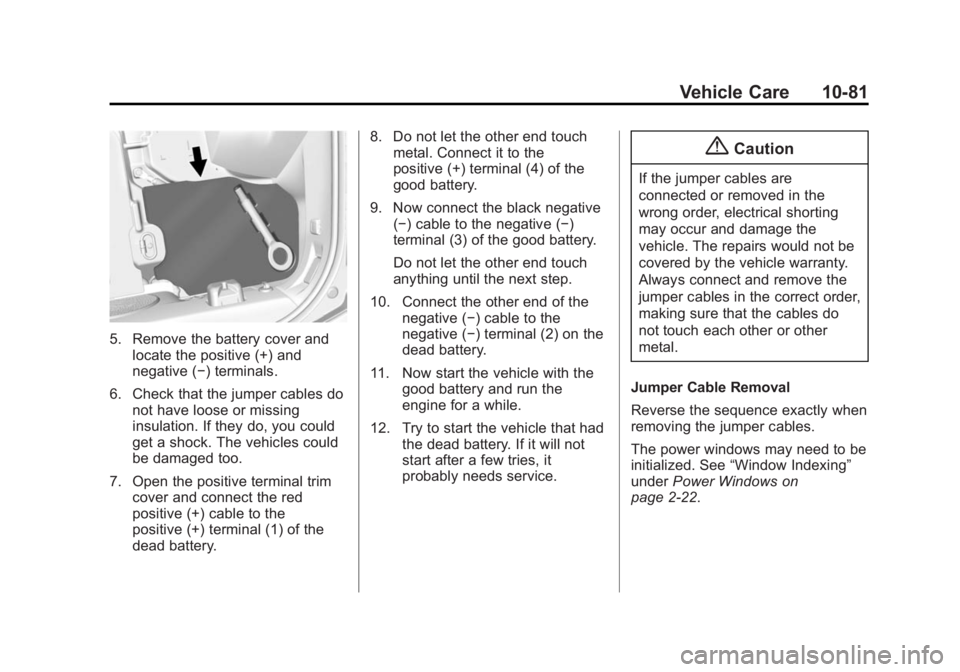
5. Remove the battery cover andlocate the positive (+) and
negative (−) terminals.
6. Check that the jumper cables do not have loose or missing
insulation. If they do, you could
get a shock. The vehicles could
be damaged too.
7. Open the positive terminal trim cover and connect the red
positive (+) cable to the
positive (+) terminal (1) of the
dead battery. 8. Do not let the other end touch
metal. Connect it to the
positive (+) terminal (4) of the
good battery.
9. Now connect the black negative (−) cable to the negative (−)
terminal (3) of the good battery.
Do not let the other end touch
anything until the next step.
10. Connect the other end of the negative (−) cable to the
negative (−) terminal (2) on the
dead battery.
11. Now start the vehicle with the good battery and run the
engine for a while.
12. Try to start the vehicle that had the dead battery. If it will not
start after a few tries, it
probably needs service.
{Caution
If the jumper cables are
connected or removed in the
wrong order, electrical shorting
may occur and damage the
vehicle. The repairs would not be
covered by the vehicle warranty.
Always connect and remove the
jumper cables in the correct order,
making sure that the cables do
not touch each other or other
metal.
Jumper Cable Removal
Reverse the sequence exactly when
removing the jumper cables.
The power windows may need to be
initialized. See “Window Indexing”
under Power Windows on
page 2-22.
Page 357 of 391
Black plate (6,1)Chevrolet Corvette Owner Manual (GMNA-Localizing-U.S./Canada/Mexico-
7576293) - 2015 - crc - 6/17/14
13-6 Customer Information
.Model, year, color, and license
plate number of the vehicle.
.Odometer reading, Vehicle
Identification Number (VIN), and
delivery date of the vehicle.
.Description of the problem.
Coverage
Services are provided up to 5 years/
160 000 km (100,000 mi), whichever
comes first.
In the U.S., anyone driving the
vehicle is covered. In Canada, a
person driving the vehicle without
permission from the owner is not
covered.
Roadside Assistance is not a part of
the New Vehicle Limited Warranty.
General Motors North America and
Chevrolet reserve the right to make
any changes or discontinue the
Roadside Assistance program at
any time without notification.
General Motors North America and
Chevrolet reserve the right to limit
services or payment to an owner ordriver if they decide the claims are
made too often, or the same type of
claim is made many times.
Services Provided
.Emergency Fuel Delivery:
Delivery of enough fuel for the
vehicle to get to the nearest
service station.
.Lock-Out Service:
Service to
unlock the vehicle if you are
locked out. A remote unlock may
be available if you have OnStar.
For security reasons, the driver
must present identification
before this service is given.
.Emergency Tow from a Public
Road or Highway: Tow to the
nearest Chevrolet dealer for
warranty service, or if the vehicle
was in a crash and cannot be
driven. Assistance is not given
when the vehicle is stuck in the
sand, mud, or snow.
.Flat Tire Change: Service to
change a flat tire with the spare
tire. The spare tire, if equipped, must be in good condition and
properly inflated. It is the owner's
responsibility for the repair or
replacement of the tire if it is not
covered by the warranty.
.Battery Jump Start:
Service to
jump start a dead battery.
Services Not Included in
Roadside Assistance
.Impound towing caused by
violation of any laws.
.Legal fines.
.Mounting, dismounting,
or changing of snow tires,
chains, or other traction devices.
Service is not provided if a vehicle
is in an area that is not accessible
to the service vehicle or is not a
regularly traveled or maintained
public road, which includes ice and
winter roads. Off-road use is not
covered.