capacities CHEVROLET CRUZE HATCHBACK 2017 Owners Manual
[x] Cancel search | Manufacturer: CHEVROLET, Model Year: 2017, Model line: CRUZE HATCHBACK, Model: CHEVROLET CRUZE HATCHBACK 2017Pages: 405, PDF Size: 6.76 MB
Page 272 of 405
Chevrolet Cruze Owner Manual (GMNA-Localizing-U.S./Canada/Mexico-
9803785) - 2017 - CRC - 4/13/16
Vehicle Care 271
the dipstick, wipe it with a clean
paper towel or cloth, then push it
back in all the way. Remove it
again, keeping the tip down, and
check the level.
When to Add Engine Oil
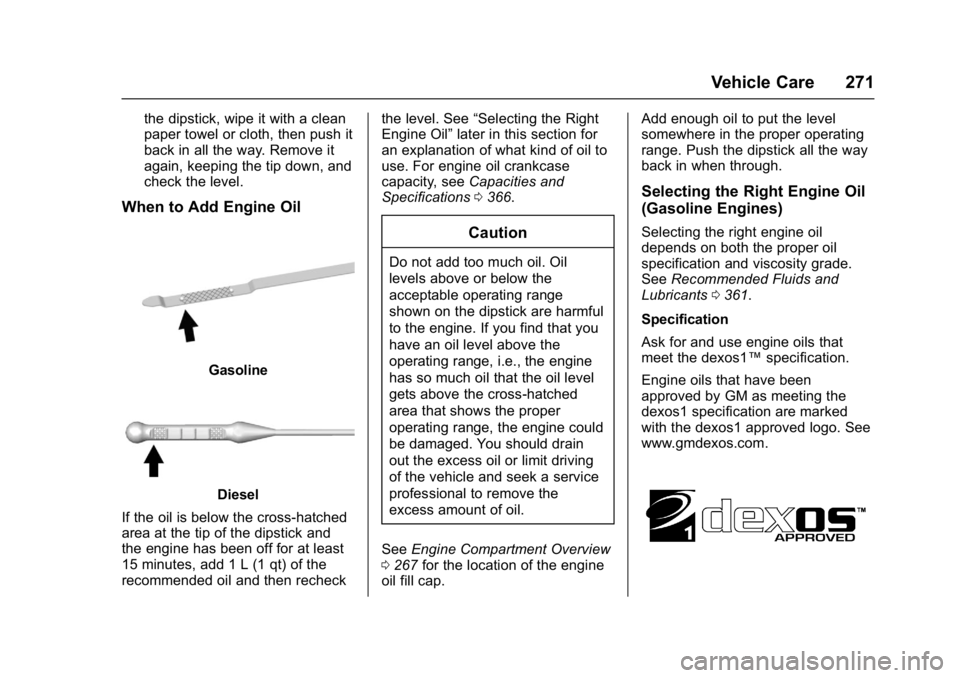
Gasoline
Diesel
If the oil is below the cross-hatched
area at the tip of the dipstick and
the engine has been off for at least
15 minutes, add 1 L (1 qt) of the
recommended oil and then recheck the level. See
“Selecting the Right
Engine Oil” later in this section for
an explanation of what kind of oil to
use. For engine oil crankcase
capacity, see Capacities and
Specifications 0366.
Caution
Do not add too much oil. Oil
levels above or below the
acceptable operating range
shown on the dipstick are harmful
to the engine. If you find that you
have an oil level above the
operating range, i.e., the engine
has so much oil that the oil level
gets above the cross-hatched
area that shows the proper
operating range, the engine could
be damaged. You should drain
out the excess oil or limit driving
of the vehicle and seek a service
professional to remove the
excess amount of oil.
See Engine Compartment Overview
0 267 for the location of the engine
oil fill cap. Add enough oil to put the level
somewhere in the proper operating
range. Push the dipstick all the way
back in when through.
Selecting the Right Engine Oil
(Gasoline Engines)
Selecting the right engine oil
depends on both the proper oil
specification and viscosity grade.
See
Recommended Fluids and
Lubricants 0361.
Specification
Ask for and use engine oils that
meet the dexos1™ specification.
Engine oils that have been
approved by GM as meeting the
dexos1 specification are marked
with the dexos1 approved logo. See
www.gmdexos.com.
Page 285 of 405
Chevrolet Cruze Owner Manual (GMNA-Localizing-U.S./Canada/Mexico-
9803785) - 2017 - CRC - 4/13/16
284 Vehicle Care
proper sequence to torque
specifications inCapacities and
Specifications 0366.
If the vehicle has rear drum brakes,
they do not have wear indicators,
but if a rear brake rubbing noise is
heard, have the rear brake linings
inspected immediately. Rear brake
drums should be removed and
inspected each time the tires are
removed for rotation or changing.
Drum brakes have an inspection
hole to inspect lining wear during
scheduled maintenance. When the
front brake pads are replaced, have
the rear brakes inspected, too.
Brake linings should always be
replaced as complete axle sets.
Brake Pedal Travel
See your dealer if the brake pedal
does not return to normal height,
or if there is a rapid increase in
pedal travel. This could be a sign
that brake service may be required.
Replacing Brake System Parts
Always replace brake system parts
with new, approved replacement
parts. If this is not done, the brakes may not work properly. The braking
performance expected can change
in many other ways if the wrong
replacement brake parts are
installed or parts are improperly
installed.
Brake Fluid
The brake/clutch master cylinder
reservoir is filled with GM approved
DOT 3 brake fluid as indicated on
the reservoir cap. See
Engine
Compartment Overview 0267 for
the location of the reservoir.
Checking Brake Fluid
Place the vehicle in P (Park) or
Neutral with the parking brake
applied if equipped with a manual
transmission. On a level surface,
the brake fluid level should be between the minimum and
maximum marks on the brake fluid
reservoir.
There are only two reasons why the
brake fluid level in the reservoir may
go down:
.
Normal brake lining wear. When
new linings are installed, the
fluid level goes back up.
. A fluid leak in the brake/clutch
hydraulic system. Have the
brake/clutch hydraulic system
fixed. With a leak, the brakes will
not work well.
Always clean the brake fluid
reservoir cap and the area around
the cap before removing it.
Do not top off the brake/clutch fluid.
Adding fluid does not correct a leak.
If fluid is added when the linings are
worn, there will be too much fluid
when new brake linings are
installed. Add or remove fluid, as
necessary, only when work is done
on the brake/clutch hydraulic
system.
Page 316 of 405
Chevrolet Cruze Owner Manual (GMNA-Localizing-U.S./Canada/Mexico-
9803785) - 2017 - CRC - 4/13/16
Vehicle Care 315
Adjust the front and rear tires to
the recommended inflation
pressure on the Tire and
Loading Information label after
the tires have been rotated. See
Tire Pressure0308 and Vehicle
Load Limits 0206.
Reset the Tire Pressure Monitor
System. See Tire Pressure
Monitor Operation 0311.
Check that all wheel nuts are
properly tightened. See “Wheel
Nut Torque” underCapacities
and Specifications 0366.
{Warning
Rust or dirt on a wheel, or on the
parts to which it is fastened, can
make wheel nuts become loose
after time. The wheel could come
off and cause an accident. When
changing a wheel, remove any
rust or dirt from places where the
wheel attaches to the vehicle. In
an emergency, a cloth or a paper
(Continued)
Warning (Continued)
towel can be used; however, use
a scraper or wire brush later to
remove all rust or dirt.
Lightly coat the center of the
wheel hub with wheel bearing
grease after a wheel change or
tire rotation to prevent corrosion
or rust build-up. Do not get
grease on the flat wheel
mounting surface or on the
wheel nuts or bolts.
When It Is Time for New
Tires
Factors such as maintenance,
temperatures, driving speeds,
vehicle loading, and road conditions
affect the wear rate of the tires.
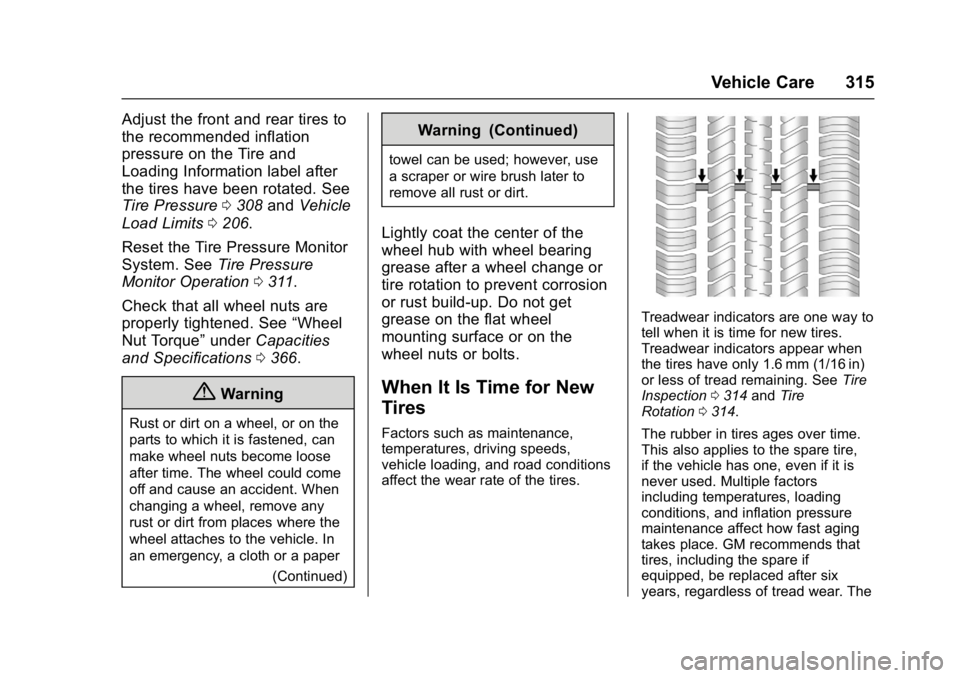
Treadwear indicators are one way to
tell when it is time for new tires.
Treadwear indicators appear when
the tires have only 1.6 mm (1/16 in)
or less of tread remaining. See Tire
Inspection 0314 andTire
Rotation 0314.
The rubber in tires ages over time.
This also applies to the spare tire,
if the vehicle has one, even if it is
never used. Multiple factors
including temperatures, loading
conditions, and inflation pressure
maintenance affect how fast aging
takes place. GM recommends that
tires, including the spare if
equipped, be replaced after six
years, regardless of tread wear. The
Page 334 of 405
Chevrolet Cruze Owner Manual (GMNA-Localizing-U.S./Canada/Mexico-
9803785) - 2017 - CRC - 4/13/16
Vehicle Care 333
Warning (Continued)
nuts. SeeCapacities and
Specifications 0366 for original
equipment wheel nut torque
specifications.
Caution
Improperly tightened wheel nuts
can lead to brake pulsation and
rotor damage. To avoid expensive
brake repairs, evenly tighten the
wheel nuts in the proper
sequence and to the proper
torque specification. See
Capacities and Specifications
0 366 for the wheel nut torque
specification.
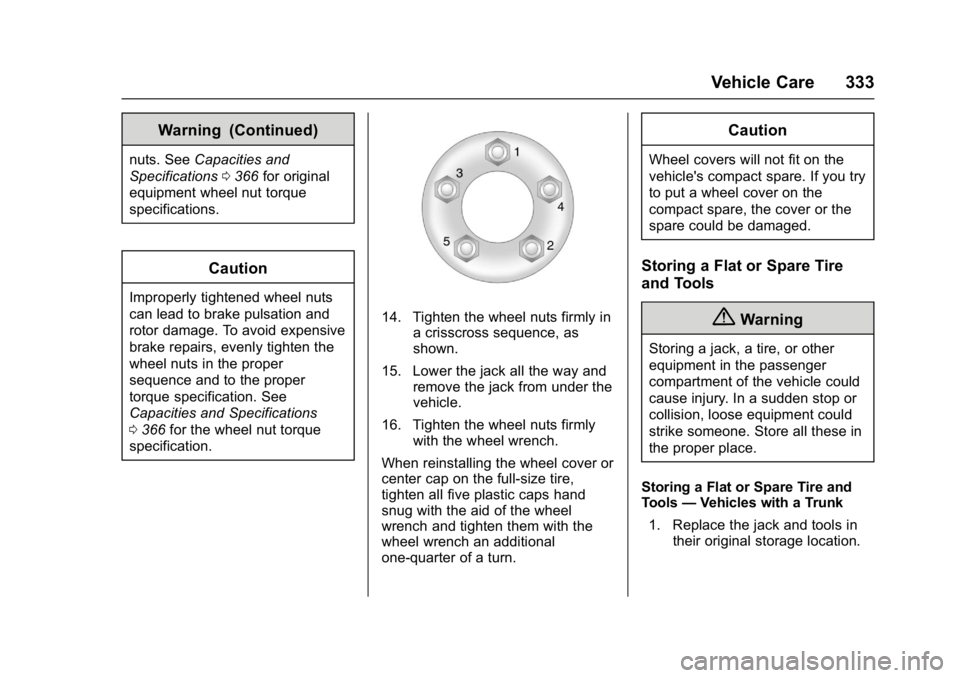
14. Tighten the wheel nuts firmly in a crisscross sequence, as
shown.
15. Lower the jack all the way and remove the jack from under the
vehicle.
16. Tighten the wheel nuts firmly with the wheel wrench.
When reinstalling the wheel cover or
center cap on the full-size tire,
tighten all five plastic caps hand
snug with the aid of the wheel
wrench and tighten them with the
wheel wrench an additional
one-quarter of a turn.
Caution
Wheel covers will not fit on the
vehicle's compact spare. If you try
to put a wheel cover on the
compact spare, the cover or the
spare could be damaged.
Storing a Flat or Spare Tire
and Tools
{Warning
Storing a jack, a tire, or other
equipment in the passenger
compartment of the vehicle could
cause injury. In a sudden stop or
collision, loose equipment could
strike someone. Store all these in
the proper place.
Storing a Flat or Spare Tire and
Tools —Vehicles with a Trunk
1. Replace the jack and tools in their original storage location.
Page 366 of 405

Chevrolet Cruze Owner Manual (GMNA-Localizing-U.S./Canada/Mexico-
9803785) - 2017 - CRC - 4/13/16
Technical Data 365
Technical Data
Vehicle Identification
Vehicle IdentificationNumber (VIN) . . . . . . . . . . . . . . . 365
Service Parts Identification Label . . . . . . . . . . . . . . . . . . . . . . . . 365
Vehicle Data
Capacities andSpecifications . . . . . . . . . . . . . . . 366
Engine Drive Belt Routing . . . . 368
Vehicle Identification
Vehicle Identification
Number (VIN)
This legal identifier is in the front
corner of the instrument panel, on
the left side of the vehicle. It can be
seen through the windshield from
outside. The Vehicle Identification
Number (VIN) also appears on the
Vehicle Certification and Service
Parts labels and certificates of title
and registration.
Engine Identification
The eighth character in the VIN is
the engine code. This code
identifies the vehicle's engine,
specifications, and replacement
parts. See “Engine Specifications”
under Capacities and Specifications
0 366 for the vehicle's engine code.
Service Parts
Identification Label
This label, located inside the trunk
area, has the following information:
.
Vehicle Identification
Number (VIN).
. Model designation.
. Paint information.
. Production options and special
equipment.
Do not remove this label from the
vehicle.
Page 367 of 405

Chevrolet Cruze Owner Manual (GMNA-Localizing-U.S./Canada/Mexico-
9803785) - 2017 - CRC - 4/13/16
366 Technical Data
Vehicle Data
Capacities and Specifications
The following approximate capacities are given in English and metric conversions. SeeRecommended Fluids and
Lubricants 0361.
Application Capacities
Metric English
Air Conditioning Refrigerant For the air conditioning system refrigerant type and charge amount, see the refrigerant label under thehood. See your dealer for more information.
Cooling System 1.4L L4 Gas Engine (LE2) 5.9 L 6.2 qt
1.6L L4 Diesel Engine (LH7) 4.5 L 4.8 qt
Engine Oil with Filter 1.4L L4 Gas Engine (LE2) 4.0 L 4.2 qt
1.6L L4 Diesel Engine (LH7) 5.0 L 5.3 qt
Fuel Tank Base Diesel 51.3 L 13.5 gal
Base Gasoline 51.7 L 13.7 gal
LS Trim with Automatic Transmission 45.6 L 12.0 gal
DEF Tank (LH7 Only) 14.3 L 3.8 gal
Page 368 of 405

Chevrolet Cruze Owner Manual (GMNA-Localizing-U.S./Canada/Mexico-
9803785) - 2017 - CRC - 4/13/16
Technical Data 367
ApplicationCapacities
Metric English
Wheel Nut Torque 140 Y100 lb ft
All capacities are approximate. When adding, be sure to fill to the approximate level, as recommended in this
manual.
Engine Specifications
Engine VIN CodeTransmission Spark Plug Gap
1.4L L4 Gas Engine (LE2) MAutomatic
Manual 0.60
–0.70 mm (0.024 –
0.028 in)
1.6L L4 Diesel Engine (LH7) EAutomatic
Manual —
Spark plug gap is for replacement spark plugs.
Page 395 of 405
Chevrolet Cruze Owner Manual (GMNA-Localizing-U.S./Canada/Mexico-
9803785) - 2017 - CRC - 4/13/16
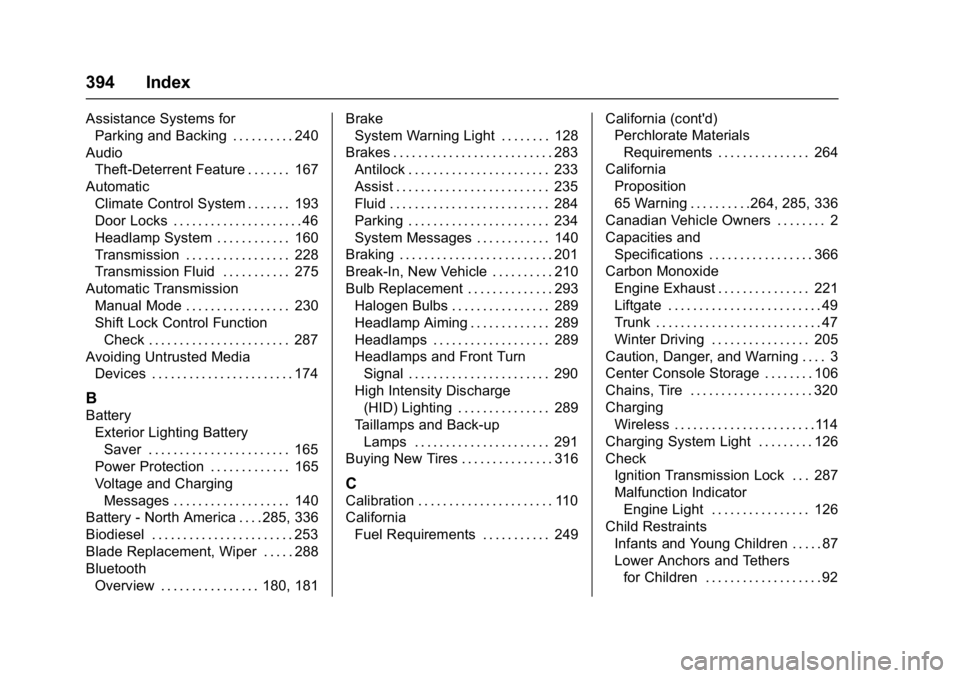
394 Index
Assistance Systems forParking and Backing . . . . . . . . . . 240
Audio Theft-Deterrent Feature . . . . . . . 167
Automatic Climate Control System . . . . . . . 193
Door Locks . . . . . . . . . . . . . . . . . . . . . 46
Headlamp System . . . . . . . . . . . . 160
Transmission . . . . . . . . . . . . . . . . . 228
Transmission Fluid . . . . . . . . . . . 275
Automatic Transmission
Manual Mode . . . . . . . . . . . . . . . . . 230
Shift Lock Control FunctionCheck . . . . . . . . . . . . . . . . . . . . . . . 287
Avoiding Untrusted Media Devices . . . . . . . . . . . . . . . . . . . . . . . 174
B
Battery
Exterior Lighting BatterySaver . . . . . . . . . . . . . . . . . . . . . . . 165
Power Protection . . . . . . . . . . . . . 165
Voltage and Charging Messages . . . . . . . . . . . . . . . . . . . 140
Battery - North America . . . . 285, 336
Biodiesel . . . . . . . . . . . . . . . . . . . . . . . 253
Blade Replacement, Wiper . . . . . 288
Bluetooth Overview . . . . . . . . . . . . . . . . 180, 181 Brake
System Warning Light . . . . . . . . 128
Brakes . . . . . . . . . . . . . . . . . . . . . . . . . . 283 Antilock . . . . . . . . . . . . . . . . . . . . . . . 233
Assist . . . . . . . . . . . . . . . . . . . . . . . . . 235
Fluid . . . . . . . . . . . . . . . . . . . . . . . . . . 284
Parking . . . . . . . . . . . . . . . . . . . . . . . 234
System Messages . . . . . . . . . . . . 140
Braking . . . . . . . . . . . . . . . . . . . . . . . . . 201
Break-In, New Vehicle . . . . . . . . . . 210
Bulb Replacement . . . . . . . . . . . . . . 293 Halogen Bulbs . . . . . . . . . . . . . . . . 289
Headlamp Aiming . . . . . . . . . . . . . 289
Headlamps . . . . . . . . . . . . . . . . . . . 289
Headlamps and Front TurnSignal . . . . . . . . . . . . . . . . . . . . . . . 290
High Intensity Discharge (HID) Lighting . . . . . . . . . . . . . . . 289
Taillamps and Back-up Lamps . . . . . . . . . . . . . . . . . . . . . . 291
Buying New Tires . . . . . . . . . . . . . . . 316
C
Calibration . . . . . . . . . . . . . . . . . . . . . . 110
California Fuel Requirements . . . . . . . . . . . 249 California (cont'd)
Perchlorate Materials
Requirements . . . . . . . . . . . . . . . 264
California
Proposition
65 Warning . . . . . . . . . .264, 285, 336
Canadian Vehicle Owners . . . . . . . . 2
Capacities and Specifications . . . . . . . . . . . . . . . . . 366
Carbon Monoxide Engine Exhaust . . . . . . . . . . . . . . . 221
Liftgate . . . . . . . . . . . . . . . . . . . . . . . . . 49
Trunk . . . . . . . . . . . . . . . . . . . . . . . . . . . 47
Winter Driving . . . . . . . . . . . . . . . . 205
Caution, Danger, and Warning . . . . 3
Center Console Storage . . . . . . . . 106
Chains, Tire . . . . . . . . . . . . . . . . . . . . 320
Charging Wireless . . . . . . . . . . . . . . . . . . . . . . .114
Charging System Light . . . . . . . . . 126
Check Ignition Transmission Lock . . . 287
Malfunction IndicatorEngine Light . . . . . . . . . . . . . . . . 126
Child Restraints Infants and Young Children . . . . . 87
Lower Anchors and Tethersfor Children . . . . . . . . . . . . . . . . . . . 92
Page 403 of 405
Chevrolet Cruze Owner Manual (GMNA-Localizing-U.S./Canada/Mexico-
9803785) - 2017 - CRC - 4/13/16
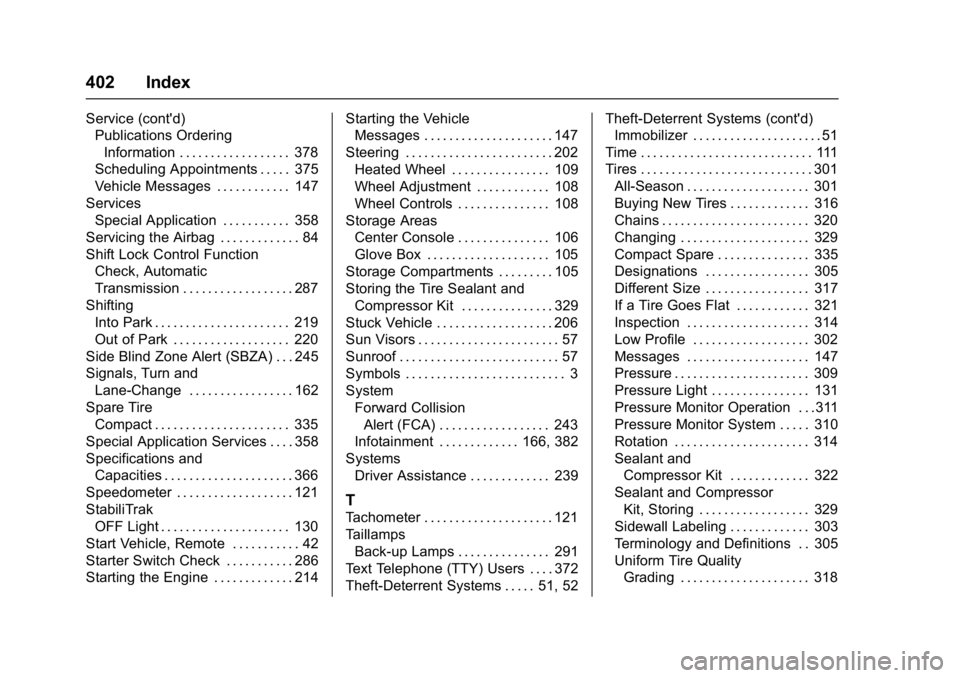
402 Index
Service (cont'd)Publications Ordering
Information . . . . . . . . . . . . . . . . . . 378
Scheduling Appointments . . . . . 375
Vehicle Messages . . . . . . . . . . . . 147
Services Special Application . . . . . . . . . . . 358
Servicing the Airbag . . . . . . . . . . . . . 84
Shift Lock Control Function Check, Automatic
Transmission . . . . . . . . . . . . . . . . . . 287
Shifting Into Park . . . . . . . . . . . . . . . . . . . . . . 219
Out of Park . . . . . . . . . . . . . . . . . . . 220
Side Blind Zone Alert (SBZA) . . . 245
Signals, Turn and Lane-Change . . . . . . . . . . . . . . . . . 162
Spare Tire
Compact . . . . . . . . . . . . . . . . . . . . . . 335
Special Application Services . . . . 358
Specifications and Capacities . . . . . . . . . . . . . . . . . . . . . 366
Speedometer . . . . . . . . . . . . . . . . . . . 121
StabiliTrak
OFF Light . . . . . . . . . . . . . . . . . . . . . 130
Start Vehicle, Remote . . . . . . . . . . . 42
Starter Switch Check . . . . . . . . . . . 286
Starting the Engine . . . . . . . . . . . . . 214 Starting the Vehicle
Messages . . . . . . . . . . . . . . . . . . . . . 147
Steering . . . . . . . . . . . . . . . . . . . . . . . . 202 Heated Wheel . . . . . . . . . . . . . . . . 109
Wheel Adjustment . . . . . . . . . . . . 108
Wheel Controls . . . . . . . . . . . . . . . 108
Storage Areas
Center Console . . . . . . . . . . . . . . . 106
Glove Box . . . . . . . . . . . . . . . . . . . . 105
Storage Compartments . . . . . . . . . 105
Storing the Tire Sealant and Compressor Kit . . . . . . . . . . . . . . . 329
Stuck Vehicle . . . . . . . . . . . . . . . . . . . 206
Sun Visors . . . . . . . . . . . . . . . . . . . . . . . 57
Sunroof . . . . . . . . . . . . . . . . . . . . . . . . . . 57
Symbols . . . . . . . . . . . . . . . . . . . . . . . . . . 3
System Forward CollisionAlert (FCA) . . . . . . . . . . . . . . . . . . 243
Infotainment . . . . . . . . . . . . . 166, 382
Systems
Driver Assistance . . . . . . . . . . . . . 239
T
Tachometer . . . . . . . . . . . . . . . . . . . . . 121
TaillampsBack-up Lamps . . . . . . . . . . . . . . . 291
Text Telephone (TTY) Users . . . . 372
Theft-Deterrent Systems . . . . . 51, 52 Theft-Deterrent Systems (cont'd)
Immobilizer . . . . . . . . . . . . . . . . . . . . . 51
Time . . . . . . . . . . . . . . . . . . . . . . . . . . . . 111
Tires . . . . . . . . . . . . . . . . . . . . . . . . . . . . 301 All-Season . . . . . . . . . . . . . . . . . . . . 301
Buying New Tires . . . . . . . . . . . . . 316
Chains . . . . . . . . . . . . . . . . . . . . . . . . 320
Changing . . . . . . . . . . . . . . . . . . . . . 329
Compact Spare . . . . . . . . . . . . . . . 335
Designations . . . . . . . . . . . . . . . . . 305
Different Size . . . . . . . . . . . . . . . . . 317
If a Tire Goes Flat . . . . . . . . . . . . 321
Inspection . . . . . . . . . . . . . . . . . . . . 314
Low Profile . . . . . . . . . . . . . . . . . . . 302
Messages . . . . . . . . . . . . . . . . . . . . 147
Pressure . . . . . . . . . . . . . . . . . . . . . . 309
Pressure Light . . . . . . . . . . . . . . . . 131
Pressure Monitor Operation . . .311
Pressure Monitor System . . . . . 310
Rotation . . . . . . . . . . . . . . . . . . . . . . 314
Sealant andCompressor Kit . . . . . . . . . . . . . 322
Sealant and Compressor
Kit, Storing . . . . . . . . . . . . . . . . . . 329
Sidewall Labeling . . . . . . . . . . . . . 303
Terminology and Definitions . . 305
Uniform Tire Quality Grading . . . . . . . . . . . . . . . . . . . . . 318