trunk CHEVROLET CRUZE LIMITED 2016 2.G User Guide
[x] Cancel search | Manufacturer: CHEVROLET, Model Year: 2016, Model line: CRUZE LIMITED, Model: CHEVROLET CRUZE LIMITED 2016 2.GPages: 357, PDF Size: 6.49 MB
Page 208 of 357
Chevrolet Cruze Limited Owner Manual (GMNA-Localizing-U.S./Canada-
9282844) - 2016 - crc - 9/3/15
Driving and Operating 207
PARK ASSIST OFF :If the RPA
system does not activate due to a
temporary condition, the message
displays on the DIC. This can occur
under the following conditions:
. The driver has disabled the
system.
. An object was hanging out of the
trunk during the last drive cycle.
Once the object is removed,
RPA will return to normal
operation.
. The bumper is damaged. Take
the vehicle to your dealer to
repair the system.
. Other conditions, such as
vibrations from a jackhammer or
the compression of air brakes on
a very large truck, are affecting
system performance.
Side Blind Zone
Alert (SBZA)
If equipped, the SBZA system is a
lane-changing aid that assists
drivers with avoiding crashes that
occur with moving vehicles in the
side blind zone (or spot) areas. The SBZA warning display will light up in
the corresponding outside side
mirror and will flash if the turn signal
is on.
{Warning
SBZA does not alert the driver to
vehicles rapidly approaching
outside of the side blind zones,
pedestrians, bicyclists,
or animals. It may not provide
alerts when changing lanes under
all driving conditions. Failure to
use proper care when changing
lanes may result in injury, death,
or vehicle damage. Before
making a lane change, always
check mirrors, glance over your
shoulder, and use the turn
signals.
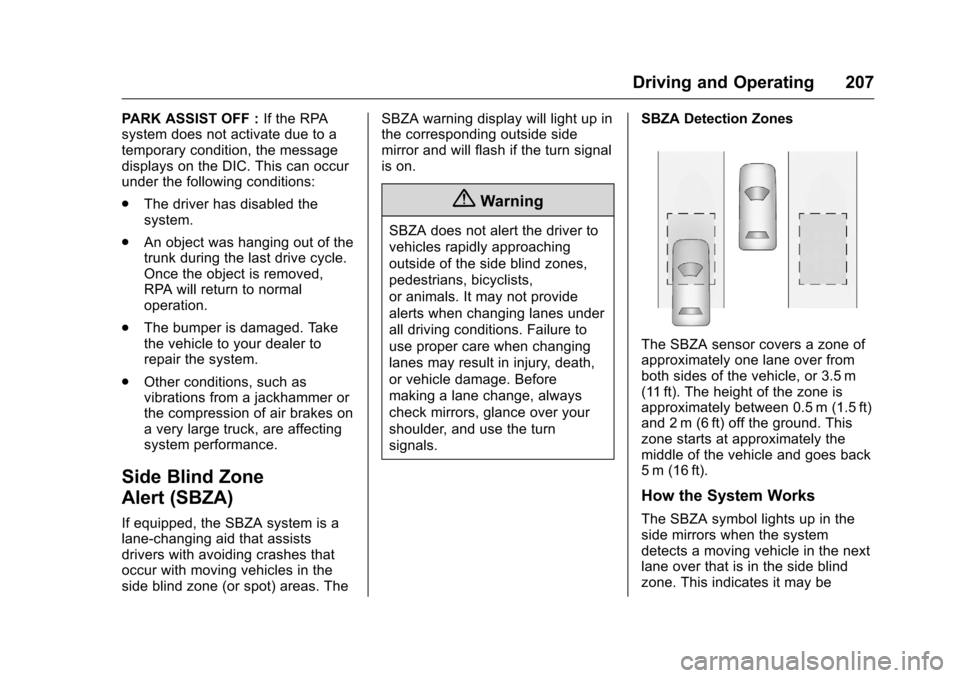
SBZA Detection Zones
The SBZA sensor covers a zone of
approximately one lane over from
both sides of the vehicle, or 3.5 m
(11 ft). The height of the zone is
approximately between 0.5 m (1.5 ft)
and 2 m (6 ft) off the ground. This
zone starts at approximately the
middle of the vehicle and goes back
5 m (16 ft).
How the System Works
The SBZA symbol lights up in the
side mirrors when the system
detects a moving vehicle in the next
lane over that is in the side blind
zone. This indicates it may be
Page 213 of 357
Chevrolet Cruze Limited Owner Manual (GMNA-Localizing-U.S./Canada-
9282844) - 2016 - crc - 9/3/15
212 Driving and Operating
Filling a Portable Fuel
Container
{Warning
Filling a portable fuel container
while it is in the vehicle can cause
fuel vapors that can ignite either
by static electricity or other
means. You or others could be
badly burned and the vehicle
could be damaged. Always:. Use approved fuel
containers.
. Remove the container from
the vehicle, trunk, or pickup
bed before filling.
. Place the container on the
ground.
. Place the nozzle inside the
fill opening of the container
before dispensing fuel, and
keep it in contact with the fill
opening until filling is
complete.
(Continued)
Warning (Continued)
.Fill the container no more
than 95% full to allow for
expansion.
. Do not smoke, light
matches, or use lighters
while pumping fuel.
. Avoid using cell phones or
other electronic devices.
Trailer Towing
General Towing
Information
Only use towing equipment that has
been designed for the vehicle.
Contact your dealer or trailering
dealer for assistance with preparing
the vehicle for towing a trailer. Read
the entire section before towing a
trailer.
For towing a disabled vehicle, see
Towing the Vehicle 0293
ii. For
towing the vehicle behind another
vehicle such as a motor home, see
Recreational Vehicle Towing 0293
ii.
Driving Characteristics
and Towing Tips
Driving with a Trailer
When towing a trailer:
.
Become familiar with the state
and local laws that apply
specifically to trailer towing.
Page 214 of 357
Chevrolet Cruze Limited Owner Manual (GMNA-Localizing-U.S./Canada-
9282844) - 2016 - crc - 9/3/15
Driving and Operating 213
.Do not tow a trailer during the
first 800 km (500 mi), to prevent
damage to the engine, axle or
other parts.
. Then, during the first 800 km
(500 mi) trailer towing, do not
drive over 80 km/h (50 mph) and
do not make starts at full throttle.
. Vehicles with automatic
transmissions can tow in D
(Drive) but M (Manual Mode) is
recommended. See Manual
Mode 0194
ii. Use a lower gear if
the transmission shifts too often.
For vehicles with a manual
transmission, it is better not to
use the highest gear.
. Turn off Parking Assist when
towing.
{Warning
When towing a trailer, exhaust
gases may collect at the rear of
the vehicle and enter if the
liftgate, trunk/hatch, or rear-most
window is open.
(Continued)
Warning (Continued)
When towing a trailer:
. Do not drive with the
liftgate, trunk/hatch,
or rear-most window open.
. Fully open the air outlets on
or under the instrument
panel.
. Also adjust the climate
control system to a setting
that brings in only outside
air. See “Climate Control
Systems” in the Index.
For information about carbon
monoxide, see Engine Exhaust
0 191
ii.
Towing a trailer requires a certain
amount of experience. The
combination you are driving is
longer and not as responsive as the
vehicle itself. Get acquainted with
the handling and braking of the rig
before setting out for the open road. Before starting, check all trailer hitch
parts and attachments, safety
chains, electrical connectors, lamps,
tires and mirrors. If the trailer has
electric brakes, start the
combination moving and then apply
the trailer brake controller by hand
to be sure the brakes work.
During the trip, check occasionally
to be sure that the load is secure
and the lamps and any trailer
brakes still work.
Towing with a Stability Control
System
When towing, the sound of the
stability control system might be
heard. The system is reacting to the
vehicle movement caused by the
trailer, which mainly occurs during
cornering. This is normal when
towing heavier trailers.
Following Distance
Stay at least twice as far behind the
vehicle ahead as you would when
driving the vehicle without a trailer.
This can help to avoid situations
that require heavy braking and
sudden turns.
Page 247 of 357
Chevrolet Cruze Limited Owner Manual (GMNA-Localizing-U.S./Canada-
9282844) - 2016 - crc - 9/3/15
246 Vehicle Care
4. Remove the bulb from the bulbsocket.
5. Install the new bulb in the bulb socket.
6. Install the bulb socket into the headlamp assembly by turning
clockwise.
7. For the driver side, reinstall the windshield washer bottle filler
neck by firmly pushing it
straight into the bottle. Ensure
that the filler neck clip engages
into the underhood electrical
center retainer.Taillamps, Turn Signal,
Sidemarker, Stoplamps,
and Back-Up Lamps
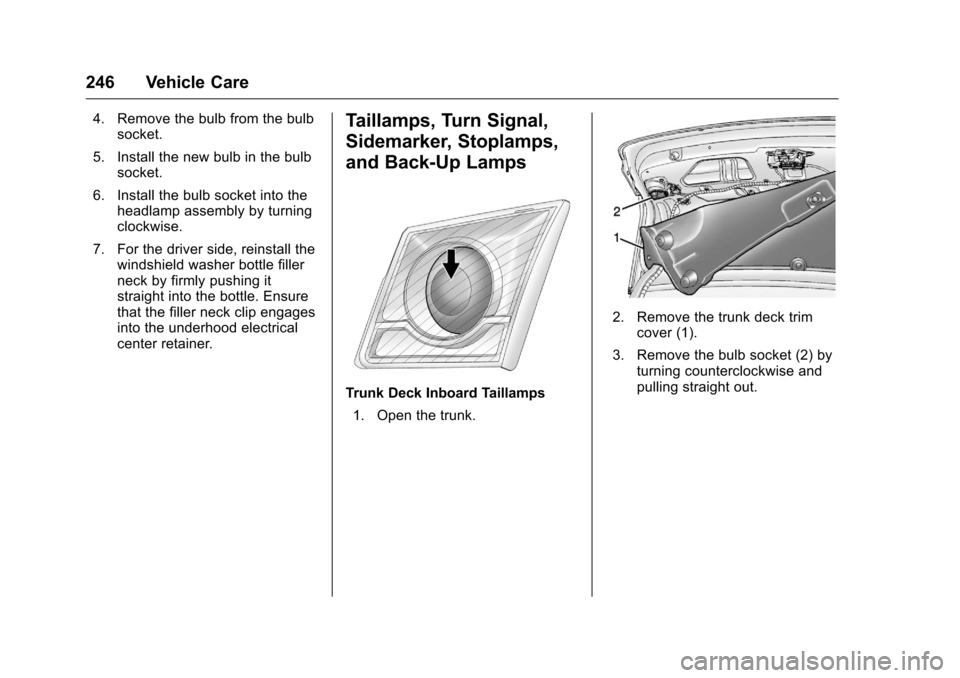
Trunk Deck Inboard Taillamps
1. Open the trunk.
2. Remove the trunk deck trim cover (1).
3. Remove the bulb socket (2) by turning counterclockwise and
pulling straight out.
Page 248 of 357
Chevrolet Cruze Limited Owner Manual (GMNA-Localizing-U.S./Canada-
9282844) - 2016 - crc - 9/3/15
Vehicle Care 247
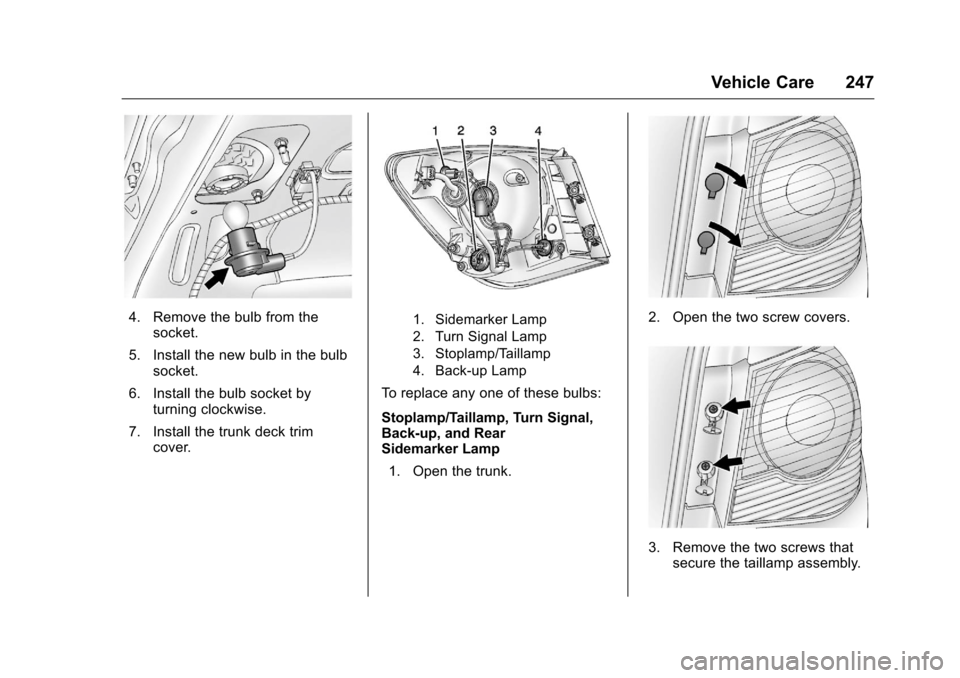
4. Remove the bulb from thesocket.
5. Install the new bulb in the bulb socket.
6. Install the bulb socket by turning clockwise.
7. Install the trunk deck trim cover.1. Sidemarker Lamp
2. Turn Signal Lamp
3. Stoplamp/Taillamp
4. Back-up Lamp
To replace any one of these bulbs:
Stoplamp/Taillamp, Turn Signal,
Back-up, and Rear
Sidemarker Lamp
1. Open the trunk.
2. Open the two screw covers.
3. Remove the two screws that secure the taillamp assembly.
Page 255 of 357
Chevrolet Cruze Limited Owner Manual (GMNA-Localizing-U.S./Canada-
9282844) - 2016 - crc - 9/3/15
254 Vehicle Care
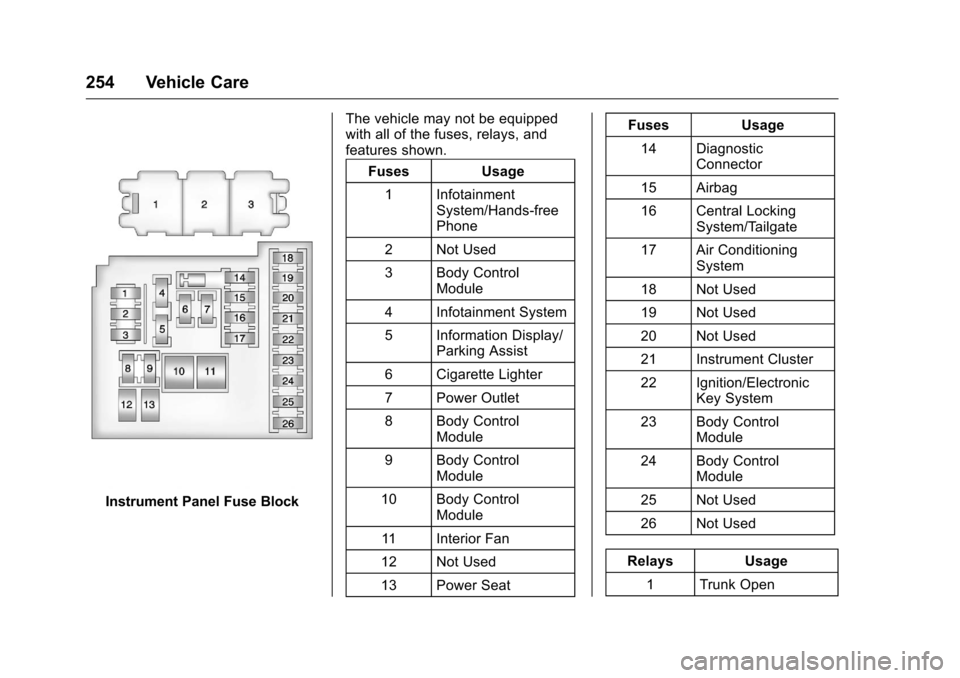
Instrument Panel Fuse BlockThe vehicle may not be equipped
with all of the fuses, relays, and
features shown.
Fuses Usage
1 Infotainment System/Hands-free
Phone
2 Not Used
3 Body Control Module
4 Infotainment System
5 Information Display/ Parking Assist
6 Cigarette Lighter
7 Power Outlet
8 Body Control Module
9 Body Control Module
10 Body Control Module
11 Interior Fan
12 Not Used
13 Power Seat Fuses Usage
14 Diagnostic Connector
15 Airbag
16 Central Locking System/Tailgate
17 Air Conditioning System
18 Not Used
19 Not Used
20 Not Used
21 Instrument Cluster
22 Ignition/Electronic Key System
23 Body Control Module
24 Body Control Module
25 Not Used
26 Not Used
Relays Usage 1 Trunk Open
Page 283 of 357
Chevrolet Cruze Limited Owner Manual (GMNA-Localizing-U.S./Canada-
9282844) - 2016 - crc - 9/3/15
282 Vehicle Care
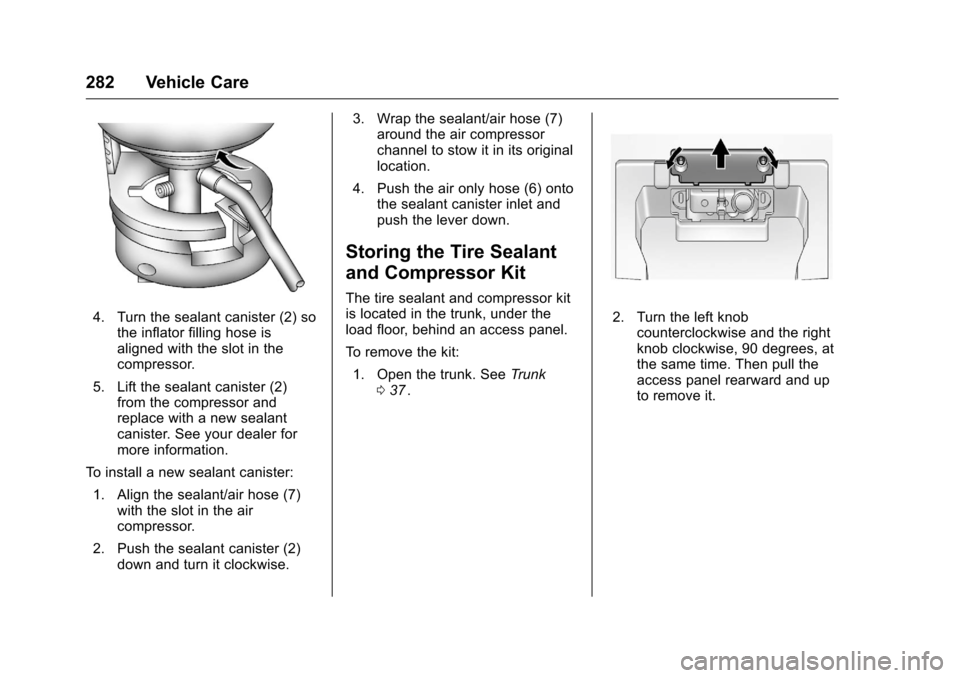
4. Turn the sealant canister (2) sothe inflator filling hose is
aligned with the slot in the
compressor.
5. Lift the sealant canister (2) from the compressor and
replace with a new sealant
canister. See your dealer for
more information.
To install a new sealant canister:
1. Align the sealant/air hose (7) with the slot in the air
compressor.
2. Push the sealant canister (2) down and turn it clockwise. 3. Wrap the sealant/air hose (7)
around the air compressor
channel to stow it in its original
location.
4. Push the air only hose (6) onto the sealant canister inlet and
push the lever down.
Storing the Tire Sealant
and Compressor Kit
The tire sealant and compressor kit
is located in the trunk, under the
load floor, behind an access panel.
To remove the kit:
1. Open the trunk. See Trunk
0 37
ii.
2. Turn the left knob
counterclockwise and the right
knob clockwise, 90 degrees, at
the same time. Then pull the
access panel rearward and up
to remove it.
Page 284 of 357
Chevrolet Cruze Limited Owner Manual (GMNA-Localizing-U.S./Canada-
9282844) - 2016 - crc - 9/3/15
Vehicle Care 283
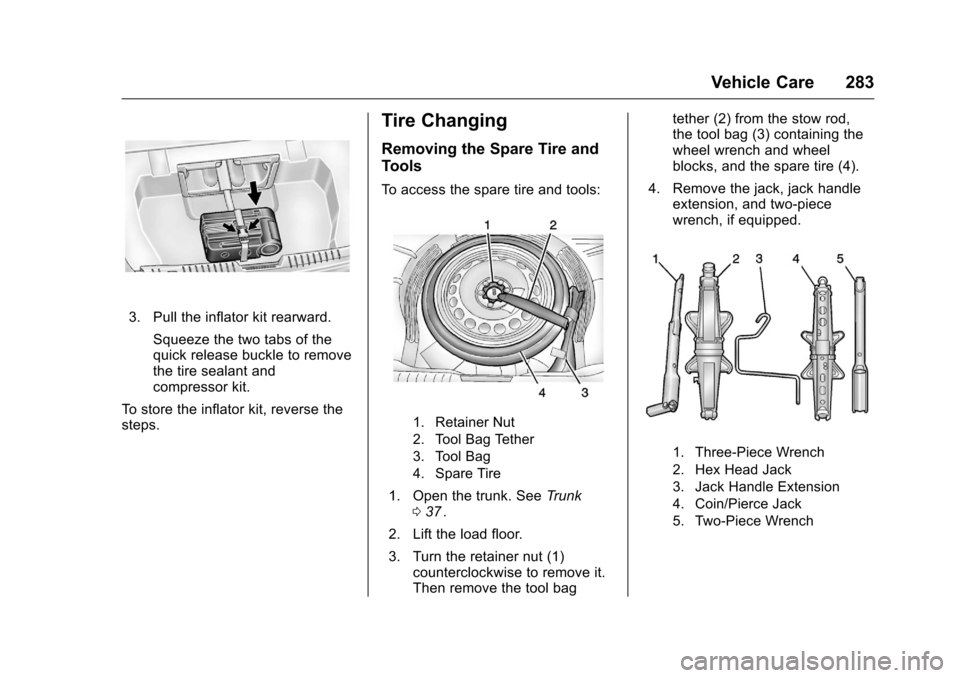
3. Pull the inflator kit rearward.Squeeze the two tabs of the
quick release buckle to remove
the tire sealant and
compressor kit.
To store the inflator kit, reverse the
steps.
Tire Changing
Removing the Spare Tire and
Tools
To access the spare tire and tools:
1. Retainer Nut
2. Tool Bag Tether
3. Tool Bag
4. Spare Tire
1. Open the trunk. See Trunk
0 37ii.
2. Lift the load floor.
3. Turn the retainer nut (1) counterclockwise to remove it.
Then remove the tool bag tether (2) from the stow rod,
the tool bag (3) containing the
wheel wrench and wheel
blocks, and the spare tire (4).
4. Remove the jack, jack handle extension, and two-piece
wrench, if equipped.
1. Three-Piece Wrench
2. Hex Head Jack
3. Jack Handle Extension
4. Coin/Pierce Jack
5. Two-Piece Wrench
Page 285 of 357
Chevrolet Cruze Limited Owner Manual (GMNA-Localizing-U.S./Canada-
9282844) - 2016 - crc - 9/3/15
284 Vehicle Care
This vehicle may have one of the
following: A coin/pierce jack (4), a
jack handle extension (3), and a
two-piece wrench (5), or a hex head
jack (2) and three-piece wrench (1).
Removing the Flat Tire and
Installing the Spare Tire
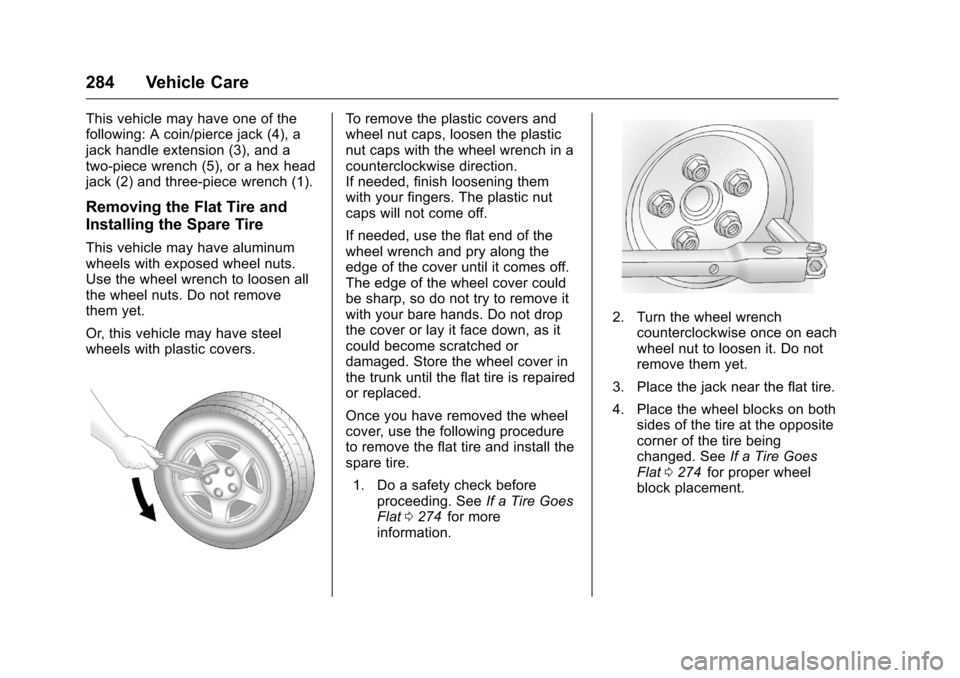
This vehicle may have aluminum
wheels with exposed wheel nuts.
Use the wheel wrench to loosen all
the wheel nuts. Do not remove
them yet.
Or, this vehicle may have steel
wheels with plastic covers.
To remove the plastic covers and
wheel nut caps, loosen the plastic
nut caps with the wheel wrench in a
counterclockwise direction.
If needed, finish loosening them
with your fingers. The plastic nut
caps will not come off.
If needed, use the flat end of the
wheel wrench and pry along the
edge of the cover until it comes off.
The edge of the wheel cover could
be sharp, so do not try to remove it
with your bare hands. Do not drop
the cover or lay it face down, as it
could become scratched or
damaged. Store the wheel cover in
the trunk until the flat tire is repaired
or replaced.
Once you have removed the wheel
cover, use the following procedure
to remove the flat tire and install the
spare tire.1. Do a safety check before proceeding. See If a Tire Goes
Flat 0274
iifor more
information.
2. Turn the wheel wrench counterclockwise once on each
wheel nut to loosen it. Do not
remove them yet.
3. Place the jack near the flat tire.
4. Place the wheel blocks on both sides of the tire at the opposite
corner of the tire being
changed. See If a Tire Goes
Flat 0274
iifor proper wheel
block placement.
Page 348 of 357
Chevrolet Cruze Limited Owner Manual (GMNA-Localizing-U.S./Canada-
9282844) - 2016 - crc - 9/3/15
Index 347
Audio PlayersCD . . . . . . . . . . . . . . . . . . . . . . . . . . . 145
Automatic Climate Control System . . . . . . . 165
Door Locks . . . . . . . . . . . . . . . . . . . . . 35
Headlamp System . . . . . . . . . . . . 129
Transmission . . . . . . . . . . . . . . . . . 192
Transmission Fluid . . . . . . . . . . . 230
Automatic Transmission Manual Mode . . . . . . . . . . . . . . . . . 194
Shift Lock Control FunctionCheck . . . . . . . . . . . . . . . . . . . . . . . 242
Auxiliary Devices . . . . . . . . . . . . . . . . . . . . . . . 147
B
BatteryExterior Lighting BatterySaver . . . . . . . . . . . . . . . . . . . . . . . 133
Power Protection . . . . . . . . . . . . . 133
Voltage and Charging Messages . . . . . . . . . . . . . . . . . . . .115
Battery - North America . . . . 241, 290
Blade Replacement, Wiper . . . . . 243
Bluetooth Overview . . . . . . . . . . . 149, 151, 154
Brake System Warning Light . . . . . . . . 106 Brakes . . . . . . . . . . . . . . . . . . . . . . . . . . 239
Antilock . . . . . . . . . . . . . . . . . . . . . . . 197
Assist . . . . . . . . . . . . . . . . . . . . . . . . . 199
Fluid . . . . . . . . . . . . . . . . . . . . . . . . . . 239
Parking . . . . . . . . . . . . . . . . . . . . . . . 198
System Messages . . . . . . . . . . . . .116
Braking . . . . . . . . . . . . . . . . . . . . . . . . . 172
Break-In, New Vehicle . . . . . . . . . . 181
Bulb Replacement . . . . . . . . . . . . . . 249
Halogen Bulbs . . . . . . . . . . . . . . . . 244
Headlamp Aiming . . . . . . . . . . . . . 244
Headlamps . . . . . . . . . . . . . . . . . . . 244
Headlamps, Front TurnSignal, and Parking
Lamps . . . . . . . . . . . . . . . . . . . . . . 244
License Plate Lamps . . . . . . . . . 248
Taillamps, Turn Signal,
Sidemarker, Stoplamps,
and Backup Lamps . . . . . . . . . . 246
Buying New Tires . . . . . . . . . . . . . . . 270
C
Calibration . . . . . . . . . . . . . . . . . . . . . . . 96
California Fuel Requirements . . . . . . . . . . . 210 California (cont'd)
Perchlorate Materials
Requirements . . . . . . . . . . . . . . . 220
California
Proposition
65 Warning . . . . . . . . . .220, 241, 290
Camera Rear Vision (RVC) . . . . . . . . . . . . 203
Canadian Vehicle Owners . . . . . . . . 2
Capacities and
Specifications . . . . . . . . . . . . . . . . . 321
Carbon Monoxide Engine Exhaust . . . . . . . . . . . . . . . 191
Trunk . . . . . . . . . . . . . . . . . . . . . . . . . . . 37
Winter Driving . . . . . . . . . . . . . . . . 175
Caution, Danger, and Warning . . . . 3
CD Player . . . . . . . . . . . . . . . . . . . . . . 145
Center Console Storage . . . . . . . . . 91
Chains, Tire . . . . . . . . . . . . . . . . . . . . 274
Charging System Light . . . . . . . . . 104
Check Ignition Transmission Lock . . . 242
Malfunction IndicatorEngine Light . . . . . . . . . . . . . . . . 104
Child Restraints Infants and Young Children . . . . . 73
Lower Anchors and Tethersfor Children . . . . . . . . . . . . . . . . . . . 78