fuel pump CHEVROLET CRUZE LIMITED 2016 2.G Owners Manual
[x] Cancel search | Manufacturer: CHEVROLET, Model Year: 2016, Model line: CRUZE LIMITED, Model: CHEVROLET CRUZE LIMITED 2016 2.GPages: 357, PDF Size: 6.49 MB
Page 102 of 357
Chevrolet Cruze Limited Owner Manual (GMNA-Localizing-U.S./Canada-
9282844) - 2016 - crc - 9/3/15
Instruments and Controls 101
Speedometer
The speedometer shows the
vehicle's speed in either kilometers
per hour (km/h) or miles per
hour (mph).
Odometer
The odometer shows how far the
vehicle has been driven, in either
kilometers or miles.
Trip Odometer
The trip odometer shows how far
the vehicle has been driven since
the trip odometer was last reset.
The trip odometer is accessed and
reset through the Driver Information
Center (DIC). SeeDriver
Information Center (DIC) 0112
ii.
Tachometer
The tachometer displays the engine
speed in revolutions per
minute (rpm).
Caution
If the engine is operated with the
rpm’s in the warning area at the
high end of the tachometer, the
vehicle could be damaged, and
the damage would not be covered
by the vehicle warranty. Do not
operate the engine with the rpm’s
in the warning area.
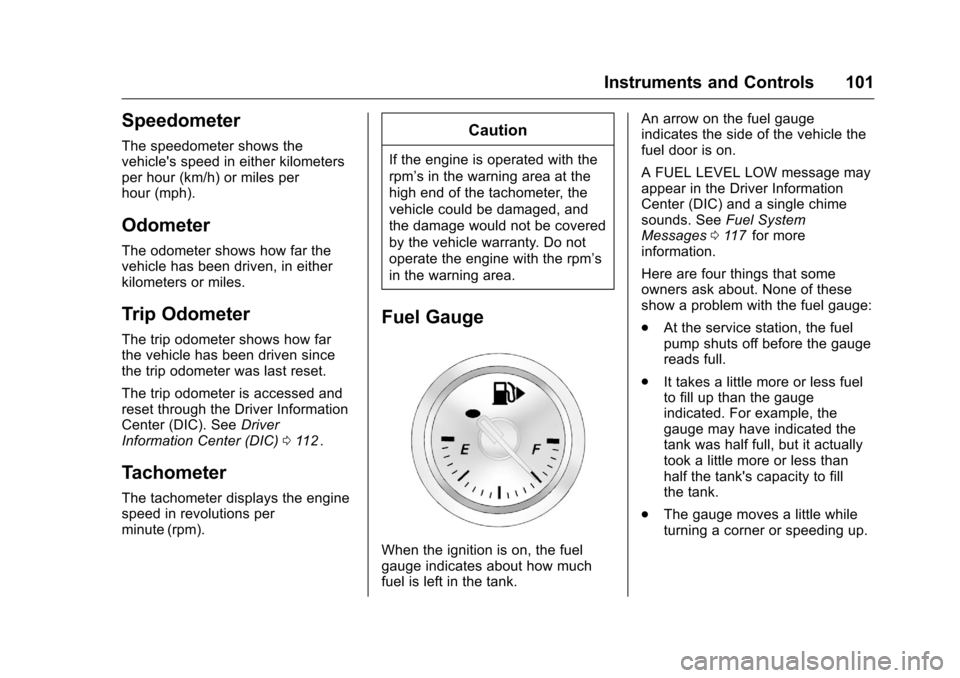
Fuel Gauge
When the ignition is on, the fuel
gauge indicates about how much
fuel is left in the tank. An arrow on the fuel gauge
indicates the side of the vehicle the
fuel door is on.
A FUEL LEVEL LOW message may
appear in the Driver Information
Center (DIC) and a single chime
sounds. See
Fuel System
Messages 0117
iifor more
information.
Here are four things that some
owners ask about. None of these
show a problem with the fuel gauge:
. At the service station, the fuel
pump shuts off before the gauge
reads full.
. It takes a little more or less fuel
to fill up than the gauge
indicated. For example, the
gauge may have indicated the
tank was half full, but it actually
took a little more or less than
half the tank's capacity to fill
the tank.
. The gauge moves a little while
turning a corner or speeding up.
Page 211 of 357
Chevrolet Cruze Limited Owner Manual (GMNA-Localizing-U.S./Canada-
9282844) - 2016 - crc - 9/3/15
210 Driving and Operating
California Fuel
Requirements
If the vehicle is certified to meet
California Emissions Standards, it is
designed to operate on fuels that
meet California specifications. See
the underhood emission control
label. If this fuel is not available in
states adopting California Emissions
Standards, the vehicle will operate
satisfactorily on fuels meeting
federal specifications, but emission
control system performance might
be affected. The malfunction
indicator lamp could turn on and the
vehicle may not pass a smog-check
test. SeeMalfunction Indicator
Lamp (Check Engine Light) 0104
ii.
If this occurs, return to your
authorized dealer for diagnosis. If it
is determined that the condition is
caused by the type of fuel used,
repairs may not be covered by the
vehicle warranty.
Fuels in Foreign
Countries
If planning to drive in countries
outside the U.S. or Canada, the
proper fuel might be hard to find.
Check regional auto club or fuel
retail brand websites for availability
in the country where driving. Never
use leaded gasoline, fuel containing
methanol, manganese, or any other
fuel not recommended. Costly
repairs caused by use of improper
fuel would not be covered by the
vehicle warranty.
Fuel Additives
To keep fuel systems clean, TOP
TIER Detergent Gasoline is
recommended. See Fuel0209
ii.
If TOP TIER Detergent Gasoline is
not available, one bottle of Fuel
System Treatment PLUS added to
the fuel tank at every engine oil
change, can help. Fuel System
Treatment PLUS is the only
gasoline additive recommended by
General Motors. It is available at
your dealer.
Filling the Tank
{Warning
Fuel vapors and fuel fires burn
violently and can cause injury or
death. . To help avoid injuries to you
and others, read and follow
all the instructions on the
fuel pump island.
. Turn off the engine when
refueling.
. Keep sparks, flames, and
smoking materials away
from fuel.
. Do not leave the fuel pump
unattended.
. Do not use a cell phone
while refueling.
. Do not reenter the vehicle
while pumping fuel.
. Keep children away from
the fuel pump and never let
children pump fuel.
(Continued)
Page 212 of 357
Chevrolet Cruze Limited Owner Manual (GMNA-Localizing-U.S./Canada-
9282844) - 2016 - crc - 9/3/15
Driving and Operating 211
Warning (Continued)
.Fuel can spray out if the fuel
cap is opened too quickly.
This spray can happen if the
tank is nearly full, and is
more likely in hot weather.
Open the fuel cap slowly
and wait for any hiss noise
to stop, then unscrew the
cap all the way.
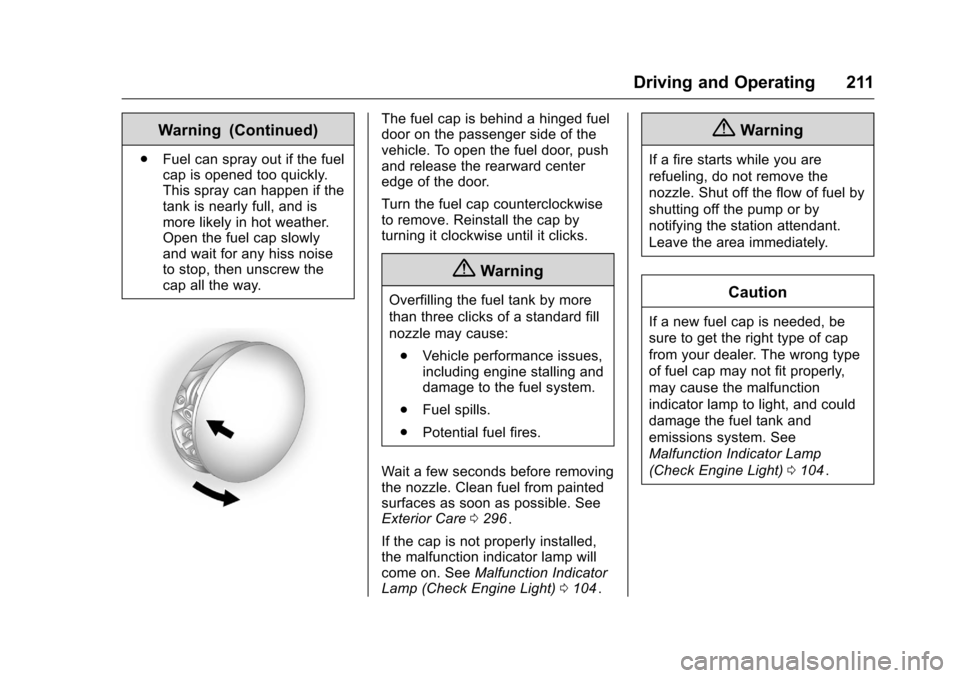
The fuel cap is behind a hinged fuel
door on the passenger side of the
vehicle. To open the fuel door, push
and release the rearward center
edge of the door.
Turn the fuel cap counterclockwise
to remove. Reinstall the cap by
turning it clockwise until it clicks.
{Warning
Overfilling the fuel tank by more
than three clicks of a standard fill
nozzle may cause:
. Vehicle performance issues,
including engine stalling and
damage to the fuel system.
. Fuel spills.
. Potential fuel fires.
Wait a few seconds before removing
the nozzle. Clean fuel from painted
surfaces as soon as possible. See
Exterior Care 0296
ii.
If the cap is not properly installed,
the malfunction indicator lamp will
come on. See Malfunction Indicator
Lamp (Check Engine Light) 0104
ii.
{Warning
If a fire starts while you are
refueling, do not remove the
nozzle. Shut off the flow of fuel by
shutting off the pump or by
notifying the station attendant.
Leave the area immediately.
Caution
If a new fuel cap is needed, be
sure to get the right type of cap
from your dealer. The wrong type
of fuel cap may not fit properly,
may cause the malfunction
indicator lamp to light, and could
damage the fuel tank and
emissions system. See
Malfunction Indicator Lamp
(Check Engine Light) 0104
ii.
Page 213 of 357
Chevrolet Cruze Limited Owner Manual (GMNA-Localizing-U.S./Canada-
9282844) - 2016 - crc - 9/3/15
212 Driving and Operating
Filling a Portable Fuel
Container
{Warning
Filling a portable fuel container
while it is in the vehicle can cause
fuel vapors that can ignite either
by static electricity or other
means. You or others could be
badly burned and the vehicle
could be damaged. Always:. Use approved fuel
containers.
. Remove the container from
the vehicle, trunk, or pickup
bed before filling.
. Place the container on the
ground.
. Place the nozzle inside the
fill opening of the container
before dispensing fuel, and
keep it in contact with the fill
opening until filling is
complete.
(Continued)
Warning (Continued)
.Fill the container no more
than 95% full to allow for
expansion.
. Do not smoke, light
matches, or use lighters
while pumping fuel.
. Avoid using cell phones or
other electronic devices.
Trailer Towing
General Towing
Information
Only use towing equipment that has
been designed for the vehicle.
Contact your dealer or trailering
dealer for assistance with preparing
the vehicle for towing a trailer. Read
the entire section before towing a
trailer.
For towing a disabled vehicle, see
Towing the Vehicle 0293
ii. For
towing the vehicle behind another
vehicle such as a motor home, see
Recreational Vehicle Towing 0293
ii.
Driving Characteristics
and Towing Tips
Driving with a Trailer
When towing a trailer:
.
Become familiar with the state
and local laws that apply
specifically to trailer towing.
Page 252 of 357
Chevrolet Cruze Limited Owner Manual (GMNA-Localizing-U.S./Canada-
9282844) - 2016 - crc - 9/3/15
Vehicle Care 251
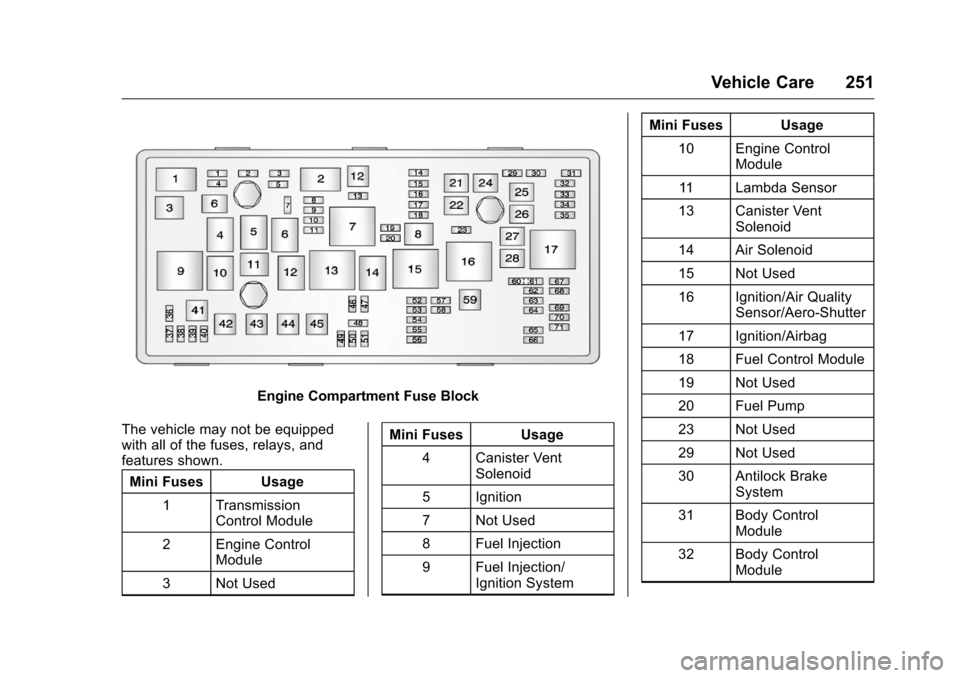
Engine Compartment Fuse Block
The vehicle may not be equipped
with all of the fuses, relays, and
features shown. Mini Fuses Usage
1 Transmission Control Module
2 Engine Control Module
3 Not Used Mini Fuses Usage
4 Canister Vent Solenoid
5 Ignition
7 Not Used
8 Fuel Injection
9 Fuel Injection/ Ignition System Mini Fuses Usage
10 Engine Control Module
11 Lambda Sensor
13 Canister Vent Solenoid
14 Air Solenoid
15 Not Used
16 Ignition/Air Quality Sensor/Aero-Shutter
17 Ignition/Airbag
18 Fuel Control Module
19 Not Used
20 Fuel Pump
23 Not Used
29 Not Used
30 Antilock Brake System
31 Body Control Module
32 Body Control Module
Page 253 of 357
Chevrolet Cruze Limited Owner Manual (GMNA-Localizing-U.S./Canada-
9282844) - 2016 - crc - 9/3/15
252 Vehicle Care
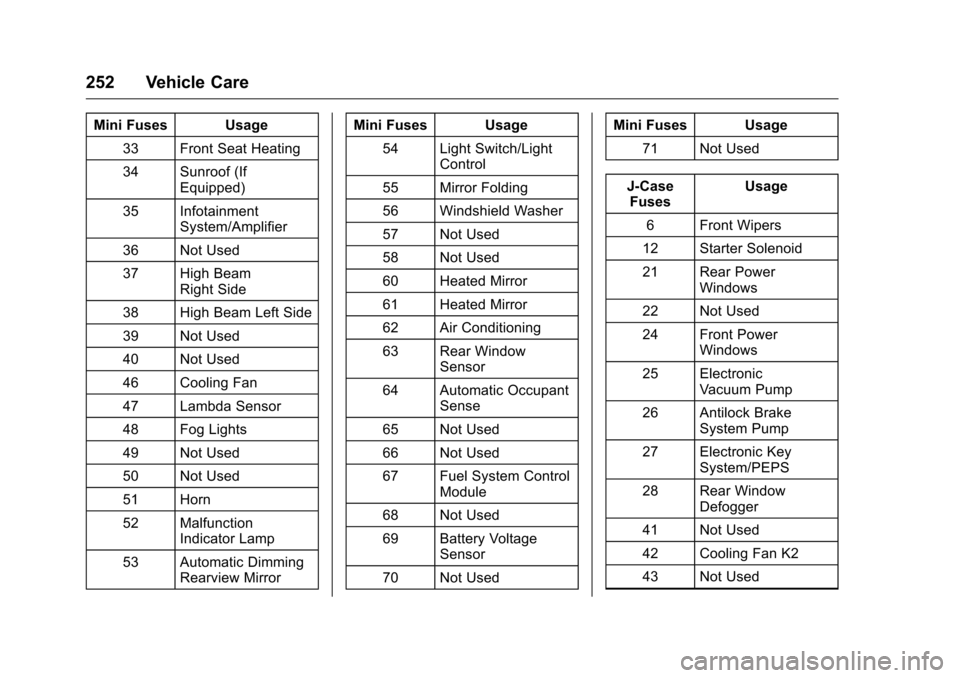
Mini Fuses Usage33 Front Seat Heating
34 Sunroof (If Equipped)
35 Infotainment System/Amplifier
36 Not Used
37 High Beam Right Side
38 High Beam Left Side
39 Not Used
40 Not Used
46 Cooling Fan
47 Lambda Sensor
48 Fog Lights
49 Not Used
50 Not Used
51 Horn
52 Malfunction Indicator Lamp
53 Automatic Dimming Rearview Mirror Mini Fuses Usage
54 Light Switch/Light Control
55 Mirror Folding
56 Windshield Washer
57 Not Used
58 Not Used
60 Heated Mirror
61 Heated Mirror
62 Air Conditioning
63 Rear Window Sensor
64 Automatic Occupant Sense
65 Not Used
66 Not Used
67 Fuel System Control Module
68 Not Used
69 Battery Voltage Sensor
70 Not Used Mini Fuses Usage
71 Not Used
J-Case Fuses Usage
6 Front Wipers
12 Starter Solenoid
21 Rear Power Windows
22 Not Used
24 Front Power Windows
25 Electronic Vacuum Pump
26 Antilock Brake System Pump
27 Electronic Key System/PEPS
28 Rear Window Defogger
41 Not Used
42 Cooling Fan K2
43 Not Used
Page 254 of 357
Chevrolet Cruze Limited Owner Manual (GMNA-Localizing-U.S./Canada-
9282844) - 2016 - crc - 9/3/15
Vehicle Care 253
J-CaseFuses Usage
44 Not Used
45 Cooling Fan K1
59 SEC Air Pump
Micro
Relays Usage
1 A/C Clutch
2 Starter Solenoid
4 Front Wiper Speed
5 Front Wiper On
6 Air Solenoid
10 Cooling Fan K3
12 Cooling Fan K3
14 Not Used
U-Micro Relays Usage
3 Cooling Fan K7
8 Fuel Pump
11 Not Used HC Relays Usage
9 Cooling Fan K2
13 Cooling Fan K1
Mini Relays Usage 7 Ignition 87 Main
15 Ignition 15
16 SEC Air Pump
17 Window and Mirror Defogger
Instrument Panel Fuse
Block
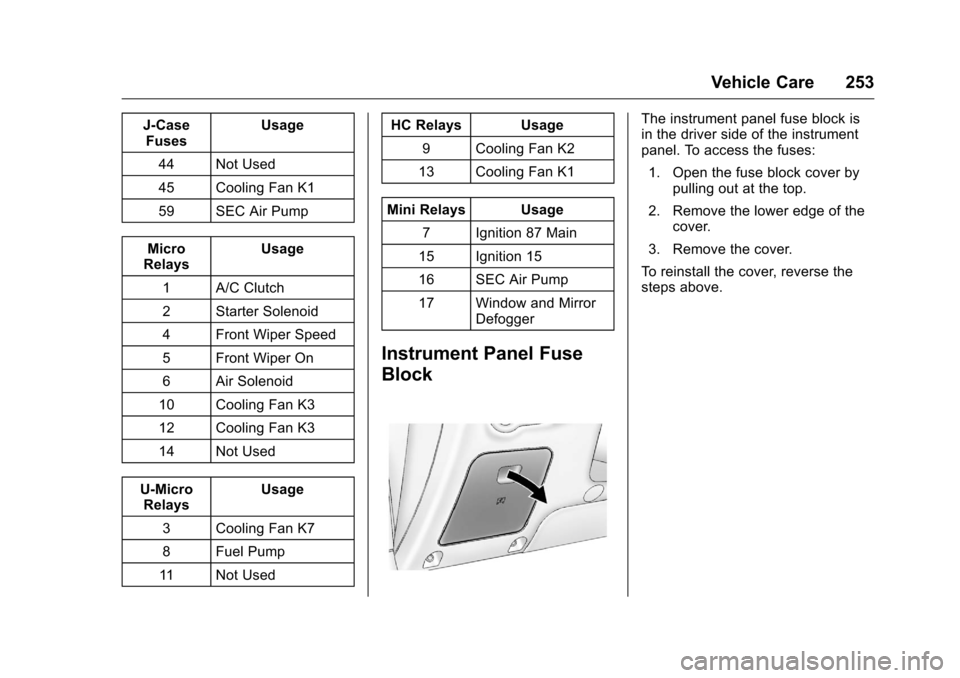
The instrument panel fuse block is
in the driver side of the instrument
panel. To access the fuses:
1. Open the fuse block cover by pulling out at the top.
2. Remove the lower edge of the cover.
3. Remove the cover.
To reinstall the cover, reverse the
steps above.
Page 301 of 357
Chevrolet Cruze Limited Owner Manual (GMNA-Localizing-U.S./Canada-
9282844) - 2016 - crc - 9/3/15
300 Vehicle Care
Wheels and Trim—Aluminum
or Chrome
Use a soft, clean cloth with mild
soap and water to clean the wheels.
After rinsing thoroughly with clean
water, dry with a soft, clean towel.
A wax may then be applied.
Caution
Chrome wheels and other chrome
trim may be damaged if the
vehicle is not washed after driving
on roads that have been sprayed
with magnesium, calcium,
or sodium chloride. These
chlorides are used on roads for
conditions such as ice and dust.
Always wash the chrome with
soap and water after exposure.
Caution
To avoid surface damage, do not
use strong soaps, chemicals,
abrasive polishes, cleaners,
brushes, or cleaners that contain
(Continued)
Caution (Continued)
acid on aluminum or
chrome-plated wheels. Use only
approved cleaners. Also, never
drive a vehicle with aluminum or
chrome-plated wheels through an
automatic car wash that uses
silicone carbide tire cleaning
brushes. Damage could occur
and the repairs would not be
covered by the vehicle warranty.
Brake System
Visually inspect brake lines and
hoses for proper hook-up, binding,
leaks, cracks, chafing, etc. Inspect
disc brake pads for wear and rotors
for surface condition. Inspect drum
brake linings/shoes for wear or
cracks. Inspect other brake parts,
including drums, wheel cylinders,
calipers, parking brake, master
cylinder, brake fluid reservoir,
vacuum pipes, electric vacuum
pump including bracket and vent
hose, if equipped.
Steering, Suspension, and
Chassis Components
Visually inspect steering,
suspension, and chassis
components for damaged, loose,
or missing parts or signs of wear at
least once a year.
Inspect power steering for proper
hook-up, binding, leaks, cracks,
chafing, etc.
Visually check constant velocity joint
boots and axle seals for leaks.
Body Component Lubrication
Lubricate all key lock cylinders,
hood hinges, liftgate hinges, the
steel fuel door hinge and power
assist step hinges, unless the
components are plastic. Applying
silicone grease on weatherstrips
with a clean cloth will make them
last longer, seal better, and not stick
or squeak.
Underbody Maintenance
At least twice a year, spring and fall,
use plain water to flush any
corrosive materials from the