open hood CHEVROLET DYNASTY 1993 Owner's Manual
[x] Cancel search | Manufacturer: CHEVROLET, Model Year: 1993, Model line: DYNASTY, Model: CHEVROLET DYNASTY 1993Pages: 2438, PDF Size: 74.98 MB
Page 684 of 2438

FRONT IMPACT SENSORS
The driver air bag system is a safety device de-
signed to reduce the risk of fatality or serious injury,
caused by a frontal impact of the vehicle. The impact sensors provide verification of the di-
rection and severity of the impact. Three impact sen-
sors are used. One is called a safing sensor. It is
located inside the diagnostic module which is
mounted on the floor pan, just forward of the center
console. The other two sensors are mounted on the
upper crossmember of the radiator closure panel on
the left and right side of the vehicle under the hood. The impact sensors are threshold sensitive switches
that complete an electrical circuit when an impact
provides a sufficient G force to close the switch. The
sensors are calibrated for the specific vehicle and re-
act to the severity and direction of the impact.
CLOCKSPRING
The clockspring is mounted on the steering column
behind the steering wheel, and is used to maintain a
continuous electrical circuit between the wiring har-
ness and the driver's air bag module. This assembly
consists of a flat ribbon-like electrically conductive
tape which winds and unwinds with the steering
wheel rotation.
DIAGNOSTIC MODULE
The Air Bag System Diagnostic Module (ASDM)
contains the safing sensor and energy reserve capac-
itor. The ASDM monitors the system to determine
the system readiness. The ASDM will store sufficient
energy to deploy the air bag for only two minutes af-
ter the battery is disconnected. If both front impact
sensors are open the air bag could be deployed up to
9.5 minutes after the battery is disconnected. The
ASDM contains on-board diagnostics, and will illumi-
nate the AIR BAG warning lamp in the cluster when
a fault occurs.
STORAGE
The air bag module must be stored in its original
special container until used for service. Additionally,
it must be stored in a clean, dry environment, away
from sources of extreme heat, sparks, and sources of
high electrical energy. Always place or store the
module on a surface with the trim cover facing up to
minimize movement in case of accidental deploy-
ment.
HANDLING LIVE MODULE
At no time should any source of electricity be per-
mitted near the inflator on the back of the module.
When carrying a live module, the trim cover should
be pointed away from the body to minimize injury in
the event of accidental deployment. In addition, if
the module is placed on a bench or other surface, the plastic trim cover should be face up to minimize
movement in case of accidental deployment. When handling a steering column with an air bag
module attached, never place the column on the floor
or other surface with the steering wheel or module
face down.
DEPLOYED MODULE
The vehicle interior may contain a very small
amount of sodium hydroxide powder, a byproduct of
air bag deployment. Since this powder can irritate
the skin, eyes, nose or throat, be sure to wear safety
glasses, rubber gloves and long sleeves during
cleanup (Fig. 2).
If you find that the cleanup is irritating your skin,
run cool water over the affected area. Also, if you ex-
perience nasal or throat irritation, exit the vehicle
for fresh air until the irritation ceases. If irritation
continues, see a physician.
CLEANUP PROCEDURE
Begin the cleanup by putting tape over the two air
bag exhaust vents (Fig. 3) so that no additional pow-
der will find its way into the vehicle interior. Then
remove the air bag and air bag module from the ve-
hicle. Use a vacuum cleaner to remove any residual pow-
der from the vehicle interior. Work from the outside
in so that you avoid kneeling or sitting in a un-
cleaned area. Be sure to vacuum the heater and A/C outlets as
well (Fig. 4). In fact it's a good idea to run the blower
on low and to vacuum up any powder expelled from
the plenum. You may need to vacuum the interior of
the car a second time to recover all of the powder. Place the deployed bag and module in your auto-
motive scrap.
Fig. 2 Wear Safety Glasses and Rubber Gloves
8M - 2 RESTRAINT SYSTEMS Ä
Page 703 of 2438
VEHICLE THEFT SECURITY SYSTEM
CONTENTS
page page
GENERAL INFORMATION .................. 1
SECURITY SYSTEM DOOR SWITCH REPLACEMENT ........................ 2
SECURITY SYSTEM HOOD SWITCH REPLACEMENT ........................ 2 SYSTEM SELF-TESTS
.................... 1
VEHICLE THEFT SECURITY SYSTEM MODULE REPLACEMENT ........................ 2
WHAT WILL TRIGGER THE SYSTEM ........ 1
GENERAL INFORMATION
JUMP-STARTING, VEHICLE EQUIPPED
WITH THEFT SECURITY SYSTEM . After the
booster battery has been connected, the Theft System
must be turned OFF. Using the key, lock then un-
lock either front door. This turns the Theft System
OFF and the remainder of the Jump-Starting proce-
dure can be followed. If this procedure is not followed, the Theft System
electronics will prevent the engine from starting. If a new Powertrain Control Module is installed,
the engine has to be cranked 20 times before the
alarm system activated. This passive system is designed to protect against
whole vehicle theft. The system monitors vehicle
doors, hood, trunk key cylinder, and ignition action
for unauthorized operation. The alarm activates by
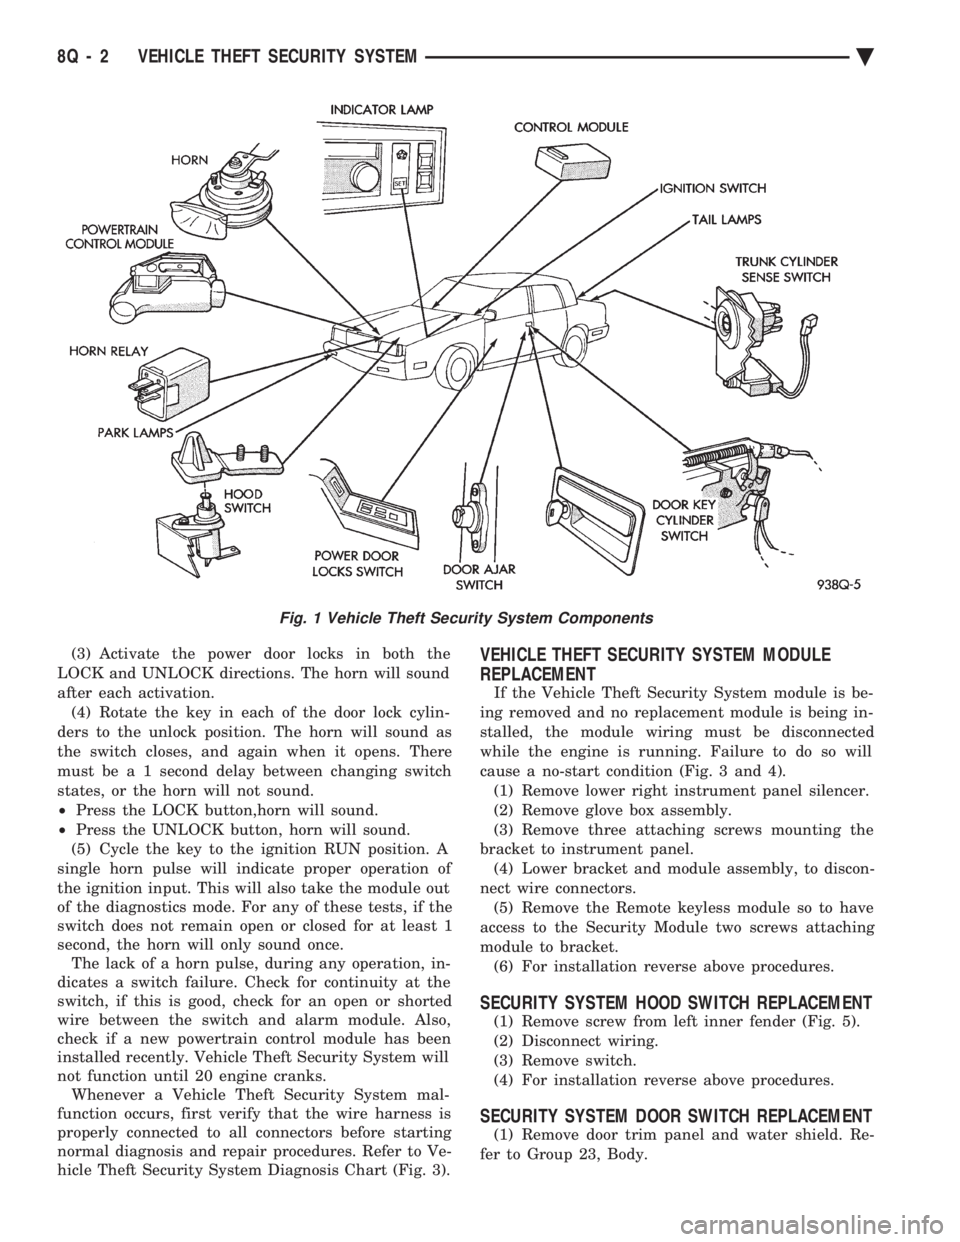
sounding the horn, flashing the park and tail lamps,
and providing an engine kill feature (Fig. 1). Passive arming occurs upon normal vehicle exit,
open door, lock with power locks, close door. The SET
lamp in the panel will flash for 15 seconds, indicat-
ing that arming is in progress. If no monitored sys-
tems are activated during this period, the system
will arm. If the hood or trunk key cylinder switches
are not sensed by the system. The SET lamp will re-
main lit during the arming process, although the sys-
tem will still arm. The system is to be considered as
an active armed system when using the Remote Key-
less Entry. If the SET lamp does not illuminate at all
upon door closing it indicates that the system is not
arming. Passive disarming occurs upon normal vehicle en-
try unlocking either door with the key, or unlocking
using the Remote Keyless transmitter. This disarm-
ing will also halt the alarm once it has been acti-
vated. Whenever the battery is disconnected and recon-
nected, the Vehicle Theft Security System enters
power up alarm mode which flashes the park and tail
lamps and prevents the engine from running. To exit
this mode, the system must be disarmed as men-
tioned above. A tamper alert exists to notify the driver that the
alarm had been activated, and the alarm has since
timed-out for more than 18 minutes. This alert con-
sists of 3 horn pulses when the vehicle is disarmed. The alarm system will not arm if the doors are
manually locked, providing a manual override of the
alarm.
WHAT WILL TRIGGER THE SYSTEM
One of the following actions will trigger the system
while it is armed. Without properly disarming sys-
tem, by using the key or the remote transmitter. (1) Opening the HOOD.
(2) Opening any DOOR.
(3) Removing the TRUNK KEY CYLINDER.
(4) Turning the IGNITION ON.
(5) The ignition switch can be turned to the acces-
sory position without triggering alarm system.
SYSTEM SELF-TESTS
A diagnostics mode is available in the system to
verify operation of all monitored switches or circuits.
To enter diagnostics, cycle the ignition key to the ac-
cessory position 3 times, leaving the key in this po-
sition. Upon entering diagnostics, the park and tail lamps
will begin flashing to verify their operation. In addi-
tion, the horn will sound twice to indicate that the
trunk key cylinder is in its proper position. Return-
ing the ignition to the OFF position will stop the
lamps from flashing while keeping the system in di-
agnostics. While in diagnostics mode, a horn pulse should oc-
cur at each of the following events indicating proper
operation: (1) Beginning with all doors closed, open then close
each door. The horn will sound when the door ajar
switch closes, and then again when the switch opens.
There must b e a 1 second delay between closing and
opening the switch. (2) Open, then close the hood. The horn will sound
when the hood is opened, and again when it is closed.
Ä VEHICLE THEFT SECURITY SYSTEM 8Q - 1
Page 704 of 2438
(3) Activate the power door locks in both the
LOCK and UNLOCK directions. The horn will sound
after each activation. (4) Rotate the key in each of the door lock cylin-
ders to the unlock position. The horn will sound as
the switch closes, and again when it opens. There
must b e a 1 second delay between changing switch
states, or the horn will not sound.
² Press the LOCK button,horn will sound.
² Press the UNLOCK button, horn will sound.
(5) Cycle the key to the ignition RUN position. A
single horn pulse will indicate proper operation of
the ignition input. This will also take the module out
of the diagnostics mode. For any of these tests, if the
switch does not remain open or closed for at least 1
second, the horn will only sound once. The lack of a horn pulse, during any operation, in-
dicates a switch failure. Check for continuity at the
switch, if this is good, check for an open or shorted
wire between the switch and alarm module. Also,
check if a new powertrain control module has been
installed recently. Vehicle Theft Security System will
not function until 20 engine cranks. Whenever a Vehicle Theft Security System mal-
function occurs, first verify that the wire harness is
properly connected to all connectors before starting
normal diagnosis and repair procedures. Refer to Ve-
hicle Theft Security System Diagnosis Chart (Fig. 3).VEHICLE THEFT SECURITY SYSTEM MODULE
REPLACEMENT
If the Vehicle Theft Security System module is be-
ing removed and no replacement module is being in-
stalled, the module wiring must be disconnected
while the engine is running. Failure to do so will
cause a no-start condition (Fig. 3 and 4). (1) Remove lower right instrument panel silencer.
(2) Remove glove box assembly.
(3) Remove three attaching screws mounting the
bracket to instrument panel. (4) Lower bracket and module assembly, to discon-
nect wire connectors. (5) Remove the Remote keyless module so to have
access to the Security Module two screws attaching
module to bracket. (6) For installation reverse above procedures.
SECURITY SYSTEM HOOD SWITCH REPLACEMENT
(1) Remove screw from left inner fender (Fig. 5).
(2) Disconnect wiring.
(3) Remove switch.
(4) For installation reverse above procedures.
SECURITY SYSTEM DOOR SWITCH REPLACEMENT
(1) Remove door trim panel and water shield. Re-
fer to Group 23, Body.
Fig. 1 Vehicle Theft Security System Components
8Q - 2 VEHICLE THEFT SECURITY SYSTEM Ä
Page 1636 of 2438
(c) Remove LEFT insulator through bolt from in-
side wheelhouse or insulator bracket to transmis-
sion screws.
(22) Remove engine.
INSTALLATION
(1) Attach hoist and lower engine into engine com-
partment. (2) Align engine mounts and install but do not
tighten until all mounting bolts have been installed.
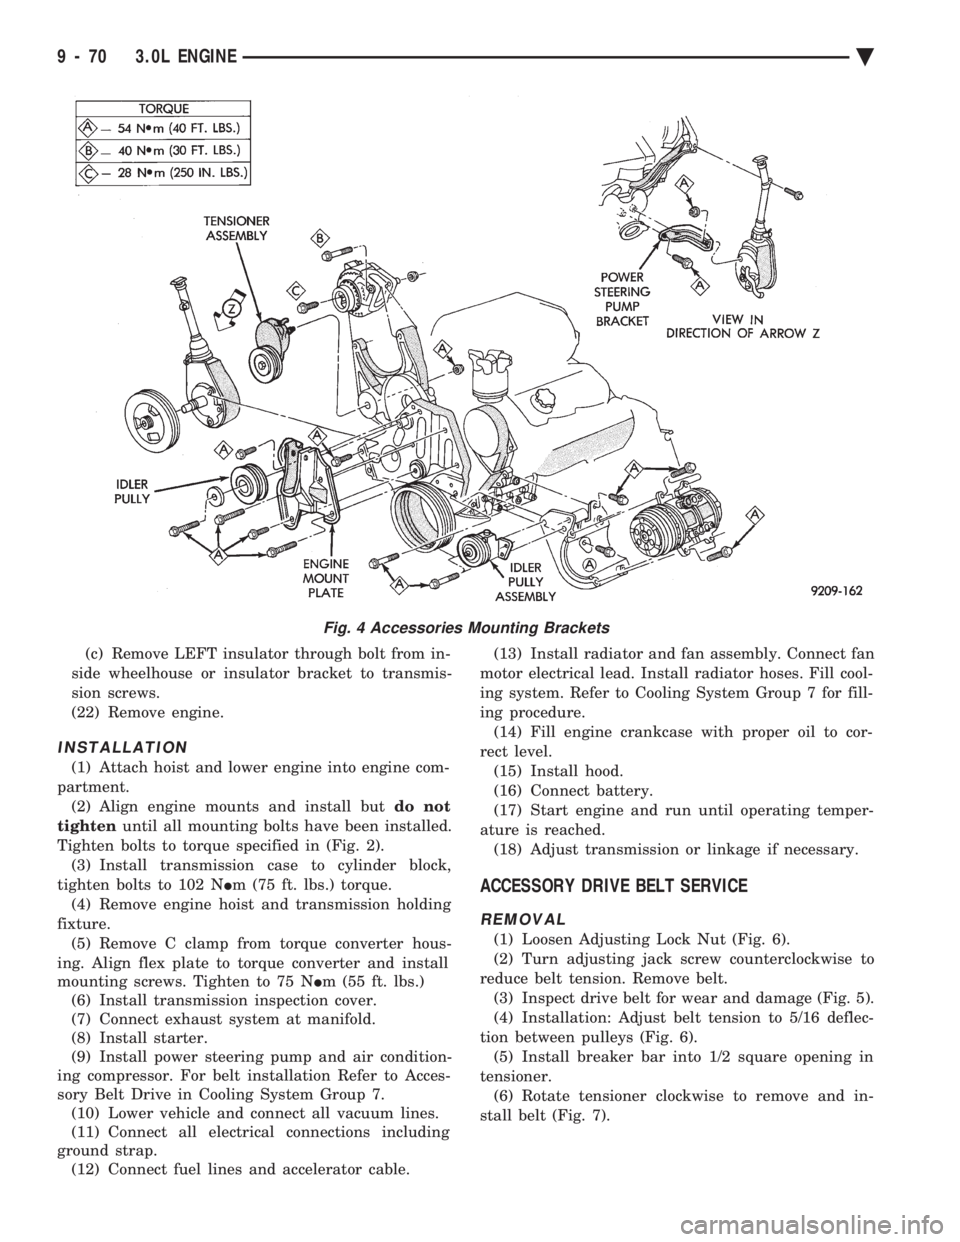
Tighten bolts to torque specified in (Fig. 2). (3) Install transmission case to cylinder block,
tighten bolts to 102 N Im (75 ft. lbs.) torque.
(4) Remove engine hoist and transmission holding
fixture. (5) Remove C clamp from torque converter hous-
ing. Align flex plate to torque converter and install
mounting screws. Tighten to 75 N Im (55 ft. lbs.)
(6) Install transmission inspection cover.
(7) Connect exhaust system at manifold.
(8) Install starter.
(9) Install power steering pump and air condition-
ing compressor. For belt installation Refer to Acces-
sory Belt Drive in Cooling System Group 7. (10) Lower vehicle and connect all vacuum lines.
(11) Connect all electrical connections including
ground strap. (12) Connect fuel lines and accelerator cable. (13) Install radiator and fan assembly. Connect fan
motor electrical lead. Install radiator hoses. Fill cool-
ing system. Refer to Cooling System Group 7 for fill-
ing procedure. (14) Fill engine crankcase with proper oil to cor-
rect level. (15) Install hood.
(16) Connect battery.
(17) Start engine and run until operating temper-
ature is reached. (18) Adjust transmission or linkage if necessary.
ACCESSORY DRIVE BELT SERVICE
REMOVAL
(1) Loosen Adjusting Lock Nut (Fig. 6).
(2) Turn adjusting jack screw counterclockwise to
reduce belt tension. Remove belt. (3) Inspect drive belt for wear and damage (Fig. 5).
(4) Installation: Adjust belt tension to 5/16 deflec-
tion between pulleys (Fig. 6). (5) Install breaker bar into 1/2 square opening in
tensioner. (6) Rotate tensioner clockwise to remove and in-
stall belt (Fig. 7).
Fig. 4 Accessories Mounting Brackets
9 - 70 3.0L ENGINE Ä
Page 1793 of 2438
(3) Install air cleaner.
(4) Connect negative cable to battery.
IDLE AIR CONTROL MOTOR
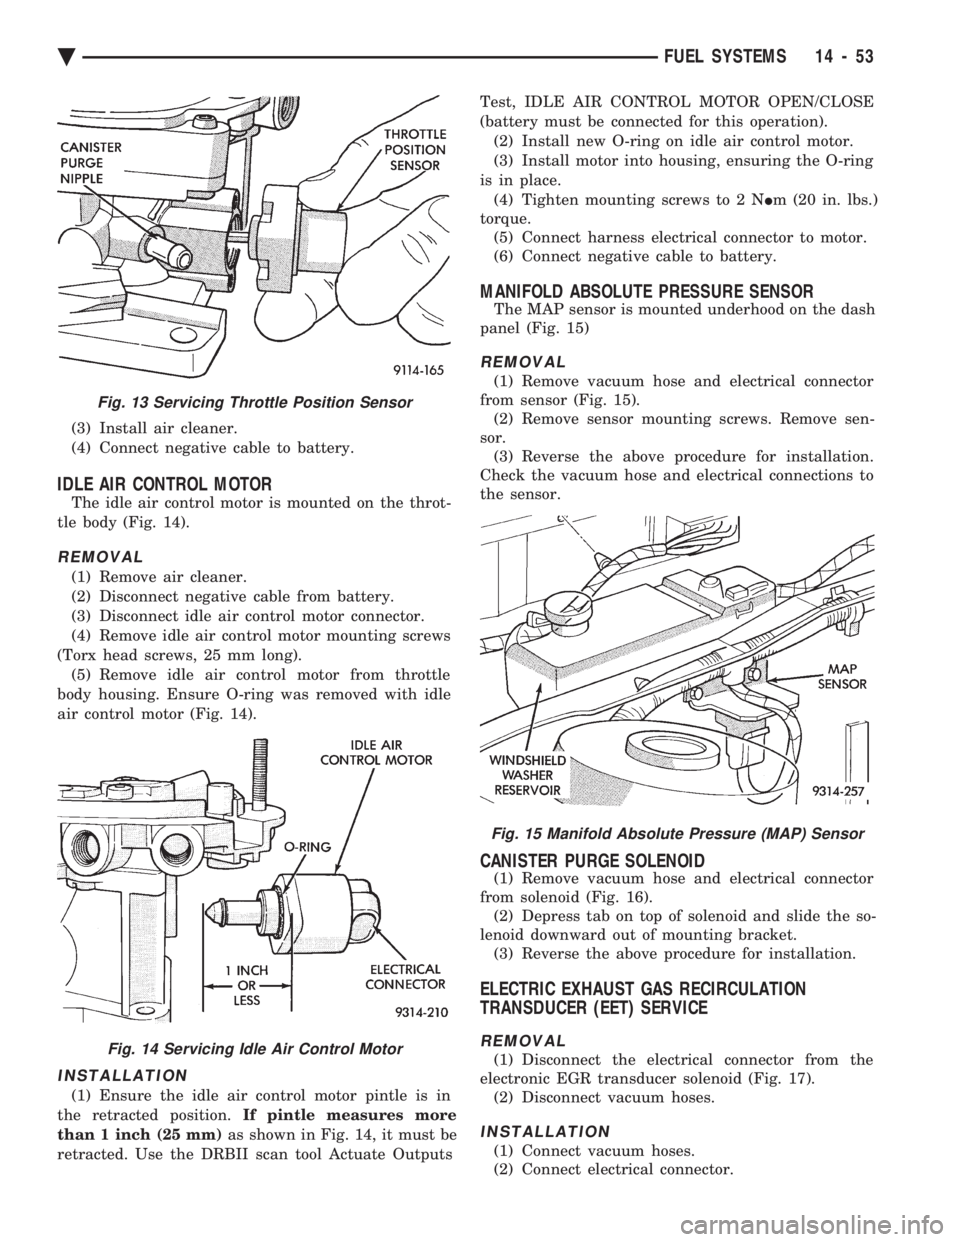
The idle air control motor is mounted on the throt-
tle body (Fig. 14).
REMOVAL
(1) Remove air cleaner.
(2) Disconnect negative cable from battery.
(3) Disconnect idle air control motor connector.
(4) Remove idle air control motor mounting screws
(Torx head screws, 25 mm long). (5) Remove idle air control motor from throttle
body housing. Ensure O-ring was removed with idle
air control motor (Fig. 14).
INSTALLATION
(1) Ensure the idle air control motor pintle is in
the retracted position. If pintle measures more
than 1 inch (25 mm) as shown in Fig. 14, it must be
retracted. Use the DRBII scan tool Actuate Outputs Test, IDLE AIR CONTROL MOTOR OPEN/CLOSE
(battery must be connected for this operation). (2) Install new O-ring on idle air control motor.
(3) Install motor into housing, ensuring the O-ring
is in place. (4) Tighten mounting screws to 2 N Im (20 in. lbs.)
torque. (5) Connect harness electrical connector to motor.
(6) Connect negative cable to battery.
MANIFOLD ABSOLUTE PRESSURE SENSOR
The MAP sensor is mounted underhood on the dash
panel (Fig. 15)
REMOVAL
(1) Remove vacuum hose and electrical connector
from sensor (Fig. 15). (2) Remove sensor mounting screws. Remove sen-
sor. (3) Reverse the above procedure for installation.
Check the vacuum hose and electrical connections to
the sensor.
CANISTER PURGE SOLENOID
(1) Remove vacuum hose and electrical connector
from solenoid (Fig. 16). (2) Depress tab on top of solenoid and slide the so-
lenoid downward out of mounting bracket. (3) Reverse the above procedure for installation.
ELECTRIC EXHAUST GAS RECIRCULATION
TRANSDUCER (EET) SERVICE
REMOVAL
(1) Disconnect the electrical connector from the
electronic EGR transducer solenoid (Fig. 17). (2) Disconnect vacuum hoses.
INSTALLATION
(1) Connect vacuum hoses.
(2) Connect electrical connector.
Fig. 15 Manifold Absolute Pressure (MAP) Sensor
Fig. 13 Servicing Throttle Position Sensor
Fig. 14 Servicing Idle Air Control Motor
Ä FUEL SYSTEMS 14 - 53
Page 1828 of 2438

During cranking, before the engine starts running,
the PCM determines atmospheric air pressure from
the MAP sensor voltage. While the engine operates,
the PCM determines intake manifold pressure and
barometric pressure from the MAP sensor voltage.
Based on MAP sensor voltage and inputs from other
sensors, the PCM adjusts spark advance, air/fuel
mixture and controls the turbocharger wastegate. The MAP sensor (Fig. 12) mounts underhood on
the right side of the engine compartment. The sensor
connects electrically to the PCM.
HEATED OXYGEN SENSOR (O2SENSOR)ÐPCM
INPUT
The O2sensor is located in the turbocharger outlet
and provides an input voltage to the PCM (Fig. 13).
The input tells the PCM the oxygen content of the
exhaust gas. The PCM uses this information to fine
tune the air-fuel ratio by adjusting injector pulse
width. The O
2sensor produces voltages from 0 to 1 volt,
depending upon the oxygen content of the exhaust
gas in the exhaust manifold. When a large amount of oxygen is present (caused by a lean air-fuel mixture),
the sensor produces a low voltage. When there is a
lesser amount present (rich air-fuel mixture) it pro-
duces a higher voltage. By monitoring the oxygen
content and converting it to electrical voltage, the
sensor acts as a rich-lean switch. The oxygen sensor is equipped with a heating ele-
ment that keeps the sensor at proper operating tem-
perature during all operating modes. Maintaining
correct sensor temperature at all times allows the
system to enter into closed loop operation sooner.
Also, it allows the system to remain in closed loop
operation during periods of extended idle. In Closed Loop operation the PCM monitors the O
2
sensor input (along with other inputs) and adjusts
the injector pulse width accordingly. During Open
Loop operation the PCM ignores the O
2sensor input.
The PCM adjusts injector pulse width based on pre-
programmed (fixed) values and inputs from other
sensors.
SPEED CONTROLÐPCM INPUT
The speed control system provides four separate
voltages (inputs) to the PCM. The voltages corre-
spond to the On/Off, Set, and Resume. The speed control ON voltage informs the PCM
that the speed control system has been activated.
The speed control SET voltage informs the PCM that
a fixed vehicle speed has been selected. The speed
control RESUME voltage indicates the previous fixed
speed is requested. The speed control OFF voltage
tells the PCM that the speed control system has de-
activated. Refer to Group 8H for further speed con-
trol information.
THROTTLE POSITION SENSOR (TPS)ÐPCM INPUT
The Throttle Position Sensor (TPS) is mounted on
the throttle body and connected to the throttle blade
shaft (Fig. 14). The TPS is a variable resistor that
provides the PCM with an input signal (voltage) rep-
Fig. 11 Knock Sensor
Fig. 12 MAP Sensor
Fig. 13 Heated Oxygen Sensor
14 - 88 FUEL SYSTEMS Ä
Page 2167 of 2438
AA-VEHICLE BODY COMPONENT SERVICE INDEX
page page
A-Pillar and Roof Rail Mouldings ............. 25
B-Pillar Trim Panel ....................... 25
Body Side Moulding and Applique ............ 24
Cowl Cover ............................. 13
Cowl Panel Trim and Scuff Plates ............ 25
Door Opening Weatherstrips ................ 24
Floor Carpet ............................ 30
Front Center Console ..................... 29
Front Door and Hinge ..................... 15
Front Door Belt Moulding and Weatherstrip ..... 17
Front Door Glass ........................ 17
Front Door Glass Channel and Run Weatherstrip . 18
Front Door Glass Run Lower Channel ......... 18
Front Door Latch ......................... 16
Front Door Side View Mirror ................ 17
Front Door Silencer and Water Shield ......... 15
Front Door Trim Panel .................... 14
Front Door Window Regulator/Manual ......... 18
Front Door Window Regulator/Power .......... 19
Front End Splash Shields .................. 13
Front Fender ............................ 14
Front Power Door Lock Actuator ............. 19
Front Seat Belts ......................... 27
Front Seats ............................. 28
Fuel Fill Door ........................... 36
Grille .................................. 11
Head Lining ............................. 30
Hood and Hinges ........................ 11
Hood Latch and Release Cable .............. 12
Outside Front Door Latch Release Handle ..... 16
Outside Rear Door Latch Release Handle ...... 21 Overhead Console
........................ 30
Quarter Extension Trim Panel ............... 27
Quarter Trim Panel ....................... 27
Rear Deck Filler Panel .................... 31
Rear Door and Hinge ..................... 20
Rear Door Belt Moulding and Weatherstrip ..... 22
Rear Door Glass ......................... 22
Rear Door Glass Run Weatherstrip ........... 22
Rear Door Glass Stationary Glass Module ..... 23
Rear Door Latch ......................... 21
Rear Door Silencer and Water Shield ......... 20
Rear Door Trim Panel ..................... 20
Rear Door Window Regulator/Manual ......... 23
Rear Door Window Regulator/Power .......... 23
Rear Power Door Lock Actuator ............. 22
Rear Seat Belts .......................... 28
Rear Seats ............................. 28
Rear Shelf Trim Panel ..................... 27
Rear Window Glass ...................... 32
Sun Roof Air Deflector .................... 31
Sun Roof Drain Tubes .................... 31
Sun Roof Weatherstrip .................... 31
Trunk Lid .............................. 33
Trunk Lid Hinge ......................... 34
Trunk Lid Latch .......................... 34
Trunk Lid Lock .......................... 34
Trunk Lid Luggage Rack ................... 35
Trunk Lid Torsion Bar ..................... 34
Trunk Lining ............................ 35
Trunk Opening Weatherstrip ................ 35
Vinyl Roof Bonnet ........................ 31
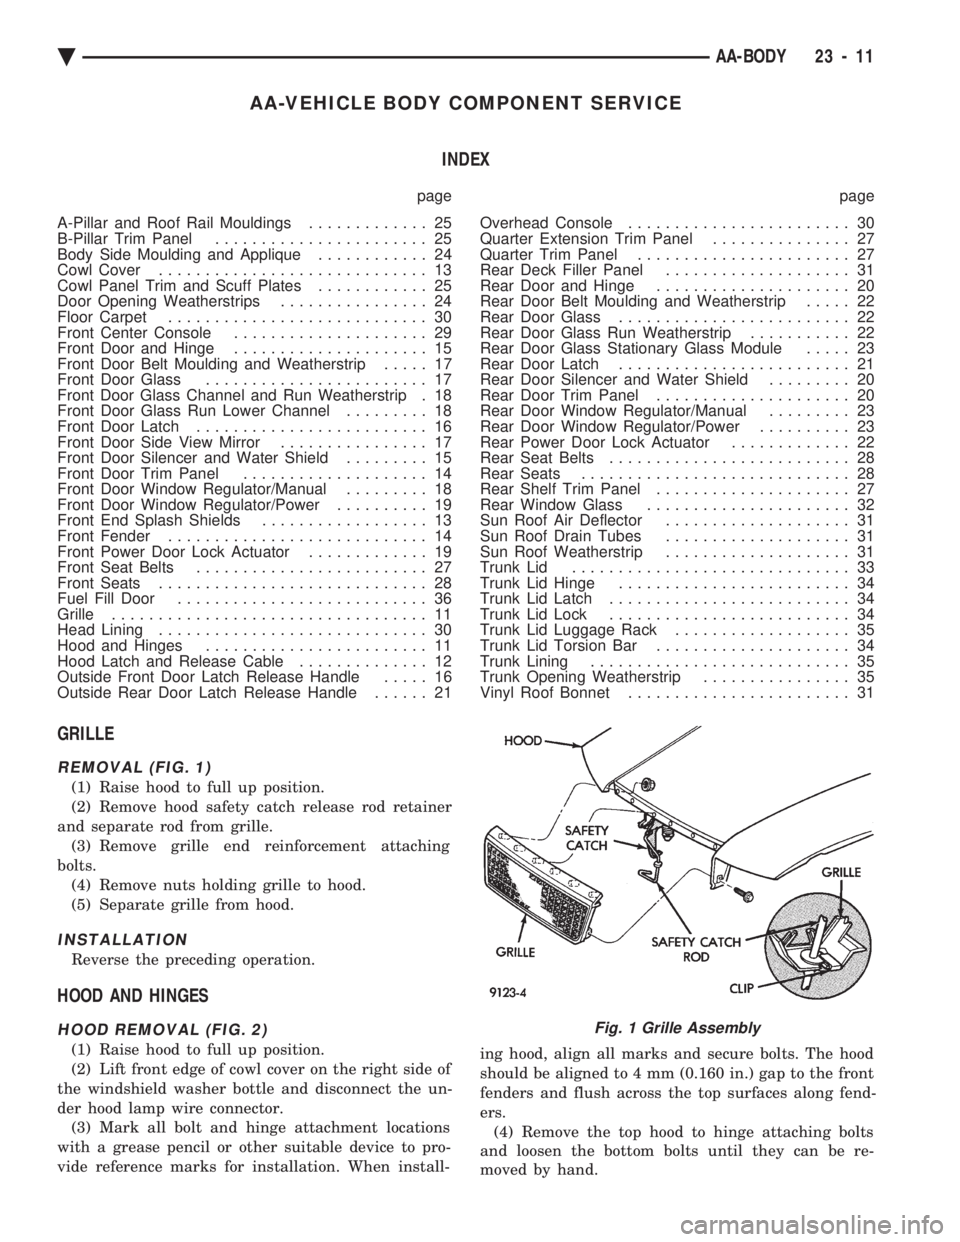
GRILLE
REMOVAL (FIG. 1)
(1) Raise hood to full up position.
(2) Remove hood safety catch release rod retainer
and separate rod from grille. (3) Remove grille end reinforcement attaching
bolts. (4) Remove nuts holding grille to hood.
(5) Separate grille from hood.
INSTALLATION
Reverse the preceding operation.
HOOD AND HINGES
HOOD REMOVAL (FIG. 2)
(1) Raise hood to full up position.
(2) Lift front edge of cowl cover on the right side of
the windshield washer bottle and disconnect the un-
der hood lamp wire connector. (3) Mark all bolt and hinge attachment locations
with a grease pencil or other suitable device to pro-
vide reference marks for installation. When install- ing hood, align all marks and secure bolts. The hood
should be aligned to 4 mm (0.160 in.) gap to the front
fenders and flush across the top surfaces along fend-
ers. (4) Remove the top hood to hinge attaching bolts
and loosen the bottom bolts until they can be re-
moved by hand.
Fig. 1 Grille Assembly
Ä AA-BODY 23 - 11
Page 2169 of 2438
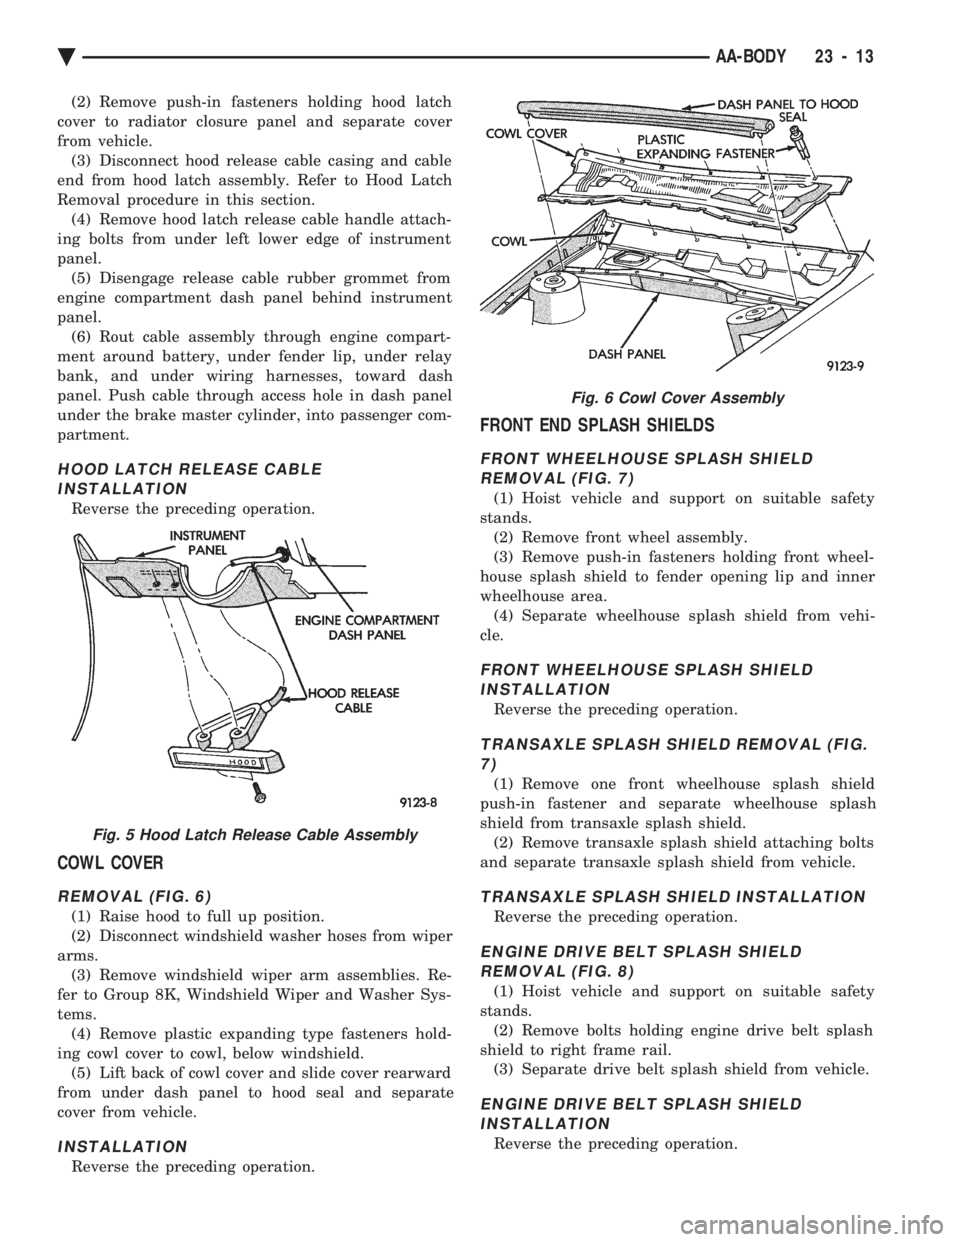
(2) Remove push-in fasteners holding hood latch
cover to radiator closure panel and separate cover
from vehicle. (3) Disconnect hood release cable casing and cable
end from hood latch assembly. Refer to Hood Latch
Removal procedure in this section. (4) Remove hood latch release cable handle attach-
ing bolts from under left lower edge of instrument
panel. (5) Disengage release cable rubber grommet from
engine compartment dash panel behind instrument
panel. (6) Rout cable assembly through engine compart-
ment around battery, under fender lip, under relay
bank, and under wiring harnesses, toward dash
panel. Push cable through access hole in dash panel
under the brake master cylinder, into passenger com-
partment.
HOOD LATCH RELEASE CABLE INSTALLATION
Reverse the preceding operation.
COWL COVER
REMOVAL (FIG. 6)
(1) Raise hood to full up position.
(2) Disconnect windshield washer hoses from wiper
arms. (3) Remove windshield wiper arm assemblies. Re-
fer to Group 8K, Windshield Wiper and Washer Sys-
tems. (4) Remove plastic expanding type fasteners hold-
ing cowl cover to cowl, below windshield. (5) Lift back of cowl cover and slide cover rearward
from under dash panel to hood seal and separate
cover from vehicle.
INSTALLATION
Reverse the preceding operation.
FRONT END SPLASH SHIELDS
FRONT WHEELHOUSE SPLASH SHIELD REMOVAL (FIG. 7)
(1) Hoist vehicle and support on suitable safety
stands. (2) Remove front wheel assembly.
(3) Remove push-in fasteners holding front wheel-
house splash shield to fender opening lip and inner
wheelhouse area. (4) Separate wheelhouse splash shield from vehi-
cle.
FRONT WHEELHOUSE SPLASH SHIELD INSTALLATION
Reverse the preceding operation.
TRANSAXLE SPLASH SHIELD REMOVAL (FIG.7)
(1) Remove one front wheelhouse splash shield
push-in fastener and separate wheelhouse splash
shield from transaxle splash shield. (2) Remove transaxle splash shield attaching bolts
and separate transaxle splash shield from vehicle.
TRANSAXLE SPLASH SHIELD INSTALLATION
Reverse the preceding operation.
ENGINE DRIVE BELT SPLASH SHIELD REMOVAL (FIG. 8)
(1) Hoist vehicle and support on suitable safety
stands. (2) Remove bolts holding engine drive belt splash
shield to right frame rail. (3) Separate drive belt splash shield from vehicle.
ENGINE DRIVE BELT SPLASH SHIELDINSTALLATION
Reverse the preceding operation.
Fig. 5 Hood Latch Release Cable Assembly
Fig. 6 Cowl Cover Assembly
Ä AA-BODY 23 - 13
Page 2170 of 2438
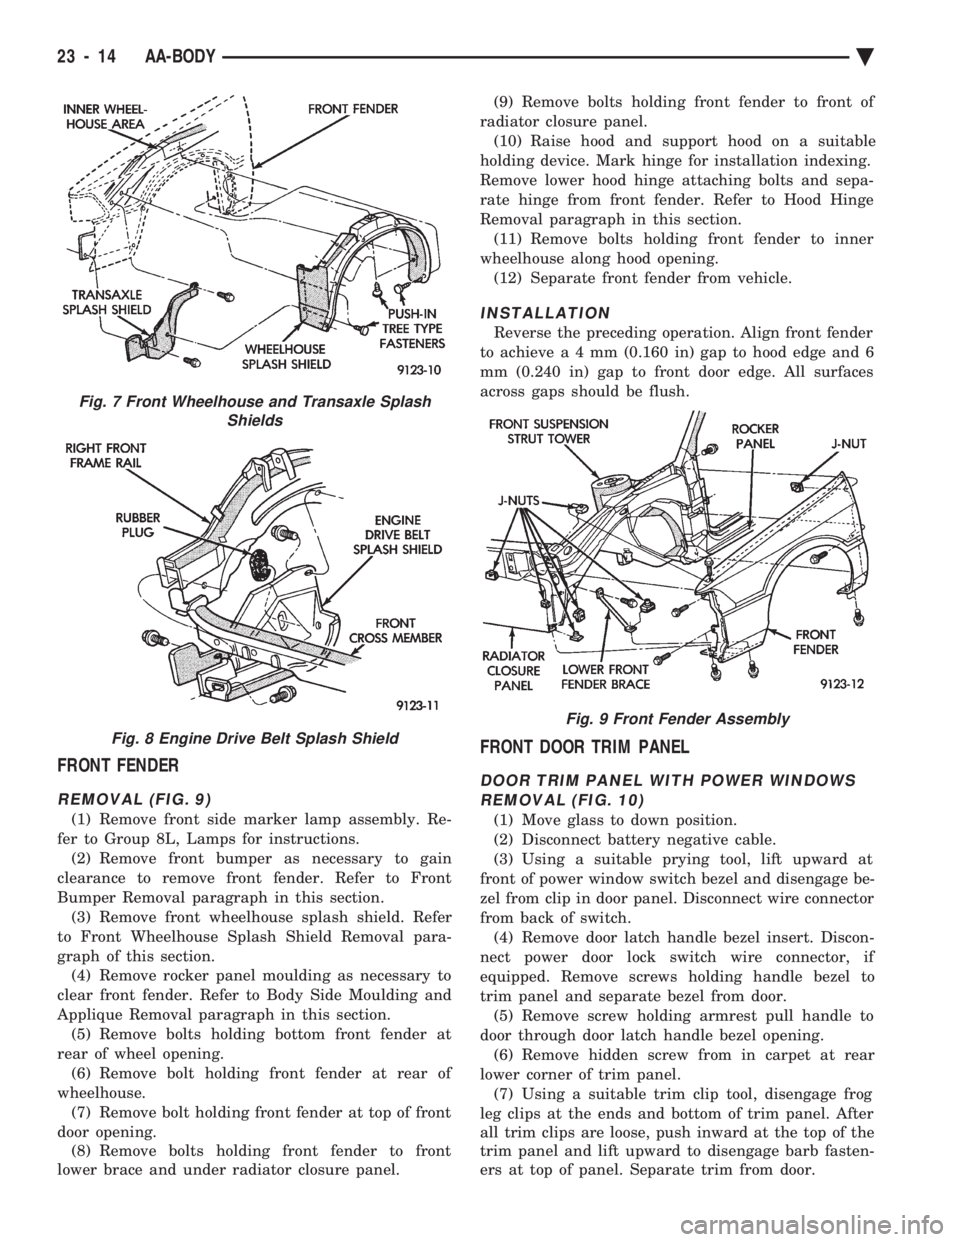
FRONT FENDER
REMOVAL (FIG. 9)
(1) Remove front side marker lamp assembly. Re-
fer to Group 8L, Lamps for instructions. (2) Remove front bumper as necessary to gain
clearance to remove front fender. Refer to Front
Bumper Removal paragraph in this section. (3) Remove front wheelhouse splash shield. Refer
to Front Wheelhouse Splash Shield Removal para-
graph of this section. (4) Remove rocker panel moulding as necessary to
clear front fender. Refer to Body Side Moulding and
Applique Removal paragraph in this section. (5) Remove bolts holding bottom front fender at
rear of wheel opening. (6) Remove bolt holding front fender at rear of
wheelhouse. (7) Remove bolt holding front fender at top of front
door opening. (8) Remove bolts holding front fender to front
lower brace and under radiator closure panel. (9) Remove bolts holding front fender to front of
radiator closure panel. (10) Raise hood and support hood on a suitable
holding device. Mark hinge for installation indexing.
Remove lower hood hinge attaching bolts and sepa-
rate hinge from front fender. Refer to Hood Hinge
Removal paragraph in this section. (11) Remove bolts holding front fender to inner
wheelhouse along hood opening. (12) Separate front fender from vehicle.
INSTALLATION
Reverse the preceding operation. Align front fender
to achiev ea4mm (0.160 in) gap to hood edge and 6
mm (0.240 in) gap to front door edge. All surfaces
across gaps should be flush.
FRONT DOOR TRIM PANEL
DOOR TRIM PANEL WITH POWER WINDOWS REMOVAL (FIG. 10)
(1) Move glass to down position.
(2) Disconnect battery negative cable.
(3) Using a suitable prying tool, lift upward at
front of power window switch bezel and disengage be-
zel from clip in door panel. Disconnect wire connector
from back of switch. (4) Remove door latch handle bezel insert. Discon-
nect power door lock switch wire connector, if
equipped. Remove screws holding handle bezel to
trim panel and separate bezel from door. (5) Remove screw holding armrest pull handle to
door through door latch handle bezel opening. (6) Remove hidden screw from in carpet at rear
lower corner of trim panel. (7) Using a suitable trim clip tool, disengage frog
leg clips at the ends and bottom of trim panel. After
all trim clips are loose, push inward at the top of the
trim panel and lift upward to disengage barb fasten-
ers at top of panel. Separate trim from door.
Fig. 7 Front Wheelhouse and Transaxle Splash Shields
Fig. 8 Engine Drive Belt Splash Shield
Fig. 9 Front Fender Assembly
23 - 14 AA-BODY Ä
Page 2193 of 2438
AC-VEHICLE BODY COMPONENT SERVICE INDEX
page page
A-Pillar and Roof Rail Mouldings ............. 46
B-Pillar Trim Panel ....................... 46
Body Mouldings .......................... 49
Cowl Panel Trim and Scuff Plates ............ 46
Door Frame Trim Moulding ................. 41
Front Door and Hinge ..................... 41
Front Door Glass ........................ 43
Front Door Latch ......................... 42
Front Door Trim Panel .................... 40
Front Door Water Shield ................... 41
Front Door Window Regulator ............... 42
Front End Splash Shields .................. 40
Front Seat Belts ......................... 47
Front Seats ............................. 48
Grille AC/C Body ......................... 38
Grille AC/D or AC/C-H Body ................ 37
Grille Extension Moulding .................. 37
Grille Opening Panel AC/C-Body ............. 38
Grille Opening Panel AC/D and AC/C-H Body . . . 37
Head Lining ............................. 45
Hood and Hinges ........................ 38
Hood Latch and Release Cable .............. 39
Hood Latch Release Cable ................. 39 Hood Ornament AC/C
..................... 38
Outside Door Handle ...................... 42
Overhead Console ........................ 45
Quarter Trim Panel ....................... 46
Rear Deck Filler Panel .................... 49
Rear Door and Hinge ..................... 44
Rear Door Frame Trim Moulding ............. 43
Rear Door Glass ......................... 45
Rear Door Glass Lift Plate and Guide Bar ..... 45
Rear Door Latch ......................... 44
Rear Door Outside Handle ................. 44
Rear Door Silencer and Water Shield ......... 43
Rear Door Trim Panel ..................... 43
Rear Door Window Regulator ............... 45
Rear Seat Belts .......................... 47
Rear Seats ............................. 49
Rear Shelf Trim Panel ..................... 47
Rear Window Glass ...................... 50
Side View Mirror Trim Cover ................ 41
Trunk Lid .............................. 50
Trunk Lid Hinge ......................... 51
Trunk Lid Torsion Bar ..................... 51
Vinyl Roof Bonnet ........................ 49
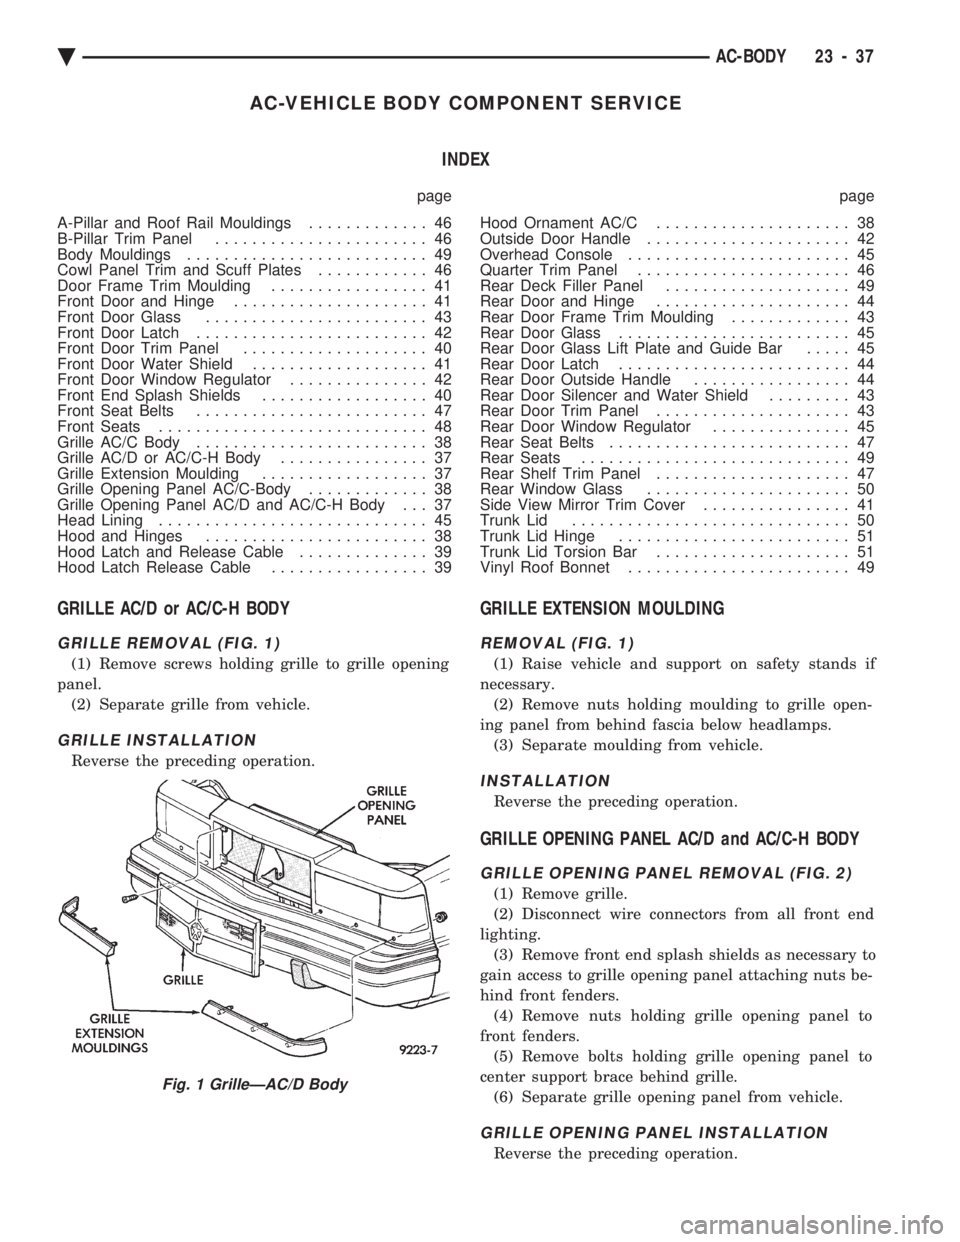
GRILLE AC/D or AC/C-H BODY
GRILLE REMOVAL (FIG. 1)
(1) Remove screws holding grille to grille opening
panel. (2) Separate grille from vehicle.
GRILLE INSTALLATION
Reverse the preceding operation.
GRILLE EXTENSION MOULDING
REMOVAL (FIG. 1)
(1) Raise vehicle and support on safety stands if
necessary. (2) Remove nuts holding moulding to grille open-
ing panel from behind fascia below headlamps. (3) Separate moulding from vehicle.
INSTALLATION
Reverse the preceding operation.
GRILLE OPENING PANEL AC/D and AC/C-H BODY
GRILLE OPENING PANEL REMOVAL (FIG. 2)
(1) Remove grille.
(2) Disconnect wire connectors from all front end
lighting. (3) Remove front end splash shields as necessary to
gain access to grille opening panel attaching nuts be-
hind front fenders. (4) Remove nuts holding grille opening panel to
front fenders. (5) Remove bolts holding grille opening panel to
center support brace behind grille. (6) Separate grille opening panel from vehicle.
GRILLE OPENING PANEL INSTALLATION
Reverse the preceding operation.
Fig. 1 GrilleÐAC/D Body
Ä AC-BODY 23 - 37