battery CHEVROLET EPICA 2005 1.G User Guide
[x] Cancel search | Manufacturer: CHEVROLET, Model Year: 2005, Model line: EPICA, Model: CHEVROLET EPICA 2005 1.GPages: 340, PDF Size: 2.19 MB
Page 139 of 340
If the word OFF or the off symbol is lit on the airbag
status indicator, it means that the passenger sensing
system has turned off the right front passenger’s frontal
airbag. SeePassenger Sensing System on page 1-58
for more on this, including important safety information.
If, after several seconds, all status indicator lights
remain on, or if there are no lights at all, there may be a
problem with the lights or the passenger sensing
system. See your dealer for service.
{CAUTION:
If the off indicator and the airbag readiness
light ever come on together, it means that
something may be wrong with the airbag
system. If this ever happens, have the vehicle
serviced promptly, because an adult-size
person sitting in the right front passenger seat
may not have the protection of the frontal
airbag. SeeAirbag Readiness Light on
page 3-33.
Charging System Light
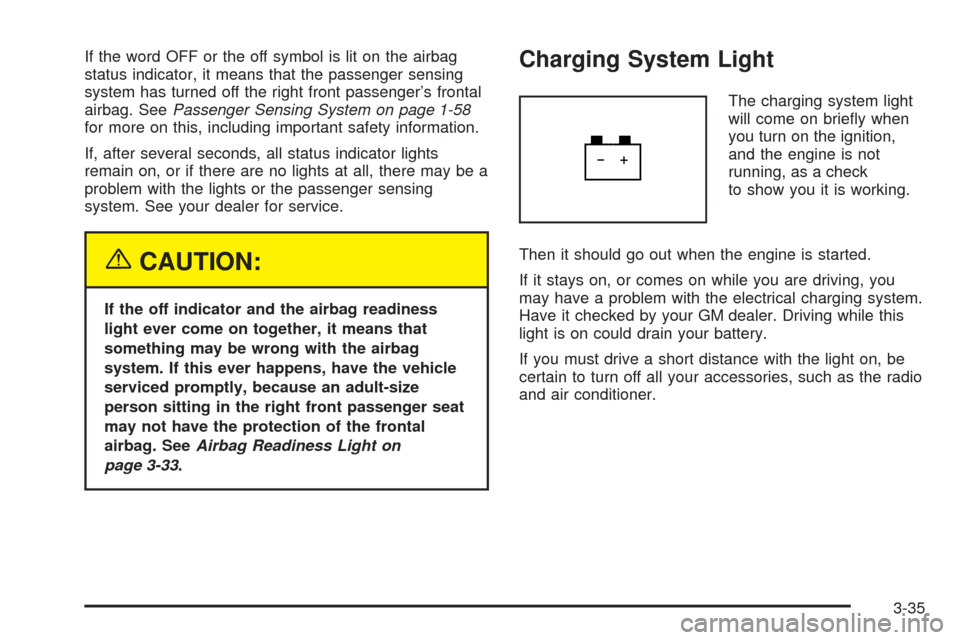
The charging system light
will come on briefly when
you turn on the ignition,
and the engine is not
running, as a check
to show you it is working.
Then it should go out when the engine is started.
If it stays on, or comes on while you are driving, you
may have a problem with the electrical charging system.
Have it checked by your GM dealer. Driving while this
light is on could drain your battery.
If you must drive a short distance with the light on, be
certain to turn off all your accessories, such as the radio
and air conditioner.
3-35
Page 147 of 340
Have you recently changed brands of fuel?
If so, be sure to fuel your vehicle with quality fuel. See
Gasoline Octane on page 5-5. Poor fuel quality will
cause your engine not to run as efficiently as designed.
You may notice this as stalling after start-up, stalling
when you put the vehicle into gear, misfiring, hesitation
on acceleration, or stumbling on acceleration. (These
conditions may go away once the engine is warmed up.)
This will be detected by the system and cause the
light to turn on.
If you experience one or more of these conditions,
change the fuel brand you use. It will require at least
one full tank of the proper fuel to turn the light off.
If none of the above steps have made the light turn off,
your dealer can check the vehicle. Your dealer has
the proper test equipment and diagnostic tools to fix any
mechanical or electrical problems that may have
developed.Emissions Inspection and Maintenance
Programs
Some state/provincial and local governments have or
may begin programs to inspect the emission control
equipment on your vehicle. Failure to pass this
inspection could prevent you from getting a vehicle
registration.
Here are some things you need to know to help your
vehicle pass an inspection:
Your vehicle will not pass this inspection if the Check
Engine light is on or not working properly.
Your vehicle will not pass this inspection if the OBD
(on-board diagnostic) system determines that critical
emission control systems have not been completely
diagnosed by the system. The vehicle would be
considered not ready for inspection. This can happen if
you have recently replaced your battery or if your
battery has run down. The diagnostic system is
designed to evaluate critical emission control systems
during normal driving. This may take several days
of routine driving. If you have done this and your vehicle
still does not pass the inspection for lack of OBD
system readiness, your GM dealer can prepare the
vehicle for inspection.
3-43
Page 193 of 340
{CAUTION:
Snow can trap exhaust gases under your
vehicle. This can cause deadly CO (carbon
monoxide) gas to get inside. CO could
overcome you and kill you. You cannot see it
or smell it, so you might not know it is in your
vehicle. Clear away snow from around the
base of your vehicle, especially any that is
blocking your exhaust pipe. And check around
again from time to time to be sure snow does
not collect there.
Open a window just a little on the side of the
vehicle that is away from the wind. This will
help keep CO out.Run your engine only as long as you must. This saves
fuel. When you run the engine, make it go a little
faster than just idle. That is, push the accelerator
slightly. This uses less fuel for the heat that you get and
it keeps the battery charged. You will need a
well-charged battery to restart the vehicle, and possibly
for signaling later on with your headlamps. Let the
heater run for a while.
Then, shut the engine off and close the window almost
all the way to preserve the heat. Start the engine
again and repeat this only when you feel really
uncomfortable from the cold. But do it as little as
possible. Preserve the fuel as long as you can. To help
keep warm, you can get out of the vehicle and do
some fairly vigorous exercises every half hour or so until
help comes.
4-27
Page 203 of 340
Service............................................................5-3
Doing Your Own Service Work.........................5-4
Adding Equipment to the Outside of
Your Vehicle..............................................5-5
Fuel................................................................5-5
Gasoline Octane............................................5-5
Gasoline Specifications....................................5-6
California Fuel...............................................5-6
Additives.......................................................5-7
Fuels in Foreign Countries...............................5-7
Filling Your Tank............................................5-8
Filling a Portable Fuel Container.....................5-10
Checking Things Under the Hood....................5-11
Hood Release..............................................5-11
Engine Compartment Overview.......................5-12
Engine Oil...................................................5-13
Engine Air Cleaner/Filter................................5-17
Automatic Transaxle Fluid..............................5-19
Engine Coolant.............................................5-19
Coolant Surge Tank Pressure Cap..................5-22Engine Overheating.......................................5-22
Cooling System............................................5-24
Power Steering Fluid.....................................5-29
Windshield Washer Fluid................................5-30
Brakes........................................................5-31
Battery........................................................5-34
Jump Starting...............................................5-35
Headlamp Aiming...........................................5-39
Bulb Replacement..........................................5-39
Halogen Bulbs..............................................5-39
Headlamps..................................................5-40
Front Turn Signal Lamps...............................5-41
Center High-Mounted Stoplamp (CHMSL).........5-42
Parking Lamps.............................................5-43
Taillamps, Turn Signal, Stoplamps and
Back-up Lamps.........................................5-44
Replacement Bulbs.......................................5-44
Windshield Wiper Blade Replacement..............5-45
Section 5 Service and Appearance Care
5-1
Page 215 of 340
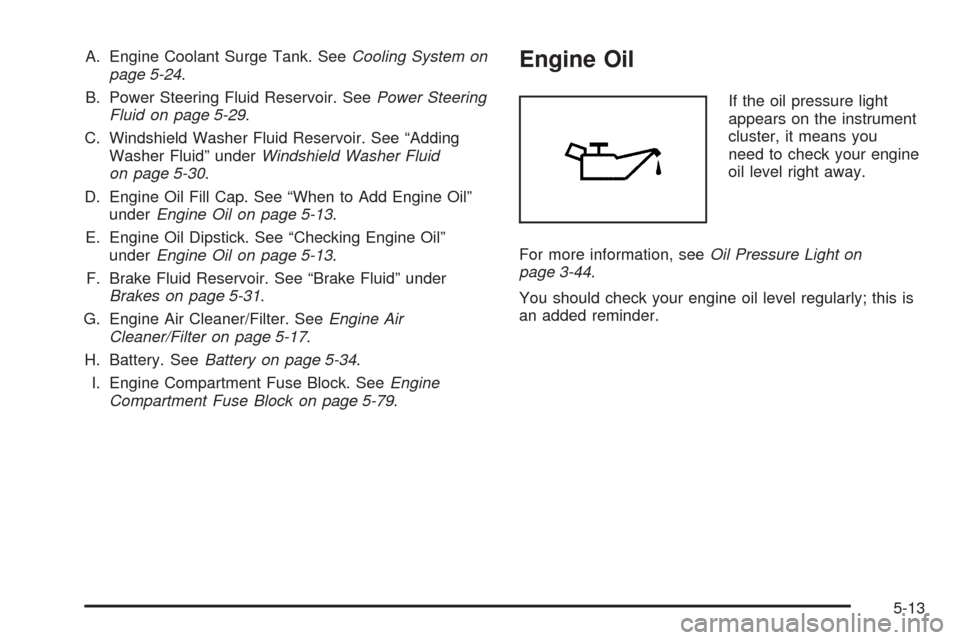
A. Engine Coolant Surge Tank. SeeCooling System on
page 5-24.
B. Power Steering Fluid Reservoir. SeePower Steering
Fluid on page 5-29.
C. Windshield Washer Fluid Reservoir. See “Adding
Washer Fluid” underWindshield Washer Fluid
on page 5-30.
D. Engine Oil Fill Cap. See “When to Add Engine Oil”
underEngine Oil on page 5-13.
E. Engine Oil Dipstick. See “Checking Engine Oil”
underEngine Oil on page 5-13.
F. Brake Fluid Reservoir. See “Brake Fluid” under
Brakes on page 5-31.
G. Engine Air Cleaner/Filter. SeeEngine Air
Cleaner/Filter on page 5-17.
H. Battery. SeeBattery on page 5-34.
I. Engine Compartment Fuse Block. SeeEngine
Compartment Fuse Block on page 5-79.Engine Oil
If the oil pressure light
appears on the instrument
cluster, it means you
need to check your engine
oil level right away.
For more information, seeOil Pressure Light on
page 3-44.
You should check your engine oil level regularly; this is
an added reminder.
5-13
Page 236 of 340
Replacing Brake System Parts
The braking system on a vehicle is complex. Its many
parts have to be of top quality and work well together if
the vehicle is to have really good braking. Your
vehicle was designed and tested with top-quality GM
brake parts. When you replace parts of your braking
system — for example, when your brake linings
wear down and you need new ones put in — be sure
you get new approved GM replacement parts. If you do
not, your brakes may no longer work properly. For
example, if someone puts in brake linings that are wrong
for your vehicle, the balance between your front and
rear brakes can change — for the worse. The braking
performance you have come to expect can change
in many other ways if someone puts in the wrong
replacement brake parts.
Battery
Your vehicle has a maintenance free battery. When it is
time for a new battery, get one that has the replacement
number shown on the original battery’s label. See
Engine Compartment Overview on page 5-12for battery
location.Warning:Battery posts, terminals and related
accessories contain lead and lead compounds,
chemicals known to the State of California to cause
cancer and reproductive harm. Wash hands after
handling.
Vehicle Storage
If you are not going to drive your vehicle for 25 days
or more, remove the black, negative (−) cable from
the battery. This will help keep your battery from
running down.
{CAUTION:
Batteries have acid that can burn you and gas
that can explode. You can be badly hurt if you
are not careful. SeeJump Starting on
page 5-35for tips on working around a battery
without getting hurt.
5-34
Page 237 of 340
Jump Starting
If your battery has run down, you may want to use
another vehicle and some jumper cables to start your
vehicle. Be sure to use the following steps to do it safely.
{CAUTION:
Batteries can hurt you. They can be dangerous
because:
They contain acid that can burn you.
They contain gas that can explode
or ignite.
They contain enough electricity to
burn you.
If you do not follow these steps exactly, some
or all of these things can hurt you.
Notice:Ignoring these steps could result in costly
damage to your vehicle that would not be covered
by your warranty.
Trying to start your vehicle by pushing or pulling it
will not work, and it could damage your vehicle.
1. Check the other vehicle. It must have a 12-volt
battery with a negative ground system.Notice:If the other vehicle’s system is not a 12-volt
system with a negative ground, both vehicles can
be damaged. Only use vehicles with 12-volt systems
with negative grounds to jump start your vehicle.
2. Get the vehicles close enough so the jumper cables
can reach, but be sure the vehicles are not touching
each other. If they are, it could cause a ground
connection you do not want. You would not be able
to start your vehicle, and the bad grounding
could damage the electrical systems.
To avoid the possibility of the vehicles rolling, set
the parking brake firmly on both vehicles involved in
the jump start procedure. Put an automatic
transaxle in PARK (P) or a manual transaxle in
NEUTRAL before setting the parking brake.
Notice:If you leave your radio or other accessories
on during the jump starting procedure, they could
be damaged. The repairs would not be covered
by your warranty. Always turn off your radio and
other accessories when jump starting your vehicle.
3. Turn off the ignition on both vehicles. Unplug
unnecessary accessories plugged into the cigarette
lighter or the accessory power outlet. Turn off
the radio and all lamps that are not needed. This
will avoid sparks and help save both batteries. And
it could save the radio!
5-35
Page 238 of 340
4. Open the hoods and locate the batteries. Find the
positive (+) and negative (−) terminal locations on
each vehicle. Your vehicle’s positive (+) terminal is
located under a red tethered cap on the battery.
The negative (−) terminal is located under a
black tethered cap on the battery. SeeEngine
Compartment Overview on page 5-12for more
information on location.
Flip the caps up to access the positive (+) and
negative (−) terminals.
{CAUTION:
An electric fan can start up even when the
engine is not running and can injure you. Keep
hands, clothing and tools away from any
underhood electric fan.
{CAUTION:
Using a match near a battery can cause battery
gas to explode. People have been hurt doing
this, and some have been blinded. Use a
ashlight if you need more light.
Be sure the battery has enough water. You do
not need to add water to the battery installed
in your new vehicle. But if a battery has ller
caps, be sure the right amount of uid is there.
If it is low, add water to take care of that rst.
If you don’t, explosive gas could be present.
Battery uid contains acid that can burn you.
Do not get it on you. If you accidentally get it
in your eyes or on your skin, ush the place
with water and get medical help immediately.
5-36
Page 239 of 340
{CAUTION:
Fans or other moving engine parts can injure
you badly. Keep your hands away from moving
parts once the engine is running.
5. Check that the jumper cables do not have loose or
missing insulation. If they do, you could get a
shock. The vehicles could be damaged too.
Before you connect the cables, here are some
basic things you should know. Positive (+) will go to
positive (+) or to a remote positive (+) terminal if
the vehicle has one. Negative (−) will go to a heavy,
unpainted metal engine part or to a remote
negative (−) terminal if the vehicle has one.
Do not connect positive (+) to negative (−)oryou
will get a short that would damage the battery
and maybe other parts too. And do not connect the
negative (−) cable to the negative (−) terminal on
the dead battery because this can cause sparks.
6. Connect the red positive (+) cable to the positive (+)
terminal of the dead battery. Use a remote
positive (+) terminal if the vehicle has one.
7. Do not let the other end touch metal. Connect it to
the positive (+) terminal of the good battery. Use a
remote positive (+) terminal if the vehicle has one.8. Now connect the black negative (−) cable to the
negative (−) terminal of the good battery. Use a
remote negative (−) terminal if the vehicle has one.
Do not let the other end touch anything until the
next step. The other end of the negative (−) cable
does notgo to the dead battery. It goes to a
heavy, unpainted metal engine part or to a remote
negative (−) terminal on the vehicle with the
dead battery.
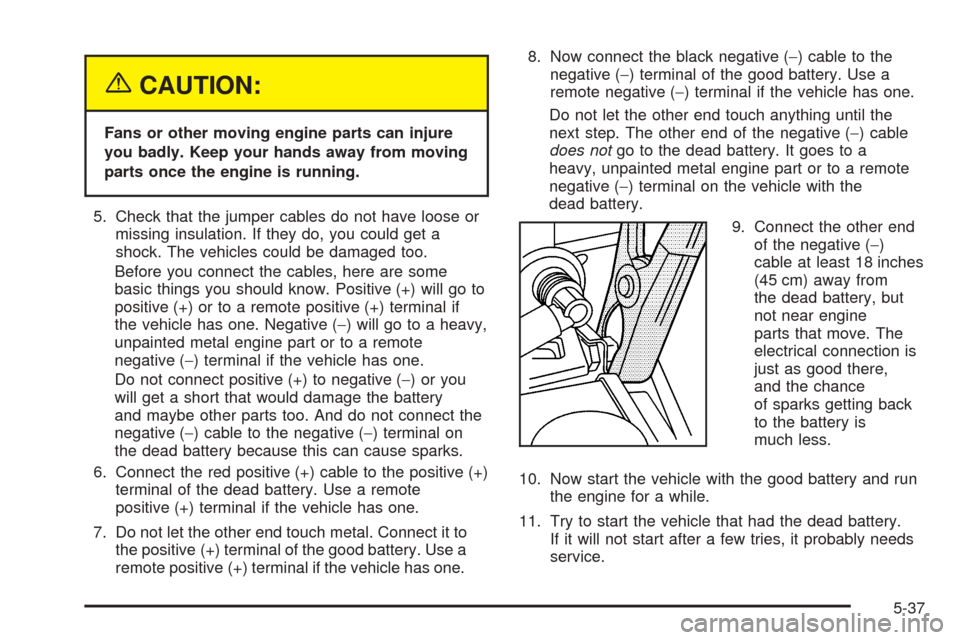
9. Connect the other end
of the negative (−)
cable at least 18 inches
(45 cm) away from
the dead battery, but
not near engine
parts that move. The
electrical connection is
just as good there,
and the chance
of sparks getting back
to the battery is
much less.
10. Now start the vehicle with the good battery and run
the engine for a while.
11. Try to start the vehicle that had the dead battery.
If it will not start after a few tries, it probably needs
service.
5-37
Page 240 of 340
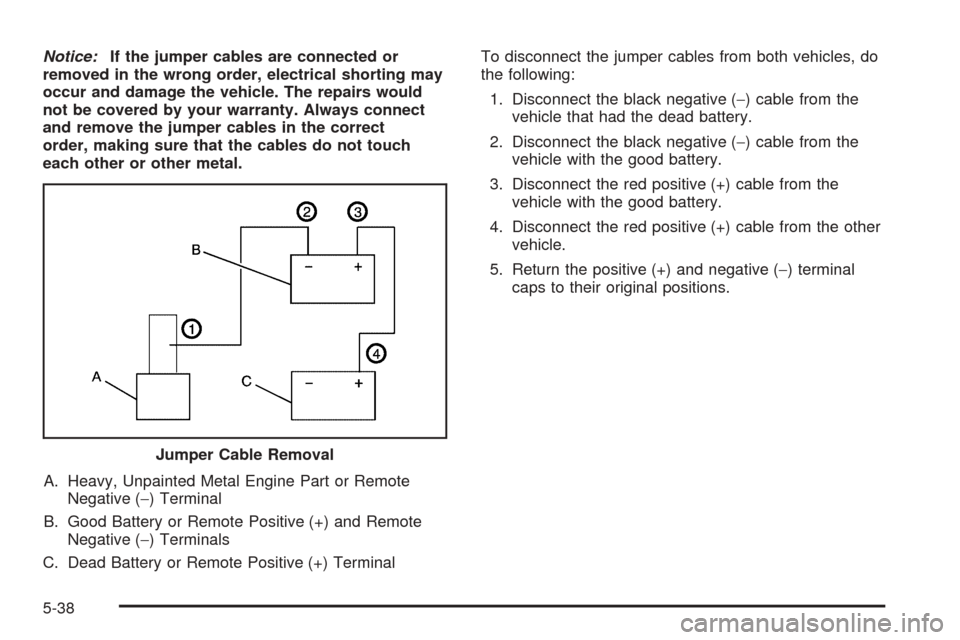
Notice:If the jumper cables are connected or
removed in the wrong order, electrical shorting may
occur and damage the vehicle. The repairs would
not be covered by your warranty. Always connect
and remove the jumper cables in the correct
order, making sure that the cables do not touch
each other or other metal.
A. Heavy, Unpainted Metal Engine Part or Remote
Negative (−) Terminal
B. Good Battery or Remote Positive (+) and Remote
Negative (−) Terminals
C. Dead Battery or Remote Positive (+) TerminalTo disconnect the jumper cables from both vehicles, do
the following:
1. Disconnect the black negative (−) cable from the
vehicle that had the dead battery.
2. Disconnect the black negative (−) cable from the
vehicle with the good battery.
3. Disconnect the red positive (+) cable from the
vehicle with the good battery.
4. Disconnect the red positive (+) cable from the other
vehicle.
5. Return the positive (+) and negative (−) terminal
caps to their original positions.
Jumper Cable Removal
5-38