lock CHEVROLET EQUINOX 2010 2.G Owner's Manual
[x] Cancel search | Manufacturer: CHEVROLET, Model Year: 2010, Model line: EQUINOX, Model: CHEVROLET EQUINOX 2010 2.GPages: 394, PDF Size: 5.7 MB
Page 39 of 394
Seats and Restraints 2-13
First, before you or your
passenger(s) wear a safety belt,
there is important information you
should know.
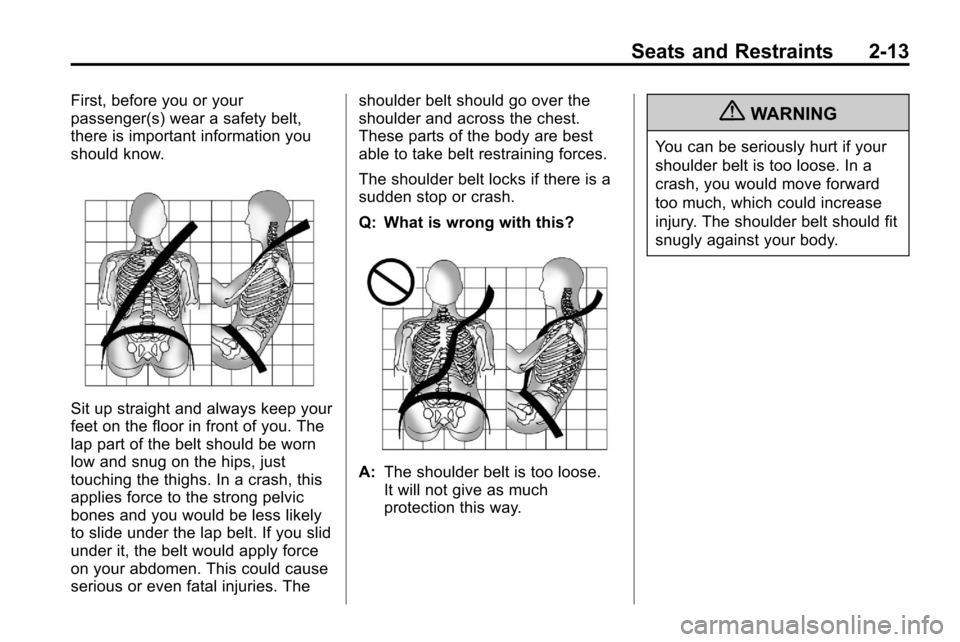
Sit up straight and always keep your
feet on the floor in front of you. The
lap part of the belt should be worn
low and snug on the hips, just
touching the thighs. In a crash, this
applies force to the strong pelvic
bones and you would be less likely
to slide under the lap belt. If you slid
under it, the belt would apply force
on your abdomen. This could cause
serious or even fatal injuries. Theshoulder belt should go over the
shoulder and across the chest.
These parts of the body are best
able to take belt restraining forces.
The shoulder belt locks if there is a
sudden stop or crash.
Q: What is wrong with this?
A:
The shoulder belt is too loose.
It will not give as much
protection this way.
{WARNING
You can be seriously hurt if your
shoulder belt is too loose. In a
crash, you would move forward
too much, which could increase
injury. The shoulder belt should fit
snugly against your body.
Page 43 of 394
Seats and Restraints 2-17
Lap-Shoulder Belt
All seating positions in the vehicle
have a lap-shoulder belt.
The following instructions explain
how to wear a lap-shoulder belt
properly.
1. Adjust the seat, if the seat isadjustable, so you can sit up
straight. To see how, see “Seats”
in the Index.
2. Pick up the latch plate and pull the belt across you. Do not let it
get twisted.
The lap-shoulder belt may lock if
you pull the belt across you very
quickly. If this happens, let the
belt go back slightly to unlock it.
Then pull the belt across you
more slowly.
If the shoulder portion of a
passenger belt is pulled out all
the way, the child restraint
locking feature may be engaged.
If this happens, let the belt go
back all the way and start again.
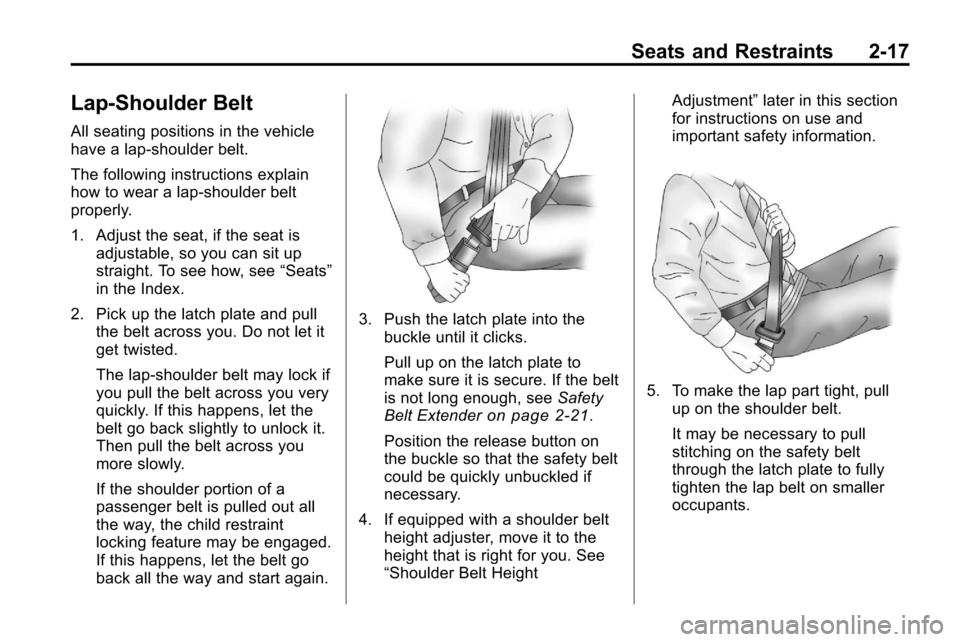
3. Push the latch plate into the
buckle until it clicks.
Pull up on the latch plate to
make sure it is secure. If the belt
is not long enough, see Safety
Belt Extender
on page 2‑21.
Position the release button on
the buckle so that the safety belt
could be quickly unbuckled if
necessary.
4. If equipped with a shoulder belt height adjuster, move it to the
height that is right for you. See
“Shoulder Belt Height Adjustment”
later in this section
for instructions on use and
important safety information.
5. To make the lap part tight, pull
up on the shoulder belt.
It may be necessary to pull
stitching on the safety belt
through the latch plate to fully
tighten the lap belt on smaller
occupants.
Page 44 of 394

2-18 Seats and Restraints
To unlatch the belt, push the button
on the buckle. For outboard seating
positions, slide the latch plate up
the safety belt webbing when the
safety belt is not in use. The latch
plate should rest on the stitching on
the safety belt, near the guide loop.
Before a door is closed, be sure the
safety belt is out of the way. If a
door is slammed against a safety
belt, damage can occur to both the
safety belt and the vehicle.
Shoulder Belt Height Adjuster
The vehicle has a shoulder belt
height adjuster for the driver and
right front passenger seating
positions.
Adjust the height so that the
shoulder portion of the belt is
centered on the shoulder. The belt
should be away from the face and
neck, but not falling off the shoulder.
Improper shoulder belt height
adjustment could reduce the
effectiveness of the safety belt
in a crash.
Move the height adjuster up to the
desired position by pushing up on
the height adjuster.
After the height adjuster is set to the
desired position, try to move it up or
down without pressing the release
button (A) to make sure it has
locked into position. Press the
release button to lower the height
adjuster.
Page 52 of 394
2-26 Seats and Restraints
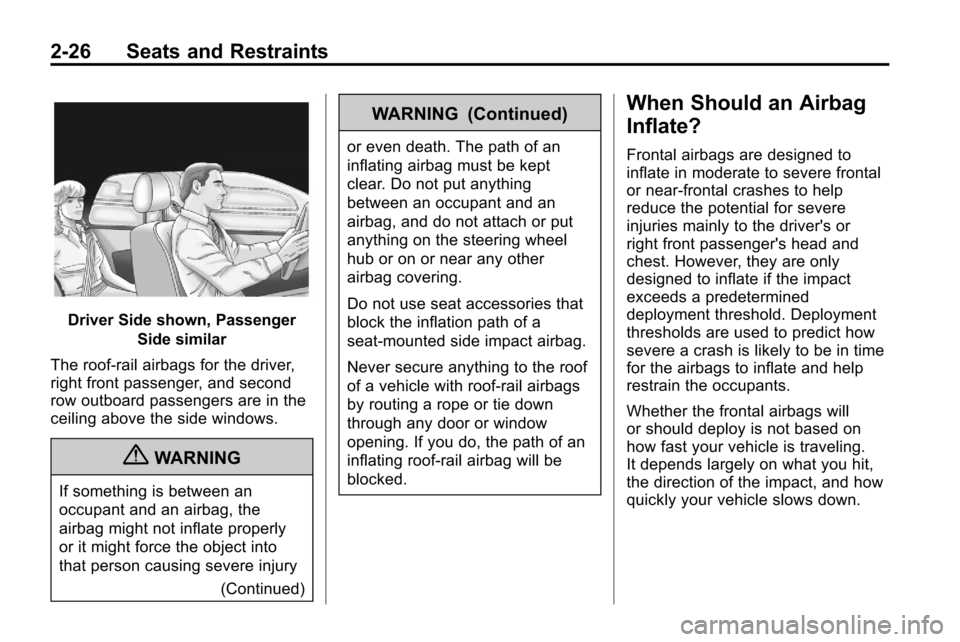
Driver Side shown, PassengerSide similar
The roof-rail airbags for the driver,
right front passenger, and second
row outboard passengers are in the
ceiling above the side windows.
{WARNING
If something is between an
occupant and an airbag, the
airbag might not inflate properly
or it might force the object into
that person causing severe injury (Continued)
WARNING (Continued)
or even death. The path of an
inflating airbag must be kept
clear. Do not put anything
between an occupant and an
airbag, and do not attach or put
anything on the steering wheel
hub or on or near any other
airbag covering.
Do not use seat accessories that
block the inflation path of a
seat-mounted side impact airbag.
Never secure anything to the roof
of a vehicle with roof-rail airbags
by routing a rope or tie down
through any door or window
opening. If you do, the path of an
inflating roof-rail airbag will be
blocked.
When Should an Airbag
Inflate?
Frontal airbags are designed to
inflate in moderate to severe frontal
or near-frontal crashes to help
reduce the potential for severe
injuries mainly to the driver's or
right front passenger's head and
chest. However, they are only
designed to inflate if the impact
exceeds a predetermined
deployment threshold. Deployment
thresholds are used to predict how
severe a crash is likely to be in time
for the airbags to inflate and help
restrain the occupants.
Whether the frontal airbags will
or should deploy is not based on
how fast your vehicle is traveling.
It depends largely on what you hit,
the direction of the impact, and how
quickly your vehicle slows down.
Page 55 of 394
Seats and Restraints 2-29
The parts of the airbag that come
into contact with you may be warm,
but not too hot to touch. There may
be some smoke and dust coming
from the vents in the deflated
airbags. Airbag inflation does not
prevent the driver from seeing out of
the windshield or being able to steer
the vehicle, nor does it prevent
people from leaving the vehicle.
{WARNING
When an airbag inflates, there
may be dust in the air. This dust
could cause breathing problems
for people with a history of
asthma or other breathing trouble.
To avoid this, everyone in the
vehicle should get out as soon as
it is safe to do so. If you have
breathing problems but cannot
get out of the vehicle after an
airbag inflates, then get fresh air
by opening a window or a door.
If you experience breathing(Continued)
WARNING (Continued)
problems following an airbag
deployment, you should seek
medical attention.
The vehicle has a feature that may
automatically unlock the doors, turn
on the interior lamps and hazard
warning flashers, and shut off the
fuel system after the airbags inflate.
You can lock the doors, turn off the
interior lamps and hazard warning
flashers by using the controls for
those features.
{WARNING
A crash severe enough to inflate
the airbags may have also
damaged important functions in
the vehicle, such as the fuel
system, brake and steering
systems, etc. Even if the vehicle
appears to be drivable after a
moderate crash, there may be (Continued)
WARNING (Continued)
concealed damage that could
make it difficult to safely operate
the vehicle.
Use caution if you should attempt
to restart the engine after a crash
has occurred.
In many crashes severe enough to
inflate the airbag, windshields are
broken by vehicle deformation.
Additional windshield breakage may
also occur from the right front
passenger airbag.
.Airbags are designed to inflate
only once. After an airbag
inflates, you will need some new
parts for the airbag system.
If you do not get them, the
airbag system will not be there
to help protect you in another
crash. A new system will include
airbag modules and possibly
other parts. The service manual
for your vehicle covers the need
to replace other parts.
Page 74 of 394

2-48 Seats and Restraints
Securing a Child Restraint
Designed for the LATCH
System
{WARNING
If a LATCH-type child restraint is
not attached to anchors, the child
restraint will not be able to protect
the child correctly. In a crash, the
child could be seriously injured or
killed. Install a LATCH-type child
restraint properly using the
anchors, or use the vehicle's
safety belts to secure the
restraint, following the instructions
that came with the child restraint
and the instructions in this
manual.
{WARNING
Do not attach more than one child
restraint to a single anchor.
Attaching more than one child
restraint to a single anchor could
cause the anchor or attachment
to come loose or even break
during a crash. A child or others
could be injured. To reduce the
risk of serious or fatal injuries
during a crash, attach only one
child restraint per anchor.
{WARNING
Children can be seriously injured
or strangled if a shoulder belt is
wrapped around their neck and
the safety belt continues to
tighten. Buckle any unused safety
belts behind the child restraint so
children cannot reach them. Pull
the shoulder belt all the way out(Continued)
WARNING (Continued)
of the retractor to set the lock,
if your vehicle has one, after the
child restraint has been installed.
Notice: Do not let the LATCH
attachments rub against the
vehicle’ s safety belts. This may
damage these parts. If necessary,
move buckled safety belts to
avoid rubbing the LATCH
attachments.
Do not fold the empty rear seat
with a safety belt buckled. This
could damage the safety belt or
the seat. Unbuckle and return the
safety belt to its stowed position,
before folding the seat.
Make sure to attach the child
restraint at the proper anchor
location.
Page 78 of 394

2-52 Seats and Restraints
3. Push the latch plate into thebuckle until it clicks.
Position the release button on
the buckle so that the safety belt
could be quickly unbuckled if
necessary.4. Pull the rest of the shoulder beltall the way out of the retractor to
set the lock.5. To tighten the belt, push downon the child restraint, pull the
shoulder portion of the belt to
tighten the lap portion of the belt
and feed the shoulder belt back
into the retractor. When installing
a forward-facing child restraint, it
may be helpful to use your knee
to push down on the child
restraint as you tighten the belt.
Page 82 of 394

2-56 Seats and Restraints
5. Pull the rest of the shoulder beltall the way out of the retractor to
set the lock.6. To tighten the belt, push downon the child restraint, pull the
shoulder portion of the belt to
tighten the lap portion of the belt
and feed the shoulder belt back
into the retractor. When installing
a forward-facing child restraint,
it may be helpful to use your
knee to push down on the child
restraint as you tighten the belt.
If the vehicle does not have a
rear seat and the child restraint
has a top tether, follow the child
restraint manufacturer's instructions regrading the use of
the top tether. See
Lower
Anchors and Tethers for
Children (LATCH System)
on
page 2‑45for more information.
7. Push and pull the child restraint in different directions to be sure
it is secure.
If the airbags are off, the off
indicator in the passenger airbag
status indicator will come on and
stay on when the vehicle is started.
If a child restraint has been installed
and the on indicator is lit, see “If
the On Indicator is Lit for a Child
Restraint” underPassenger Sensing
System
on page 2‑30for more
information.
To remove the child restraint,
unbuckle the vehicle safety belt and
let it return to the stowed position.
Page 84 of 394

3-2 Storage
Roof Rack System
{WARNING
If something is carried on top of
the vehicle that is longer or wider
than the roof rack—like paneling,
plywood, or a mattress— the wind
can catch it while the vehicle is
being driven. The item being
carried could be violently torn off,
and this could cause a collision,
and damage the vehicle. Never
carry something longer or wider
than the roof rack on top of the
vehicle unless using a GM
Certified accessory carrier.
This vehicle may be equipped with
a roof rack. For roof racks that do
not have cross rails included,
GM Certified cross rails can be
purchased as an accessory. See
your dealer for additional
information. Notice:
Loading cargo on the
roof rack that weighs more than
100 kg (220 lbs) or hangs over the
rear or sides of the vehicle may
damage the vehicle. Load cargo
so that it rests evenly between
the crossrails, making sure to
fasten cargo securely.
To prevent damage or loss of cargo
when driving, check to make sure
cross rails and cargo are securely
fastened. Loading cargo on the roof
rack will make the vehicle's center
of gravity higher. Avoid high speeds,
sudden starts, sharp turns, sudden
braking or abrupt maneuvers,
otherwise it may result in loss of
control. If driving for a long distance,
on rough roads, or at high speeds,
occasionally stop the vehicle to
make sure the cargo remains in its
place. Do not exceed the maximum
vehicle capacity when loading the
vehicle. For more information on
vehicle capacity and loading, see
Vehicle Load Limits on page 8‑24.
The roof rack crossrails can be
locked in four positions along the
roof rack side rails.
Page 85 of 394

Storage 3-3
Lift the lever to release and move
the crossrail.
Position the crossrail on both sides
of the vehicle at the same time.Push the lever down to completely
engage into the side rail holes.
Slide the crossrails back and forth
until the lock pins engage in the
holes and a click is heard as the
pins align and the crossrail locks.Try sliding the crossrails forward
and backward to ensure that they
are correctly secured and that the
levers stay tight to the cross rails.
Do not stand on the plastic lower
body panels when loading cargo
on the luggage carrier.
When the roof rack is not in use,
lock one crossrail at the furthest
forward position and lock the other
crossrail at the furthest rearward
position to reduce wind noise.