bulb CHEVROLET EQUINOX 2010 2.G Owners Manual
[x] Cancel search | Manufacturer: CHEVROLET, Model Year: 2010, Model line: EQUINOX, Model: CHEVROLET EQUINOX 2010 2.GPages: 394, PDF Size: 5.7 MB
Page 2 of 394

2010 Chevrolet Equinox Owner ManualM
Driving and Operating. . . . . . . . 8-1
Driving Information . . . . . . . . . . . . . 8-2
Starting and Operating . . . . . . . 8-28
Engine Exhaust . . . . . . . . . . . . . . 8-34
Automatic Transmission . . . . . . 8-35
Drive Systems . . . . . . . . . . . . . . . . 8-38
Brakes . . . . . . . . . . . . . . . . . . . . . . . 8-38
Ride Control Systems . . . . . . . . 8-41
Cruise Control . . . . . . . . . . . . . . . . 8-44
Object Detection Systems . . . . 8-46
Fuel . . . . . . . . . . . . . . . . . . . . . . . . . . 8-53
Towing . . . . . . . . . . . . . . . . . . . . . . . 8-57
Conversions and Add-Ons . . . 8-64 Vehicle Care
. . . . . . . . . . . . . . . . . . 9-1
General Information . . . . . . . . . . . . 9-3
Vehicle Checks . . . . . . . . . . . . . . . . 9-4
Headlamp Aiming . . . . . . . . . . . . 9-27
Bulb Replacement . . . . . . . . . . . . 9-30
Electrical System . . . . . . . . . . . . . 9-34
Wheels and Tires . . . . . . . . . . . . . 9-40
Jump Starting . . . . . . . . . . . . . . . . 9-69
Towing . . . . . . . . . . . . . . . . . . . . . . . 9-72
Appearance Care . . . . . . . . . . . . . 9-75
Service and Maintenance . . . 10-1
General Information . . . . . . . . . . 10-1
Scheduled Maintenance . . . . . . 10-2
Recommended Fluids,
Lubricants, and Parts . . . . . . . 10-7
Maintenance Records . . . . . . . 10-10 Technical Data
. . . . . . . . . . . . . . . 11-1
Vehicle Identification . . . . . . . . . . 11-1
Vehicle Data . . . . . . . . . . . . . . . . . . 11-2
Customer Information . . . . . . . 12-1
Customer Information . . . . . . . . 12-1
Reporting Safety Defects . . . . 12-13
Vehicle Data Recording and
Privacy . . . . . . . . . . . . . . . . . . . . 12-14
Index . . . . . . . . . . . . . . . . . . . . . i-1
Page 129 of 394
Lighting 5-3
Turn and Lane-Change
Signals
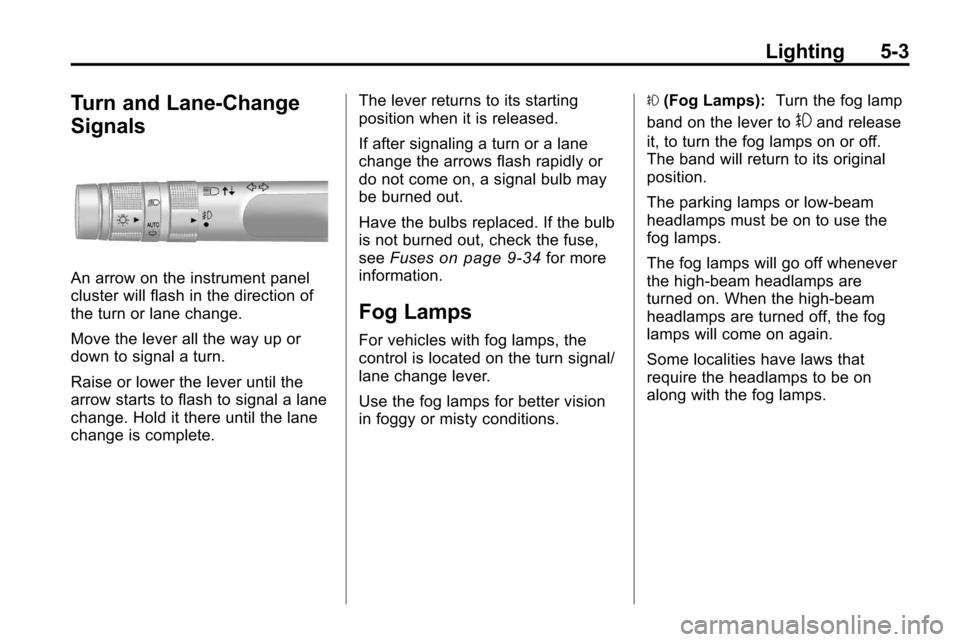
An arrow on the instrument panel
cluster will flash in the direction of
the turn or lane change.
Move the lever all the way up or
down to signal a turn.
Raise or lower the lever until the
arrow starts to flash to signal a lane
change. Hold it there until the lane
change is complete.The lever returns to its starting
position when it is released.
If after signaling a turn or a lane
change the arrows flash rapidly or
do not come on, a signal bulb may
be burned out.
Have the bulbs replaced. If the bulb
is not burned out, check the fuse,
see
Fuses
on page 9‑34for more
information.
Fog Lamps
For vehicles with fog lamps, the
control is located on the turn signal/
lane change lever.
Use the fog lamps for better vision
in foggy or misty conditions. #
(Fog Lamps): Turn the fog lamp
band on the lever to
#and release
it, to turn the fog lamps on or off.
The band will return to its original
position.
The parking lamps or low‐beam
headlamps must be on to use the
fog lamps.
The fog lamps will go off whenever
the high-beam headlamps are
turned on. When the high‐beam
headlamps are turned off, the fog
lamps will come on again.
Some localities have laws that
require the headlamps to be on
along with the fog lamps.
Page 264 of 394
8-60 Driving and Operating
Making Turns
Notice:Making very sharp turns
while trailering could cause the
trailer to come in contact with the
vehicle. The vehicle could be
damaged. Avoid making very
sharp turns while trailering.
When turning with a trailer, make
wider turns than normal so the
trailer will not strike soft shoulders,
curbs, road signs, trees or other
objects. Use the turn signal well in
advance and avoid jerky or sudden
maneuvers.
Turn Signals When Towing
a Trailer
The turn signal indicators on the
instrument panel flash whenever
signaling a turn or lane change.
Properly hooked up, the trailer
lamps also flash, telling other
drivers the vehicle is turning,
changing lanes or stopping.
When towing a trailer, the arrows
on the instrument panel flash for
turns even if the bulbs on the trailer are burned out. Check occasionally
to be sure the trailer bulbs are still
working.
Driving On Grades
Reduce speed and shift to a lower
gear before starting down a long or
steep downgrade. If the
transmission is not shifted down, the
brakes might have to be used so
much that they would get hot and no
longer work well.
The vehicle can tow in D (Drive).
Use a lower gear if the transmission
shifts too often.
When towing at high altitude on
steep uphill grades, engine coolant
will boil at a lower temperature than
at normal altitudes. If the engine is
turned off immediately after towing
at high altitude on steep uphill
grades, the vehicle may show signs
similar to engine overheating. To
avoid this, let the engine run while
parked, preferably on level ground,
with the transmission in P (Park) for
a few minutes before turning the
engine off. If the overheat warning
comes on, see
Engine Overheating
on page 9‑18.
Parking on Hills
{WARNING
Parking the vehicle on a hill with
the trailer attached can be
dangerous. If something goes
wrong, the rig could start to move.
People can be injured, and both
the vehicle and the trailer can be
damaged. When possible, always
park the rig on a flat surface.
If parking the rig on a hill:
1. Press the brake pedal, but do not shift into P (Park) yet. Turn
the wheels into the curb if facing
downhill or into traffic if facing
uphill.
2. Have someone place chocks under the trailer wheels.
Page 269 of 394
Vehicle Care 9-1
Vehicle Care
General Information
General Information . . . . . . . . . . . 9-3
California Proposition65 Warning . . . . . . . . . . . . . . . . . . 9-3
California Perchlorate Materials Requirements . . . . . . . . . . . . . . . 9-3
Accessories and Modifications . . . . . . . . . . . . . . . . 9-4
Vehicle Checks
Doing Your OwnService Work . . . . . . . . . . . . . . . . 9-4
Hood . . . . . . . . . . . . . . . . . . . . . . . . . . 9-5
Engine Compartment Overview . . . . . . . . . . . . . . . . . . . . 9-6
Engine Cover . . . . . . . . . . . . . . . . . 9-9
Engine Oil . . . . . . . . . . . . . . . . . . . 9-10
Engine Oil Life System . . . . . . . 9-11
Automatic Transmission Fluid . . . . . . . . . . . . . . . . . . . . . . . 9-12 Engine Air Cleaner/Filter . . . . . 9-13
Cooling System . . . . . . . . . . . . . . 9-14
Engine Coolant . . . . . . . . . . . . . . 9-15
Engine Overheating . . . . . . . . . 9-18
Power Steering Fluid (2.4L
L4 Engine) . . . . . . . . . . . . . . . . . 9-20
Power Steering Fluid (3.0L V6 Engine) . . . . . . . . . . . . . . . . . 9-20
Washer Fluid . . . . . . . . . . . . . . . . 9-21
Brakes . . . . . . . . . . . . . . . . . . . . . . . 9-21
Brake Fluid . . . . . . . . . . . . . . . . . . 9-22
Battery . . . . . . . . . . . . . . . . . . . . . . . 9-24
All-Wheel Drive . . . . . . . . . . . . . . 9-24
Starter Switch Check . . . . . . . . 9-25
Automatic Transmission Shift Lock Control System
Check . . . . . . . . . . . . . . . . . . . . . . 9-25
Ignition Transmission Lock Check . . . . . . . . . . . . . . . . . . . . . . 9-25
Park Brake and P (Park) Mechanism Check . . . . . . . . . 9-26
Wiper Blade Replacement . . . 9-26
Headlamp Aiming
Headlamp Aiming . . . . . . . . . . . . 9-27
Bulb Replacement
Bulb Replacement . . . . . . . . . . . 9-30
Headlamps, Front Turn Signal, Sidemarker, and Parking
Lamps . . . . . . . . . . . . . . . . . . . . . . 9-30
Fog Lamps . . . . . . . . . . . . . . . . . . 9-31
Taillamps, Turn Signal, Sidemarker, Stoplamps,
and Back-Up Lamps . . . . . . . 9-32
License Plate Lamp . . . . . . . . . . 9-33
Replacement Bulbs . . . . . . . . . . 9-34
Electrical System
Fuses . . . . . . . . . . . . . . . . . . . . . . . . 9-34
Engine Compartment Fuse Block . . . . . . . . . . . . . . . . . . . . . . . 9-34
Instrument Panel Fuse Block . . . . . . . . . . . . . . . . . . . . . . . 9-37
Page 298 of 394
9-30 Vehicle Care
Bulb Replacement
For the proper type of replacement
bulbs, seeReplacement Bulbson
page 9‑34.
For any bulb changing procedure
not listed in this section, contact
your dealer.
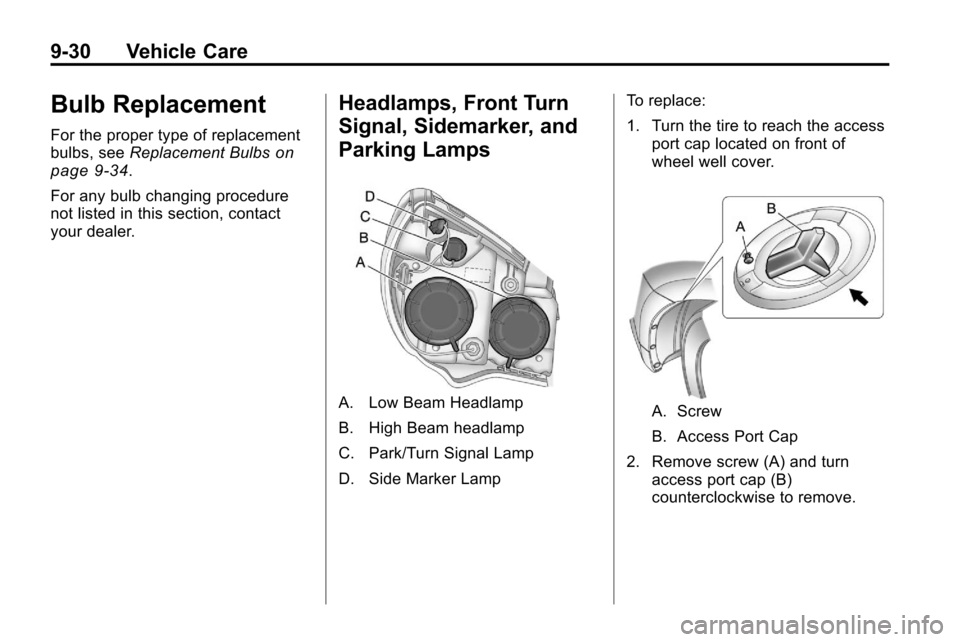
Headlamps, Front Turn
Signal, Sidemarker, and
Parking Lamps
A. Low Beam Headlamp
B. High Beam headlamp
C. Park/Turn Signal Lamp
D. Side Marker Lamp To replace:
1. Turn the tire to reach the access
port cap located on front of
wheel well cover.A. Screw
B. Access Port Cap
2. Remove screw (A) and turn access port cap (B)
counterclockwise to remove.
Page 299 of 394
Vehicle Care 9-31
3. If replacing low/high headlampbulb, remove the dust cover cap
from the back of the headlamp
housing by turning the cap
counterclockwise.
4. Turn the bulb socket counterclockwise to remove from
lamp assembly.
5. Remove the bulb from the socket or disconnect bulb
assembly from harness
connector.
6. Install new bulb.
7. Reinstall the lamp socket to lamp assembly turning
clockwise.
8. Replace the dust cover cap on headlamps.
9. Reinstall the wheel well cover access port cap and secure by
installing screw.Fog Lamps
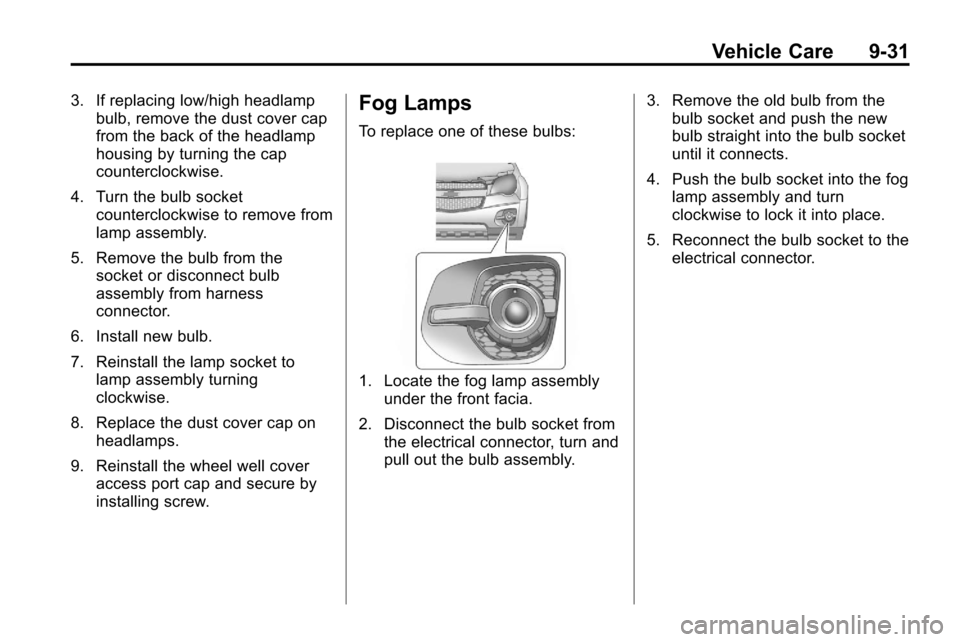
To replace one of these bulbs:
1. Locate the fog lamp assembly
under the front facia.
2. Disconnect the bulb socket from the electrical connector, turn and
pull out the bulb assembly. 3. Remove the old bulb from the
bulb socket and push the new
bulb straight into the bulb socket
until it connects.
4. Push the bulb socket into the fog lamp assembly and turn
clockwise to lock it into place.
5. Reconnect the bulb socket to the electrical connector.
Page 300 of 394
9-32 Vehicle Care
Taillamps, Turn Signal,
Sidemarker, Stoplamps,
and Back-Up Lamps
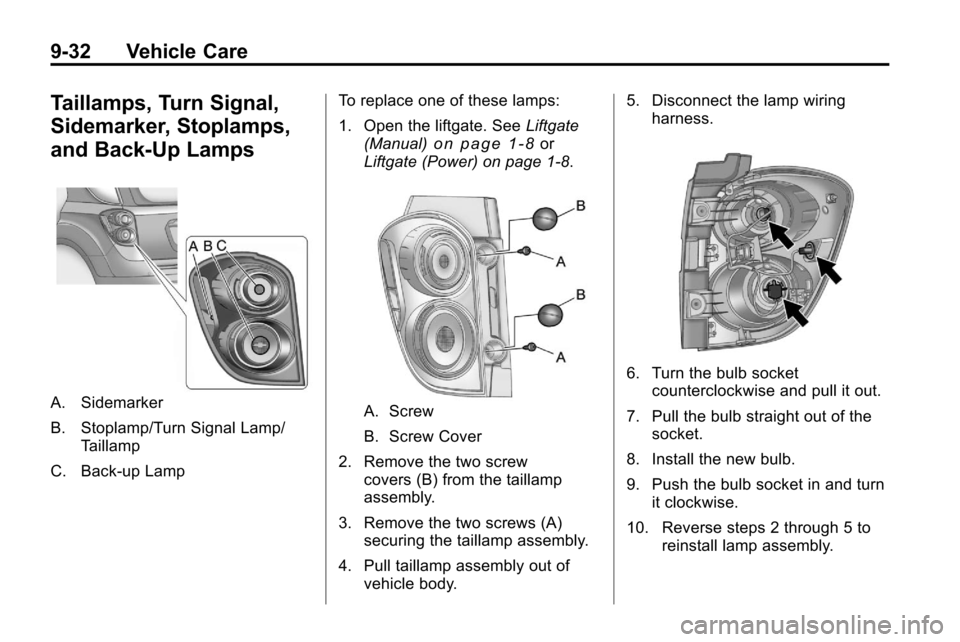
A. Sidemarker
B. Stoplamp/Turn Signal Lamp/Taillamp
C. Back-up Lamp To replace one of these lamps:
1. Open the liftgate. See
Liftgate
(Manual)
on page 1‑8or
Liftgate (Power) on page 1‑8.
A. Screw
B. Screw Cover
2. Remove the two screw covers (B) from the taillamp
assembly.
3. Remove the two screws (A) securing the taillamp assembly.
4. Pull taillamp assembly out of vehicle body. 5. Disconnect the lamp wiring
harness.
6. Turn the bulb socketcounterclockwise and pull it out.
7. Pull the bulb straight out of the socket.
8. Install the new bulb.
9. Push the bulb socket in and turn it clockwise.
10. Reverse steps 2 through 5 to reinstall lamp assembly.
Page 301 of 394
Vehicle Care 9-33
License Plate Lamp
To replace one of these bulbs:
1. Open the liftgate partway. SeeLiftgate (Manual)
on page 1‑8orLiftgate (Power)on
page 1‑8for more information.
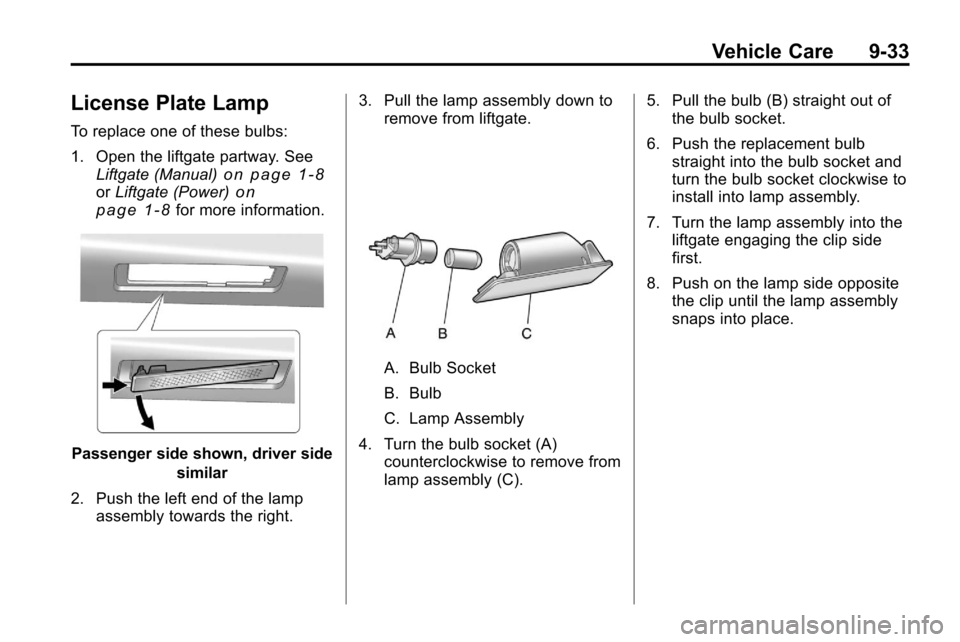
Passenger side shown, driver side
similar
2. Push the left end of the lamp assembly towards the right. 3. Pull the lamp assembly down to
remove from liftgate.
A. Bulb Socket
B. Bulb
C. Lamp Assembly
4. Turn the bulb socket (A) counterclockwise to remove from
lamp assembly (C). 5. Pull the bulb (B) straight out of
the bulb socket.
6. Push the replacement bulb straight into the bulb socket and
turn the bulb socket clockwise to
install into lamp assembly.
7. Turn the lamp assembly into the liftgate engaging the clip side
first.
8. Push on the lamp side opposite the clip until the lamp assembly
snaps into place.
Page 302 of 394
9-34 Vehicle Care
Replacement Bulbs
Exterior LampBulb
Number
Back-Up Lamp 921
Fog Lamp Front H11
Headlamp
High Beam HB3
Headlamp
Low Beam H11
License Plate Lamp W5WLL
Parking Lamp/Turn
Signal Front T20
Sidemarker Front
and Rear 194
Taillamp/Turn Signal
Lamp/Stop Lamp 3157K
For replacement bulbs not listed
here, contact your dealer.
Electrical System
Fuses
The wiring circuits in the vehicle are
protected from short circuits by
fuses. This greatly reduces the
chance of damage caused by
electrical problems.
Look at the silver-colored band
inside the fuse. If the band is broken
or melted, replace the fuse. Be sure
to replace a bad fuse with a new
one of the identical size and rating.
There are two fuse blocks in the
vehicle: one in the engine
compartment and one in the
instrument panel.
There is a fuse puller located in the
engine compartment fuse block.
See Engine Compartment Fuse
Block
on page 9‑34. It can be used
to easily remove fuses from the fuse
block.
Engine Compartment
Fuse Block
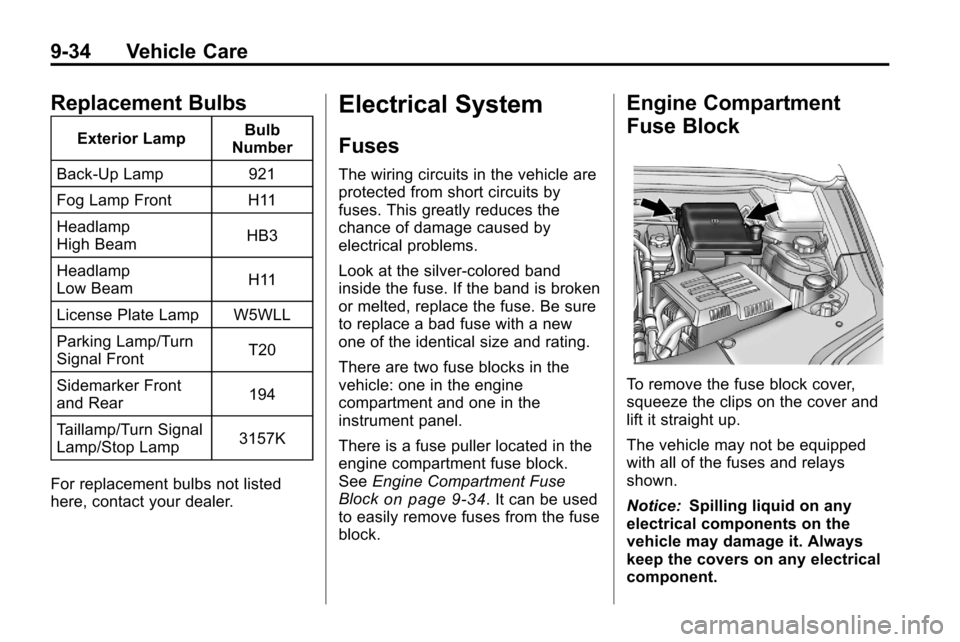
To remove the fuse block cover,
squeeze the clips on the cover and
lift it straight up.
The vehicle may not be equipped
with all of the fuses and relays
shown.
Notice: Spilling liquid on any
electrical components on the
vehicle may damage it. Always
keep the covers on any electrical
component.
Page 384 of 394

i-2 INDEX
B
Battery . . . . . . . . . . . . . . . . . . . . . . . . 9-24Jump Starting . . . . . . . . . . . . . . . . . 9-69
Voltage and ChargingMessages . . . . . . . . . . . . . . . . . . . 4-28
Blade Replacement, Wiper . . . . 9-26
Bluetooth . . . . 6-42, 6-43, 6-46, 6-58
Brakes . . . . . . . . . . . . . . . . . . . . . . . . . 9-21 Antilock . . . . . . . . . . . . . . . . . . . . . . . 8-38
Assist . . . . . . . . . . . . . . . . . . . . . . . . . 8-40
Fluid . . . . . . . . . . . . . . . . . . . . . . . . . . 9-22
Parking . . . . . . . . . . . . . . . . . . . . . . . 8-40
System Messages . . . . . . . . . . . . 4-28
Braking . . . . . . . . . . . . . . . . . . . . . . . . . 8-4
Break-In, New Vehicle . . . . . . . . . 8-28
Bulb Replacement . . . . . . . . . . . . . 9-34 Fog Lamps . . . . . . . . . . . . . . 5-3, 9-31
Headlamp Aiming . . . . . . . . . . . . . 9-27
Headlamps . . . . . . . . . . . . . . . . . . . 9-30
Headlamps, Front TurnSignal, Sidemarker, and
Parking Lamps . . . . . . . . . . . . . . 9-30 Bulb Replacement (cont.)
License Plate Lamps . . . . . . . . . 9-33
Taillamps, Turn Signal,
Sidemarker, Stoplamps,
and Backup Lamps . . . . . . . . . . 9-32
Buying New Tires . . . . . . . . . . . . . . 9-54
C
Calibration . . . . . . . . . . . . . . . . . . . . . . 4-8
California Fuel Requirements . . . . . . . . . . . 8-54
Perchlorate Materials
Requirements . . . . . . . . . . . . . . . . 9-3
Warning . . . . . . . . . . . . . . . . . . . . . . . 9-3
Camera, Rear Vision . . . . . . . . . . 8-49
Canadian Vehicle Owners . . . . . . . . iv
Capacities and Specifications . . . . . . . . . . . . . . . . 11-2
Carbon Monoxide Engine Exhaust . . . . . . . . . . . . . . . 8-34
Liftgate . . . . . . . . . . . . . . . . . . . . . . . . 1-8
Winter Driving . . . . . . . . . . . . . . . . 8-21 Cargo
Cover . . . . . . . . . . . . . . . . . . . . . . . . . . 3-1
Cautions, Danger, and Warnings . . . . . . . . . . . . . . . . . . . . . . . . iv
CD DVD Player . . . . . . . . . . . . . . . . . . . 6-21
CD Player . . . . . . . . . . . . . . . . . . . . . 6-19
Center Console Storage . . . . . . . . 3-1
Chains, Tire . . . . . . . . . . . . . . . . . . . 9-58
Charging System Light . . . . . . . . 4-16
Check
Engine Light . . . . . . . . . . . . . . . . . . 4-16
Ignition Transmission Lock . . . 9-25
Child Restraints Infants and YoungChildren . . . . . . . . . . . . . . . . . . . . . 2-39
Lower Anchors and Tethers for Children . . . . . . . . . 2-45
Older Children . . . . . . . . . . . . . . . . 2-37
Securing . . . . . . . . . . . . . . . . 2-51, 2-54
Systems . . . . . . . . . . . . . . . . . . . . . . 2-41
Where to Put the Restraint . . . 2-43