seats CHEVROLET EQUINOX 2010 2.G Owners Manual
[x] Cancel search | Manufacturer: CHEVROLET, Model Year: 2010, Model line: EQUINOX, Model: CHEVROLET EQUINOX 2010 2.GPages: 394, PDF Size: 5.7 MB
Page 1 of 394
2010 Chevrolet Equinox Owner ManualM
Keys, Doors and Windows. . . 1-1
Keys and Locks . . . . . . . . . . . . . . . 1-2
Doors . . . . . . . . . . . . . . . . . . . . . . . . . . 1-8
Vehicle Security . . . . . . . . . . . . . . 1-12
Exterior Mirrors . . . . . . . . . . . . . . . 1-14
Interior Mirrors . . . . . . . . . . . . . . . . 1-15
Windows . . . . . . . . . . . . . . . . . . . . . 1-16
Roof . . . . . . . . . . . . . . . . . . . . . . . . . . 1-18
Seats and Restraints . . . . . . . . . 2-1
Head Restraints . . . . . . . . . . . . . . . 2-2
Front Seats . . . . . . . . . . . . . . . . . . . . 2-3
Rear Seats . . . . . . . . . . . . . . . . . . . . 2-8
Safety Belts . . . . . . . . . . . . . . . . . . . . 2-9
Airbag System . . . . . . . . . . . . . . . . 2-22
Child Restraints . . . . . . . . . . . . . . 2-37 Storage
. . . . . . . . . . . . . . . . . . . . . . . 3-1
Storage Compartments . . . . . . . . 3-1
Additional Storage Features . . . 3-1
Roof Rack System . . . . . . . . . . . . . 3-2
Instruments and Controls . . . . 4-1
Instrument Panel Overview . . . . 4-4
Controls . . . . . . . . . . . . . . . . . . . . . . . 4-6
Warning Lights, Gauges, and Indicators . . . . . . . . . . . . . . . . . . . 4-11
Information Displays . . . . . . . . . . 4-24
Vehicle Messages . . . . . . . . . . . . 4-27
Vehicle Personalization . . . . . . . 4-34
OnStar
®System . . . . . . . . . . . . . . 4-39 Lighting
. . . . . . . . . . . . . . . . . . . . . . . 5-1
Exterior Lighting . . . . . . . . . . . . . . . 5-1
Interior Lighting . . . . . . . . . . . . . . . . 5-4
Lighting Features . . . . . . . . . . . . . . 5-4
Infotainment System . . . . . . . . . 6-1
Introduction . . . . . . . . . . . . . . . . . . . . 6-1
Radio . . . . . . . . . . . . . . . . . . . . . . . . . 6-11
Audio Players . . . . . . . . . . . . . . . . 6-19
Rear Seat Infotainment . . . . . . . 6-33
Phone . . . . . . . . . . . . . . . . . . . . . . . . 6-42
Climate Controls . . . . . . . . . . . . . 7-1
Climate Control Systems . . . . . . 7-1
Air Vents . . . . . . . . . . . . . . . . . . . . . . . 7-6
Maintenance . . . . . . . . . . . . . . . . . . . 7-6
Page 27 of 394
Seats and Restraints 2-1
Seats and
Restraints
Head Restraints
Head Restraints . . . . . . . . . . . . . . . 2-2
Front Seats
Seat Adjustment . . . . . . . . . . . . . . 2-3
Power Seat Adjustment . . . . . . . 2-3
Lumbar Adjustment . . . . . . . . . . . 2-5
Reclining Seatbacks . . . . . . . . . . 2-5
Heated Front Seats . . . . . . . . . . . 2-7
Rear Seats
Rear Seats . . . . . . . . . . . . . . . . . . . . 2-8
Safety Belts
Safety Belts . . . . . . . . . . . . . . . . . . . 2-9
How to Wear Safety BeltsProperly . . . . . . . . . . . . . . . . . . . . 2-12
Lap-Shoulder Belt . . . . . . . . . . . 2-17
Safety Belt Use During Pregnancy . . . . . . . . . . . . . . . . . . 2-21 Safety Belt Extender . . . . . . . . . 2-21
Safety System Check . . . . . . . . 2-21
Safety Belt Care . . . . . . . . . . . . . 2-22
Replacing Safety Belt System
Parts After a Crash . . . . . . . . . 2-22
Airbag System
Airbag System . . . . . . . . . . . . . . . 2-22
Where Are the Airbags? . . . . . 2-25
When Should an Airbag
Inflate? . . . . . . . . . . . . . . . . . . . . . 2-26
What Makes an Airbag Inflate? . . . . . . . . . . . . . . . . . . . . . 2-28
How Does an Airbag Restrain? . . . . . . . . . . . . . . . . . . . 2-28
What Will You See After an Airbag Inflates? . . . . . . . . . . . . 2-28
Passenger Sensing System . . . . . . . . . . . . . . . . . . . . . 2-30
Servicing the Airbag-Equipped Vehicle . . . . . . . . . . . . . . . . . . . . . 2-34
Adding Equipment to the Airbag-Equipped Vehicle . . . 2-35 Airbag System Check . . . . . . . . 2-36
Replacing Airbag System
Parts After a Crash . . . . . . . . . 2-36
Child Restraints
Older Children . . . . . . . . . . . . . . . 2-37
Infants and YoungChildren . . . . . . . . . . . . . . . . . . . . 2-39
Child Restraint Systems . . . . . 2-41
Where to Put the Restraint . . . . . . . . . . . . . . . . . . . 2-43
Lower Anchors and Tethers for Children (LATCH
System) . . . . . . . . . . . . . . . . . . . . 2-45
Replacing LATCH System Parts After a Crash . . . . . . . . . 2-51
Securing Child Restraints
(Rear Seat ) . . . . . . . . . . . . . . . . 2-51
Securing Child Restraints (Front Passenger Seat) . . . . 2-54
Page 28 of 394
2-2 Seats and Restraints
Head Restraints
The vehicle's front and rear seats
have head restraints in all outboard
seating positions.
{WARNING
With head restraints that are not
installed and adjusted properly,
there is a greater chance that
occupants will suffer a neck/
spinal injury in a crash. Do not
drive until the head restraints for
all occupants are installed and
adjusted properly.
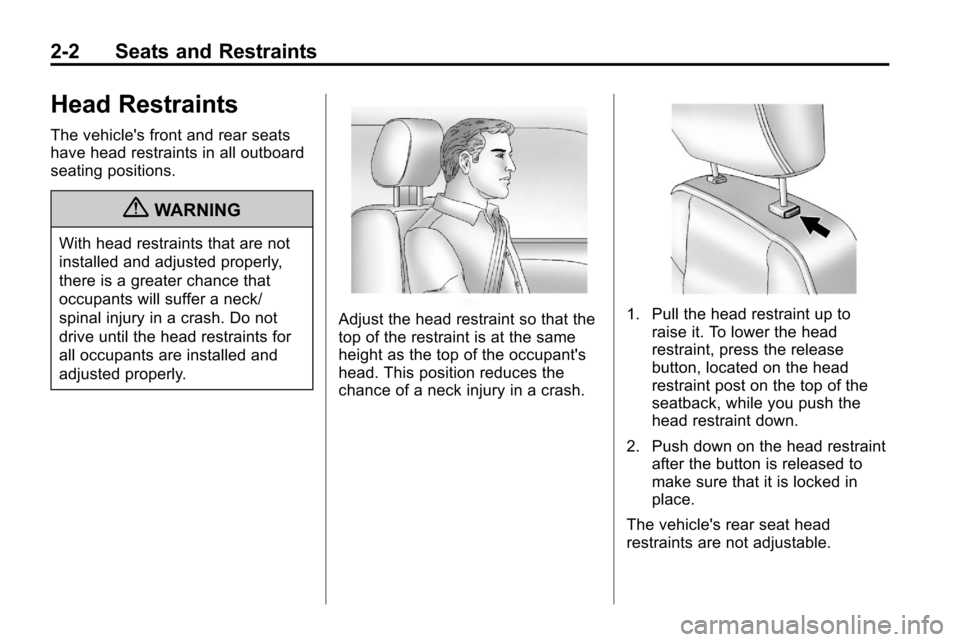
Adjust the head restraint so that the
top of the restraint is at the same
height as the top of the occupant's
head. This position reduces the
chance of a neck injury in a crash.1. Pull the head restraint up toraise it. To lower the head
restraint, press the release
button, located on the head
restraint post on the top of the
seatback, while you push the
head restraint down.
2. Push down on the head restraint after the button is released to
make sure that it is locked in
place.
The vehicle's rear seat head
restraints are not adjustable.
Page 29 of 394
Seats and Restraints 2-3
Front Seats
Seat Adjustment
{WARNING
You can lose control of the
vehicle if you try to adjust a
manual driver's seat while the
vehicle is moving. The sudden
movement could startle and
confuse you, or make you push a(Continued)
WARNING (Continued)
pedal when you do not want to.
Adjust the driver's seat only when
the vehicle is not moving.
To adjust the seat position:
1. Pull the handle located at the front of the seat.
2. Move the seat forward or backward to adjust the seat
position.
3. Release the handle to stop the seat from moving.
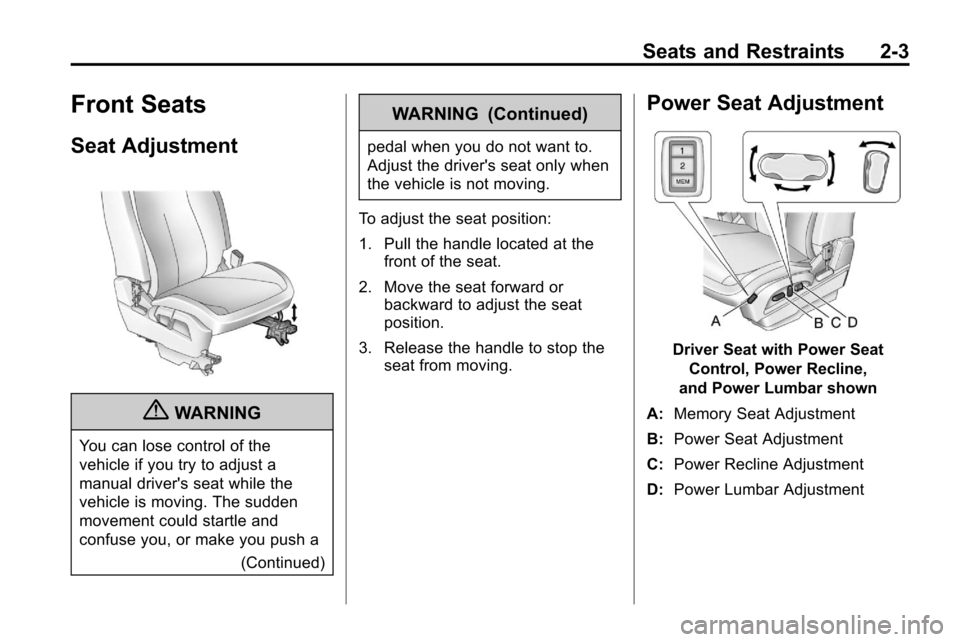
Power Seat Adjustment
Driver Seat with Power Seat
Control, Power Recline,
and Power Lumbar shown
A: Memory Seat Adjustment
B: Power Seat Adjustment
C: Power Recline Adjustment
D: Power Lumbar Adjustment
Page 30 of 394
2-4 Seats and Restraints
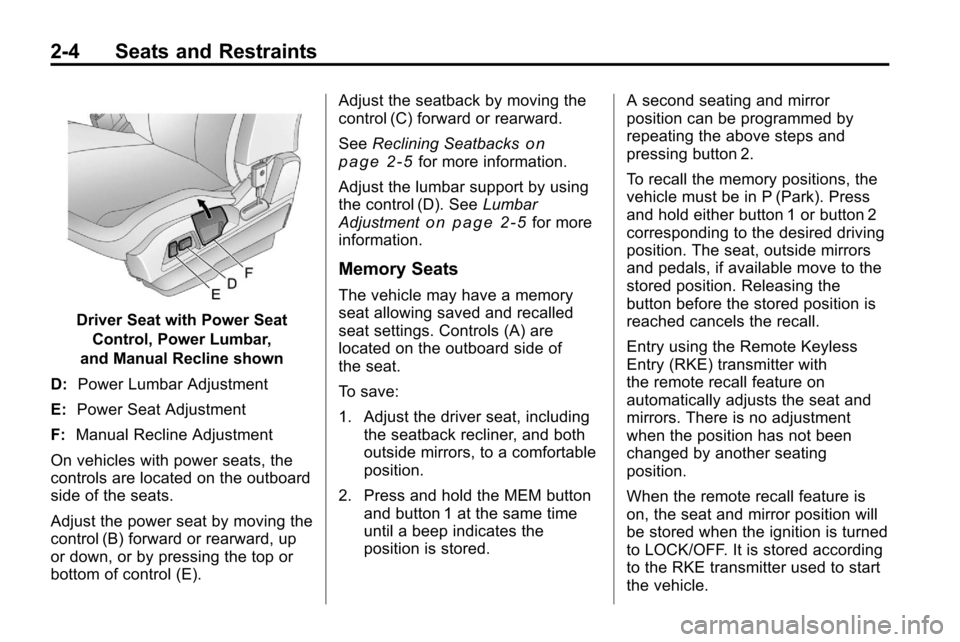
Driver Seat with Power SeatControl, Power Lumbar,
and Manual Recline shown
D: Power Lumbar Adjustment
E: Power Seat Adjustment
F: Manual Recline Adjustment
On vehicles with power seats, the
controls are located on the outboard
side of the seats.
Adjust the power seat by moving the
control (B) forward or rearward, up
or down, or by pressing the top or
bottom of control (E). Adjust the seatback by moving the
control (C) forward or rearward.
See
Reclining Seatbacks
on
page 2‑5for more information.
Adjust the lumbar support by using
the control (D). See Lumbar
Adjustment
on page 2‑5for more
information.
Memory Seats
The vehicle may have a memory
seat allowing saved and recalled
seat settings. Controls (A) are
located on the outboard side of
the seat.
To save:
1. Adjust the driver seat, including the seatback recliner, and both
outside mirrors, to a comfortable
position.
2. Press and hold the MEM button and button 1 at the same time
until a beep indicates the
position is stored. A second seating and mirror
position can be programmed by
repeating the above steps and
pressing button 2.
To recall the memory positions, the
vehicle must be in P (Park). Press
and hold either button 1 or button 2
corresponding to the desired driving
position. The seat, outside mirrors
and pedals, if available move to the
stored position. Releasing the
button before the stored position is
reached cancels the recall.
Entry using the Remote Keyless
Entry (RKE) transmitter with
the remote recall feature on
automatically adjusts the seat and
mirrors. There is no adjustment
when the position has not been
changed by another seating
position.
When the remote recall feature is
on, the seat and mirror position will
be stored when the ignition is turned
to LOCK/OFF. It is stored according
to the RKE transmitter used to start
the vehicle.
Page 31 of 394
Seats and Restraints 2-5
To stop recall movement of the RKE
remote recall feature, press one of
the power seat controls, memory
buttons, or power mirror buttons.
Memory Seat recall may stop if
the seat is blocked. Remove the
obstruction and then press the
memory button again. If the memory
function does not work properly, see
your dealer for service.
Easy Exit Seat
If the easy exit seat feature is on in
the Driver Information Center (DIC),
automatic adjustment occurs when
the ignition is turned to LOCK/OFF
and the driver door is opened. The
driver seat moves back.
SeeVehicle Personalization
on
page 4‑34for more information.
Lumbar Adjustment
Power Lumbar
Seats with power lumbar have
controls located on the outboard
side of the seat. See Power Seat
Adjustment
on page 2‑3for more
information.
Adjust lumbar support by using the
rocker switch (D) on the outboard
side of the driver seat.
Release the switch when the
seatback reaches the desired level
of lumbar support.
Reclining Seatbacks
Manual Reclining Seatbacks
{WARNING
You can lose control of the
vehicle if you try to adjust a
manual driver's seat while the
vehicle is moving. The sudden
(Continued)
WARNING (Continued)
movement could startle and
confuse you, or make you push a
pedal when you do not want to.
Adjust the driver's seat only when
the vehicle is not moving.
{WARNING
If either seatback is not locked, it
could move forward in a sudden
stop or crash. That could cause
injury to the person sitting there.
Always push and pull on the
seatbacks to be sure they are
locked.
Vehicles with manual reclining
seatbacks have a lever on the
outboard side of the seat. Lift the
lever and move the seatback to the
desired position, then release the
lever. The seatback should not
move when pushed or pulled.
Page 32 of 394
2-6 Seats and Restraints
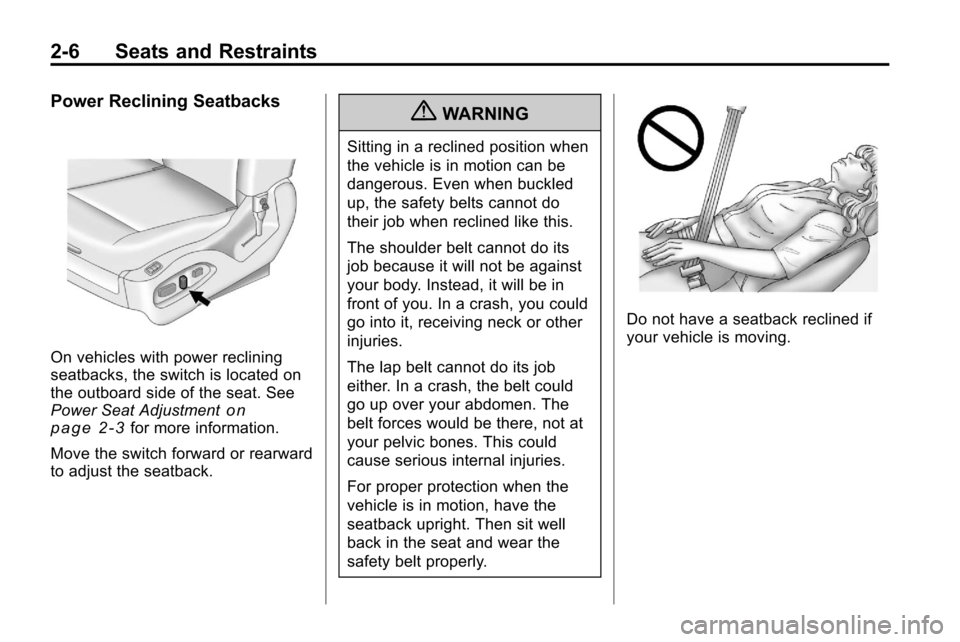
Power Reclining Seatbacks
On vehicles with power reclining
seatbacks, the switch is located on
the outboard side of the seat. See
Power Seat Adjustment
on
page 2‑3for more information.
Move the switch forward or rearward
to adjust the seatback.
{WARNING
Sitting in a reclined position when
the vehicle is in motion can be
dangerous. Even when buckled
up, the safety belts cannot do
their job when reclined like this.
The shoulder belt cannot do its
job because it will not be against
your body. Instead, it will be in
front of you. In a crash, you could
go into it, receiving neck or other
injuries.
The lap belt cannot do its job
either. In a crash, the belt could
go up over your abdomen. The
belt forces would be there, not at
your pelvic bones. This could
cause serious internal injuries.
For proper protection when the
vehicle is in motion, have the
seatback upright. Then sit well
back in the seat and wear the
safety belt properly.
Do not have a seatback reclined if
your vehicle is moving.
Page 33 of 394
Seats and Restraints 2-7
Heated Front Seats
{WARNING
If you cannot feel temperature
change or pain to the skin, the
seat heater may cause burns
even at low temperatures. To
reduce the risk of burns, people
with such a condition should use
care when using the seat heater,
especially for long periods of
time. Do not place anything on
the seat that insulates against
heat, such as a blanket, cushion,
cover or similar item. This may
cause the seat heater to
overheat. An overheated seat
heater may cause a burn or may
damage the seat.
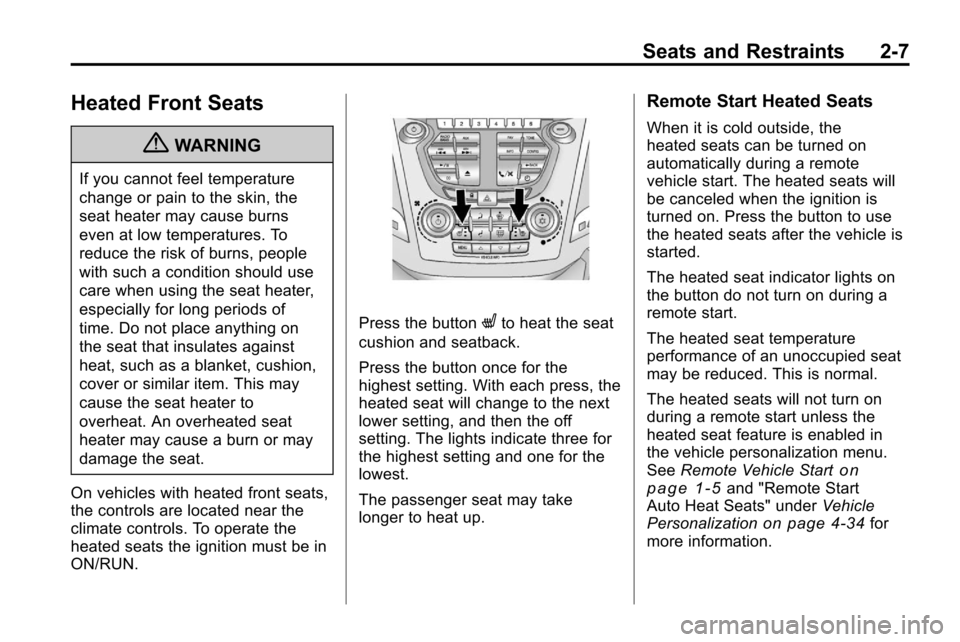
On vehicles with heated front seats,
the controls are located near the
climate controls. To operate the
heated seats the ignition must be in
ON/RUN.
Press the buttonLto heat the seat
cushion and seatback.
Press the button once for the
highest setting. With each press, the
heated seat will change to the next
lower setting, and then the off
setting. The lights indicate three for
the highest setting and one for the
lowest.
The passenger seat may take
longer to heat up.
Remote Start Heated Seats
When it is cold outside, the
heated seats can be turned on
automatically during a remote
vehicle start. The heated seats will
be canceled when the ignition is
turned on. Press the button to use
the heated seats after the vehicle is
started.
The heated seat indicator lights on
the button do not turn on during a
remote start.
The heated seat temperature
performance of an unoccupied seat
may be reduced. This is normal.
The heated seats will not turn on
during a remote start unless the
heated seat feature is enabled in
the vehicle personalization menu.
See Remote Vehicle Start
on
page 1‑5and "Remote Start
Auto Heat Seats" under Vehicle
Personalization
on page 4‑34for
more information.
Page 34 of 394
2-8 Seats and Restraints
Rear Seats
Split Folding Seatbacks
With this feature, either side of the
rear seatback can be folded down
for more cargo space.
{WARNING
If either seatback is not locked, it
could move forward in a sudden
stop or crash. That could cause
injury to the person sitting there.
Always push and pull on the
seatbacks to be sure they are
locked.
{WARNING
A safety belt that is improperly
routed, not properly attached,
or twisted will not provide the
protection needed in a crash. The
person wearing the belt could be
seriously injured. After raising the(Continued)
WARNING (Continued)
rear seatback, always check to
be sure that the safety belts are
properly routed and attached, and
are not twisted.
Notice: Folding a rear seat with
the safety belts still fastened may
cause damage to the seat or the
safety belts. Always unbuckle the
safety belts and return them to
their normal stowed position
before folding a rear seat.
1. To fold the seatback down:
The rear safety belts must
be unbuckled and the front
seatbacks are not reclined.
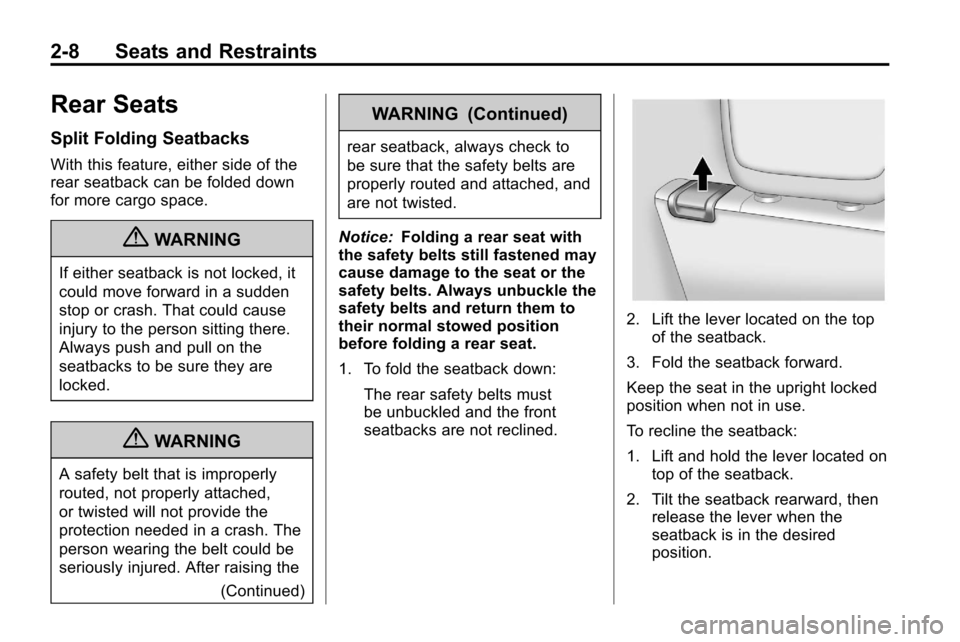
2. Lift the lever located on the topof the seatback.
3. Fold the seatback forward.
Keep the seat in the upright locked
position when not in use.
To recline the seatback:
1. Lift and hold the lever located on top of the seatback.
2. Tilt the seatback rearward, then release the lever when the
seatback is in the desired
position.
Page 35 of 394
Seats and Restraints 2-9
To slide the entire seat forward or
rearward:
1. Lift and hold the release barunder the front of the seat
cushion to unlock the seat.
2. Slide the seat to the desired position.
3. Release the bar.
4. Try to move the seat back and forth to endure the seat is locked
into place.Safety Belts
This section of the manual
describes how to use safety belts
properly. It also describes some
things not to do with safety belts.
{WARNING
Do not let anyone ride where a
safety belt cannot be worn
properly. In a crash, if you or your
passenger(s) are not wearing
safety belts, the injuries can be
much worse. You can hit things
inside the vehicle harder or be
ejected from the vehicle. You
and your passenger(s) can be
seriously injured or killed. In the
same crash, you might not be,
if you are buckled up. Always
fasten your safety belt, and check
that your passenger(s) are
restrained properly too.
{WARNING
It is extremely dangerous to ride
in a cargo area, inside or outside
of a vehicle. In a collision, people
riding in these areas are more
likely to be seriously injured or
killed. Do not allow people to ride
in any area of your vehicle that is
not equipped with seats and
safety belts. Be sure everyone in
your vehicle is in a seat and using
a safety belt properly.
This vehicle has indicators as a
reminder to buckle the safety belts.
See Safety Belt Reminders
on
page 4‑14for additional
information.