sunroof CHEVROLET EQUINOX 2010 2.G Owners Manual
[x] Cancel search | Manufacturer: CHEVROLET, Model Year: 2010, Model line: EQUINOX, Model: CHEVROLET EQUINOX 2010 2.GPages: 394, PDF Size: 5.7 MB
Page 7 of 394
Keys, Doors and Windows 1-1
Keys, Doors and
Windows
Keys and Locks
Keys . . . . . . . . . . . . . . . . . . . . . . . . . . 1-2
Remote Keyless Entry (RKE)System . . . . . . . . . . . . . . . . . . . . . . 1-3
Remote Keyless Entry (RKE) System Operation . . . . . . . . . . . 1-3
Remote Vehicle Start . . . . . . . . . 1-5
Door Locks . . . . . . . . . . . . . . . . . . . 1-6
Power Door Locks . . . . . . . . . . . . 1-7
Safety Locks . . . . . . . . . . . . . . . . . . 1-7
Doors
Liftgate (Manual) . . . . . . . . . . . . . . 1-8
Liftgate (Power) . . . . . . . . . . . . . . . 1-8
Vehicle Security
Vehicle Security . . . . . . . . . . . . . . 1-12
Anti-Theft Alarm System . . . . . 1-12
Immobilizer . . . . . . . . . . . . . . . . . . 1-13
Immobilizer Operation . . . . . . . 1-13
Exterior Mirrors
Convex Mirrors . . . . . . . . . . . . . . 1-14
Power Mirrors . . . . . . . . . . . . . . . . 1-14
Heated Mirrors . . . . . . . . . . . . . . . 1-14
Park Tilt Mirrors . . . . . . . . . . . . . . 1-15
Interior Mirrors
Manual Rearview Mirror . . . . . . 1-15
Automatic Dimming Rearview Mirror . . . . . . . . . . . . . . . . . . . . . . . 1-15
Windows
Windows . . . . . . . . . . . . . . . . . . . . . 1-16
Power Windows . . . . . . . . . . . . . 1-16
Sun Visors . . . . . . . . . . . . . . . . . . . 1-18
Roof
Sunroof . . . . . . . . . . . . . . . . . . . . . . 1-18
Page 24 of 394
1-18 Keys, Doors and Windows
Window Lockout
o(Window Lockout): The window
lockout switch is located on the
driver door. This feature prevents
the rear passenger windows from
operating, except from the driver
position. Press the switch to turn
the lockout feature on or off. An
indicator light shows the feature
is on.
Sun Visors
Pull the sun visor down to block
glare. Detach the sun visor from the
center mount and slide it along the
rod from side-to-side to cover the
driver or passenger side of the front
window. Swing the sun visor to the
side to cover the side window. It can
be moved along the rod from
side-to-side in this position also.
Roof
Sunroof
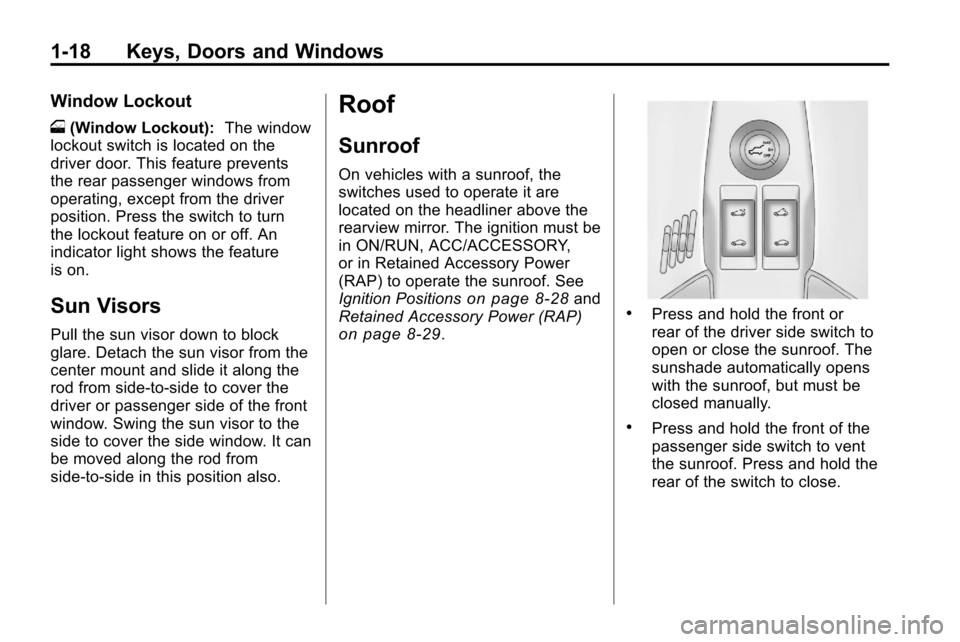
On vehicles with a sunroof, the
switches used to operate it are
located on the headliner above the
rearview mirror. The ignition must be
in ON/RUN, ACC/ACCESSORY,
or in Retained Accessory Power
(RAP) to operate the sunroof. See
Ignition Positions
on page 8‑28and
Retained Accessory Power (RAP)
on page 8‑29.
.Press and hold the front or
rear of the driver side switch to
open or close the sunroof. The
sunshade automatically opens
with the sunroof, but must be
closed manually.
.Press and hold the front of the
passenger side switch to vent
the sunroof. Press and hold the
rear of the switch to close.
Page 25 of 394
Keys, Doors and Windows 1-19
Express-open/Express-close
Press and release the front or rear
of the driver side switch to
express-open or express-close the
sunroof.
Anti-Pinch Feature
If an object is in the path of the
sunroof when it is closing, the
anti-pinch feature detects the object
and stops the sunroof from closing
at the point of the obstruction. The
sunroof then returns to the full-open
position.Dirt and debris may collect on the
sunroof seal or in the tracks that
could cause an issue with sunroof
operation, noise or plug the water
drainage system. Periodically open
the sunroof and remove any
obstacles or loose debris. Wipe the
sunroof seal and roof sealing area
using a clean cloth, mild soap, and
water. Do not remove grease from
sunroof.
Page 148 of 394
6-18 Infotainment System
Radio Reception
Frequency interference and static
can occur during normal radio
reception if items such as cell phone
chargers, vehicle convenience
accessories, and external electronic
devices are plugged into the
accessory power outlet. If there is
interference or static, unplug the
item from the accessory power
outlet.
FM
FM signals only reach about 16 to
65 km (10 to 40 miles). Although the
radio has a built-in electronic circuit
that automatically works to reduce
interference, some static can occur,
especially around tall buildings or
hills, causing the sound to fade in
and out.
AM
The range for most AM stations is
greater than for FM, especially at
night. The longer range can cause
station frequencies to interfere with
each other. Static can occur when
things like storms and power lines
interfere with radio reception. When
this happens, try reducing the treble
on the radio.
XM™Satellite Radio Service
XM Satellite Radio Service gives
digital radio reception from
coast-to-coast in the 48 contiguous
United States, and in Canada. Just
as with FM, tall buildings or hills can
interfere with satellite radio signals,
causing the sound to fade in and
out. In addition, traveling or standing
under heavy foliage, bridges,
garages, or tunnels may cause loss
of the XM signal for a period of time.
Cellular Phone Usage
Cellular phone usage can cause
interference with the vehicle's radio.
Multi-Band Antenna
The multi-band antenna is located
on the roof of the vehicle. The
antenna is used for the AM/FM
radio, OnStar, the XM Satellite
Radio Service System, and GPS
(Global Positioning System); if the
vehicle has these features. Keep
the antenna clear of obstructions
for clear reception. If the vehicle
has a sunroof and it is open, the
performance of the AM/FM radio,
OnStar, XM system, and GPS can
be affected.
Page 233 of 394
Driving and Operating 8-29
A (LOCK/OFF):This is the only
position from which the key can be
removed. This locks the steering
wheel, ignition and automatic
transmission.
On vehicles with an automatic
transmission, the shift lever must be
in P (Park) to turn the ignition switch
to the LOCK/OFF position.
The ignition switch can bind in the
LOCK/OFF position with the wheels
turned off center. If this happens,
move the steering wheel from right
to left while turning the key to ACC/
ACCESSORY. If this does not work,
then the vehicle needs service.
B (ACC/ACCESSORY): This
position provides power to some of
the electrical accessories. It unlocks
the steering wheel and ignition. The
transmission is also unlocked in this
position on automatic transmission
vehicles. To move the key from
ACC/ACCESSORY to LOCK/OFF,
push in the key and then turn it to
LOCK/OFF. C (ON/RUN):
The ignition switch
stays in this position when the
engine is running. This position can
be used to operate the electrical
accessories, including the
ventilation fan and 12 volt power
outlet, as well as to display some
warning and indicator lights.
The battery could be drained if the
key is left in the ACC/ACCESSORY
or ON/RUN position with the engine
off. The vehicle might not start if the
battery is allowed to drain for an
extended period of time.
D (START): This position starts the
engine. When the engine starts,
release the key. The ignition switch
will return to ON/RUN for normal
driving.
A warning tone sounds when the
driver door is opened if the ignition
is still in ACC/ACCESSORY and the
key is in the ignition.Retained Accessory
Power (RAP)
These vehicle accessories can be
used for up to 10 minutes after the
engine is turned off:
.Audio System
.Power Windows
.Sunroof (if equipped)
Power to the audio system will
continue to operate for up to
10 minutes or until the driver door is
opened.
Power to the power windows and
sunroof will continue to operate for
up to 10 minutes or until any door is
opened.
All these features will work when
the key is in ON/RUN or ACC/
ACCESSORY.
Page 303 of 394
Vehicle Care 9-35
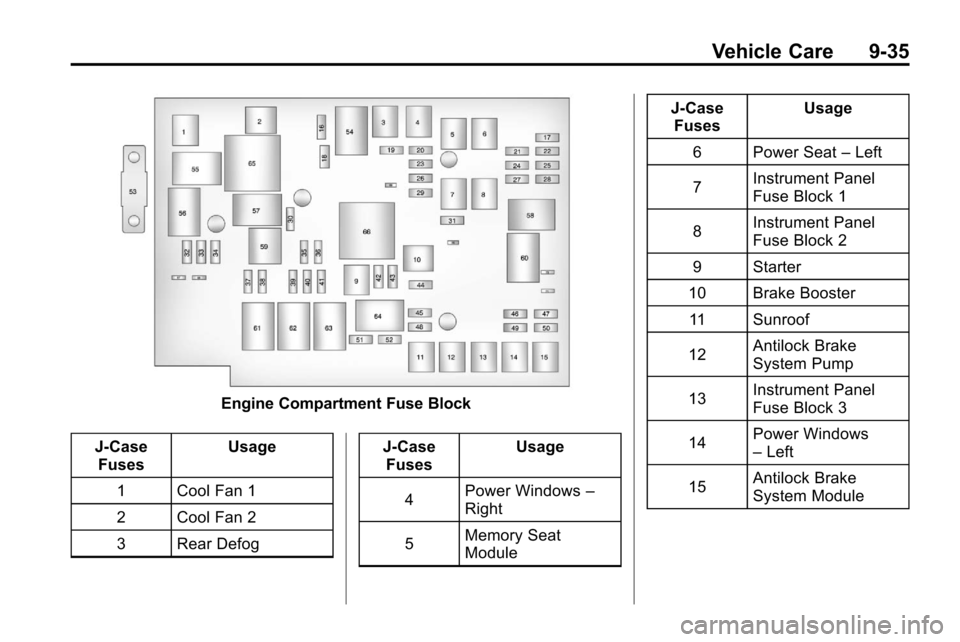
Engine Compartment Fuse Block
J-Case Fuses Usage
1 Cool Fan 1
2 Cool Fan 2
3 Rear Defog J-Case
Fuses Usage
4 Power Windows
–
Right
5 Memory Seat
Module J-Case
Fuses Usage
6 Power Seat –Left
7 Instrument Panel
Fuse Block 1
8 Instrument Panel
Fuse Block 2
9 Starter
10 Brake Booster 11 Sunroof
12 Antilock Brake
System Pump
13 Instrument Panel
Fuse Block 3
14 Power Windows
–
Left
15 Antilock Brake
System Module
Page 354 of 394
10-4 Service and Maintenance
.Body hinges and latches, key
lock cylinders, folding seat
hardware, and sunroof (if
equipped) lubrication. See
Recommended Fluids and
Lubricants
on page 10‑7. More
frequent lubrication may be
required when vehicle is
exposed to a corrosive
environment. Applying silicone
grease on weatherstrips with a
clean cloth makes them last
longer, seal better, and not stick
or squeak.
.Restraint system component
check. See Safety System
Check on page 2‑21.
.Automatic transmission fluid
level check and adding fluid,
if needed. See Automatic
Transmission Fluid
on
page 9‑12.
.Engine air cleaner filter
inspection. See Engine Air
Cleaner/Filter on page 9‑13.
.Passenger compartment air
filter replacement (or every
12 months, whichever comes
first). More frequent replacement
may be required if vehicle is
driven regularly under dusty
conditions.
Additional Required Services
At Each Fuel Stop
.Engine oil level check. See
Engine Oil on page 9‑10.
.Engine coolant level check. See
Engine Coolant on page 9‑15.
.Windshield washer fluid level
check. See Washer Fluidon
page 9‑21.
Once a Month
.Tire inflation check. See Tire
Pressure on page 9‑46.
.Tire wear inspection. See Tire
Inspection on page 9‑52. Once a Year
.See
Starter Switch Checkon
page 9‑25.
.See Automatic Transmission
Shift Lock Control System
Check on page 9‑25.
.See Ignition Transmission Lock
Check on page 9‑25.
.See Park Brake and P (Park)
Mechanism Checkon
page 9‑26.
.Engine cooling system and
pressure cap pressure check.
Radiator and air conditioning
condenser outside cleaning. See
Cooling System on page 9‑14.
.Exhaust system and nearby heat
shields inspection for loose or
damaged components.
.Accelerator pedal check for
damage, high effort, or binding.
Replace if needed.
Page 391 of 394

INDEX i-9
Recreational Vehicle Towing . . . 9-72
Reimbursement Program,GM Mobility . . . . . . . . . . . . . . . . . . 12-5
Remote Keyless Entry (RKE) System . . . . . . . . . . . . . . . . . . . . . . . . 1-3
Remote Vehicle Start . . . . . . . . . . . 1-5
Replacement Bulbs . . . . . . . . . . . . 9-34
Replacement Parts Airbags . . . . . . . . . . . . . . . . . . . . . . . 2-36
Maintenance . . . . . . . . . . . . . . . . . . 10-9
Replacing Airbag System . . . . . . 2-36
Replacing LATCH System
Parts After a Crash . . . . . . . . . . . 2-51
Replacing Safety Belt System Parts After a
Crash . . . . . . . . . . . . . . . . . . . . . . . . 2-22
Reporting Safety Defects Canadian Government . . . . . . 12-14
General Motors . . . . . . . . . . . . . 12-14
U.S. Government . . . . . . . . . . . 12-13
Retained Accessory
Power (RAP) . . . . . . . . . . . . . . . . . 8-29 Ride Control Systems
Messages . . . . . . . . . . . . . . . . . . . . 4-31
Roadside Assistance Program . . . . . . . . . . . . . . . . . . . . . . 12-6
Roof Sunroof . . . . . . . . . . . . . . . . . . . . . . . 1-18
Roof Rack System . . . . . . . . . . . . . . 3-2
Rotation, Tires . . . . . . . . . . . . . . . . . 9-52
Routing, Engine Drive Belt . . . . . 11-4
Running the Vehicle While Parked . . . . . . . . . . . . . . . . . . . . . . . 8-34
S
Safety Belts . . . . . . . . . . . . . . . . . . . . 2-9
Care . . . . . . . . . . . . . . . . . . . . . . . . . . 2-22
Extender . . . . . . . . . . . . . . . . . . . . . . 2-21
How to Wear Safety BeltsProperly . . . . . . . . . . . . . . . . . . . . . 2-12
Lap-Shoulder Belt . . . . . . . . . . . . 2-17
Messages . . . . . . . . . . . . . . . . . . . . 4-32
Reminders . . . . . . . . . . . . . . . . . . . . 4-14
Replacing After a Crash . . . . . . 2-22
Use During Pregnancy . . . . . . . . 2-21 Safety Defects Reporting
Canadian Government . . . . . . 12-14
General Motors . . . . . . . . . . . . . 12-14
U.S. Government . . . . . . . . . . . 12-13
Safety Locks . . . . . . . . . . . . . . . . . . . . 1-7
Safety System Check . . . . . . . . . . 2-21
Satellite Radio . . . . . . . . . . . . . . . . . 6-14
Scheduled Maintenance . . . . . . . 10-2
Scheduling Appointments . . . . . . 12-8
Seats Adjustment, Front . . . . . . . . . . . . . . 2-3
Head Restraints . . . . . . . . . . . . . . . 2-2
Heated Front . . . . . . . . . . . . . . . . . . 2-7
Lumbar Adjustment, Front . . . . . 2-5
Power Adjustment, Front . . . . . . 2-3
Rear . . . . . . . . . . . . . . . . . . . . . . . . . . . 2-8
Reclining Seatbacks . . . . . . . . . . . 2-5
Securing Child Restraints . . . . . . . . . . . . . . 2-51, 2-54
Security Light . . . . . . . . . . . . . . . . . . . . . . . . . . 4-23
Vehicle . . . . . . . . . . . . . . . . . . . . . . . 1-12
Page 392 of 394

i-10 INDEX
ServiceAccessories and
Modifications . . . . . . . . . . . . . . . . . 9-4
Doing Your Own Work . . . . . . . . . 9-4
Engine Soon Light . . . . . . . . . . . . 4-16
Maintenance Records . . . . . . 10-10
Maintenance, General Information . . . . . . . . . . . . . . . . . . 10-1
Parts Identification Label . . . . . 11-1
Publications Ordering Information . . . . . . . . . . . . . . . . 12-12
Scheduling Appointments . . . . . 12-8
Vehicle Messages . . . . . . . . . . . . 4-32
Servicing the Airbag-Equipped Vehicle . . . . . 2-34
Shifting
Into Park . . . . . . . . . . . . . . . . . . . . . . 8-32
Out of Park . . . . . . . . . . . . . . . . . . . 8-33 Sidemarker
Bulb Replacement . . . . . . . . . . . . 9-32
Signals, Turn and Lane-Change . . . . . . . . . . . . . . . . . 5-3
Spare Tire Compact . . . . . . . . . . . . . . . . . . . . . . 9-68
Specifications and
Capacities . . . . . . . . . . . . . . . . . . . . 11-2
Speedometer . . . . . . . . . . . . . . . . . . 4-13
StabiliTrak System . . . . . . . . . . . . . 8-43
StabiliTrak
®OFF Light . . . . . . . . . 4-20
Start Assist, Hills . . . . . . . . . . . . . . 8-41
Start Vehicle, Remote . . . . . . . . . . 1-5
Starter Switch Check . . . . . . . . . . 9-25
Starting the Engine . . . . . . . . . . . . 8-30
Steering . . . . . . . . . . . . . . . . . . . . . . . . 8-5 Fluid, Power . . . . . . . . . . . . . . . . . . 9-20
Wheel Adjustment . . . . . . . . . . . . . 4-6
Wheel Controls . . . . . . . . . . . . . . . . 4-6 Stoplamps and Back-Up Lamps
Bulb Replacement . . . . . . . . . . . . 9-32
Storage Mass Media (MEM) . . . . . . . . . . . 6-25
Storage Areas Cargo Cover . . . . . . . . . . . . . . . . . . . 3-1
Center Console . . . . . . . . . . . . . . . . 3-1
Convenience Net . . . . . . . . . . . . . . 3-1
Glove Box . . . . . . . . . . . . . . . . . . . . . 3-1
Instrument Panel . . . . . . . . . . . . . . 3-1
Roof Rack System . . . . . . . . . . . . . 3-2
Stuck Vehicle . . . . . . . . . . . . . . . . . . 8-23
Sun Visors . . . . . . . . . . . . . . . . . . . . . 1-18
Sunroof . . . . . . . . . . . . . . . . . . . . . . . . 1-18
Symbols . . . . . . . . . . . . . . . . . . . . . . . . . . .v
System Roof Rack . . . . . . . . . . . . . . . . . . . . . 3-2
System Check Automatic TransmissionShiftlock Control . . . . . . . . . . . . 9-25