raise vehicle CHEVROLET EQUINOX 2014 2.G Owners Manual
[x] Cancel search | Manufacturer: CHEVROLET, Model Year: 2014, Model line: EQUINOX, Model: CHEVROLET EQUINOX 2014 2.GPages: 390, PDF Size: 5.29 MB
Page 15 of 390
Black plate (9,1)Chevrolet Equinox Owner Manual (GMNA-Localizing-U.S./Canada-
6081479) - 2014 - crc2 - 10/23/13
In Brief 1-9
.Tilt the top of the control forward
to raise.
See Reclining Seatbacks on
page 3-5.
Memory Features
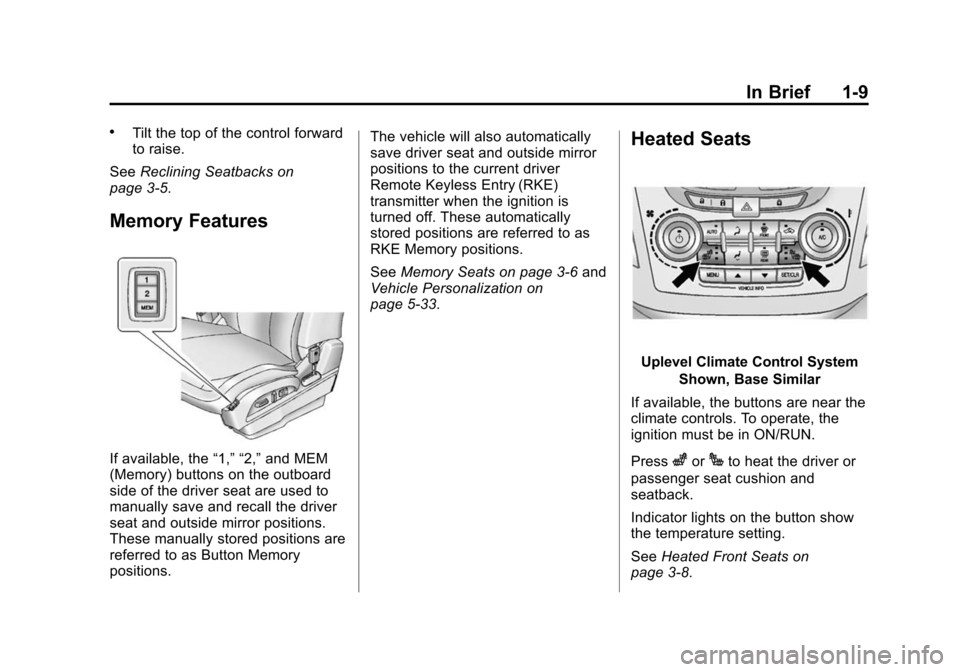
If available, the “1,” “2,”and MEM
(Memory) buttons on the outboard
side of the driver seat are used to
manually save and recall the driver
seat and outside mirror positions.
These manually stored positions are
referred to as Button Memory
positions. The vehicle will also automatically
save driver seat and outside mirror
positions to the current driver
Remote Keyless Entry (RKE)
transmitter when the ignition is
turned off. These automatically
stored positions are referred to as
RKE Memory positions.
See
Memory Seats on page 3-6 and
Vehicle Personalization on
page 5-33.
Heated Seats
Uplevel Climate Control System
Shown, Base Similar
If available, the buttons are near the
climate controls. To operate, the
ignition must be in ON/RUN.
Press
zorJto heat the driver or
passenger seat cushion and
seatback.
Indicator lights on the button show
the temperature setting.
See Heated Front Seats on
page 3-8.
Page 52 of 390
Black plate (2,1)Chevrolet Equinox Owner Manual (GMNA-Localizing-U.S./Canada-
6081479) - 2014 - crc2 - 10/23/13
3-2 Seats and Restraints
Head Restraints
Front Seats
The vehicle's front seats have head
restraints in the outboard seating
positions.
{Warning
With head restraints that are not
installed and adjusted properly,
there is a greater chance that
occupants will suffer a neck/
spinal injury in a crash. Do not
drive until the head restraints for
all occupants are installed and
adjusted properly.
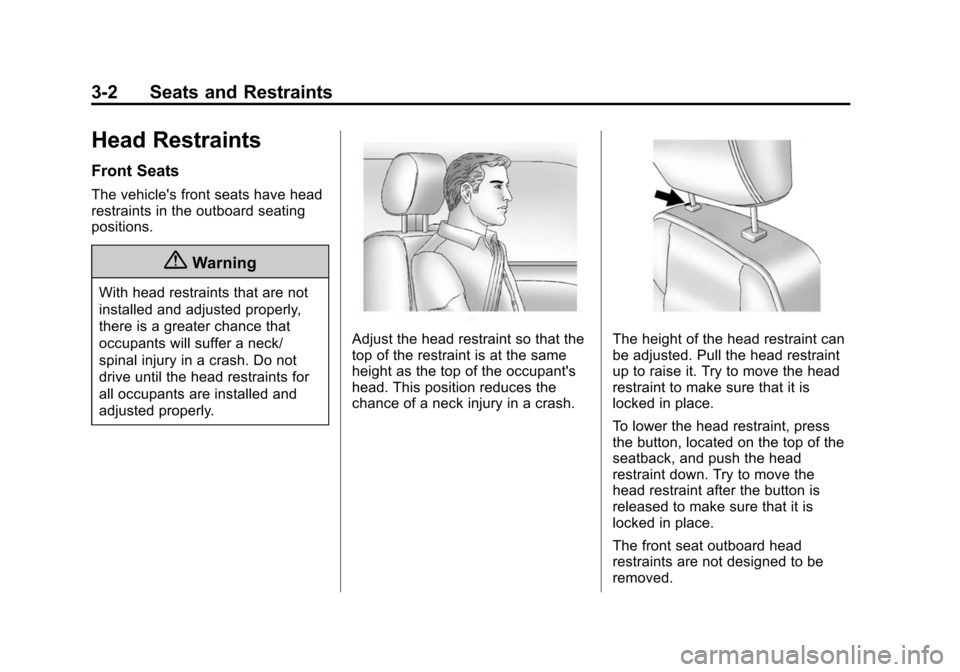
Adjust the head restraint so that the
top of the restraint is at the same
height as the top of the occupant's
head. This position reduces the
chance of a neck injury in a crash.The height of the head restraint can
be adjusted. Pull the head restraint
up to raise it. Try to move the head
restraint to make sure that it is
locked in place.
To lower the head restraint, press
the button, located on the top of the
seatback, and push the head
restraint down. Try to move the
head restraint after the button is
released to make sure that it is
locked in place.
The front seat outboard head
restraints are not designed to be
removed.
Page 56 of 390
Black plate (6,1)Chevrolet Equinox Owner Manual (GMNA-Localizing-U.S./Canada-
6081479) - 2014 - crc2 - 10/23/13
3-6 Seats and Restraints
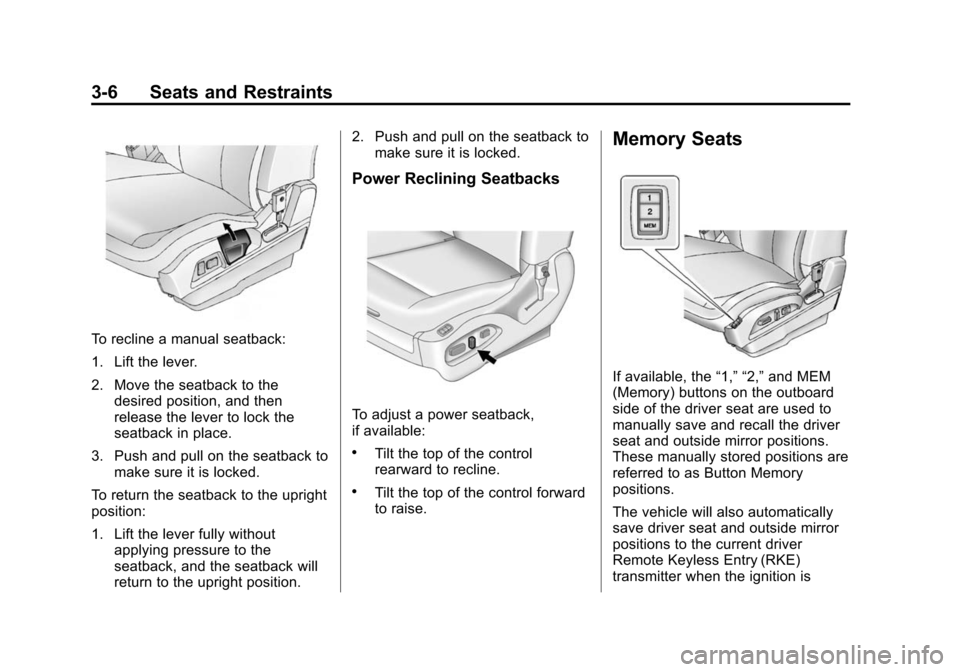
To recline a manual seatback:
1. Lift the lever.
2. Move the seatback to thedesired position, and then
release the lever to lock the
seatback in place.
3. Push and pull on the seatback to make sure it is locked.
To return the seatback to the upright
position:
1. Lift the lever fully without applying pressure to the
seatback, and the seatback will
return to the upright position. 2. Push and pull on the seatback to
make sure it is locked.
Power Reclining Seatbacks
To adjust a power seatback,
if available:
.Tilt the top of the control
rearward to recline.
.Tilt the top of the control forward
to raise.
Memory Seats
If available, the “1,” “2,”and MEM
(Memory) buttons on the outboard
side of the driver seat are used to
manually save and recall the driver
seat and outside mirror positions.
These manually stored positions are
referred to as Button Memory
positions.
The vehicle will also automatically
save driver seat and outside mirror
positions to the current driver
Remote Keyless Entry (RKE)
transmitter when the ignition is
Page 147 of 390
Black plate (3,1)Chevrolet Equinox Owner Manual (GMNA-Localizing-U.S./Canada-
6081479) - 2014 - crc2 - 10/23/13
Lighting 6-3
not operating, these lamps turn off.
Move the exterior lamp control to
P
or;to disable this feature.
Hazard Warning Flashers
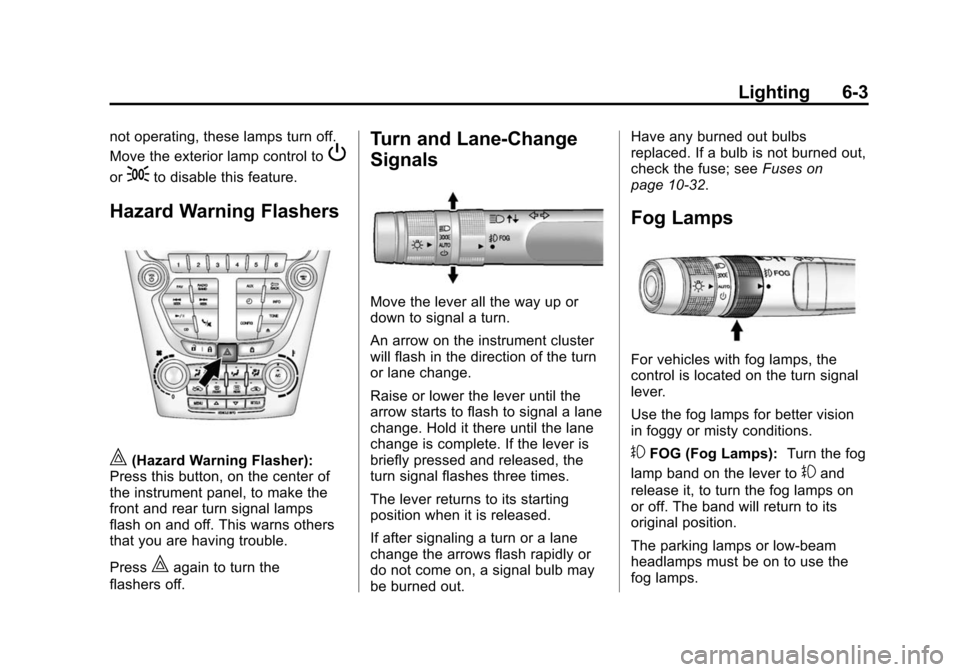
|(Hazard Warning Flasher):
Press this button, on the center of
the instrument panel, to make the
front and rear turn signal lamps
flash on and off. This warns others
that you are having trouble.
Press
|again to turn the
flashers off.
Turn and Lane-Change
Signals
Move the lever all the way up or
down to signal a turn.
An arrow on the instrument cluster
will flash in the direction of the turn
or lane change.
Raise or lower the lever until the
arrow starts to flash to signal a lane
change. Hold it there until the lane
change is complete. If the lever is
briefly pressed and released, the
turn signal flashes three times.
The lever returns to its starting
position when it is released.
If after signaling a turn or a lane
change the arrows flash rapidly or
do not come on, a signal bulb may
be burned out. Have any burned out bulbs
replaced. If a bulb is not burned out,
check the fuse; see
Fuses on
page 10-32.
Fog Lamps
For vehicles with fog lamps, the
control is located on the turn signal
lever.
Use the fog lamps for better vision
in foggy or misty conditions.
#FOG (Fog Lamps): Turn the fog
lamp band on the lever to
#and
release it, to turn the fog lamps on
or off. The band will return to its
original position.
The parking lamps or low-beam
headlamps must be on to use the
fog lamps.
Page 149 of 390
Black plate (5,1)Chevrolet Equinox Owner Manual (GMNA-Localizing-U.S./Canada-
6081479) - 2014 - crc2 - 10/23/13
Lighting 6-5
Lighting Features
Entry Lighting
The dome lamp, cargo lamp, and
foot lamp inside the vehicle come
on when any door is opened, if the
dome lamp is in the door position. In
addition, these lamps come on
when the Remote Keyless Entry
(RKE) unlock button is pressed.
They stay on for 20 seconds or until
a door is opened. After the door is
opened and then closed, the light
remains on for 20 seconds, or until
the ignition is turned to ON/RUN.
Battery Load
Management
The vehicle has Electric Power
Management (EPM) that estimates
the battery's temperature and state
of charge. It then adjusts the voltage
for best performance and extended
life of the battery.When the battery's state of charge
is low, the voltage is raised slightly
to quickly bring the charge back up.
When the state of charge is high,
the voltage is lowered slightly to
prevent overcharging. If the vehicle
has a voltmeter gauge or a voltage
display on the Driver Information
Center (DIC), you may see the
voltage move up or down. This is
normal. If there is a problem, an
alert will be displayed.
The battery can be discharged at
idle if the electrical loads are very
high. This is true for all vehicles.
This is because the generator
(alternator) may not be spinning fast
enough at idle to produce all of the
power needed for very high
electrical loads.
A high electrical load occurs when
several of the following are on, such
as: headlamps, high beams, fog
lamps, rear window defogger,
climate control fan at high speed,
heated seats, engine cooling fans,
trailer loads, and loads plugged into
accessory power outlets.EPM works to prevent excessive
discharge of the battery. It does this
by balancing the generator's output
and the vehicle's electrical needs.
It can increase engine idle speed to
generate more power whenever
needed. It can temporarily reduce
the power demands of some
accessories.
Normally, these actions occur in
steps or levels, without being
noticeable. In rare cases at the
highest levels of corrective action,
this action may be noticeable to the
driver. If so, a DIC message might
be displayed and it is recommended
that the driver reduce the electrical
loads as much as possible. See
Battery Voltage and Charging
Messages on page 5-27.
Page 199 of 390
Black plate (7,1)Chevrolet Equinox Owner Manual (GMNA-Localizing-U.S./Canada-
6081479) - 2014 - crc2 - 10/23/13
Driving and Operating 9-7
Loading the Vehicle for
Off-Road Driving
{Warning
.Unsecured cargo on the load
floor can be tossed about
when driving over rough
terrain. You or your
passengers can be struck by
flying objects. Secure the
cargo properly.
.Keep cargo in the cargo area
as far forward and as low as
possible. The heaviest things
should be on the floor,
forward of the rear axle.
.Heavy loads on the roof raise
the vehicle's center of gravity,
making it more likely to roll
over. You can be seriously or
fatally injured if the vehicle
rolls over. Put heavy loads
inside the cargo area, not on
the roof.For more information about loading
the vehicle, see
Vehicle Load Limits
on page 9-14.
Environmental Concerns
.Always use established trails,
roads, and areas that have been
set aside for public off-road
recreational driving and obey all
posted regulations.
.Do not damage shrubs, flowers,
trees, or grasses or disturb
wildlife.
.Do not park over things that
burn. See Parking over Things
That Burn on page 9-25.
Driving on Hills
Driving safely on hills requires good
judgment and an understanding of
what the vehicle can and cannot do.
{Warning
Many hills are simply too steep
for any vehicle. Driving up hills
can cause the vehicle to stall.
Driving down hills can cause loss
of control. Driving across hills can
cause a rollover. You could be
injured or killed. Do not drive on
steep hills.
Before driving on a hill, assess the
steepness, traction, and
obstructions. If the terrain ahead
cannot be seen, get out of the
vehicle and walk the hill before
driving further.
When driving on hills:
.Use a low gear and keep a firm
grip on the steering wheel.
.Maintain a slow speed.
.When possible, drive straight up
or down the hill.
.Slow down when approaching
the top of the hill.
Page 252 of 390
Black plate (4,1)Chevrolet Equinox Owner Manual (GMNA-Localizing-U.S./Canada-
6081479) - 2014 - crc2 - 10/23/13
10-4 Vehicle Care
Hood
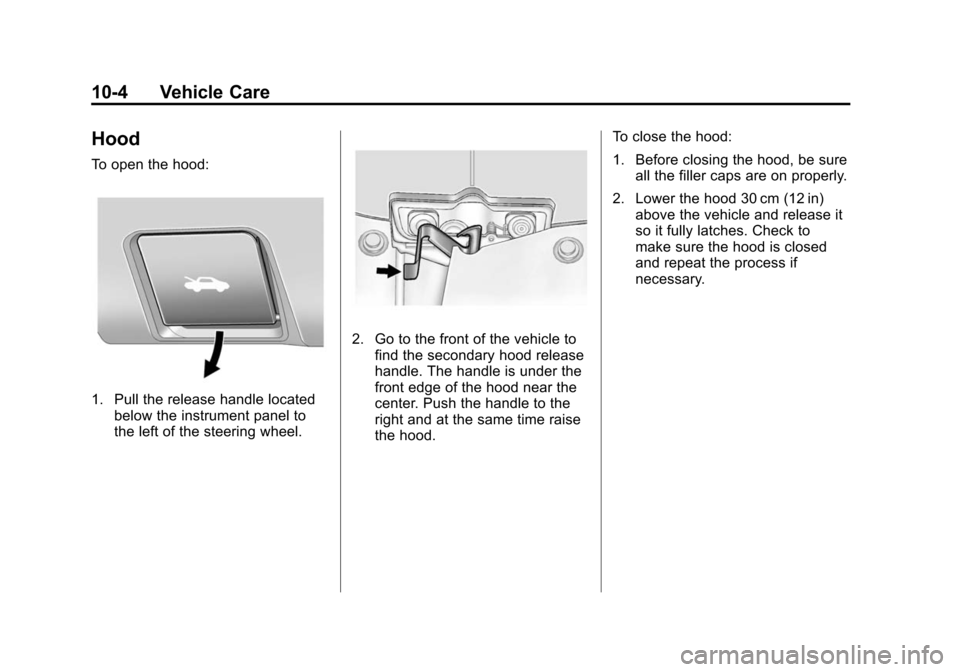
To open the hood:
1. Pull the release handle locatedbelow the instrument panel to
the left of the steering wheel.
2. Go to the front of the vehicle tofind the secondary hood release
handle. The handle is under the
front edge of the hood near the
center. Push the handle to the
right and at the same time raise
the hood. To close the hood:
1. Before closing the hood, be sure
all the filler caps are on properly.
2. Lower the hood 30 cm (12 in) above the vehicle and release it
so it fully latches. Check to
make sure the hood is closed
and repeat the process if
necessary.
Page 256 of 390
Black plate (8,1)Chevrolet Equinox Owner Manual (GMNA-Localizing-U.S./Canada-
6081479) - 2014 - crc2 - 10/23/13
10-8 Vehicle Care
1.Engine Air Cleaner/Filter on
page 10-12.
2. Power Steering Fluid Reservoir (Under Engine Cover). See
Power Steering Fluid (2.4L L4
Engine) on page 10-20 orPower
Steering Fluid (3.6L V6 Engine)
on page 10-20.
3. Engine Oil Fill Cap. See Engine
Oil on page 10-8.
4. Engine Cover on page 10-8.
5. Engine Oil Dipstick (Out of View). See Engine Oil on
page 10-8.
6. Brake Fluid Reservoir. See Brakes on page 10-21.
7. Engine Compartment Fuse
Block on page 10-32.
8. Remote Positive (+) Terminal. See Jump Starting on
page 10-67.
9. Remote Negative (−) Terminal. See Jump Starting on
page 10-67. 10.
Battery on page 10-24 (Out
of View).
11. Engine Coolant Surge Tank and Pressure Cap. See Engine
Coolant on page 10-15.
12. Windshield Washer Fluid Reservoir. See Washer Fluid
on page 10-21.
Engine Cover
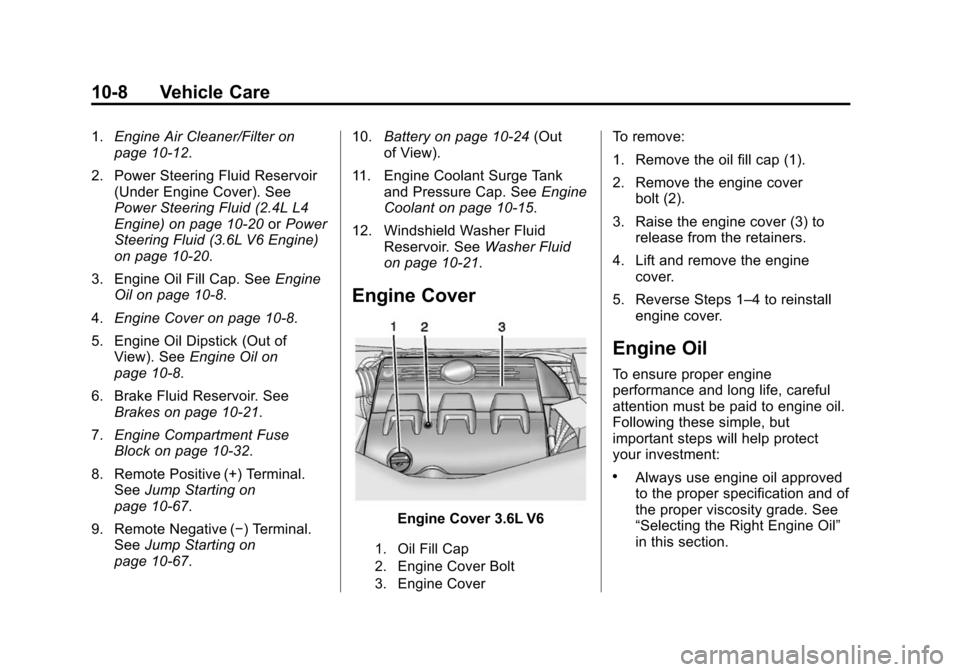
Engine Cover 3.6L V6
1. Oil Fill Cap
2. Engine Cover Bolt
3. Engine Cover
To remove:
1. Remove the oil fill cap (1).
2. Remove the engine cover bolt (2).
3. Raise the engine cover (3) to release from the retainers.
4. Lift and remove the engine cover.
5. Reverse Steps 1–4 to reinstall engine cover.
Engine Oil
To ensure proper engine
performance and long life, careful
attention must be paid to engine oil.
Following these simple, but
important steps will help protect
your investment:
.Always use engine oil approved
to the proper specification and of
the proper viscosity grade. See
“Selecting the Right Engine Oil”
in this section.
Page 301 of 390
Black plate (53,1)Chevrolet Equinox Owner Manual (GMNA-Localizing-U.S./Canada-
6081479) - 2014 - crc2 - 10/23/13
Vehicle Care 10-53
When It Is Time for New
Tires
Factors such as maintenance,
temperatures, driving speeds,
vehicle loading, and road conditions
affect the wear rate of the tires.
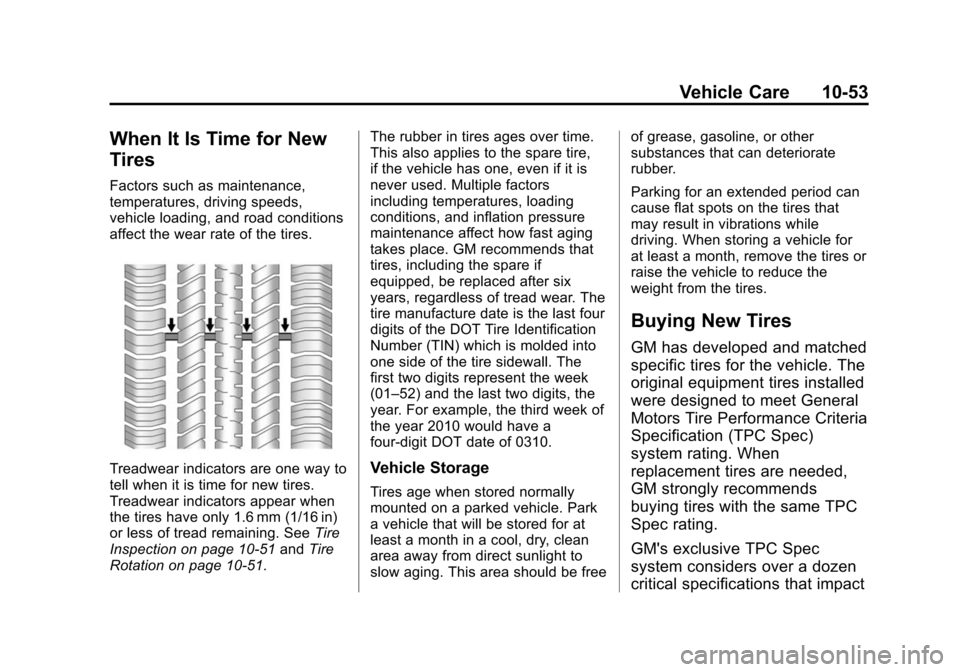
Treadwear indicators are one way to
tell when it is time for new tires.
Treadwear indicators appear when
the tires have only 1.6 mm (1/16 in)
or less of tread remaining. SeeTire
Inspection on page 10-51 andTire
Rotation on page 10-51. The rubber in tires ages over time.
This also applies to the spare tire,
if the vehicle has one, even if it is
never used. Multiple factors
including temperatures, loading
conditions, and inflation pressure
maintenance affect how fast aging
takes place. GM recommends that
tires, including the spare if
equipped, be replaced after six
years, regardless of tread wear. The
tire manufacture date is the last four
digits of the DOT Tire Identification
Number (TIN) which is molded into
one side of the tire sidewall. The
first two digits represent the week
(01–52) and the last two digits, the
year. For example, the third week of
the year 2010 would have a
four-digit DOT date of 0310.Vehicle Storage
Tires age when stored normally
mounted on a parked vehicle. Park
a vehicle that will be stored for at
least a month in a cool, dry, clean
area away from direct sunlight to
slow aging. This area should be freeof grease, gasoline, or other
substances that can deteriorate
rubber.
Parking for an extended period can
cause flat spots on the tires that
may result in vibrations while
driving. When storing a vehicle for
at least a month, remove the tires or
raise the vehicle to reduce the
weight from the tires.
Buying New Tires
GM has developed and matched
specific tires for the vehicle. The
original equipment tires installed
were designed to meet General
Motors Tire Performance Criteria
Specification (TPC Spec)
system rating. When
replacement tires are needed,
GM strongly recommends
buying tires with the same TPC
Spec rating.
GM's exclusive TPC Spec
system considers over a dozen
critical specifications that impact
Page 307 of 390
Black plate (59,1)Chevrolet Equinox Owner Manual (GMNA-Localizing-U.S./Canada-
6081479) - 2014 - crc2 - 10/23/13
Vehicle Care 10-59
A rear blowout, particularly on a
curve, acts much like a skid and
may require the same correction as
used in a skid. Stop pressing the
accelerator pedal and steer to
straighten the vehicle. It may be
very bumpy and noisy. Gently brake
to a stop, well off the road,
if possible.
{Warning
Driving on a flat tire will cause
permanent damage to the tire.
Re-inflating a tire after it has been
driven on while severely
underinflated or flat may cause a
blowout and a serious crash.
Never attempt to re-inflate a tire
that has been driven on while
severely underinflated or flat.
Have your dealer or an authorized
tire service center repair or
replace the flat tire as soon as
possible.
{Warning
Lifting a vehicle and getting under
it to do maintenance or repairs is
dangerous without the
appropriate safety equipment and
training. If a jack is provided with
the vehicle, it is designed only for
changing a flat tire. If it is used for
anything else, you or others could
be badly injured or killed if the
vehicle slips off the jack. If a jack
is provided with the vehicle, only
use it for changing a flat tire.
If a tire goes flat, avoid further tire
and wheel damage by driving slowly
to a level place, well off the road,
if possible. Turn on the hazard
warning flashers. See Hazard
Warning Flashers on page 6-3.
{Warning
Changing a tire can be
dangerous. The vehicle can slip
off the jack and roll over or fall
causing injury or death. Find a
level place to change the tire. To
help prevent the vehicle from
moving:
1. Set the parking brake firmly.
2. Put an automatic transmission in P (Park) or a
manual transmission in
1 (First) or R (Reverse).
3. Turn off the engine and do not restart while the vehicle
is raised.
4. Do not allow passengers to remain in the vehicle.
5. Place wheel blocks on both sides of the tire at the
opposite corner of the tire
being changed.