instrument panel CHEVROLET EQUINOX 2023 User Guide
[x] Cancel search | Manufacturer: CHEVROLET, Model Year: 2023, Model line: EQUINOX, Model: CHEVROLET EQUINOX 2023Pages: 360, PDF Size: 14.71 MB
Page 115 of 360
Chevrolet Equinox Owner Manual (GMNA-Localizing-U.S./Canada-
16540728) - 2023 - crc - 6/16/22
114 Lighting
Lighting
Exterior Lighting
Exterior Lamp Controls . . . . . . . . . . . . . . . . . 114
Headlamp High/Low-Beam Changer . . . . 115
Flash-to-Pass . . . . . . . . . . . . . . . . . . . . . . . . . . . 116
Daytime Running Lamps (DRL) . . . . . . . . . 116
Automatic Headlamp System . . . . . . . . . . 116
Hazard Warning Flashers . . . . . . . . . . . . . . . 117
Turn and Lane-Change Signals . . . . . . . . . . 117
Fog Lamps . . . . . . . . . . . . . . . . . . . . . . . . . . . . . 117
Interior Lighting
Instrument Panel IlluminationControl . . . . . . . . . . . . . . . . . . . . . . . . . . . . . . . 118
Courtesy Lamps . . . . . . . . . . . . . . . . . . . . . . . . 118
Dome Lamps . . . . . . . . . . . . . . . . . . . . . . . . . . . 118
Reading Lamps . . . . . . . . . . . . . . . . . . . . . . . . . 118
Lighting Features
Entry Lighting . . . . . . . . . . . . . . . . . . . . . . . . . 119
Exit Lighting . . . . . . . . . . . . . . . . . . . . . . . . . . . 119
Battery Load Management . . . . . . . . . . . . . 119
Battery Power Protection . . . . . . . . . . . . . . 120
Exterior Lighting Battery Saver . . . . . . . . 120
Exterior Lighting
Exterior Lamp Controls
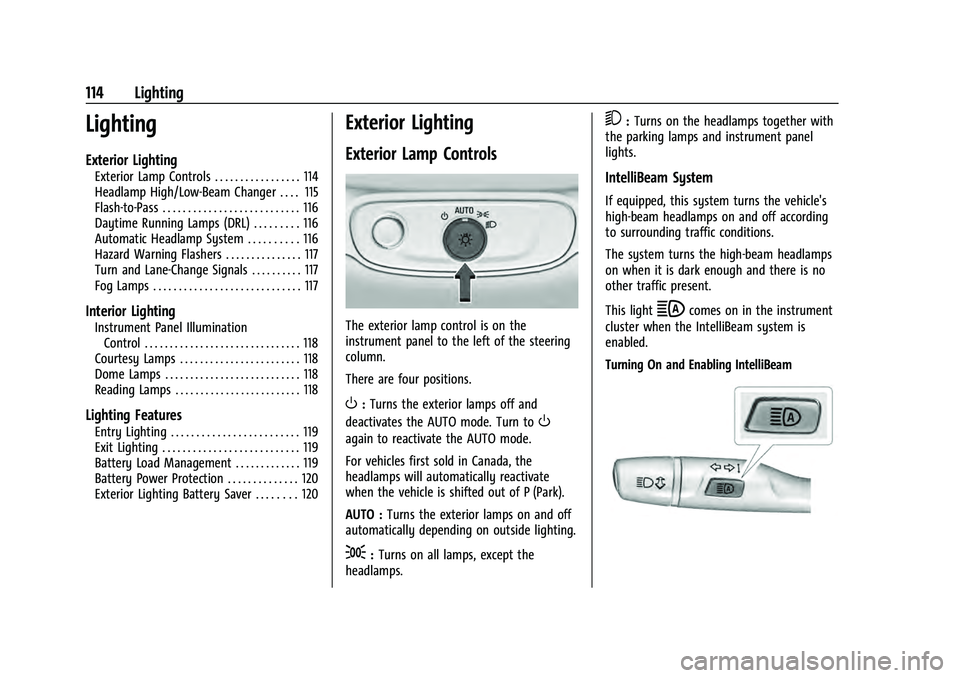
The exterior lamp control is on the
instrument panel to the left of the steering
column.
There are four positions.
O: Turns the exterior lamps off and
deactivates the AUTO mode. Turn to
O
again to reactivate the AUTO mode.
For vehicles first sold in Canada, the
headlamps will automatically reactivate
when the vehicle is shifted out of P (Park).
AUTO : Turns the exterior lamps on and off
automatically depending on outside lighting.
;: Turns on all lamps, except the
headlamps.
5: Turns on the headlamps together with
the parking lamps and instrument panel
lights.
IntelliBeam System
If equipped, this system turns the vehicle's
high-beam headlamps on and off according
to surrounding traffic conditions.
The system turns the high-beam headlamps
on when it is dark enough and there is no
other traffic present.
This light
bcomes on in the instrument
cluster when the IntelliBeam system is
enabled.
Turning On and Enabling IntelliBeam
Page 117 of 360
Chevrolet Equinox Owner Manual (GMNA-Localizing-U.S./Canada-
16540728) - 2023 - crc - 6/16/22
116 Lighting
Flash-to-Pass
The flash-to-pass feature works with the low
beams or Daytime Running Lamps (DRL) on
or off.
To flash the high beams, pull the turn signal
lever toward you momentarily and then
release it.
Daytime Running Lamps (DRL)
DRL can make it easier for others to see the
front of your vehicle during the day.
Fully functional DRL are required on all
vehicles first sold in Canada.
The DRL come on when all of the following
conditions are met:
.The vehicle is on.
.The exterior lamp control is in AUTO.
.The light sensor determines it is daytime.
The taillamps, instrument panel lights, and
other lamps will not turn on when this
feature is activated.
The DRL turn off when the headlamps are
turned to
Oor the vehicle is off.
For vehicles first sold in Canada, the DRL can
only be turned off when the vehicle is
parked.
Automatic Headlamp System
When the exterior lamp control is set to
AUTO and it is dark enough outside, the
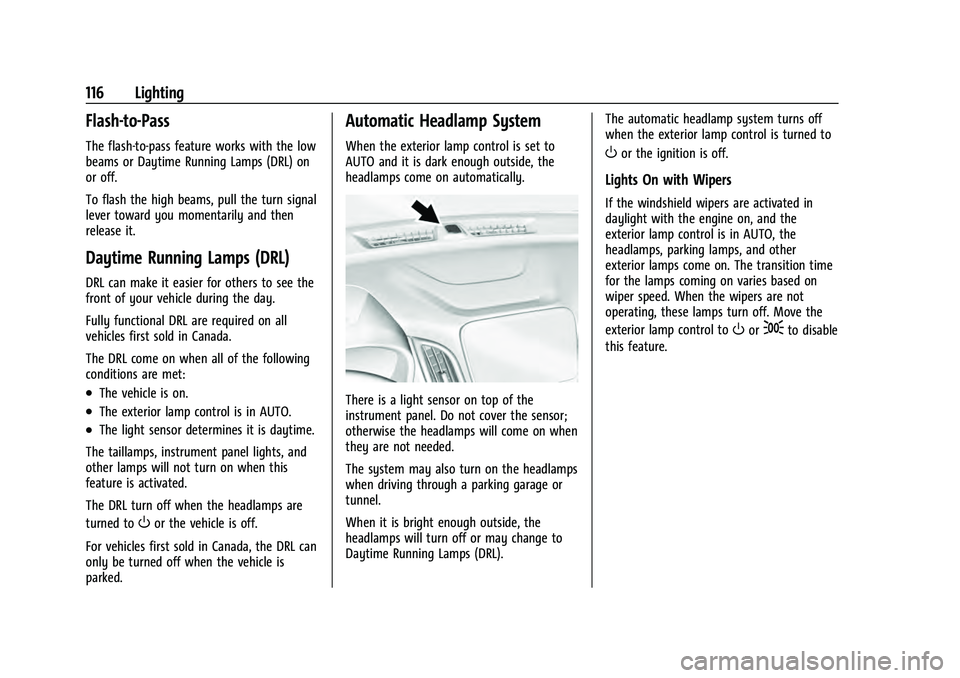
headlamps come on automatically.
There is a light sensor on top of the
instrument panel. Do not cover the sensor;
otherwise the headlamps will come on when
they are not needed.
The system may also turn on the headlamps
when driving through a parking garage or
tunnel.
When it is bright enough outside, the
headlamps will turn off or may change to
Daytime Running Lamps (DRL). The automatic headlamp system turns off
when the exterior lamp control is turned to
Oor the ignition is off.
Lights On with Wipers
If the windshield wipers are activated in
daylight with the engine on, and the
exterior lamp control is in AUTO, the
headlamps, parking lamps, and other
exterior lamps come on. The transition time
for the lamps coming on varies based on
wiper speed. When the wipers are not
operating, these lamps turn off. Move the
exterior lamp control to
Oor;to disable
this feature.
Page 119 of 360
Chevrolet Equinox Owner Manual (GMNA-Localizing-U.S./Canada-
16540728) - 2023 - crc - 6/16/22
118 Lighting
Some localities have laws that require the
high beams to be off when the fog lamps
are on.
Interior Lighting
Instrument Panel Illumination
Control
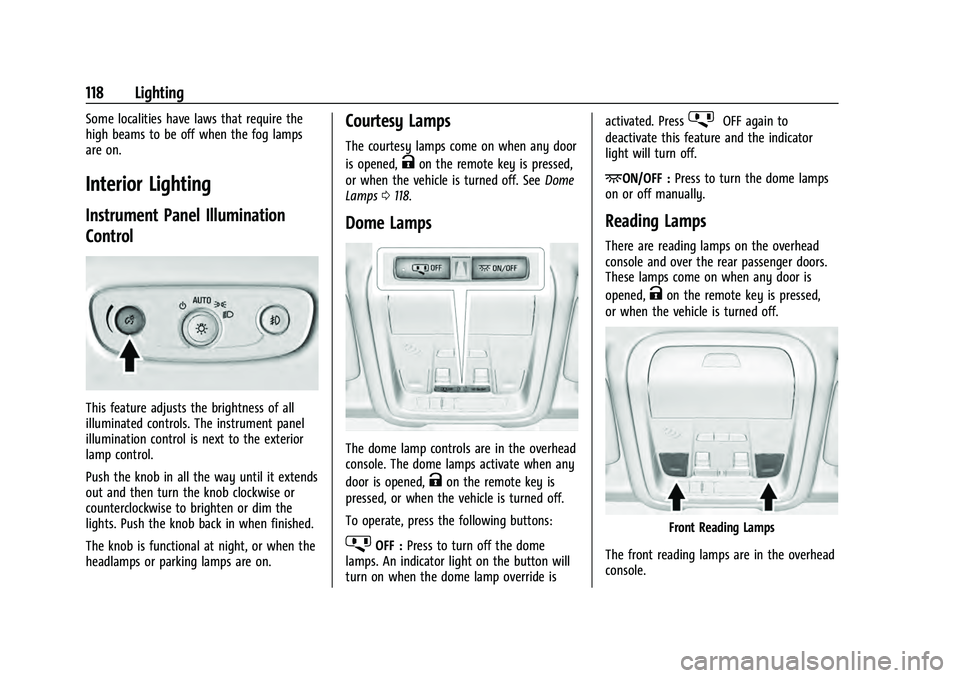
This feature adjusts the brightness of all
illuminated controls. The instrument panel
illumination control is next to the exterior
lamp control.
Push the knob in all the way until it extends
out and then turn the knob clockwise or
counterclockwise to brighten or dim the
lights. Push the knob back in when finished.
The knob is functional at night, or when the
headlamps or parking lamps are on.
Courtesy Lamps
The courtesy lamps come on when any door
is opened,
Kon the remote key is pressed,
or when the vehicle is turned off. See Dome
Lamps 0118.
Dome Lamps
The dome lamp controls are in the overhead
console. The dome lamps activate when any
door is opened,
Kon the remote key is
pressed, or when the vehicle is turned off.
To operate, press the following buttons:
jOFF : Press to turn off the dome
lamps. An indicator light on the button will
turn on when the dome lamp override is activated. Press
jOFF again to
deactivate this feature and the indicator
light will turn off.
+ON/OFF : Press to turn the dome lamps
on or off manually.
Reading Lamps
There are reading lamps on the overhead
console and over the rear passenger doors.
These lamps come on when any door is
opened,
Kon the remote key is pressed,
or when the vehicle is turned off.
Front Reading Lamps
The front reading lamps are in the overhead
console.
Page 171 of 360
Chevrolet Equinox Owner Manual (GMNA-Localizing-U.S./Canada-
16540728) - 2023 - crc - 6/16/22
170 Climate Controls
To change the current mode, select one or
more of the following:
0:Clears the windows of fog or moisture.
Air is directed to the windshield.
{: Air is directed to the instrument
panel outlets.
z: Air is directed to the floor outlets.
0MAX : Air is directed to the windshield
and the fan runs at a higher speed. Fog or
frost is cleared from the windshield more
quickly. When the button is pressed again,
the system returns to the previous mode
setting.
For best results, clear all snow and ice from
the windshield before defrosting.
A/C : Press to turn the air conditioning
system on or off. If the climate control
system is turned off or the outside
temperature falls below freezing, the air
conditioner will not run.
@: Press to turn on recirculation. An
indicator light comes on. Air is recirculated
to quickly cool the inside of the vehicle or
to reduce the entry of outside air and odors.
Rear Window Defogger
K: Press to turn the rear window defogger
on or off. An indicator light on the button
comes on to show that the rear window
defogger is on.
The rear window defogger can be turned off
by turning the vehicle off or to
accessory mode.
To turn Auto Rear Defog off or on, select
Settings > Climate and Air Quality > Auto
Rear Defog > Select ON or OFF. When Auto
Rear Defog is selected, the rear window
defogger turns on automatically when the
interior temperature is cold and the outside
temperature is about 7 °C (44 °F) and below.
The auto rear defogger turns off
automatically.
If the vehicle is equipped with heated
outside mirrors, they turn on when the rear
window defogger button is on and help to
clear fog or frost from the surface of the
mirror. See Heated Mirrors 025.
Caution
Do not try to clear frost or other material
from the inside of the front windshield
and rear window with a razor blade or
(Continued)
Caution (Continued)
anything else that is sharp. This may
damage the rear window defogger grid
and affect the radio's ability to pick up
stations clearly. The repairs would not be
covered by the vehicle warranty.
MorL:If equipped, pressMorLto
heat the driver or passenger seat. See
Heated and Ventilated Front Seats 037.
Page 173 of 360
Chevrolet Equinox Owner Manual (GMNA-Localizing-U.S./Canada-
16540728) - 2023 - crc - 6/16/22
172 Climate Controls
Manual Operation
O:Press to turn the fan off or on. When
off, no air will flow into the vehicle. Turning
the fan on, pressing any other button,
or turning a knob will turn the system back
on using the current setting.
^: Press to increase or decrease the fan
speed. The fan speed setting appears on the
main display. Pressing either button cancels
automatic fan control and the fan is
controlled manually. Press AUTO to return
to automatic operation.
Air Delivery Mode Controls : Press any
combination of
X,Y, or[to change the
direction of the airflow. The indicator light
in the button will turn on. The current mode
appears in the display screen. Pressing any
of the three buttons cancels automatic air
delivery control and the direction of the
airflow is controlled manually. Press AUTO
to return to automatic operation.
To change the current mode, select one or
more of the following:
X: Clears the windows of fog or moisture.
Air is directed to the windshield.
Y: Air is directed to the instrument panel
outlets.
[: Air is directed to the floor outlets.
0MAX : Air is directed to the windshield
and the fan runs at a higher speed. Fog or
frost is cleared from the windshield more
quickly. When the button is pressed again,
the system returns to the previous mode
setting.
For best results, clear all snow and ice from
the windshield before defrosting.
A/C : Press to turn the air conditioning
system on or off. If the climate control
system is turned off or the outside
temperature falls below freezing, the air
conditioner will not run.
Pressing this button cancels automatic air
conditioning and turns off the air
conditioner. Press AUTO to return to
automatic operation and the air conditioner
runs automatically as needed. When the
indicator light is on, the air conditioner runs
automatically to cool the air inside the
vehicle or to dry the air needed to defog
the windshield faster.
@: Press to turn on recirculation. An
indicator light comes on. Air is recirculated
to quickly cool the inside of the vehicle or
to reduce the entry of outside air and odors. Auto Defog :
The climate control system
may have a sensor to automatically detect
high humidity inside the vehicle. When high
humidity is detected, the climate control
system may adjust to outside air supply and
turn on the air conditioner. The fan speed
may slightly increase to help prevent
fogging. If the climate control system does
not detect possible window fogging, it
returns to normal operation.
To turn Auto Defog off or on, select Settings
> Climate and Air Quality > Auto Defog >
Select ON or OFF.
Rear Window Defogger
K: Press to turn the rear window defogger
on or off. An indicator light on the button
comes on to show that the rear window
defogger is on. The defogger only works
when the vehicle is on.
The rear window defogger can be turned off
by turning the vehicle off or to
accessory mode.
To turn Auto Rear Defog off or on, select
Settings > Climate and Air Quality > Auto
Rear Defog > Select ON or OFF. When auto
rear defog is selected, the rear window
defogger turns on automatically when the
interior temperature is cold and the outside
Page 174 of 360
Chevrolet Equinox Owner Manual (GMNA-Localizing-U.S./Canada-
16540728) - 2023 - crc - 6/16/22
Climate Controls 173
temperature is about 7 °C (44 °F) and below.
The Auto Rear Defogger turns off
automatically.
If the vehicle is equipped with heated
outside mirrors, they turn on when the rear
window defogger button is on and help to
clear fog or frost from the surface of the
mirror. SeeHeated Mirrors 025.
Caution
Do not try to clear frost or other material
from the inside of the front windshield
and rear window with a razor blade or
anything else that is sharp. This may
damage the rear window defogger grid
and affect the radio's ability to pick up
stations clearly. The repairs would not be
covered by the vehicle warranty.
Driver and Passenger Heated and Ventilated
Front Seats : If equipped, press
LorMto
heat the driver or passenger seat.
If equipped, press
{orCto ventilate the
driver or passenger seat. See Heated and
Ventilated Front Seats 037.
Remote Start Climate Control Operation (If
Equipped) : If the vehicle is equipped with
the remote start feature, the climate control system may run when the vehicle is started
remotely. The system uses the driver’s
previous settings to heat or cool the inside
of the vehicle. The rear defog may come on
during remote start based on cold ambient
conditions. If the vehicle has heated or
ventilated seats, they may come on during a
remote start. See
Remote Vehicle Start 014
and
Heated and Ventilated Front Seats 037.
Sensor
The solar sensor on top of the instrument
panel near the windshield monitors the
solar heat.
The climate control system uses the sensor
information to adjust the temperature, fan
speed, recirculation, and air delivery mode
for best comfort.
Do not cover the sensor; otherwise the
automatic climate control system may not
work properly.
Afterblow Feature
If equipped, under certain conditions, the
fan may stay on or may turn on and off
several times after you turn off and lock the
vehicle. This is normal.
Air Vents
Use the louvers located on the air vents to
change the direction of the airflow.
To open or close off the airflow:
.On the center air vents, move the slider
knobs up or down.
.On the outer and rear air vents, move the
slider knobs right or left.
Operation Tips
.Clear away any ice, snow, or leaves from
air inlets at the base of the windshield
that could block the flow of air into the
vehicle.
.Clear snow off the hood to improve
visibility and help decrease moisture
drawn into the vehicle, which may
improve long term system performance.
.Keep the path under the front seats clear
of objects to help circulate the air inside
of the vehicle more effectively.
.Use of non-GM approved hood deflectors
can adversely affect the performance of
the system. Check with your dealer
before adding equipment to the outside
of the vehicle.
Page 187 of 360
Chevrolet Equinox Owner Manual (GMNA-Localizing-U.S./Canada-
16540728) - 2023 - crc - 6/16/22
186 Driving and Operating
Assistance. SeeRoadside Assistance Program
0 330. To get help and keep everyone in the
vehicle safe:
.Turn on the hazard warning flashers.
.Tie a red cloth to an outside mirror.
{Warning
Snow can trap engine exhaust under the
vehicle. This may cause exhaust gases to
get inside. Engine exhaust contains
carbon monoxide (CO), which cannot be
seen or smelled. It can cause
unconsciousness and even death.
If the vehicle is stuck in snow:
.Clear snow from the base of the
vehicle, especially any blocking the
exhaust pipe.
.Open a window about 5 cm (2 in) on
the vehicle side that is away from the
wind, to bring in fresh air.
.Fully open the air outlets on or under
the instrument panel.
.Adjust the climate control system to
circulate the air inside the vehicle and
set the fan speed to the highest
setting. See “Climate Control Systems.”
(Continued)
Warning (Continued)
For more information about CO, see
Engine Exhaust 0197.
To save fuel, run the engine for short
periods to warm the vehicle and then shut
the engine off and partially close the
window. Moving about to keep warm also
helps.
If it takes time for help to arrive, when
running the engine, push the accelerator
pedal slightly so the engine runs faster than
the idle speed. This keeps the battery
charged to restart the vehicle and to signal
for help with the headlamps. Do this as
little as possible, to save fuel.
If the Vehicle Is Stuck
Slowly and cautiously spin the wheels to
free the vehicle when stuck in sand, mud,
ice, or snow.
If stuck too severely for the traction system
to free the vehicle, turn the traction system
off and use the rocking method. See
Traction Control/Electronic Stability Control
0 204.
{Warning
If the vehicle's tires spin at high speed,
they can explode, and you or others
could be injured. The vehicle can
overheat, causing an engine compartment
fire or other damage. Spin the wheels as
little as possible and avoid going above
56 km/h (35 mph).
If equipped, select All-Wheel Drive (AWD)
Mode. See All-Wheel Drive 0201.
Rocking the Vehicle to Get it Out
Turn the steering wheel left and right to
clear the area around the front wheels. Turn
off any traction system. Shift back and forth
between R (Reverse) and a low forward gear,
spinning the wheels as little as possible. To
prevent transmission wear, wait until the
wheels stop spinning before shifting gears.
Release the accelerator pedal while shifting,
and press lightly on the accelerator pedal
when the transmission is in gear. Slowly
spinning the wheels in the forward and
reverse directions causes a rocking motion
that could free the vehicle. If that does not
get the vehicle out after a few tries, it
Page 240 of 360
Chevrolet Equinox Owner Manual (GMNA-Localizing-U.S./Canada-
16540728) - 2023 - crc - 6/16/22
Driving and Operating 239
The following information has many
time-tested, important trailering tips and
safety rules. Many of these are important
for your safety and that of your passengers.
Read this section carefully before pulling a
trailer.
When towing a trailer:
.Become familiar with, and follow all state
and local laws that apply to trailer
towing. These requirements vary from
state to state.
.State laws may require the use of
extended side view mirrors. If your
visibility is limited or restricted while
towing, install extended side view mirrors
on your vehicle, even if not required.
.Do not tow a trailer during the first 800
km (500 mi) of vehicle use to prevent
damage to the engine, axle, or other
parts.
.Perform the first oil change before heavy
towing.
.Do not drive over 80 km/h (50 mph) and
do not make starts at full throttle during
the first 800 km (500 mi) of trailer
towing.
.Tow in D (Drive). If the transmission
downshifts too often, a lower gear may
be selected using Manual Mode See
Manual Mode0200.
If equipped, the following driver assistance
features should be turned off when towing
a trailer:
.Adaptive Cruise Control (ACC)
.Super Cruise Control
.Park Assist
.Automatic Parking Assist (APA)
.Reverse Automatic Braking (RAB)
If equipped, the following driver assistance
features should be turned to alert or off
when towing a trailer:
.Automatic Emergency Braking (AEB)
.Intelligent Brake Assist (IBA)
.Front Pedestrian Braking (FPB)
If equipped with Lane Change Alert (LCA),
the LCA detection zones that extend back
from the side of the vehicle do not move
further back when a trailer is towed. Use
caution while changing lanes when towing a
trailer.
If equipped with Rear Cross Traffic Alert
(RCTA), use caution while backing up when
towing a trailer, as the RCTA detection zones that extend out from the back of the vehicle
do not move further back when a trailer is
towed.
{Warning
To prevent serious injury or death from
carbon monoxide (CO), when towing a
trailer:
.Do not drive with the liftgate, trunk/
hatch, or rear-most window open.
.Fully open the air outlets on or under
the instrument panel.
.Adjust the climate control system to a
setting that brings in only outside air.
See
“Climate Control Systems” in the
Index.
For more information about carbon
monoxide, see Engine Exhaust 0197.
Towing a trailer requires experience. The
combination of the vehicle and trailer is
longer and not as responsive as the vehicle
itself. Get used to the handling and braking
of the combination by driving on a level
road surface before driving on public roads.
The trailer structure, the tires, and the
brakes must be all be rated to carry the
intended cargo. Inadequate trailer
Page 248 of 360
Chevrolet Equinox Owner Manual (GMNA-Localizing-U.S./Canada-
16540728) - 2023 - crc - 6/16/22
Vehicle Care 247
Vehicle Care
General Information
General Information . . . . . . . . . . . . . . . . . . . 248
California Perchlorate MaterialsRequirements . . . . . . . . . . . . . . . . . . . . . . . . 248
Accessories and Modifications . . . . . . . . . 248
Vehicle Checks
Doing Your Own Service Work . . . . . . . . 248
Hood . . . . . . . . . . . . . . . . . . . . . . . . . . . . . . . . . . 249
Engine Compartment Overview . . . . . . . . 251
Engine Oil . . . . . . . . . . . . . . . . . . . . . . . . . . . . . 252
Engine Oil Life System . . . . . . . . . . . . . . . . 254
Automatic Transmission Fluid . . . . . . . . . . 255
Engine Air Filter Life System . . . . . . . . . . . 255
Engine Air Cleaner/Filter . . . . . . . . . . . . . . . 255
Cooling System . . . . . . . . . . . . . . . . . . . . . . . . 257
Engine Overheating . . . . . . . . . . . . . . . . . . . 259
Washer Fluid . . . . . . . . . . . . . . . . . . . . . . . . . . 260
Brakes . . . . . . . . . . . . . . . . . . . . . . . . . . . . . . . . . 261
Brake Fluid . . . . . . . . . . . . . . . . . . . . . . . . . . . . 262
Battery - North America . . . . . . . . . . . . . . . 263
All-Wheel Drive . . . . . . . . . . . . . . . . . . . . . . . . 263
Park Brake and P (Park) Mechanism Check . . . . . . . . . . . . . . . . . . . . . . . . . . . . . . . . 263
Wiper Blade Replacement . . . . . . . . . . . . . 264
Windshield Replacement . . . . . . . . . . . . . . 265
Gas Strut(s) . . . . . . . . . . . . . . . . . . . . . . . . . . . 265
Headlamp Aiming
Front Headlamp Aiming . . . . . . . . . . . . . . . 266
Bulb Replacement
Bulb Replacement . . . . . . . . . . . . . . . . . . . . . 266
Halogen Bulbs . . . . . . . . . . . . . . . . . . . . . . . . 266
High Intensity Discharge (HID) Lighting . . . . . . . . . . . . . . . . . . . . . . . . . . . . . 267
LED Lighting . . . . . . . . . . . . . . . . . . . . . . . . . . . 267
Headlamps . . . . . . . . . . . . . . . . . . . . . . . . . . . . 267
Front Turn Signal and Fog Lamps . . . . . 268
Taillamps . . . . . . . . . . . . . . . . . . . . . . . . . . . . . . 268
License Plate Lamp . . . . . . . . . . . . . . . . . . . . 268
Electrical System
Electrical System Overload . . . . . . . . . . . . 269
Fuses and Circuit Breakers . . . . . . . . . . . . . 271
Engine Compartment Fuse Block . . . . . . . 271
Instrument Panel Fuse Block . . . . . . . . . . . 273
Rear Compartment Fuse Block . . . . . . . . . 275
Wheels and Tires
Tires . . . . . . . . . . . . . . . . . . . . . . . . . . . . . . . . . . . 277
All-Season Tires . . . . . . . . . . . . . . . . . . . . . . . . 277
Winter Tires . . . . . . . . . . . . . . . . . . . . . . . . . . . 278
Tire Sidewall Labeling . . . . . . . . . . . . . . . . . 278
Tire Designations . . . . . . . . . . . . . . . . . . . . . . 280
Tire Terminology and Definitions . . . . . 280
Tire Pressure . . . . . . . . . . . . . . . . . . . . . . . . . . 282
Tire Pressure Monitor System . . . . . . . . . 283
Tire Pressure Monitor Operation . . . . . . 284 Tire Inspection . . . . . . . . . . . . . . . . . . . . . . . . 287
Tire Rotation . . . . . . . . . . . . . . . . . . . . . . . . . . 287
When It Is Time for New Tires . . . . . . . . 288
Buying New Tires . . . . . . . . . . . . . . . . . . . . . 289
Different Size Tires and Wheels . . . . . . . 290
Uniform Tire Quality Grading . . . . . . . . . 290
Wheel Alignment and Tire Balance . . . . 292
Wheel Replacement . . . . . . . . . . . . . . . . . . . 292
Tire Chains . . . . . . . . . . . . . . . . . . . . . . . . . . . . 292
If a Tire Goes Flat . . . . . . . . . . . . . . . . . . . . . 293
Tire Changing . . . . . . . . . . . . . . . . . . . . . . . . . 294
Compact Spare Tire . . . . . . . . . . . . . . . . . . . 299
Jump Starting
Jump Starting - North America . . . . . . . . 300
Towing the Vehicle
Transporting a Disabled Vehicle . . . . . . . 302
Recreational Vehicle Towing . . . . . . . . . . . 304
Appearance Care
Exterior Care . . . . . . . . . . . . . . . . . . . . . . . . . . 306
Interior Care . . . . . . . . . . . . . . . . . . . . . . . . . . . 310
Floor Mats . . . . . . . . . . . . . . . . . . . . . . . . . . . . . 313
Page 250 of 360
Chevrolet Equinox Owner Manual (GMNA-Localizing-U.S./Canada-
16540728) - 2023 - crc - 6/16/22
Vehicle Care 249
If doing some of your own service work, use
the proper service manual. It tells you much
more about how to service the vehicle than
this manual can. To order the proper service
manual, seePublication Ordering
Information 0334.
This vehicle has an airbag system. Before
attempting to do your own service work,
see Servicing the Airbag-Equipped Vehicle
0 56.
If equipped with remote vehicle start, open
the hood before performing any service
work to prevent remote starting the vehicle
accidentally. See Remote Vehicle Start 014.
Keep a record with all parts receipts and list
the mileage and the date of any service
work performed. See Maintenance Records
0 322.
Caution
Even small amounts of contamination can
cause damage to vehicle systems. Do not
allow contaminants to contact the fluids,
reservoir caps, or dipsticks.
Hood
{Warning
For vehicles with auto engine stop/start,
turn the vehicle off before opening the
hood. If the vehicle is on, the engine will
start when the hood is opened. You or
others could be injured.
{Warning
Components under the hood can get hot
from running the engine. To help avoid
the risk of burning unprotected skin,
never touch these components until they
have cooled, and always use a glove or
towel to avoid direct skin contact.
Clear any snow from the hood before
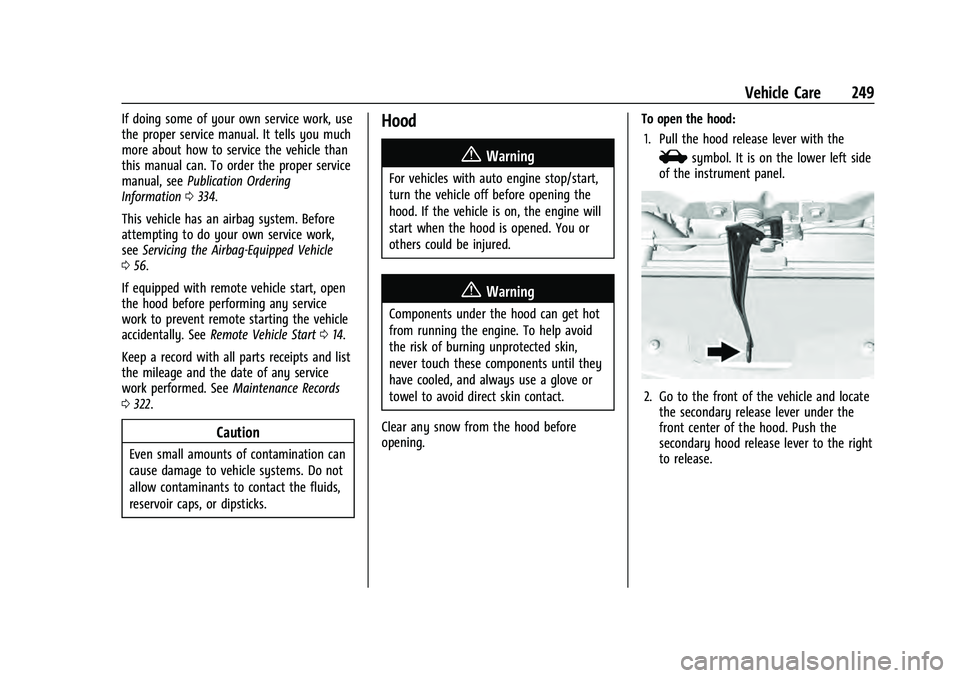
opening. To open the hood:
1. Pull the hood release lever with the
isymbol. It is on the lower left side
of the instrument panel.
2. Go to the front of the vehicle and locate the secondary release lever under the
front center of the hood. Push the
secondary hood release lever to the right
to release.