capacities CHEVROLET EXPRESS 2008 Owners Manual
[x] Cancel search | Manufacturer: CHEVROLET, Model Year: 2008, Model line: EXPRESS, Model: CHEVROLET EXPRESS 2008Pages: 440, PDF Size: 2.42 MB
Page 2 of 440

Appearance Care
...................................6-102
Vehicle Identification
...............................6-109
Electrical System
....................................6-109
Capacities and Specifications
...................6-116
Maintenance Schedule..................................... 7-1
Maintenance Schedule
................................ 7-2Customer Assistance Information.................... 8-1
Customer Assistance and Information
........... 8-2
Reporting Safety Defects
...........................8-16
Vehicle Data Recording and Privacy
...........8-18
Index................................................................ 1
Page 272 of 440
Tires..............................................................6-60
Tire Sidewall Labeling...................................6-61
Tire Terminology and Definitions.....................6-65
Inflation - Tire Pressure.................................6-68
Dual Tire Operation.......................................6-70
Tire Pressure Monitor System.........................6-70
Tire Pressure Monitor Operation.....................6-72
Tire Inspection and Rotation...........................6-75
When It Is Time for New Tires.......................6-78
Buying New Tires.........................................6-79
Different Size Tires and Wheels......................6-80
Uniform Tire Quality Grading..........................6-81
Wheel Alignment and Tire Balance..................6-82
Wheel Replacement......................................6-82
Tire Chains..................................................6-84
If a Tire Goes Flat........................................6-85
Changing a Flat Tire.....................................6-86
Removing the Spare Tire and Tools................6-87
Removing the Flat Tire and Installing the
Spare Tire................................................6-90
Secondary Latch System...............................6-97
Storing a Flat or Spare Tire and Tools...........6-100
Spare Tire.................................................6-101
Appearance Care..........................................6-102
Interior Cleaning.........................................6-102
Fabric/Carpet..............................................6-103Instrument Panel, Vinyl, and Other Plastic
Surfaces.................................................6-104
Care of Safety Belts....................................6-104
Weatherstrips.............................................6-105
Washing Your Vehicle..................................6-105
Cleaning Exterior Lamps/Lenses....................6-105
Finish Care................................................6-106
Windshield and Wiper Blades.......................6-106
Aluminum Wheels.......................................6-107
Tires.........................................................6-107
Sheet Metal Damage...................................6-107
Finish Damage...........................................6-108
Underbody Maintenance...............................6-108
Chemical Paint Spotting...............................6-108
Vehicle Identication.....................................6-109
Vehicle Identification Number (VIN)................6-109
Service Parts Identification Label...................6-109
Electrical System..........................................6-109
Add-On Electrical Equipment.........................6-109
Headlamp Wiring........................................6-110
Windshield Wiper Fuses...............................6-110
Fuses and Circuit Breakers..........................6-110
Floor Console Fuse Block............................6-111
Engine Compartment Fuse Block...................6-112
Capacities and Specications........................6-116
Section 6 Service and Appearance Care
6-2
Page 286 of 440

When to Add Engine Oil
If the oil is below the cross-hatched area at the tip of the
dipstick, add at least one quart/liter of the recommended
oil. This section explains what kind of oil to use. For
engine oil crankcase capacity, seeCapacities and
Specications on page 6-116.
Notice:Do not add too much oil. If the engine
has so much oil that the oil level gets above the
cross-hatched area that shows the proper operating
range, the engine could be damaged.SeeEngine Compartment
Overview on page 6-14
for the location of the
engine oil fill cap.
Add enough oil to put the level somewhere in the proper
operating range. Push the dipstick all the way back in
when through.
6-16
Page 312 of 440
Brake Wear
This vehicle has disc brakes. Disc brake pads have
built-in wear indicators that make a high-pitched warning
sound when the brake pads are worn and new pads
are needed. The sound can come and go or be heard all
the time the vehicle is moving, except when applying
the brake pedal firmly.
{WARNING:
The brake wear warning sound means that soon
the brakes will not work well. That could lead to an
accident. When the brake wear warning sound is
heard, have the vehicle serviced.
Notice:Continuing to drive with worn-out brake
pads could result in costly brake repair.Some driving conditions or climates can cause a brake
squeal when the brakes are first applied or lightly applied.
This does not mean something is wrong with the brakes.
Properly torqued wheel nuts are necessary to help
prevent brake pulsation. When tires are rotated, inspect
brake pads for wear and evenly tighten wheel nuts
in the proper sequence to torque specifications
inCapacities and Specications on page 6-116.
Brake linings should always be replaced as complete
axle sets.Brake Pedal Travel
See your dealer/retailer if the brake pedal does not
return to normal height, or if there is a rapid increase
in pedal travel. This could be a sign that brake service
might be required.
Brake Adjustment
Every brake stop, the brakes adjust for wear.
6-42
Page 340 of 440

Dual Tire Operation
When the vehicle is new, or whenever a wheel, wheel bolt
or wheel nut is replaced, check the wheel nut torque after
100, 1,000 and 6,000 miles (160, 1 600 and 10 000 km)
of driving. For proper wheel nut tightening information,
see “Removing the Flat Tire and Installing the Spare
Tire” later in this section, underChanging a Flat Tire
on page 6-86. Also see “Wheel Nut Torque” under
Capacities and Specications on page 6-116.
The outer tire on a dual wheel setup generally wears
faster than the inner tire. Your tires will wear more
evenly and last longer if you rotate the tires periodically.
SeeTire Inspection and Rotation on page 6-75. Also
seeScheduled Maintenance on page 7-3.
{WARNING:
If you operate your vehicle with a tire that is badly
underinflated, the tire can overheat. An overheated
tire can lose air suddenly or catch fire. You or
others could be injured. Be sure all tires (including
the spare) are properly inflated.
SeeTires on page 6-60andInation - Tire Pressure on
page 6-68for more information on proper tire inflation.
Tire Pressure Monitor System
The Tire Pressure Monitor System (TPMS) uses radio
and sensor technology to check tire pressure levels.
The TPMS sensors monitor the air pressure in
your vehicle’s tires and transmit tire pressure readings
to a receiver located in the vehicle.
Each tire, including the spare (if provided), should be
checked monthly when cold and inflated to the inflation
pressure recommended by the vehicle manufacturer
on the vehicle placard or tire inflation pressure label.
(If your vehicle has tires of a different size than the
size indicated on the vehicle placard or tire inflation
pressure label, you should determine the proper
tire inflation pressure for those tires.)
As an added safety feature, your vehicle has been
equipped with a tire pressure monitoring system (TPMS)
that illuminates a low tire pressure telltale when one
or more of your tires is significantly under-inflated.
6-70
Page 347 of 440

If the vehicle has dual rear wheels and the tread
design for the front tires is different from the dual
rear tires, always use the correct rotation pattern
shown here when rotating the tires. The dual tires
are rotated as a pair and the inside rear tires
become the outside rear tires.
When you install dual wheels, be sure that vent
holes in the inner and outer wheels on each
side are lined up.
Also seeDual Tire Operation on page 6-70for
additional information.
After the tires have been rotated, adjust the front
and rear inflation pressures as shown on the Tire
and Loading Information label. SeeInation - TirePressure on page 6-68andLoading the Vehicle
on page 5-19. Make certain that all wheel nuts are
properly tightened. See “Wheel Nut Torque” under
Capacities and Specications on page 6-116.
{WARNING:
Rust or dirt on a wheel, or on the parts to
which it is fastened, can make wheel nuts
become loose after time. The wheel could
come off and cause an accident. When you
change a wheel, remove any rust or dirt from
places where the wheel attaches to the
vehicle. In an emergency, you can use a cloth
or a paper towel to do this; but be sure to use a
scraper or wire brush later, if needed, to get all
the rust or dirt off. SeeChanging a Flat Tire on
page 6-86.
If your vehicle has a Tire Pressure Monitor
System (TPMS), reset the TPMS sensors after
rotating the tires. SeeTire Pressure Monitor
Operation on page 6-72.
Make sure the spare tire is stored securely. Push,
pull, and then try to rotate or turn the tire. If it
moves, tighten the cable. SeeStoring a Flat or
Spare Tire and Tools on page 6-100.
6-77
Page 353 of 440

Your dealer/retailer will know the kind of wheel
you need.
Each new wheel should have the same load-carrying
capacity, diameter, width, offset and be mounted
the same way as the one it replaces.
If you need to replace any of the wheels, wheel bolts,
wheel nuts or Tire Pressure Monitor System (TPMS)
sensors, replace them only with new GM original
equipment parts. This way, you will be sure to have
the right wheel, wheel bolts, wheel nuts, and TPMS
sensors for the vehicle.
{WARNING:
Using the wrong replacement wheels, wheel bolts,
or wheel nuts on your vehicle can be dangerous.
It could affect the braking and handling of your
vehicle, make your tires lose air and make you
lose control. You could have a collision in which
you or others could be injured. Always use the
correct wheel, wheel bolts, and wheel nuts for
replacement.Notice:The wrong wheel can also cause problems
with bearing life, brake cooling, speedometer or
odometer calibration, headlamp aim, bumper height,
vehicle ground clearance, and tire or tire chain
clearance to the body and chassis.
Whenever a wheel, wheel bolt or wheel nut is replaced
on a dual wheel setup, check the wheel nut torque after
100, 1,000 and 6,000 miles (160, 1 600 and 10 000 km)
of driving. For proper torque, see “Wheel Nut Torque”
underCapacities and Specications on page 6-116.
SeeChanging a Flat Tire on page 6-86for more
information.
Used Replacement Wheels
{WARNING:
Putting a used wheel on the vehicle is dangerous.
You cannot know how it has been used or how
far it has been driven. It could fail suddenly and
cause a crash. If you have to replace a wheel,
use a new GM original equipment wheel.
6-83
Page 366 of 440
{WARNING:
Wheel nuts that are improperly or incorrectly
tightened can cause the wheels to become loose or
come off. The wheel nuts should be tightened with
a torque wrench to the proper torque specification
after replacing. Follow the torque specification
supplied by the aftermarket manufacturer when
using accessory locking wheel nuts. SeeCapacities
and Specications on page 6-116for original
equipment wheel nut torque specifications.
Notice:Improperly tightened wheel nuts can lead
to brake pulsation and rotor damage. To avoid
expensive brake repairs, evenly tighten the wheel
nuts in the proper sequence and to the proper
torque specication. SeeCapacities and
Specifications on page 6-116for the wheel nut
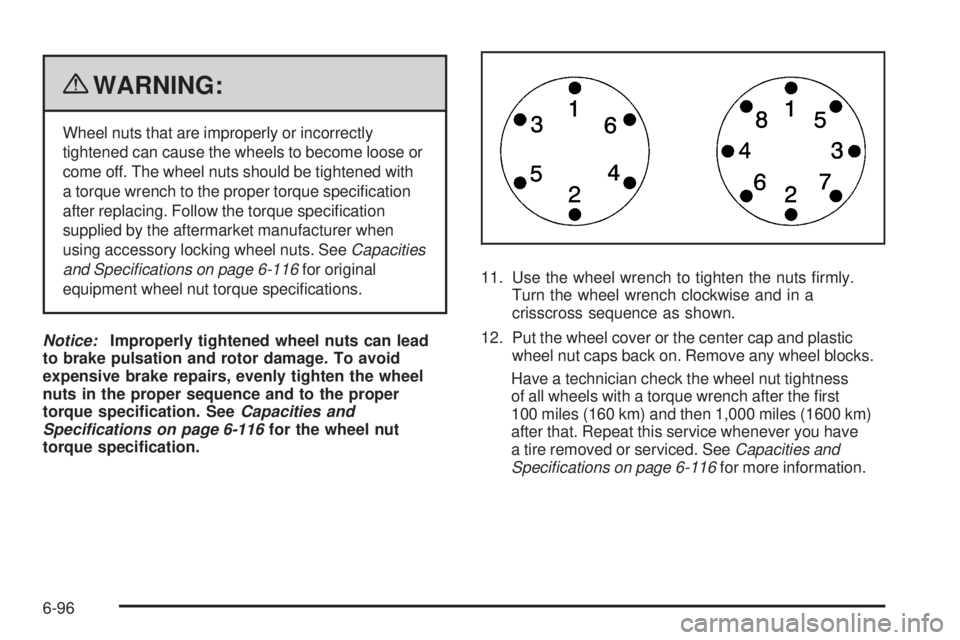
torque specication.11. Use the wheel wrench to tighten the nuts firmly.
Turn the wheel wrench clockwise and in a
crisscross sequence as shown.
12. Put the wheel cover or the center cap and plastic
wheel nut caps back on. Remove any wheel blocks.
Have a technician check the wheel nut tightness
of all wheels with a torque wrench after the first
100 miles (160 km) and then 1,000 miles (1600 km)
after that. Repeat this service whenever you have
a tire removed or serviced. SeeCapacities and
Specications on page 6-116for more information.
6-96
Page 379 of 440

Vehicle Identication
Vehicle Identication Number (VIN)
This legal identifier is in the front corner of the
instrument panel, on the driver side. It can be seen
through the windshield from outside. The VIN also
appears on the Certification/Tire and Service Parts
labels and certificates of title and registration.
Engine Identication
The eighth character in the VIN is the engine code.
This code identifies the vehicle’s engine, specifications,
and replacement parts. See “Engine Specifications”
underCapacities and Specications on page 6-116for
the vehicle’s engine code.
Service Parts Identication Label
This label, on the front passenger door frame, has the
following information:
•Vehicle Identification Number (VIN)
•Model designation
•Paint information
•Production options and special equipment
Do not remove this label from the vehicle.
Electrical System
Add-On Electrical Equipment
Notice:Do not add anything electrical to the
vehicle unless you check with your dealer/retailer
rst. Some electrical equipment can damage
the vehicle and the damage would not be covered
by the vehicle’s warranty. Some add-on electrical
equipment can keep other components from
working as they should.
Add-on equipment can drain the vehicle battery, even if
the vehicle is not operating.
6-109
Page 386 of 440

Capacities and Specications
If your vehicle has the DURAMAX Diesel engine, see the DURAMAX Diesel manual for more information.
The following approximate capacities are given in metric and English conversions. SeeRecommended Fluids and
Lubricants on page 7-12for more information.
ApplicationCapacities
Metric English
Air Conditioning Refrigerant R134aFor the air conditioning system refrigerant charge
amount, see the refrigerant caution label located
under the hood. See your dealer/retailer for more
information.
Cooling System without Rear Heat
4.3L V6 9.5 L 10.0 qt
4.8L V8, 5.3L V8 11.8 L 12.4 qt
6.0L V8 13.1 L 13.8 qt
Cooling System with Rear Heat
4.3L V6 12.3 L 13.0 qt
4.8L V8, 5.3L V8 14.6 L 15.4 qt
6.0L V8 16.1 L 17.0 qt
Engine Oil with Filter
4.3L V6 4.3 L 4.5 qt
4.8L V8, 5.3L V8, 6.0L V8 5.7 L 6.0 qt
6-116