recommended CHEVROLET EXPRESS 2016 Owner's Guide
[x] Cancel search | Manufacturer: CHEVROLET, Model Year: 2016, Model line: EXPRESS, Model: CHEVROLET EXPRESS 2016Pages: 289, PDF Size: 11.46 MB
Page 214 of 289
Chevrolet Express Owner Manual (GMNA-Localizing-U.S./Canada/Mexico-
15555951) - 2022 - CRC - 1/27/22
Vehicle Care 213
Caution (Continued)
warranty. Always use only the GM
approved tire sealant available through
your dealer or included in the vehicle.
TPMS Malfunction Light and Message
The TPMS will not function properly if one
or more of the TPMS sensors are missing or
inoperable. When the system detects a
malfunction, the low tire pressure warning
light flashes for about one minute and then
stays on for the remainder of the ignition
cycle. A DIC warning message also displays.
The malfunction light and DIC warning
message come on at each ignition cycle
until the problem is corrected. Some of the
conditions that can cause these to come
on are:
.One of the road tires has been replaced
with the spare tire. The spare tire does
not have a TPMS sensor. The malfunction
light and the DIC message should go off
after the road tire is replaced and the
sensor matching process is performed
successfully. See "TPMS Sensor Matching
Process" later in this section.
.The TPMS sensor matching process was
not done or not completed successfully
after rotating the tires. The malfunction
light and the DIC message should go off
after successfully completing the sensor
matching process. See "TPMS Sensor
Matching Process" later in this section.
.One or more TPMS sensors are missing or
damaged. The malfunction light and the
DIC message should go off when the
TPMS sensors are installed and the sensor
matching process is performed
successfully. See your dealer for service.
.Replacement tires or wheels do not match
the original equipment tires or wheels.
Tires and wheels other than those
recommended could prevent the TPMS
from functioning properly. SeeBuying
New Tires 0217.
.Operating electronic devices or being near
facilities using radio wave frequencies
similar to the TPMS could cause the TPMS
sensors to malfunction.
If the TPMS is not functioning properly, it
cannot detect or signal a low tire pressure
condition. See your dealer for service if the
TPMS malfunction light and DIC message
come on and stay on.
TPMS Sensor Matching Process
Each TPMS sensor has a unique
identification code. The identification code
needs to be matched to a new tire/wheel
position after rotating the vehicle’s tires or
replacing one or more of the TPMS sensors.
Also, the TPMS sensor matching process
should be performed after replacing a spare
tire with a road tire containing the TPMS
sensor. The malfunction light and the DIC
message should go off at the next ignition
cycle. The sensors are matched to the tire/
wheel positions, using a TPMS relearn tool,
in the following order: driver side front tire,
passenger side front tire, passenger side rear
tire, and driver side rear. See your dealer for
service or to purchase a relearn tool.
A TPMS relearn tool can also be purchased.
See Tire Pressure Monitor Sensor Activation
Tool at www.gmtoolsandequipment.com or
call 1-800-GM TOOLS (1-800-468-6657).
There are two minutes to match the first
tire/wheel position, and five minutes overall
to match all four tire/wheel positions. If it
takes longer, the matching process stops
and must be restarted.
The TPMS sensor matching process is: 1. Set the parking brake.
Page 215 of 289
Chevrolet Express Owner Manual (GMNA-Localizing-U.S./Canada/Mexico-
15555951) - 2022 - CRC - 1/27/22
214 Vehicle Care
2. Turn the ignition on without starting thevehicle. See Ignition Positions 0130.
3. Press the Remote Keyless Entry (RKE) transmitter's
QandKbuttons at the
same time for approximately
five seconds. The horn sounds twice to
signal the receiver is in relearn mode
and TIRE LEARNING ACTIVE message
displays on the DIC screen.
If the vehicle does not have RKE, press
the Driver Information Center (DIC)
vehicle information button until the
PRESS VTO RELEARN TIRE POSITIONS
message displays. The horn sounds twice
to signal the receiver is in relearn mode
and TIRE LEARNING ACTIVE message
displays on the DIC screen.
4. Start with the driver side front tire.
5. Place the relearn tool against the tire sidewall, near the valve stem. Then press
the button to activate the TPMS sensor.
A horn chirp confirms that the sensor
identification code has been matched to
this tire and wheel position.
6. Proceed to the passenger side front tire, and repeat the procedure in Step 5.
7. Proceed to the passenger side rear tire, and repeat the procedure in Step 5. 8. Proceed to the driver side rear tire, and
repeat the procedure in Step 5. The horn
sounds two times to indicate the sensor
identification code has been matched to
the driver side rear tire, and the TPMS
sensor matching process is no longer
active. The TIRE LEARNING ACTIVE
message on the DIC display screen
goes off.
9. Turn the vehicle off.
10. Set all four tires to the recommended air pressure level as indicated on the Tire
and Loading Information label.
Tire Inspection
We recommend that the tires, including
the spare tire, if the vehicle has one, be
inspected for signs of wear or damage
at least once a month.
Replace the tire if:
.The indicators at three or more
places around the tire can be seen.
.There is cord or fabric showing
through the tire's rubber.
.The tread or sidewall is cracked, cut,
or snagged deep enough to show
cord or fabric.
.The tire has a bump, bulge, or split.
.The tire has a puncture, cut, or other
damage that cannot be repaired well
because of the size or location of the
damage.
Tire Rotation
Tires should be rotated every 12 000 km
(7,500 mi). See Maintenance Schedule
0 245.
Tires are rotated to achieve a more
uniform wear for all tires. The first
rotation is the most important.
Anytime unusual wear is noticed, rotate
the tires as soon as possible, check for
proper tire inflation pressure, and check
for damaged tires or wheels. If the
unusual wear continues after the
rotation, check the wheel alignment.
See When It Is Time for New Tires 0216
and Wheel Replacement 0220.
Page 216 of 289
Chevrolet Express Owner Manual (GMNA-Localizing-U.S./Canada/Mexico-
15555951) - 2022 - CRC - 1/27/22
Vehicle Care 215
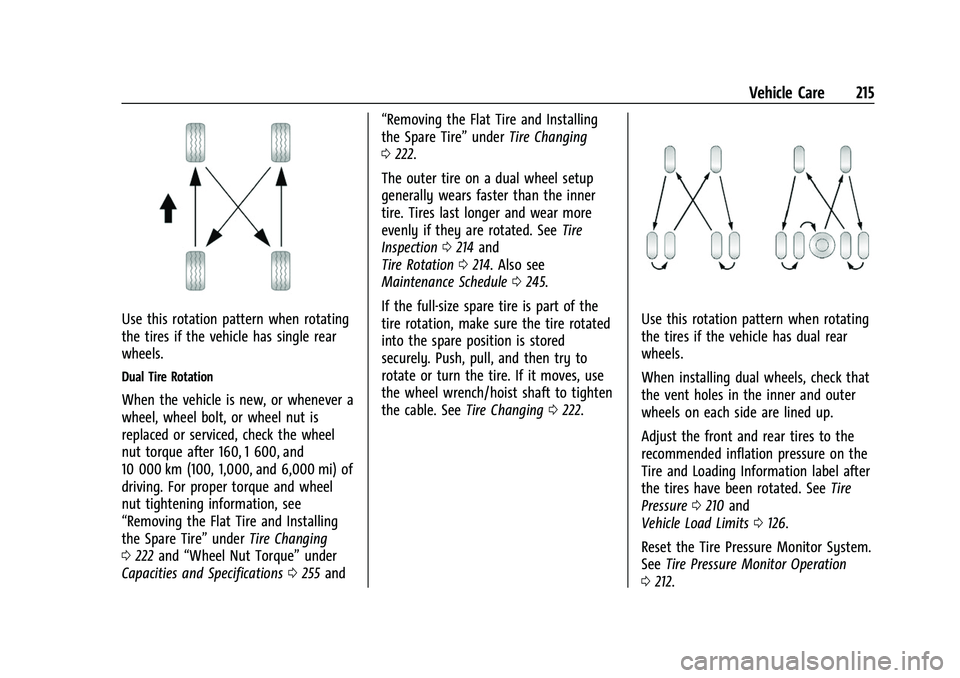
Use this rotation pattern when rotating
the tires if the vehicle has single rear
wheels.
Dual Tire Rotation
When the vehicle is new, or whenever a
wheel, wheel bolt, or wheel nut is
replaced or serviced, check the wheel
nut torque after 160, 1 600, and
10 000 km (100, 1,000, and 6,000 mi) of
driving. For proper torque and wheel
nut tightening information, see
“Removing the Flat Tire and Installing
the Spare Tire”underTire Changing
0 222 and “Wheel Nut Torque” under
Capacities and Specifications 0255 and “Removing the Flat Tire and Installing
the Spare Tire”
underTire Changing
0 222.
The outer tire on a dual wheel setup
generally wears faster than the inner
tire. Tires last longer and wear more
evenly if they are rotated. See Tire
Inspection 0214 and
Tire Rotation 0214. Also see
Maintenance Schedule 0245.
If the full-size spare tire is part of the
tire rotation, make sure the tire rotated
into the spare position is stored
securely. Push, pull, and then try to
rotate or turn the tire. If it moves, use
the wheel wrench/hoist shaft to tighten
the cable. See Tire Changing0222.
Use this rotation pattern when rotating
the tires if the vehicle has dual rear
wheels.
When installing dual wheels, check that
the vent holes in the inner and outer
wheels on each side are lined up.
Adjust the front and rear tires to the
recommended inflation pressure on the
Tire and Loading Information label after
the tires have been rotated. See Tire
Pressure 0210 and
Vehicle Load Limits 0126.
Reset the Tire Pressure Monitor System.
See Tire Pressure Monitor Operation
0 212.
Page 219 of 289
Chevrolet Express Owner Manual (GMNA-Localizing-U.S./Canada/Mexico-
15555951) - 2022 - CRC - 1/27/22
218 Vehicle Care
Warning (Continued)
suddenly and cause a crash. Use only
radial-ply tires with the wheels on
the vehicle.
Winter tires with the same speed rating
as the original equipment tires may not
be available for H, V, W, Y and ZR
speed rated tires. Never exceed the
winter tires’ maximum speed capability
when using winter tires with a lower
speed rating.
If the vehicle tires must be replaced
with a tire that does not have a TPC
Spec number, make sure they are the
same size, load range, speed rating, and
construction (radial) as the original
tires.
The Tire and Loading Information label
indicates the original equipment tires
on the vehicle. See Vehicle Load Limits
0 126.Different Size Tires and Wheels
If wheels or tires are installed that are a
different size than the original equipment
wheels and tires, vehicle performance,
including its braking, ride and handling
characteristics, stability, and resistance to
rollover may be affected. If the vehicle has
electronic systems such as antilock brakes,
rollover airbags, traction control, electronic
stability control, or All-Wheel Drive, the
performance of these systems can also be
affected.
{Warning
If different sized wheels are used, there
may not be an acceptable level of
performance and safety if tires not
recommended for those wheels are
selected. This increases the chance of a
crash and serious injury. Only use GM
specific wheel and tire systems developed
for the vehicle, and have them properly
installed by a GM certified technician.
See Buying New Tires 0217 and
Accessories and Modifications 0173.
Uniform Tire Quality Grading
The following information relates to the
system developed by the United States
National Highway Traffic Safety
Administration (NHTSA), which grades
tires by treadwear, traction, and
temperature performance. This applies
only to vehicles sold in the United
States. The grades are molded on the
sidewalls of most passenger car tires.
The Uniform Tire Quality Grading
(UTQG) system does not apply to deep
tread, winter tires, compact spare tires,
tires with nominal rim diameters of
10 to 12 inches (25 to 30 cm), or to some
limited-production tires.
While the tires available on General
Motors passenger cars and light trucks
may vary with respect to these grades,
they must also conform to federal
safety requirements and additional
General Motors Tire Performance
Criteria (TPC) standards.
Page 222 of 289
Chevrolet Express Owner Manual (GMNA-Localizing-U.S./Canada/Mexico-
15555951) - 2022 - CRC - 1/27/22
Vehicle Care 221
Caution (Continued)
Tighten them as tightly as possible with
the ends securely fastened. Drive slowly
and follow the chain manufacturer's
instructions. If the chains contact the
vehicle, stop and retighten them. If the
contact continues, slow down until it
stops. Driving too fast or spinning the
wheels with chains on will damage the
vehicle.
For Cutaway models with LT245/75R16 or
LT225/75R16 size single or dual rear tires, use
Low Profile Z-Chain or SAE Class S cables.
For Cargo or Passenger models with
LT225/75R16 or LT245/75R16 size tires, use
Low Profile Z-Chain cables. SAE Class S chains
are not recommended.
If the vehicle has dual rear tires, do not use
individual tire chains. Use tire chains that fit
across both dual tires.
If a Tire Goes Flat
It is unusual for a tire to blow out while
driving, especially if the tires are maintained
properly. See Tires0204. If air goes out of
a tire, it is much more likely to leak out slowly. But if there is ever a blowout, here
are a few tips about what to expect and
what to do:
If a front tire fails, the flat tire creates a
drag that pulls the vehicle toward that side.
Take your foot off the accelerator pedal and
grip the steering wheel firmly. Steer to
maintain lane position, and then gently
brake to a stop, well off the road,
if possible.
A rear blowout, particularly on a curve, acts
much like a skid and may require the same
correction as used in a skid. Stop pressing
the accelerator pedal and steer to straighten
the vehicle. It may be very bumpy and
noisy. Gently brake to a stop, well off the
road, if possible.
{Warning
Driving on a flat tire will cause
permanent damage to the tire.
Re-inflating a tire after it has been driven
on while severely underinflated or flat
may cause a blowout and a serious crash.
Never attempt to re-inflate a tire that has
been driven on while severely
(Continued)
Warning (Continued)
underinflated or flat. Have your dealer or
an authorized tire service center repair or
replace the flat tire as soon as possible.
{Warning
Lifting a vehicle and getting under it to
do maintenance or repairs is dangerous
without the appropriate safety equipment
and training. If a jack is provided with
the vehicle, it is designed only for
changing a flat tire. If it is used for
anything else, you or others could be
badly injured or killed if the vehicle slips
off the jack. If a jack is provided with the
vehicle, only use it for changing a
flat tire.
If a tire goes flat, avoid further tire and
wheel damage by driving slowly to a level
place, well off the road, if possible. Turn on
the hazard warning flashers. See Hazard
Warning Flashers 093.
Page 230 of 289
Chevrolet Express Owner Manual (GMNA-Localizing-U.S./Canada/Mexico-
15555951) - 2022 - CRC - 1/27/22
Vehicle Care 229
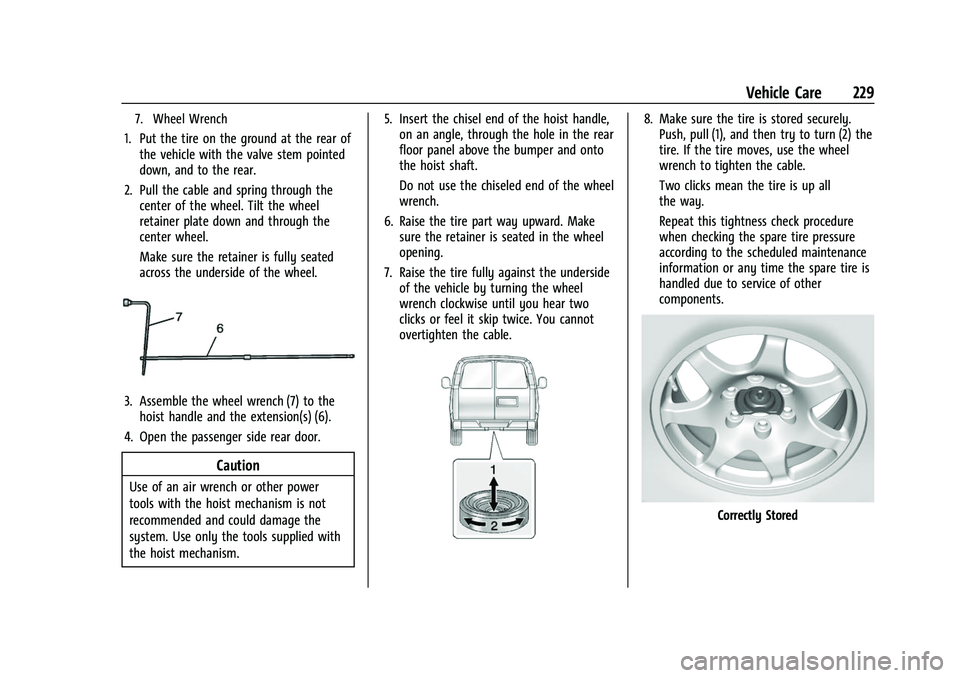
7. Wheel Wrench
1. Put the tire on the ground at the rear ofthe vehicle with the valve stem pointed
down, and to the rear.
2. Pull the cable and spring through the center of the wheel. Tilt the wheel
retainer plate down and through the
center wheel.
Make sure the retainer is fully seated
across the underside of the wheel.
3. Assemble the wheel wrench (7) to thehoist handle and the extension(s) (6).
4. Open the passenger side rear door.
Caution
Use of an air wrench or other power
tools with the hoist mechanism is not
recommended and could damage the
system. Use only the tools supplied with
the hoist mechanism. 5. Insert the chisel end of the hoist handle,
on an angle, through the hole in the rear
floor panel above the bumper and onto
the hoist shaft.
Do not use the chiseled end of the wheel
wrench.
6. Raise the tire part way upward. Make sure the retainer is seated in the wheel
opening.
7. Raise the tire fully against the underside of the vehicle by turning the wheel
wrench clockwise until you hear two
clicks or feel it skip twice. You cannot
overtighten the cable.
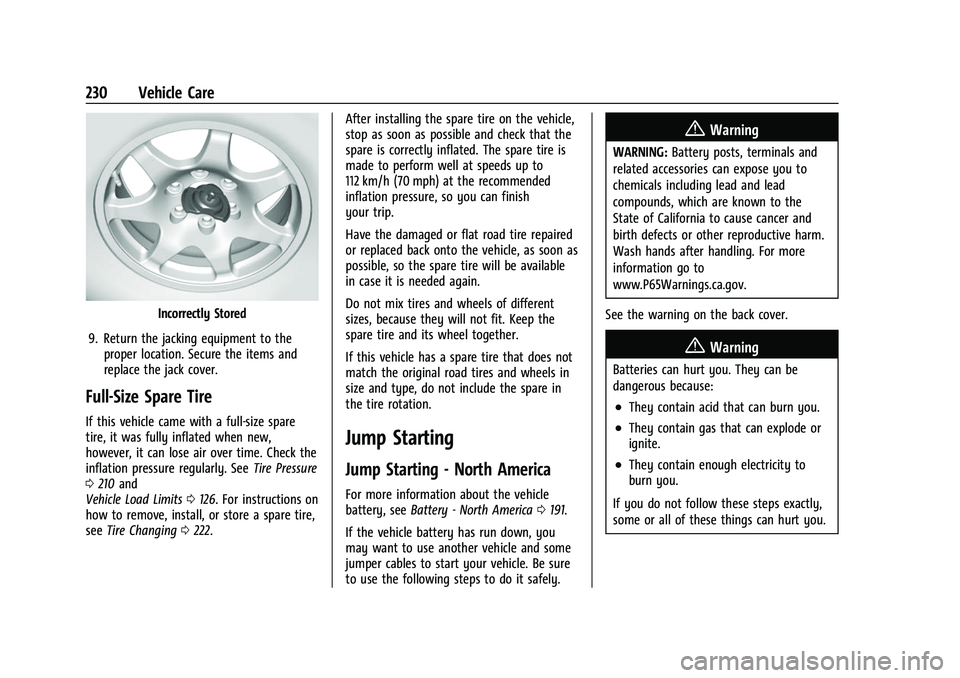
8. Make sure the tire is stored securely.Push, pull (1), and then try to turn (2) the
tire. If the tire moves, use the wheel
wrench to tighten the cable.
Two clicks mean the tire is up all
the way.
Repeat this tightness check procedure
when checking the spare tire pressure
according to the scheduled maintenance
information or any time the spare tire is
handled due to service of other
components.
Correctly Stored
Page 231 of 289
Chevrolet Express Owner Manual (GMNA-Localizing-U.S./Canada/Mexico-
15555951) - 2022 - CRC - 1/27/22
230 Vehicle Care
Incorrectly Stored
9. Return the jacking equipment to the proper location. Secure the items and
replace the jack cover.
Full-Size Spare Tire
If this vehicle came with a full-size spare
tire, it was fully inflated when new,
however, it can lose air over time. Check the
inflation pressure regularly. See Tire Pressure
0 210 and
Vehicle Load Limits 0126. For instructions on
how to remove, install, or store a spare tire,
see Tire Changing 0222. After installing the spare tire on the vehicle,
stop as soon as possible and check that the
spare is correctly inflated. The spare tire is
made to perform well at speeds up to
112 km/h (70 mph) at the recommended
inflation pressure, so you can finish
your trip.
Have the damaged or flat road tire repaired
or replaced back onto the vehicle, as soon as
possible, so the spare tire will be available
in case it is needed again.
Do not mix tires and wheels of different
sizes, because they will not fit. Keep the
spare tire and its wheel together.
If this vehicle has a spare tire that does not
match the original road tires and wheels in
size and type, do not include the spare in
the tire rotation.
Jump Starting
Jump Starting - North America
For more information about the vehicle
battery, see
Battery - North America 0191.
If the vehicle battery has run down, you
may want to use another vehicle and some
jumper cables to start your vehicle. Be sure
to use the following steps to do it safely.
{Warning
WARNING: Battery posts, terminals and
related accessories can expose you to
chemicals including lead and lead
compounds, which are known to the
State of California to cause cancer and
birth defects or other reproductive harm.
Wash hands after handling. For more
information go to
www.P65Warnings.ca.gov.
See the warning on the back cover.
{Warning
Batteries can hurt you. They can be
dangerous because:
.They contain acid that can burn you.
.They contain gas that can explode or
ignite.
.They contain enough electricity to
burn you.
If you do not follow these steps exactly,
some or all of these things can hurt you.
Page 236 of 289
Chevrolet Express Owner Manual (GMNA-Localizing-U.S./Canada/Mexico-
15555951) - 2022 - CRC - 1/27/22
Vehicle Care 235
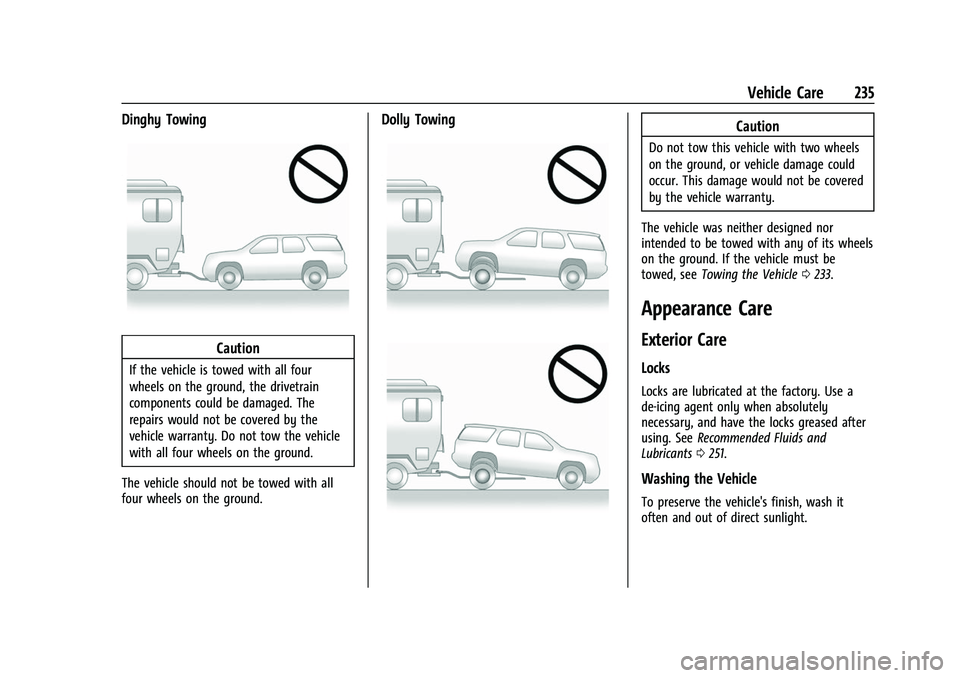
Dinghy Towing
Caution
If the vehicle is towed with all four
wheels on the ground, the drivetrain
components could be damaged. The
repairs would not be covered by the
vehicle warranty. Do not tow the vehicle
with all four wheels on the ground.
The vehicle should not be towed with all
four wheels on the ground.
Dolly TowingCaution
Do not tow this vehicle with two wheels
on the ground, or vehicle damage could
occur. This damage would not be covered
by the vehicle warranty.
The vehicle was neither designed nor
intended to be towed with any of its wheels
on the ground. If the vehicle must be
towed, see Towing the Vehicle 0233.
Appearance Care
Exterior Care
Locks
Locks are lubricated at the factory. Use a
de-icing agent only when absolutely
necessary, and have the locks greased after
using. See Recommended Fluids and
Lubricants 0251.
Washing the Vehicle
To preserve the vehicle's finish, wash it
often and out of direct sunlight.
Page 237 of 289

Chevrolet Express Owner Manual (GMNA-Localizing-U.S./Canada/Mexico-
15555951) - 2022 - CRC - 1/27/22
236 Vehicle Care
Caution
Do not use petroleum-based, acidic,
or abrasive cleaning agents as they can
damage the vehicle's paint, metal,
or plastic parts. If damage occurs, it
would not be covered by the vehicle
warranty. Approved cleaning products can
be obtained from your dealer. Follow all
manufacturer directions regarding correct
product usage, necessary safety
precautions, and appropriate disposal of
any vehicle care product.
Caution
Avoid using high-pressure washes closer
than 30 cm (12 in) to the surface of the
vehicle. Use of power washers exceeding
8 274 kPa (1,200 psi) can result in
damage or removal of paint and decals.
If using an automatic car wash, follow the
car wash instructions. The windshield wiper
and rear window wiper, if equipped, must
be off. Remove any accessories that may be
damaged or interfere with the car wash
equipment. Rinse the vehicle well, before washing and
after, to remove all cleaning agents
completely. If they are allowed to dry on
the surface, they could stain.
Dry the finish with a soft, clean chamois or
an all-cotton towel to avoid surface
scratches and water spotting.
Cleaning Underhood Components
Caution
Do not power wash any component
under the hood that has this
e
symbol.
This could cause damage that would not
be covered by the vehicle warranty.
Solvents or aggressive cleaners may harm
underhood components. The usages of these
chemicals should be avoided.
Recommend water only.
A pressure washer may be used, but care
must be utilized. The following criteria must
be followed:
.Water pressure must be kept below
14 000 KPa (2,000 PSI).
.Water temperature must be below 80 °C
(180 °F).
.Spray nozzle with a 40 degree wide angle
spray pattern or wider must be used.
.Nozzle must be kept at least 30 cm (1 ft)
away from all surfaces.
Finish Care
Application of aftermarket clearcoat sealant/
wax materials is not recommended.
If painted surfaces are damaged, see your
dealer to have the damage assessed and
repaired. Foreign materials such as calcium
chloride and other salts, ice melting agents,
road oil and tar, tree sap, bird droppings,
chemicals from industrial chimneys, etc., can
damage the vehicle's finish if they remain
on painted surfaces. Wash the vehicle as
soon as possible. If necessary, use
non-abrasive cleaners that are marked safe
for painted surfaces to remove foreign
matter.
Occasional hand waxing or mild polishing
should be done to remove residue from the
paint finish. See your dealer for approved
cleaning products.
Do not apply waxes or polishes to uncoated
plastic, vinyl, rubber, decals, simulated
wood, or flat paint as damage can occur.
Page 239 of 289
Chevrolet Express Owner Manual (GMNA-Localizing-U.S./Canada/Mexico-
15555951) - 2022 - CRC - 1/27/22
238 Vehicle Care
Windshield and Wiper Blades
Clean the outside of the windshield with
glass cleaner.
Clean rubber blades using a lint-free cloth or
paper towel soaked with windshield washer
fluid or a mild detergent. Wash the
windshield thoroughly when cleaning the
blades. Bugs, road grime, sap, and a buildup
of vehicle wash/wax treatments may cause
wiper streaking.
Replace the wiper blades if they are worn or
damaged. Damage can be caused by
extreme dusty conditions, sand, salt, heat,
sun, snow, and ice.
Weatherstrips
Apply weatherstrip lubricant on
weatherstrips to make them last longer, seal
better, and not stick or squeak. Lubricate
weatherstrips at least once a year. Hot, dry
climates may require more frequent
application. Black marks from rubber
material on painted surfaces can be removed
by rubbing with a clean cloth. See
Recommended Fluids and Lubricants0251.
Tires
Use a stiff brush with tire cleaner to clean
the tires.
Caution
Using petroleum-based tire dressing
products on the vehicle may damage the
paint finish and/or tires. When applying a
tire dressing, always wipe off any
overspray from all painted surfaces on
the vehicle.
Wheels and Wheel Trim
Use a soft, clean cloth with mild soap and
water to clean the wheels. After rinsing
thoroughly with clean water, dry with a
soft, clean towel. A wax may then be
applied.
Caution
Chrome wheels and chrome wheel trim
may be damaged if the vehicle is not
washed after driving on roads that have
been sprayed with magnesium chloride or
calcium chloride. These are used on roads
for conditions such as dust and ice.
Always wash the chrome with soap and
water after exposure.
Caution
To avoid surface damage on wheels and
wheel trim, do not use strong soaps,
chemicals, abrasive polishes, cleaners,
or brushes. Use only GM approved
cleaners. Do not drive the vehicle through
an automatic car wash that uses silicon
carbide tire/wheel cleaning brushes.
Damage could occur and the repairs
would not be covered by the vehicle
warranty.
Brake System
Visually inspect brake lines and hoses for
proper hook-up, binding, leaks, cracks,
chafing, etc. Inspect disc brake pads for wear
and rotors for surface condition. Inspect
drum brake linings/shoes for wear or cracks.
Inspect all other brake parts.
Steering, Suspension, and Chassis
Components
Visually inspect steering, suspension, and
chassis components for damaged, loose,
or missing parts or signs of wear at least
once a year.