tires CHEVROLET EXPRESS 2020 Get To Know Guide
[x] Cancel search | Manufacturer: CHEVROLET, Model Year: 2020, Model line: EXPRESS, Model: CHEVROLET EXPRESS 2020Pages: 356, PDF Size: 5.7 MB
Page 160 of 356
Chevrolet Express Owner Manual (GMNA-Localizing-U.S./Canada/Mexico-
13882570) - 2020 - CRC - 11/1/19
Driving and Operating 159
Tire and Loading Information
Label
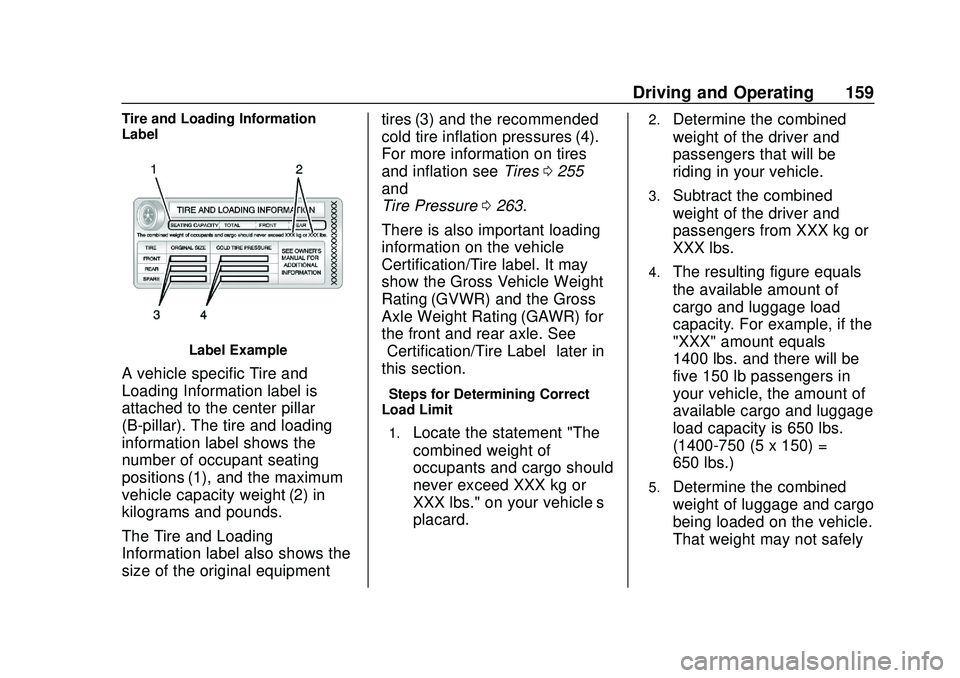
Label Example
A vehicle specific Tire and
Loading Information label is
attached to the center pillar
(B-pillar). The tire and loading
information label shows the
number of occupant seating
positions (1), and the maximum
vehicle capacity weight (2) in
kilograms and pounds.
The Tire and Loading
Information label also shows the
size of the original equipmenttires (3) and the recommended
cold tire inflation pressures (4).
For more information on tires
and inflation see
Tires0255
and
Tire Pressure 0263.
There is also important loading
information on the vehicle
Certification/Tire label. It may
show the Gross Vehicle Weight
Rating (GVWR) and the Gross
Axle Weight Rating (GAWR) for
the front and rear axle. See
“Certification/Tire Label” later in
this section.
“Steps for Determining Correct
Load Limit–
1.
Locate the statement "The
combined weight of
occupants and cargo should
never exceed XXX kg or
XXX lbs." on your vehicle’s
placard.
2.Determine the combined
weight of the driver and
passengers that will be
riding in your vehicle.
3.Subtract the combined
weight of the driver and
passengers from XXX kg or
XXX lbs.
4.The resulting figure equals
the available amount of
cargo and luggage load
capacity. For example, if the
"XXX" amount equals
1400 lbs. and there will be
five 150 lb passengers in
your vehicle, the amount of
available cargo and luggage
load capacity is 650 lbs.
(1400-750 (5 x 150) =
650 lbs.)
5.Determine the combined
weight of luggage and cargo
being loaded on the vehicle.
That weight may not safely
Page 162 of 356

Chevrolet Express Owner Manual (GMNA-Localizing-U.S./Canada/Mexico-
13882570) - 2020 - CRC - 11/1/19
Driving and Operating 161
Example 3
1. Maximum Vehicle CapacityWeight for Example 3 =
453 kg (1,000 lbs)
2. Subtract Occupant Weight @ 91 kg (200 lbs) × 5 =
453 kg (1,000 lbs)
3. Available Cargo Weight = 0 kg (0 lbs)
Refer to the vehicle tire and
loading information label for
specific information about the
vehicle's capacity weight and
seating positions. The combined weight of the driver, passengers,
and cargo should never exceed
the vehicle capacity weight.
Certification/Tire Label
A vehicle specific Certification/
Tire label is attached to the rear
edge of the driver door. The
label may show the size of the
vehicle's original tires and the
inflation pressures needed to
obtain the gross weight capacity
of the vehicle. This is called
Gross Vehicle Weight Rating
(GVWR). The GVWR includes
the weight of the vehicle, all
occupants, fuel, and cargo.
The Certification/Tire label also
may show the maximum weights
for the front and rear axles,
called Gross Axle Weight Rating
(GAWR). To find out the actual
loads on the front and rear
axles, you need to go to a weigh
station and weigh the vehicle.
Your dealer can help you with
this. Be sure to spread out the
load equally on both sides of the
centerline.{Warning
Things you put inside the
vehicle can strike and injure
people in a sudden stop or
turn, or in a crash.
.Put things in the cargo
area of the vehicle. Try to
spread the weight evenly.
(Continued)
Page 175 of 356
Chevrolet Express Owner Manual (GMNA-Localizing-U.S./Canada/Mexico-
13882570) - 2020 - CRC - 11/1/19
174 Driving and Operating
vehicle has this feature, see“Range
Selection Mode” underManual
Mode 0174.
1 : This position reduces vehicle
speed without using the brakes.
You can use it for major/severe
downgrades where the vehicle
would otherwise accelerate due to
steepness of grade. When you shift
to 1 (First) it provides the lowest
gear appropriate to current road
speed and continues to downshift
as the vehicle slows, eventually
downshifting to 1 (First) gear. The
transmission can be held in 1 (First)
gear using Range Selection Mode
or the shift lever. See “Range
Selection Mode” underManual
Mode 0174.
Caution
Spinning the tires or holding the
vehicle in one place on a hill
using only the accelerator pedal
may damage the transmission.
The repair will not be covered by
the vehicle warranty. If the vehicle
(Continued)
Caution (Continued)
is stuck, do not spin the tires.
When stopping on a hill, use the
brakes to hold the vehicle in
place.
Normal Mode Grade Braking
This mode is enabled when the
vehicle is started, but is not enabled
in Range Selection Mode. It assists
in maintaining desired vehicle
speeds when driving on downhill
grades by using the engine and
transmission to slow the vehicle.
The first time the system activates
for each ignition key cycle.
To disable or enable Normal Mode
Grade Braking within the current
ignition key cycle, press and hold
the Tow/Haul button for
three seconds.
For other forms of grade braking,
seeTow/Haul Mode 0175 and
Cruise Control 0180.
Manual Mode
Range Selection Mode
If equipped, Range Selection Mode
helps control the vehicle's
transmission and vehicle speed
while driving downhill or towing a
trailer by letting you select a desired
range of gears.
To use this feature:
1. Move the shift lever to M (Manual Mode).
2. Press the +/− buttons on the
shift lever to select the desired
range of gears for current
driving conditions.
When M (Manual Mode) is selected,
the transmission will downshift and
a number displays in the Driver
Information Center (DIC) next to
the M indicating the current gear.
Page 176 of 356

Chevrolet Express Owner Manual (GMNA-Localizing-U.S./Canada/Mexico-
13882570) - 2020 - CRC - 11/1/19
Driving and Operating 175
This number is the highest gear that
can be used. However, the vehicle
can automatically shift to lower
gears as it adjusts to driving
conditions. This means that all
gears below that number are
available. When 5 (Fifth) is selected,
1 (First) through 5 (Fifth) gears are
automatically shifted by the vehicle,
but 6 (Sixth) cannot be used until
the +/−button on the shift lever is
used to change to the gear.
Grade Braking is not available when
Range Selection Mode is active.
See Tow/Haul Mode 0175.
While using Range Selection Mode,
cruise control and the Tow/Haul
Mode can be used.
Caution
Spinning the tires or holding the
vehicle in one place on a hill
using only the accelerator pedal
may damage the transmission.
The repair will not be covered by
the vehicle warranty. If the vehicle (Continued)
Caution (Continued)
is stuck, do not spin the tires.
When stopping on a hill, use the
brakes to hold the vehicle in
place.
Tow/Haul Mode
If equipped, Tow/Haul Mode adjusts
the transmission shift pattern to
reduce shift cycling, providing
increased performance, vehicle
control, and transmission cooling
when towing or hauling heavy loads. Turn the Tow/Haul Mode on and off
by pressing the button on the
instrument panel. When Tow/Haul is
on, a light on the instrument cluster
will come on.
See
Tow/Haul Mode Light 096.
Also see “Tow/Haul Mode” under
Towing Equipment 0208.
Tow/Haul Mode Grade Braking
Tow/Haul Mode Grade Braking is
only enabled while the Tow/Haul
Mode is selected and the vehicle is
not in the Range Selection Mode.
See “Tow/Haul Mode” listed
previously and Manual Mode0174.
Tow/Haul Mode Grade Braking
assists in maintaining desired
vehicle speeds when driving on
downhill grades by using the engine
and transmission to slow the
vehicle.
To disable or enable Tow/Haul Mode
Grade Braking within the current
ignition key cycle, press and hold
the Tow/Haul button for
three seconds.
See Towing Equipment 0208.
Page 198 of 356

Chevrolet Express Owner Manual (GMNA-Localizing-U.S./Canada/Mexico-
13882570) - 2020 - CRC - 11/1/19
Driving and Operating 197
.Vehicles can tow in D (Drive).
Tow/Haul Mode is recommended
for heavier trailers. See Tow/
Haul Mode 0175. If the
transmission downshifts too
often, a lower gear may be
selected using Manual Mode.
See Manual Mode 0174.
If equipped, the following driver
assistance features should be
turned off when towing a trailer:
. Adaptive Cruise Control (ACC)
. Super Cruise Control
. Lane Keep Assist (LKA)
. Park Assist
. Automatic Parking Assist (APA)
. Reverse Automatic
Braking (RAB)
If equipped, the following driver
assistance features should be
turned to alert or off when towing a
trailer:
. Automatic Emergency
Braking (AEB)
. Intelligent Brake Assist (IBA)
. Front Pedestrian Braking (FPB) If equipped with Lane Change Alert
(LCA), the LCA detection zones that
extend back from the side of the
vehicle do not move further back
when a trailer is towed. Use caution
while changing lanes when towing a
trailer.
If equipped with Rear Cross Traffic
Alert (RCTA), use caution while
backing up when towing a trailer, as
the RCTA detection zones that
extend out from the back of the
vehicle do not move further back
when a trailer is towed.
{Warning
To prevent serious injury or death
from carbon monoxide (CO),
when towing a trailer:
. Do not drive with the
liftgate, trunk/hatch,
or rear-most window open.
. Fully open the air outlets on
or under the instrument
panel.
(Continued)
Warning (Continued)
.Adjust the climate control
system to a setting that
brings in only outside air.
See “Climate Control
Systems” in the Index.
For more information about
carbon monoxide, see Engine
Exhaust 0170.
Towing a trailer requires experience.
The combination of the vehicle and
trailer is longer and not as
responsive as the vehicle itself. Get
used to the handling and braking of
the combination by driving on a
level road surface before driving on
public roads.
The trailer structure, the tires, and
the brakes must be all be rated to
carry the intended cargo.
Inadequate trailer equipment can
cause the combination to operate in
an unexpected or unsafe manner.
Before driving, inspect all trailer
hitch parts and attachments, safety
chains, electrical connectors, lamps,
Page 199 of 356

Chevrolet Express Owner Manual (GMNA-Localizing-U.S./Canada/Mexico-
13882570) - 2020 - CRC - 11/1/19
198 Driving and Operating
tires, and mirrors. SeeTowing
Equipment 0208. If the trailer has
electric brakes, start the
combination moving and then
manually apply the trailer brake
controller to check the trailer brakes
work. During the trip, occasionally
check that the cargo and trailer are
secure and that the lamps and any
trailer brakes are working.
Towing with a Stability Control
System
When towing, the stability control
system might be heard. The system
reacts to vehicle movement caused
by the trailer, which mainly occurs
during cornering. This is normal
when towing heavier trailers.
Following Distance
Stay at least twice as far behind the
vehicle ahead as you would when
driving without a trailer. This can
help to avoid heavy braking and
sudden turns.
Passing
More passing distance is needed
when towing a trailer. The
combination of the vehicle and
trailer will not accelerate as quickly
and is much longer than the vehicle
alone. It is necessary to go much
farther beyond the passed vehicle
before returning to the lane. Pass
on level roadways. Avoid passing
on hills if possible.
Backing Up
Hold the bottom of the steering
wheel with one hand. To move the
trailer to the left, move that hand to
the left. To move the trailer to the
right, move that hand to the right.
Always back up slowly and,
if possible, have someone
guide you.
Making Turns
Caution
Turn more slowly and make wider
arcs when towing a trailer to
prevent damage to your vehicle.
Making very sharp turns could
cause the trailer to contact the
vehicle.
Make wider turns than normal when
towing, so trailer will not go over soft
shoulders, over curbs, or strike road
signs, trees, or other objects.
Always signal turns well in advance.
Do not steer or brake suddenly.
Driving on Grades
Reduce speed and shift to a lower
gear before starting down a long or
steep downhill grade. If the
transmission is not shifted down, the
brakes may overheat and result in
reduced braking efficiency.
Page 201 of 356
Chevrolet Express Owner Manual (GMNA-Localizing-U.S./Canada/Mexico-
13882570) - 2020 - CRC - 11/1/19
200 Driving and Operating
Warning (Continued)
can be especially slippery at
low tide when part of the
ramp was previously
submerged at high tide. Do
not back onto the ramp to
launch the boat if you are
not sure the vehicle can
maintain traction.
. Do not move the vehicle if
someone is in the path of
the trailer. Some parts of the
trailer might be underwater
and not visible to people
who are assisting in
launching the boat.
Disconnect the wiring to the trailer
before backing the trailer into the
water to prevent damage to the
electrical circuits on the trailer.
Reconnect the wiring to the trailer
after removing the trailer from the
water. If the trailer has electric
brakes that can function when the
trailer is submerged, it might help to leave the electrical trailer connector
attached to maintain trailer brake
functionality while on the boat ramp.
To back the trailer into the water:
1. Slowly back down the boat ramp until the boat is floating,
but no further than necessary.
2. Press and hold the brake pedal, but do not shift into
P (Park) yet.
3. Have someone place chocks under the front wheels of the
vehicle.
4. Gradually release the brake pedal to allow the chocks to
absorb the load of the trailer.
5. Reapply the brake pedal. Then apply the parking brake and
shift into P (Park).
6. Release the brake pedal.
Pulling the Trailer from the Water
To pull the trailer from the water: 1. Press and hold the brake pedal. 2. Start the engine and shift into
a gear.
3. Release the parking brake.
4. Let up on the brake pedal.
5. Drive slowly until the tires are clear of the chocks.
6. Stop and have someone pick up and store the chocks.
7. Slowly pull the trailer from the water.
Caution
If the vehicle tires begin to spin
and the vehicle begins to slide
toward the water, remove your
foot from the accelerator pedal
and apply the brake pedal. Seek
help to have the vehicle towed up
the ramp.
Maintenance when Trailer
Towing
The vehicle needs service more
often when used to tow trailers. See
Maintenance Schedule 0305. It is
Page 210 of 356
Chevrolet Express Owner Manual (GMNA-Localizing-U.S./Canada/Mexico-
13882570) - 2020 - CRC - 11/1/19
Driving and Operating 209
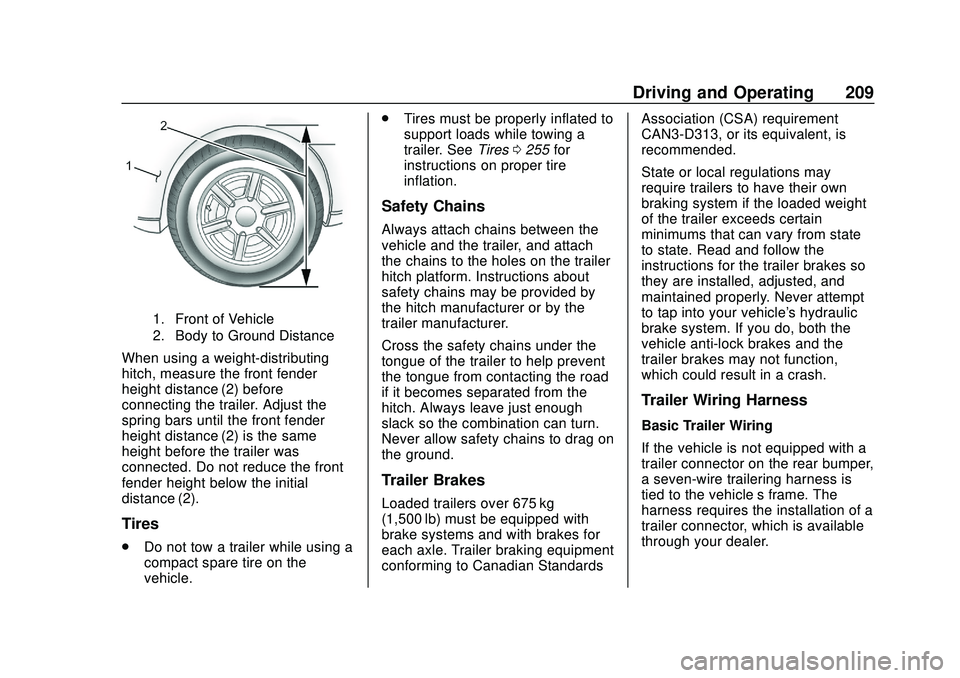
1. Front of Vehicle
2. Body to Ground Distance
When using a weight-distributing
hitch, measure the front fender
height distance (2) before
connecting the trailer. Adjust the
spring bars until the front fender
height distance (2) is the same
height before the trailer was
connected. Do not reduce the front
fender height below the initial
distance (2).
Tires
.Do not tow a trailer while using a
compact spare tire on the
vehicle. .
Tires must be properly inflated to
support loads while towing a
trailer. See Tires0255 for
instructions on proper tire
inflation.
Safety Chains
Always attach chains between the
vehicle and the trailer, and attach
the chains to the holes on the trailer
hitch platform. Instructions about
safety chains may be provided by
the hitch manufacturer or by the
trailer manufacturer.
Cross the safety chains under the
tongue of the trailer to help prevent
the tongue from contacting the road
if it becomes separated from the
hitch. Always leave just enough
slack so the combination can turn.
Never allow safety chains to drag on
the ground.
Trailer Brakes
Loaded trailers over 675 kg
(1,500 lb) must be equipped with
brake systems and with brakes for
each axle. Trailer braking equipment
conforming to Canadian Standards Association (CSA) requirement
CAN3-D313, or its equivalent, is
recommended.
State or local regulations may
require trailers to have their own
braking system if the loaded weight
of the trailer exceeds certain
minimums that can vary from state
to state. Read and follow the
instructions for the trailer brakes so
they are installed, adjusted, and
maintained properly. Never attempt
to tap into your vehicle's hydraulic
brake system. If you do, both the
vehicle anti-lock brakes and the
trailer brakes may not function,
which could result in a crash.
Trailer Wiring Harness
Basic Trailer Wiring
If the vehicle is not equipped with a
trailer connector on the rear bumper,
a seven-wire trailering harness is
tied to the vehicle’s frame. The
harness requires the installation of a
trailer connector, which is available
through your dealer.
Page 213 of 356

Chevrolet Express Owner Manual (GMNA-Localizing-U.S./Canada/Mexico-
13882570) - 2020 - CRC - 11/1/19
212 Driving and Operating
sway is increasing, the vehicle
brakes are selectively applied at
each wheel, to help reduce
excessive trailer sway. If equipped
with the Integrated Trailer Brake
Control (ITBC) system, and the
trailer has an electric brake system,
StabiliTrak/ESC may also apply the
trailer brakes.
If TSC is enabled, the Traction
Control System (TCS)/StabiliTrak/
ESC warning light will flash on the
instrument cluster. Reduce vehicle
speed by gradually removing your
foot from the accelerator. If trailer
sway continues, StabiliTrak/ESC
can reduce engine torque to help
slow the vehicle. TSC will not
function if StabiliTrak/ESC is turned
off. SeeTraction Control/Electronic
Stability Control 0178.
{Warning
Trailer sway can result in a crash
and in serious injury or death,
even if the vehicle is equipped
with TSC.
If the trailer begins to sway,
reduce vehicle speed by
gradually removing your foot from
the accelerator. Then pull over to
check the trailer and vehicle to
help correct possible causes,
including an improperly or
overloaded trailer, unrestrained
cargo, improper trailer hitch
configuration, or improperly
inflated or incorrect vehicle or
trailer tires. See Towing
Equipment 0208 for trailer ratings
and hitch setup
recommendations.
Trailer Tires
Special Trailer (ST) tires differ from
vehicle tires. Trailer tires are
designed with stiff sidewalls to help
prevent sway and to support heavy loads. These features can make it
difficult to determine if the trailer tire
pressures are low only based on a
visual inspection.
Always check all trailer tire
pressures before each trip when the
tires are cool. Low trailer tire
pressure is a leading cause of trailer
tire blow-outs.
Trailer tires deteriorate over time.
The trailer tire sidewall will show the
week and year the tire was
manufactured. Many trailer tire
manufacturers recommend
replacing tires more than six
years old.
Overloading is another leading
cause of trailer tire blow-outs. Never
load your trailer with more weight
than the tires are designed to
support. The load rating is located
on the trailer tire sidewall.
Always know the maximum speed
rating for the trailer tires before
driving. This may be significantly
lower than the vehicle tire speed
rating. The speed rating may be on
the trailer tire sidewall. If the speed
Page 215 of 356
Chevrolet Express Owner Manual (GMNA-Localizing-U.S./Canada/Mexico-
13882570) - 2020 - CRC - 11/1/19
214 Vehicle Care
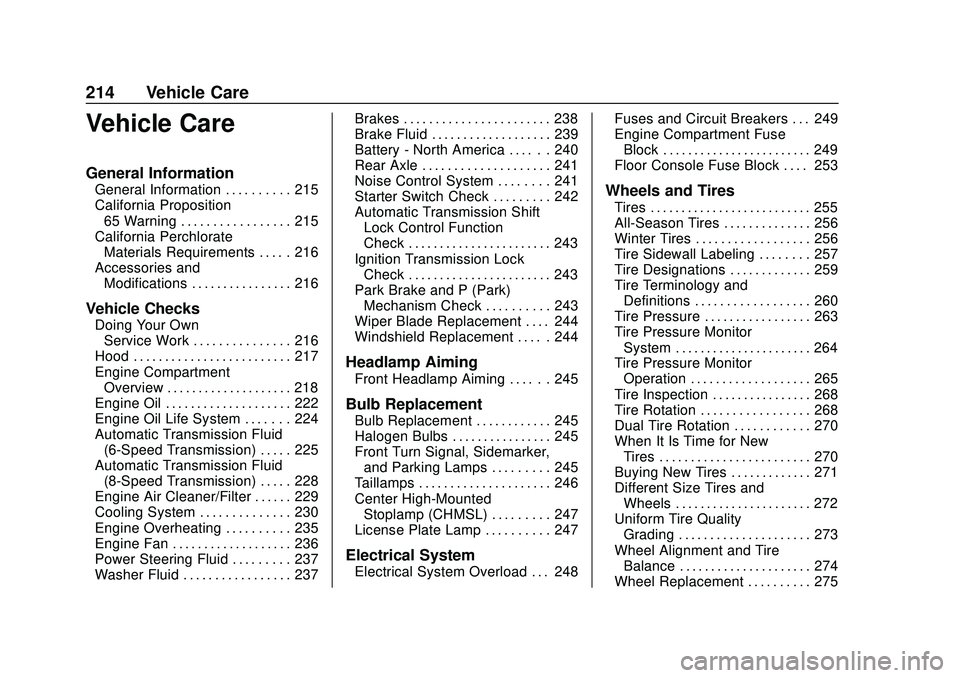
Vehicle Care
General Information
General Information . . . . . . . . . . 215
California Proposition65 Warning . . . . . . . . . . . . . . . . . 215
California Perchlorate Materials Requirements . . . . . 216
Accessories and Modifications . . . . . . . . . . . . . . . . 216
Vehicle Checks
Doing Your OwnService Work . . . . . . . . . . . . . . . 216
Hood . . . . . . . . . . . . . . . . . . . . . . . . . 217
Engine Compartment Overview . . . . . . . . . . . . . . . . . . . . 218
Engine Oil . . . . . . . . . . . . . . . . . . . . 222
Engine Oil Life System . . . . . . . 224
Automatic Transmission Fluid (6-Speed Transmission) . . . . . 225
Automatic Transmission Fluid (8-Speed Transmission) . . . . . 228
Engine Air Cleaner/Filter . . . . . . 229
Cooling System . . . . . . . . . . . . . . 230
Engine Overheating . . . . . . . . . . 235
Engine Fan . . . . . . . . . . . . . . . . . . . 236
Power Steering Fluid . . . . . . . . . 237
Washer Fluid . . . . . . . . . . . . . . . . . 237 Brakes . . . . . . . . . . . . . . . . . . . . . . . 238
Brake Fluid . . . . . . . . . . . . . . . . . . . 239
Battery - North America . . . . . . 240
Rear Axle . . . . . . . . . . . . . . . . . . . . 241
Noise Control System . . . . . . . . 241
Starter Switch Check . . . . . . . . . 242
Automatic Transmission Shift
Lock Control Function
Check . . . . . . . . . . . . . . . . . . . . . . . 243
Ignition Transmission Lock Check . . . . . . . . . . . . . . . . . . . . . . . 243
Park Brake and P (Park) Mechanism Check . . . . . . . . . . 243
Wiper Blade Replacement . . . . 244
Windshield Replacement . . . . . 244
Headlamp Aiming
Front Headlamp Aiming . . . . . . 245
Bulb Replacement
Bulb Replacement . . . . . . . . . . . . 245
Halogen Bulbs . . . . . . . . . . . . . . . . 245
Front Turn Signal, Sidemarker, and Parking Lamps . . . . . . . . . 245
Taillamps . . . . . . . . . . . . . . . . . . . . . 246
Center High-Mounted Stoplamp (CHMSL) . . . . . . . . . 247
License Plate Lamp . . . . . . . . . . 247
Electrical System
Electrical System Overload . . . 248 Fuses and Circuit Breakers . . . 249
Engine Compartment Fuse
Block . . . . . . . . . . . . . . . . . . . . . . . . 249
Floor Console Fuse Block . . . . 253
Wheels and Tires
Tires . . . . . . . . . . . . . . . . . . . . . . . . . . 255
All-Season Tires . . . . . . . . . . . . . . 256
Winter Tires . . . . . . . . . . . . . . . . . . 256
Tire Sidewall Labeling . . . . . . . . 257
Tire Designations . . . . . . . . . . . . . 259
Tire Terminology and Definitions . . . . . . . . . . . . . . . . . . 260
Tire Pressure . . . . . . . . . . . . . . . . . 263
Tire Pressure Monitor System . . . . . . . . . . . . . . . . . . . . . . 264
Tire Pressure Monitor
Operation . . . . . . . . . . . . . . . . . . . 265
Tire Inspection . . . . . . . . . . . . . . . . 268
Tire Rotation . . . . . . . . . . . . . . . . . 268
Dual Tire Rotation . . . . . . . . . . . . 270
When It Is Time for New Tires . . . . . . . . . . . . . . . . . . . . . . . . 270
Buying New Tires . . . . . . . . . . . . . 271
Different Size Tires and Wheels . . . . . . . . . . . . . . . . . . . . . . 272
Uniform Tire Quality Grading . . . . . . . . . . . . . . . . . . . . . 273
Wheel Alignment and Tire Balance . . . . . . . . . . . . . . . . . . . . . 274
Wheel Replacement . . . . . . . . . . 275