turn signal CHEVROLET EXPRESS 2020 Get To Know Guide
[x] Cancel search | Manufacturer: CHEVROLET, Model Year: 2020, Model line: EXPRESS, Model: CHEVROLET EXPRESS 2020Pages: 356, PDF Size: 5.7 MB
Page 199 of 356

Chevrolet Express Owner Manual (GMNA-Localizing-U.S./Canada/Mexico-
13882570) - 2020 - CRC - 11/1/19
198 Driving and Operating
tires, and mirrors. SeeTowing
Equipment 0208. If the trailer has
electric brakes, start the
combination moving and then
manually apply the trailer brake
controller to check the trailer brakes
work. During the trip, occasionally
check that the cargo and trailer are
secure and that the lamps and any
trailer brakes are working.
Towing with a Stability Control
System
When towing, the stability control
system might be heard. The system
reacts to vehicle movement caused
by the trailer, which mainly occurs
during cornering. This is normal
when towing heavier trailers.
Following Distance
Stay at least twice as far behind the
vehicle ahead as you would when
driving without a trailer. This can
help to avoid heavy braking and
sudden turns.
Passing
More passing distance is needed
when towing a trailer. The
combination of the vehicle and
trailer will not accelerate as quickly
and is much longer than the vehicle
alone. It is necessary to go much
farther beyond the passed vehicle
before returning to the lane. Pass
on level roadways. Avoid passing
on hills if possible.
Backing Up
Hold the bottom of the steering
wheel with one hand. To move the
trailer to the left, move that hand to
the left. To move the trailer to the
right, move that hand to the right.
Always back up slowly and,
if possible, have someone
guide you.
Making Turns
Caution
Turn more slowly and make wider
arcs when towing a trailer to
prevent damage to your vehicle.
Making very sharp turns could
cause the trailer to contact the
vehicle.
Make wider turns than normal when
towing, so trailer will not go over soft
shoulders, over curbs, or strike road
signs, trees, or other objects.
Always signal turns well in advance.
Do not steer or brake suddenly.
Driving on Grades
Reduce speed and shift to a lower
gear before starting down a long or
steep downhill grade. If the
transmission is not shifted down, the
brakes may overheat and result in
reduced braking efficiency.
Page 211 of 356
Chevrolet Express Owner Manual (GMNA-Localizing-U.S./Canada/Mexico-
13882570) - 2020 - CRC - 11/1/19
210 Driving and Operating
Use only a round, seven-wire
connector with flat blade terminals
meeting SAE J2863 specifications
for proper electrical connectivity.
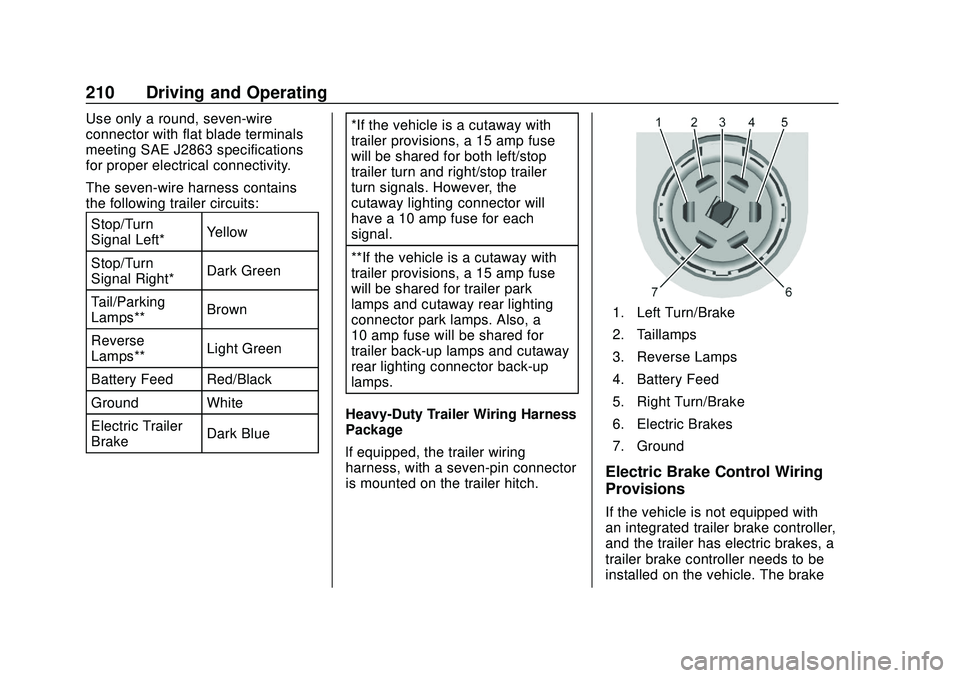
The seven-wire harness contains
the following trailer circuits:Stop/Turn
Signal Left* Yellow
Stop/Turn
Signal Right* Dark Green
Tail/Parking
Lamps** Brown
Reverse
Lamps** Light Green
Battery Feed Red/Black
Ground White
Electric Trailer
Brake Dark Blue *If the vehicle is a cutaway with
trailer provisions, a 15 amp fuse
will be shared for both left/stop
trailer turn and right/stop trailer
turn signals. However, the
cutaway lighting connector will
have a 10 amp fuse for each
signal.
**If the vehicle is a cutaway with
trailer provisions, a 15 amp fuse
will be shared for trailer park
lamps and cutaway rear lighting
connector park lamps. Also, a
10 amp fuse will be shared for
trailer back-up lamps and cutaway
rear lighting connector back-up
lamps.
Heavy-Duty Trailer Wiring Harness
Package
lf equipped, the trailer wiring
harness, with a seven-pin connector
is mounted on the trailer hitch.
1. Left Turn/Brake
2. Taillamps
3. Reverse Lamps
4. Battery Feed
5. Right Turn/Brake
6. Electric Brakes
7. Ground
Electric Brake Control Wiring
Provisions
If the vehicle is not equipped with
an integrated trailer brake controller,
and the trailer has electric brakes, a
trailer brake controller needs to be
installed on the vehicle. The brake
Page 212 of 356
Chevrolet Express Owner Manual (GMNA-Localizing-U.S./Canada/Mexico-
13882570) - 2020 - CRC - 11/1/19
Driving and Operating 211
controller should be installed by
your dealer or a qualified service
center.
If equipped, wiring provisions for an
aftermarket electric trailer brake
controller are included with the
vehicle as part of the trailer wiring
package. The harness contains the
following circuits:Electric Trailer
Brakes Dark Blue
Battery Feed Red/White
Brake Apply
Signal Light Blue
Ground Black
There are four blunt cut wires under
the floor carpeting in front of the
brake pedal. It will be necessary to
have a technician connect the
12-volt power to the engine
compartment fuse block.
Refer to the aftermarket electric
trailer brake controller owner's
manual to determine wire color
coding of the electric trailer brake controller. The wire colors on the
brake controller may be different
from the vehicle.
Trailer Lamps
Always check all trailer lamps are
working at the beginning of each
trip, and periodically on longer trips.
Turn Signals When Towing a
Trailer
When properly connected, the trailer
turn signals will illuminate to indicate
the vehicle is turning, changing
lanes, or stopping. When towing a
trailer, the arrows on the instrument
cluster will illuminate even if the
trailer is not properly connected or
the bulbs are burned out.
Tow/Haul Mode
Tow/Haul assists when pulling a
heavy trailer or a large or heavy
load. For instructions on how to
enter Tow/Haul mode, see
Tow/Haul
Mode 0175.
Tow/Haul Mode is designed to be
most effective when the vehicle and
trailer combined weight is at least 75% of the vehicle's Gross
Combined Weight Rating (GCWR).
See
“Trailer Weight ”under Trailer
Towing 0201.
Tow/Haul Mode is most useful when
towing a heavy trailer or carrying a
large or heavy load:
. through rolling terrain
. in stop-and-go traffic
. in busy parking lots
Operating the vehicle in Tow/Haul
Mode when lightly loaded or not
towing will not cause damage;
however, it is not recommended and
may result in unpleasant engine and
transmission driving characteristics
and reduced fuel economy.
Trailer Sway
Control (TSC)
Vehicles with StabiliTrak/Electronic
Stability Control (ESC) have a
Trailer Sway Control (TSC) feature.
Trailer sway is unintended
side-to-side motion of a trailer while
towing. If the vehicle is towing a
trailer and the TSC detects that
Page 215 of 356
Chevrolet Express Owner Manual (GMNA-Localizing-U.S./Canada/Mexico-
13882570) - 2020 - CRC - 11/1/19
214 Vehicle Care
Vehicle Care
General Information
General Information . . . . . . . . . . 215
California Proposition65 Warning . . . . . . . . . . . . . . . . . 215
California Perchlorate Materials Requirements . . . . . 216
Accessories and Modifications . . . . . . . . . . . . . . . . 216
Vehicle Checks
Doing Your OwnService Work . . . . . . . . . . . . . . . 216
Hood . . . . . . . . . . . . . . . . . . . . . . . . . 217
Engine Compartment Overview . . . . . . . . . . . . . . . . . . . . 218
Engine Oil . . . . . . . . . . . . . . . . . . . . 222
Engine Oil Life System . . . . . . . 224
Automatic Transmission Fluid (6-Speed Transmission) . . . . . 225
Automatic Transmission Fluid (8-Speed Transmission) . . . . . 228
Engine Air Cleaner/Filter . . . . . . 229
Cooling System . . . . . . . . . . . . . . 230
Engine Overheating . . . . . . . . . . 235
Engine Fan . . . . . . . . . . . . . . . . . . . 236
Power Steering Fluid . . . . . . . . . 237
Washer Fluid . . . . . . . . . . . . . . . . . 237 Brakes . . . . . . . . . . . . . . . . . . . . . . . 238
Brake Fluid . . . . . . . . . . . . . . . . . . . 239
Battery - North America . . . . . . 240
Rear Axle . . . . . . . . . . . . . . . . . . . . 241
Noise Control System . . . . . . . . 241
Starter Switch Check . . . . . . . . . 242
Automatic Transmission Shift
Lock Control Function
Check . . . . . . . . . . . . . . . . . . . . . . . 243
Ignition Transmission Lock Check . . . . . . . . . . . . . . . . . . . . . . . 243
Park Brake and P (Park) Mechanism Check . . . . . . . . . . 243
Wiper Blade Replacement . . . . 244
Windshield Replacement . . . . . 244
Headlamp Aiming
Front Headlamp Aiming . . . . . . 245
Bulb Replacement
Bulb Replacement . . . . . . . . . . . . 245
Halogen Bulbs . . . . . . . . . . . . . . . . 245
Front Turn Signal, Sidemarker, and Parking Lamps . . . . . . . . . 245
Taillamps . . . . . . . . . . . . . . . . . . . . . 246
Center High-Mounted Stoplamp (CHMSL) . . . . . . . . . 247
License Plate Lamp . . . . . . . . . . 247
Electrical System
Electrical System Overload . . . 248 Fuses and Circuit Breakers . . . 249
Engine Compartment Fuse
Block . . . . . . . . . . . . . . . . . . . . . . . . 249
Floor Console Fuse Block . . . . 253
Wheels and Tires
Tires . . . . . . . . . . . . . . . . . . . . . . . . . . 255
All-Season Tires . . . . . . . . . . . . . . 256
Winter Tires . . . . . . . . . . . . . . . . . . 256
Tire Sidewall Labeling . . . . . . . . 257
Tire Designations . . . . . . . . . . . . . 259
Tire Terminology and Definitions . . . . . . . . . . . . . . . . . . 260
Tire Pressure . . . . . . . . . . . . . . . . . 263
Tire Pressure Monitor System . . . . . . . . . . . . . . . . . . . . . . 264
Tire Pressure Monitor
Operation . . . . . . . . . . . . . . . . . . . 265
Tire Inspection . . . . . . . . . . . . . . . . 268
Tire Rotation . . . . . . . . . . . . . . . . . 268
Dual Tire Rotation . . . . . . . . . . . . 270
When It Is Time for New Tires . . . . . . . . . . . . . . . . . . . . . . . . 270
Buying New Tires . . . . . . . . . . . . . 271
Different Size Tires and Wheels . . . . . . . . . . . . . . . . . . . . . . 272
Uniform Tire Quality Grading . . . . . . . . . . . . . . . . . . . . . 273
Wheel Alignment and Tire Balance . . . . . . . . . . . . . . . . . . . . . 274
Wheel Replacement . . . . . . . . . . 275
Page 246 of 356

Chevrolet Express Owner Manual (GMNA-Localizing-U.S./Canada/Mexico-
13882570) - 2020 - CRC - 11/1/19
Vehicle Care 245
Headlamp Aiming
Front Headlamp Aiming
Headlamp aim has been preset and
should need no further adjustment.
If the vehicle is damaged in a crash,
the headlamp aim may be affected.
If adjustment to the headlamps is
necessary, see your dealer.
Bulb Replacement
For the proper type of replacement
bulbs, or any bulb changing
procedure not listed in this section,
contact your dealer.
Caution
Do not replace incandescent
bulbs with aftermarket LED
replacement bulbs. This can
cause damage to the vehicle
electrical system.
Halogen Bulbs
{Warning
Halogen bulbs have pressurized
gas inside and can burst if you
drop or scratch the bulb. You or
others could be injured. Be sure
to read and follow the instructions
on the bulb package.
Front Turn Signal,
Sidemarker, and Parking
Lamps
1. Front Parking and TurnSignal Lamp
2. Front Sidemarker Lamp
To replace the front turn signal,
sidemarker, and/or parking lamp
bulb(s):
Page 247 of 356

Chevrolet Express Owner Manual (GMNA-Localizing-U.S./Canada/Mexico-
13882570) - 2020 - CRC - 11/1/19
246 Vehicle Care
1. Use a small tool to unlatch theoutboard clip on the lamp by
pushing inboard and prying the
lamp assembly forward.
2. Remove the lamp from the grille.
3. Turn the bulb socket counterclockwise one-quarter
turn and remove it from the
lamp assembly.
4. Remove the bulb from the socket by pulling it straight out.
5. Replace the bulb.
6. Turn the bulb socket clockwise to reinstall it in the lamp
assembly.
7. Reinstall the lamp assembly into the grille until the outboard
clip snaps into place.
Taillamps
To replace a taillamp/turn signal
lamp or back-up lamp bulb:
1. Remove the two inboard nutsfrom the inside of the taillamp
assembly.
2. The third nut (3) is under theapplique piece (2) above the
lamp. Remove the two inboard
applique nuts. Pull the
applique (2) straight rearward
slightly to clear the studs. Then
rotate the applique (2) just far
enough to gain access to the
outer push pins (1).
3. Carefully disconnect the push pins (1) from the applique
bracket.
4. Remove the third nut (3) from the upper outboard side of
the lamp.
5. Remove the taillamp assembly from the vehicle.
Page 248 of 356

Chevrolet Express Owner Manual (GMNA-Localizing-U.S./Canada/Mexico-
13882570) - 2020 - CRC - 11/1/19
Vehicle Care 247
6. Remove the taillamp/turn signallamp (1) or back-up lamp (2)
bulb socket by turning it
counterclockwise one-quarter
turn and pulling it out of the
lamp assembly.
7. Remove the bulb by pulling it straight out.
8. Push the new bulb into the socket.
9. Reinstall the bulb socket by turning it clockwise into the
lamp assembly.
10. Reverse Steps 1–5 to reinstall the taillamp assembly and
applique.
Center High-Mounted
Stoplamp (CHMSL)
The Center High-Mounted Stoplamp
(CHMSL) is above the rear doors at
the center of the vehicle.
To replace a bulb:
1. Remove the two screws fromthe CHMSL assembly.
2. Remove the CHMSL assembly.
3. Turn the bulb socket counterclockwise one-quarter
turn to remove it from the lamp
assembly. 4. Pull the old bulb straight out of
the socket and push the new
bulb into the socket.
5. Turn the bulb socket clockwise one-quarter turn to install it in
the lamp assembly.
6. Reinstall the CHMSL assembly and two screws.
Do not block or damage the CHMSL
when items are loaded on the roof
of the vehicle.
License Plate Lamp
1. Bulb Socket
Page 251 of 356
Chevrolet Express Owner Manual (GMNA-Localizing-U.S./Canada/Mexico-
13882570) - 2020 - CRC - 11/1/19
250 Vehicle Care
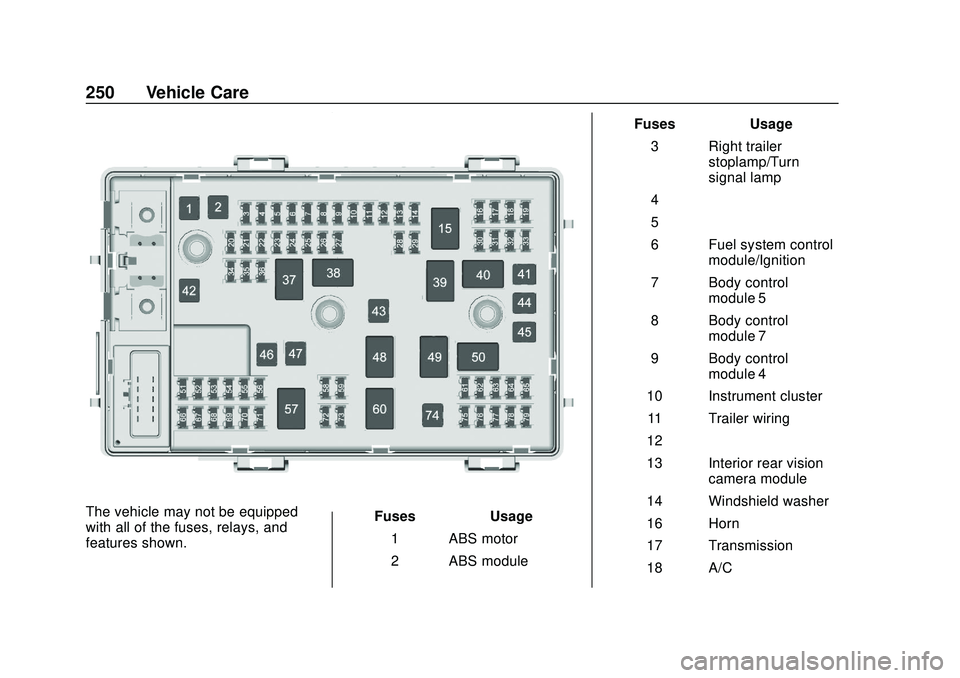
The vehicle may not be equipped
with all of the fuses, relays, and
features shown.Fuses
Usage
1 ABS motor
2 ABS module Fuses
Usage
3 Right trailer stoplamp/Turn
signal lamp
4 –
5 –
6 Fuel system control module/Ignition
7 Body control module 5
8 Body control module 7
9 Body control module 4
10 Instrument cluster 11 Trailer wiring
12 –
13 Interior rear vision camera module
14 Windshield washer
16 Horn
17 Transmission
18 A/C
Page 252 of 356
Chevrolet Express Owner Manual (GMNA-Localizing-U.S./Canada/Mexico-
13882570) - 2020 - CRC - 11/1/19
Vehicle Care 251
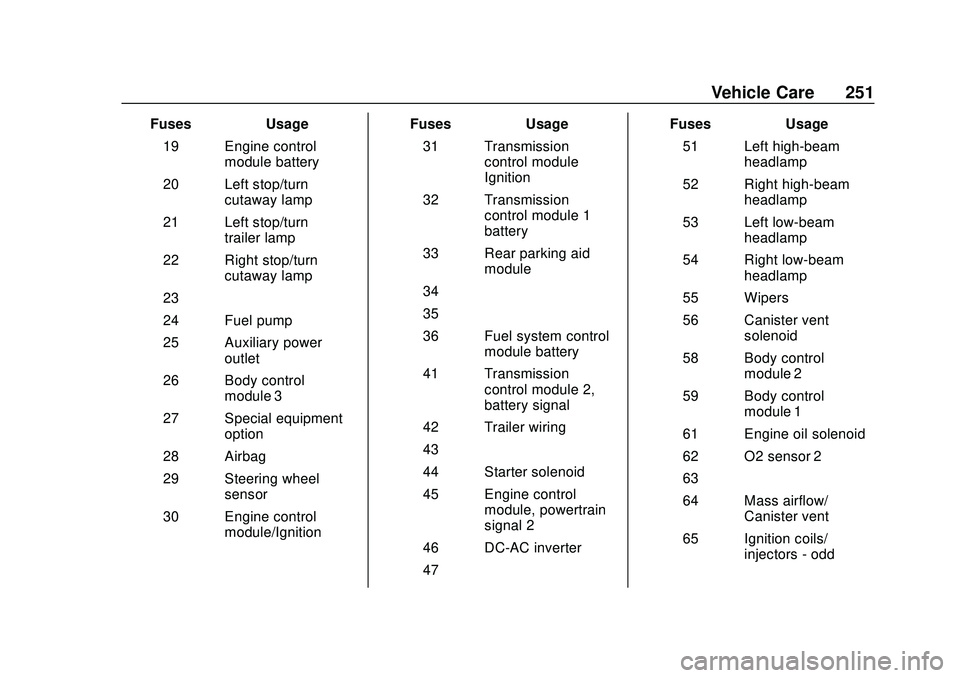
FusesUsage
19 Engine control module battery
20 Left stop/turn cutaway lamp
21 Left stop/turn trailer lamp
22 Right stop/turn cutaway lamp
23 –
24 Fuel pump
25 Auxiliary power outlet
26 Body control module 3
27 Special equipment option
28 Airbag
29 Steering wheel sensor
30 Engine control module/Ignition Fuses
Usage
31 Transmission control module
Ignition
32 Transmission control module 1
battery
33 Rear parking aid module
34 –
35 –
36 Fuel system control module battery
41 Transmission control module 2,
battery signal
42 Trailer wiring
43 –
44 Starter solenoid
45 Engine control module, powertrain
signal 2
46 DC-AC inverter
47 – Fuses
Usage
51 Left high-beam headlamp
52 Right high-beam headlamp
53 Left low-beam headlamp
54 Right low-beam headlamp
55 Wipers
56 Canister vent solenoid
58 Body control module 2
59 Body control module 1
61 Engine oil solenoid
62 O2 sensor 2
63 –
64 Mass airflow/ Canister vent
65 Ignition coils/ injectors - odd
Page 268 of 356

Chevrolet Express Owner Manual (GMNA-Localizing-U.S./Canada/Mexico-
13882570) - 2020 - CRC - 11/1/19
Vehicle Care 267
.One or more TPMS sensors are
missing or damaged. The
malfunction light and the DIC
message should go off when the
TPMS sensors are installed and
the sensor matching process is
performed successfully. See
your dealer for service.
. Replacement tires or wheels do
not match the original equipment
tires or wheels. Tires and wheels
other than those recommended
could prevent the TPMS from
functioning properly. See Buying
New Tires 0271.
. Operating electronic devices or
being near facilities using radio
wave frequencies similar to the
TPMS could cause the TPMS
sensors to malfunction.
If the TPMS is not functioning
properly, it cannot detect or signal a
low tire pressure condition. See
your dealer for service if the TPMS
malfunction light and DIC message
come on and stay on.TPMS Sensor Matching
Process
Each TPMS sensor has a unique
identification code. The identification
code needs to be matched to a new
tire/wheel position after rotating the
vehicle’s tires or replacing one or
more of the TPMS sensors. Also,
the TPMS sensor matching process
should be performed after replacing
a spare tire with a road tire
containing the TPMS sensor. The
malfunction light and the DIC
message should go off at the next
ignition cycle. The sensors are
matched to the tire/wheel positions,
using a TPMS relearn tool, in the
following order: driver side front tire,
passenger side front tire, passenger
side rear tire, and driver side rear.
See your dealer for service or to
purchase a relearn tool. A TPMS
relearn tool can also be purchased.
See Tire Pressure Monitor Sensor
Activation Tool at
www.gmtoolsandequipment.com or
call 1-800-GM TOOLS
(1-800-468-6657). There are two minutes to match the
first tire/wheel position, and
five minutes overall to match all four
tire/wheel positions. If it takes
longer, the matching process stops
and must be restarted.
The TPMS sensor matching
process is:
1. Set the parking brake.
2. Turn the ignition on without starting the vehicle. See
Ignition Positions 0163.
3. Press the Remote Keyless Entry (RKE) transmitter's
Q
andKbuttons at the same
time for approximately
five seconds. The horn sounds
twice to signal the receiver is in
relearn mode and TIRE
LEARNING ACTIVE message
displays on the DIC screen.
If the vehicle does not have
RKE, press the Driver
Information Center (DIC)
vehicle information button until
the PRESS VTO RELEARN
TIRE POSITIONS message
displays. The horn sounds