manual transmission CHEVROLET EXPRESS 2020 Get To Know Guide
[x] Cancel search | Manufacturer: CHEVROLET, Model Year: 2020, Model line: EXPRESS, Model: CHEVROLET EXPRESS 2020Pages: 356, PDF Size: 5.7 MB
Page 229 of 356
Chevrolet Express Owner Manual (GMNA-Localizing-U.S./Canada/Mexico-
13882570) - 2020 - CRC - 11/1/19
228 Vehicle Care
How to Add Automatic
Transmission Fluid
Refer toRecommended Fluids and
Lubricants 0313 to determine what
kind of transmission fluid to use.
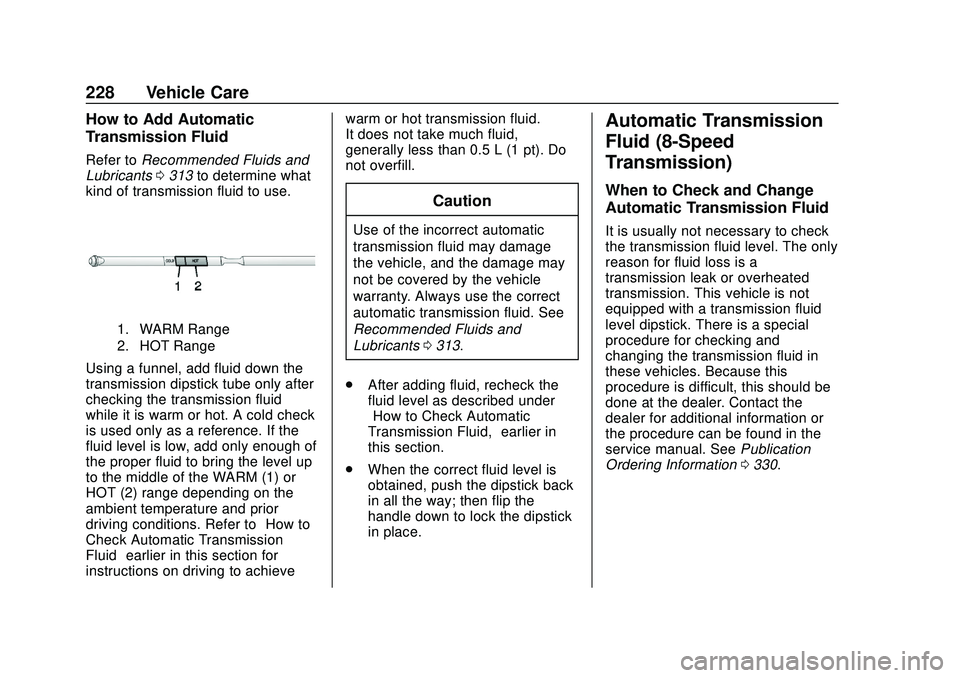
1. WARM Range
2. HOT Range
Using a funnel, add fluid down the
transmission dipstick tube only after
checking the transmission fluid
while it is warm or hot. A cold check
is used only as a reference. If the
fluid level is low, add only enough of
the proper fluid to bring the level up
to the middle of the WARM (1) or
HOT (2) range depending on the
ambient temperature and prior
driving conditions. Refer to “How to
Check Automatic Transmission
Fluid” earlier in this section for
instructions on driving to achieve warm or hot transmission fluid.
It does not take much fluid,
generally less than 0.5 L (1 pt). Do
not overfill.
Caution
Use of the incorrect automatic
transmission fluid may damage
the vehicle, and the damage may
not be covered by the vehicle
warranty. Always use the correct
automatic transmission fluid. See
Recommended Fluids and
Lubricants
0313.
. After adding fluid, recheck the
fluid level as described under
“How to Check Automatic
Transmission Fluid,” earlier in
this section.
. When the correct fluid level is
obtained, push the dipstick back
in all the way; then flip the
handle down to lock the dipstick
in place.
Automatic Transmission
Fluid (8-Speed
Transmission)
When to Check and Change
Automatic Transmission Fluid
It is usually not necessary to check
the transmission fluid level. The only
reason for fluid loss is a
transmission leak or overheated
transmission. This vehicle is not
equipped with a transmission fluid
level dipstick. There is a special
procedure for checking and
changing the transmission fluid in
these vehicles. Because this
procedure is difficult, this should be
done at the dealer. Contact the
dealer for additional information or
the procedure can be found in the
service manual. See Publication
Ordering Information 0330.
Page 230 of 356

Chevrolet Express Owner Manual (GMNA-Localizing-U.S./Canada/Mexico-
13882570) - 2020 - CRC - 11/1/19
Vehicle Care 229
Caution
Use of the incorrect automatic
transmission fluid may damage
the vehicle, and the damage may
not be covered by the vehicle
warranty. Always use the correct
automatic transmission fluid. See
Recommended Fluids and
Lubricants0313.
Change the fluid and filter at the
scheduled maintenance intervals
listed in Maintenance Schedule
0 305. Be sure to use the
transmission fluid listed in
Recommended Fluids and
Lubricants 0313.
Engine Air Cleaner/Filter
The air cleaner/filter assembly is on
the front of the engine compartment
on the driver side of the vehicle.
See Engine Compartment Overview
0 218. When to Inspect the Engine Air
Cleaner/Filter
For intervals on changing and
inspecting the engine air filter, see
Maintenance Schedule
0305.
How to Inspect the Engine Air
Cleaner/Filter
Do not start the engine or have the
engine running with the engine air
filter housing open. Before removing
the engine air filter, make sure that
the engine air filter housing and
nearby components are free of dirt
and debris. Remove the engine air
filter. Lightly tap and shake the
engine air filter (away from the
vehicle) to release dust and dirt.
Inspect the engine air filter for
damage, and replace if damaged.
Do not clean the engine air filter or
components with water or
compressed air.
4.3L V6 Engine
To inspect and replace the filter: 1. Remove the eight screws, slide the top cover forward and lift,
to gain access to the air
cleaner/filter.
2. Remove the air cleaner/filter from the housing base. Take
care to dislodge as little dirt as
possible.
3. Clean the air cleaner/filter sealing surface and
housing base.
4. Install the engine air cleaner/ filter in the housing base.
Page 237 of 356
Chevrolet Express Owner Manual (GMNA-Localizing-U.S./Canada/Mexico-
13882570) - 2020 - CRC - 11/1/19
236 Vehicle Care
If No Steam is Coming from
the Engine Compartment
If an engine overheat warning is
displayed but no steam can be seen
or heard, the problem may not be
too serious. Sometimes the engine
can get a little too hot when the
vehicle:
.Climbs a long hill on a hot day.
. Stops after high-speed driving.
. Idles for long periods in traffic.
. Tows a trailer. See “Driving on
Grades” underTrailer Towing
0 201.
If the overheat warning is displayed
with no sign of steam: 1. Turn the air conditioning off.
2. Turn the heater on to the highest temperature and to the
highest fan speed. Open the
windows as necessary.
3. When it is safe to do so, pull off the road, shift to P (Park) or
N (Neutral) and let the
engine idle. If the engine coolant temperature
gauge is no longer in the overheat
zone or an overheat warning no
longer displays, the vehicle can be
driven. Continue to drive the vehicle
slowly for about 10 minutes. Keep a
safe vehicle distance from the
vehicle in front. If the warning does
not come back on, continue to drive
normally and have the cooling
system checked for proper fill and
function.
If the warning continues, pull over,
stop, and park the vehicle
right away.
If there is still no sign of steam,
push down the accelerator until the
engine speed is about twice as fast
as normal idle speed for at least
three minutes while parked. If the
warning is still on, turn off the
engine until it cools down.
If the decision is made not to lift the
hood, get service help right away.
Engine Fan
The vehicle has a clutched engine
cooling fan. When the clutch is
engaged, the fan spins faster to
provide more air to cool the engine.
In most everyday driving conditions,
the fan is spinning slower and the
clutch is not fully engaged. This
improves fuel economy and reduces
fan noise. Under heavy vehicle
loading, trailer towing, and/or high
outside temperatures, the fan speed
increases as the clutch more fully
engages, so an increase in fan
noise may be heard. This is normal
and should not be mistaken as the
transmission slipping or making
extra shifts. It is merely the cooling
system functioning properly. The fan
will slow down when additional
cooling is not required and the
clutch partially disengages.
This fan noise may be heard when
starting the engine. It will go away
as the fan clutch partially
disengages.
Page 244 of 356

Chevrolet Express Owner Manual (GMNA-Localizing-U.S./Canada/Mexico-
13882570) - 2020 - CRC - 11/1/19
Vehicle Care 243
1. Before starting this check, besure there is enough room
around the vehicle.
2. Apply both the parking brake and the regular brake.
Do not use the accelerator
pedal, and be ready to turn off
the engine immediately if it
starts.
3. Try to start the engine in each gear. The vehicle should start
only in P (Park) or N (Neutral).
If the vehicle starts in any other
position, contact your dealer for
service.
Automatic Transmission
Shift Lock Control
Function Check
{Warning
When you are doing this
inspection, the vehicle could
move suddenly. If the vehicle
moves, you or others could be
injured. 1. Before starting this check, be
sure there is enough room
around the vehicle. It should be
parked on a level surface.
2. Apply the parking brake. Be ready to apply the regular
brake immediately if the vehicle
begins to move.
3. With the engine off, turn the ignition on, but do not start the
engine. Without applying the
regular brake, try to move the
shift lever out of P (Park) with
normal effort. If the shift lever
moves out of P (Park), contact
your dealer for service.
Ignition Transmission
Lock Check
While parked, and with the parking
brake set, try to turn the ignition off
in each shift lever position.
.The ignition should turn to off
only when the shift lever is in
P (Park).
. The ignition key should come
out only when the ignition is off. Contact your dealer if service is
required.
Park Brake and P (Park)
Mechanism Check
{Warning
When you are doing this check,
the vehicle could begin to move.
You or others could be injured
and property could be damaged.
Make sure there is room in front
of the vehicle in case it begins to
roll. Be ready to apply the regular
brake at once should the vehicle
begin to move.
Park on a fairly steep hill, with the
vehicle facing downhill. Keeping
your foot on the regular brake, set
the parking brake.
. To check the parking brake's
holding ability: With the engine
running and the transmission in
N (Neutral), slowly remove foot
Page 251 of 356
Chevrolet Express Owner Manual (GMNA-Localizing-U.S./Canada/Mexico-
13882570) - 2020 - CRC - 11/1/19
250 Vehicle Care
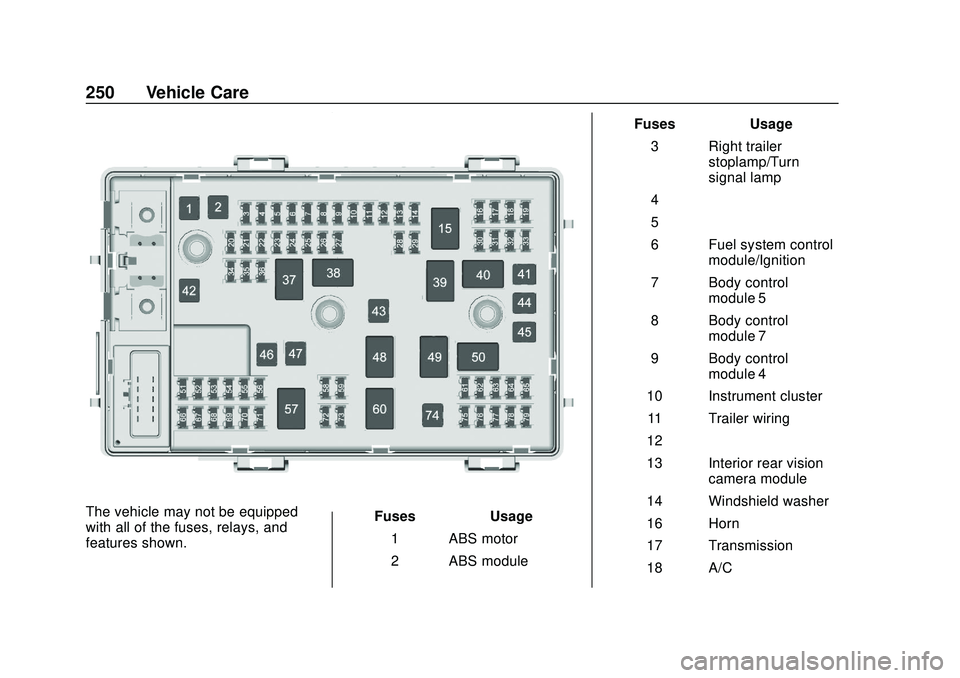
The vehicle may not be equipped
with all of the fuses, relays, and
features shown.Fuses
Usage
1 ABS motor
2 ABS module Fuses
Usage
3 Right trailer stoplamp/Turn
signal lamp
4 –
5 –
6 Fuel system control module/Ignition
7 Body control module 5
8 Body control module 7
9 Body control module 4
10 Instrument cluster 11 Trailer wiring
12 –
13 Interior rear vision camera module
14 Windshield washer
16 Horn
17 Transmission
18 A/C
Page 252 of 356
Chevrolet Express Owner Manual (GMNA-Localizing-U.S./Canada/Mexico-
13882570) - 2020 - CRC - 11/1/19
Vehicle Care 251
FusesUsage
19 Engine control module battery
20 Left stop/turn cutaway lamp
21 Left stop/turn trailer lamp
22 Right stop/turn cutaway lamp
23 –
24 Fuel pump
25 Auxiliary power outlet
26 Body control module 3
27 Special equipment option
28 Airbag
29 Steering wheel sensor
30 Engine control module/Ignition Fuses
Usage
31 Transmission control module
Ignition
32 Transmission control module 1
battery
33 Rear parking aid module
34 –
35 –
36 Fuel system control module battery
41 Transmission control module 2,
battery signal
42 Trailer wiring
43 –
44 Starter solenoid
45 Engine control module, powertrain
signal 2
46 DC-AC inverter
47 – Fuses
Usage
51 Left high-beam headlamp
52 Right high-beam headlamp
53 Left low-beam headlamp
54 Right low-beam headlamp
55 Wipers
56 Canister vent solenoid
58 Body control module 2
59 Body control module 1
61 Engine oil solenoid
62 O2 sensor 2
63 –
64 Mass airflow/ Canister vent
65 Ignition coils/ injectors - odd
Page 261 of 356
Chevrolet Express Owner Manual (GMNA-Localizing-U.S./Canada/Mexico-
13882570) - 2020 - CRC - 11/1/19
260 Vehicle Care
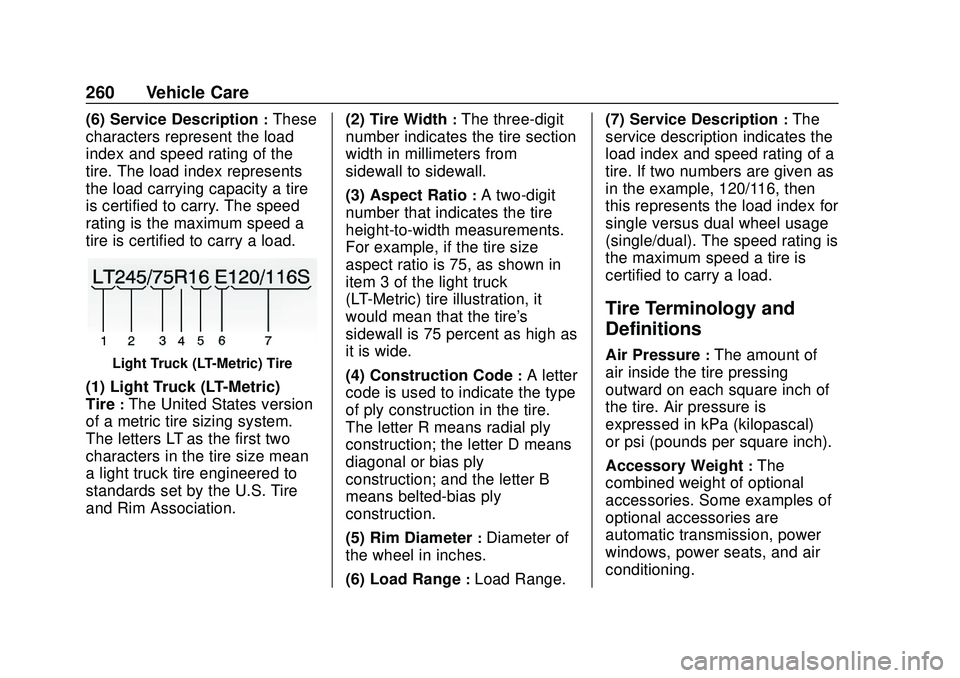
(6) Service Description:These
characters represent the load
index and speed rating of the
tire. The load index represents
the load carrying capacity a tire
is certified to carry. The speed
rating is the maximum speed a
tire is certified to carry a load.
Light Truck (LT-Metric) Tire
(1) Light Truck (LT-Metric)
Tire
:The United States version
of a metric tire sizing system.
The letters LT as the first two
characters in the tire size mean
a light truck tire engineered to
standards set by the U.S. Tire
and Rim Association. (2) Tire Width
:The three-digit
number indicates the tire section
width in millimeters from
sidewall to sidewall.
(3) Aspect Ratio
:A two-digit
number that indicates the tire
height-to-width measurements.
For example, if the tire size
aspect ratio is 75, as shown in
item 3 of the light truck
(LT-Metric) tire illustration, it
would mean that the tire's
sidewall is 75 percent as high as
it is wide.
(4) Construction Code
:A letter
code is used to indicate the type
of ply construction in the tire.
The letter R means radial ply
construction; the letter D means
diagonal or bias ply
construction; and the letter B
means belted-bias ply
construction.
(5) Rim Diameter
:Diameter of
the wheel in inches.
(6) Load Range
:Load Range. (7) Service Description
:The
service description indicates the
load index and speed rating of a
tire. If two numbers are given as
in the example, 120/116, then
this represents the load index for
single versus dual wheel usage
(single/dual). The speed rating is
the maximum speed a tire is
certified to carry a load.
Tire Terminology and
Definitions
Air Pressure:The amount of
air inside the tire pressing
outward on each square inch of
the tire. Air pressure is
expressed in kPa (kilopascal)
or psi (pounds per square inch).
Accessory Weight
:The
combined weight of optional
accessories. Some examples of
optional accessories are
automatic transmission, power
windows, power seats, and air
conditioning.
Page 278 of 356

Chevrolet Express Owner Manual (GMNA-Localizing-U.S./Canada/Mexico-
13882570) - 2020 - CRC - 11/1/19
Vehicle Care 277
Warning (Continued)
underinflated or flat may cause a
blowout and a serious crash.
Never attempt to re-inflate a tire
that has been driven on while
severely underinflated or flat.
Have your dealer or an authorized
tire service center repair or
replace the flat tire as soon as
possible.
{Warning
Lifting a vehicle and getting under
it to do maintenance or repairs is
dangerous without the
appropriate safety equipment and
training. If a jack is provided with
the vehicle, it is designed only for
changing a flat tire. If it is used for
anything else, you or others could
be badly injured or killed if the
vehicle slips off the jack. If a jack
is provided with the vehicle, only
use it for changing a flat tire.If a tire goes flat, avoid further tire
and wheel damage by driving slowly
to a level place, well off the road,
if possible. Turn on the hazard
warning flashers. See
Hazard
Warning Flashers 0113.
{Warning
Changing a tire can be
dangerous. The vehicle can slip
off the jack and roll over or fall
causing injury or death. Find a
level place to change the tire. To
help prevent the vehicle from
moving:
1. Set the parking brake firmly.
2. Put an automatictransmission in P (Park) or a
manual transmission in
1 (First) or R (Reverse).
3. Turn off the engine and do not restart while the vehicle
is raised.
4. Do not allow passengers to remain in the vehicle.
(Continued)
Warning (Continued)
5. Place wheel blocks,if equipped, on both sides of
the tire at the opposite
corner of the tire being
changed.
When the vehicle has a flat tire (2),
use the following example as a
guide to assist in the placement of
the wheel blocks (1), if equipped.
1. Wheel Block (If Equipped)
2. Flat Tire
The following information explains
how to repair or change a tire.
Page 290 of 356
Chevrolet Express Owner Manual (GMNA-Localizing-U.S./Canada/Mexico-
13882570) - 2020 - CRC - 11/1/19
Vehicle Care 289
ground connection you do not
want. You would not be able to
start your vehicle, and the bad
grounding could damage the
electrical systems.
To avoid the possibility of the
vehicles rolling, set the parking
brake firmly on both vehicles
involved in the jump start
procedure. Put an automatic
transmission in P (Park) or a
manual transmission in Neutral
before setting the parking
brake.
Caution
If any accessories are left on or
plugged in during the jump
starting procedure, they could be
damaged. The repairs would not
be covered by the vehicle
warranty. Whenever possible, turn
off or unplug all accessories on
either vehicle when jump starting.
3. Turn the ignition off on both vehicles. Unplug unnecessary
accessories plugged into the cigarette lighter or the
accessory power outlet. Turn
off the radio and all lamps that
are not needed. This will avoid
sparks and help save both
batteries. And it could save the
radio!
4. Open the hoods and locate the positive (+) and negative (−)
terminal locations of the other
vehicle.
On your van, use the unpainted
radio antenna bracket as a
remote negative (−) terminal.
{Warning
Using a match near a battery can
cause battery gas to explode.
People have been hurt doing this,
and some have been blinded.
Use a flashlight if you need more
light.
Battery fluid contains acid that
can burn you. Do not get it on
you. If you accidentally get it in
(Continued)
Warning (Continued)
your eyes or on your skin, flush
the place with water and get
medical help immediately.
{Warning
Fans or other moving engine
parts can injure you badly. Keep
your hands away from moving
parts once the engine is running.
5. Check that the jumper cables do not have loose or missing
insulation. If they do, you could
get a shock. The vehicles
could be damaged too.
Before you connect the cables,
here are some basic things you
should know. Positive (+) will
go to positive (+) or to a remote
positive (+) terminal if the
vehicle has one. Negative (−)
will go to an unpainted metal
part or to a remote negative (−)
terminal if the vehicle has one.
Page 293 of 356

Chevrolet Express Owner Manual (GMNA-Localizing-U.S./Canada/Mexico-
13882570) - 2020 - CRC - 11/1/19
292 Vehicle Care
Caution (Continued)
tow truck from a flat road surface,
or to move the vehicle a short
distance. Use caution and low
speeds. The transmission must
be in (N) Neutral when moving
the vehicle.
GM recommends a flatbed tow truck
to transport a disabled vehicle. Use
ramps to help reduce approach
angles, if necessary. A towed
vehicle should have its drive wheels
off the ground. Contact Roadside
Assistance or a professional towing
service if the disabled vehicle must
be towed. Front Attachment Points
The vehicle is equipped with
specific attachment points to be
used to pull the vehicle onto a
flatbed car carrier from a flat road
surface. Do not use these
attachment points to pull the vehicle
from snow, mud or sand.
Recreational Vehicle
Towing
Recreational vehicle towing means
towing the vehicle behind another
vehicle, such as behind a motor
home. The two most common types
of recreational vehicle towing areknown as dinghy towing and dolly
towing. Dinghy towing is towing the
vehicle with all four wheels on the
ground. Dolly towing is towing the
vehicle with two wheels on the
ground and two wheels up on a
device known as a dolly.
Here are some important things to
consider before recreational vehicle
towing:
.
Before towing the vehicle,
become familiar with the local
laws that apply to recreational
vehicle towing. These laws may
vary by region.
. What is the towing capacity of
the towing vehicle? Be sure to
read the tow vehicle
manufacturer's
recommendations.
. What is the distance that will be
traveled? Some vehicles have
restrictions on how far and how
long they can tow.