AUX CHEVROLET EXPRESS 2020 Get To Know Guide
[x] Cancel search | Manufacturer: CHEVROLET, Model Year: 2020, Model line: EXPRESS, Model: CHEVROLET EXPRESS 2020Pages: 356, PDF Size: 5.7 MB
Page 7 of 356
Chevrolet Express Owner Manual (GMNA-Localizing-U.S./Canada/Mexico-
13882570) - 2020 - CRC - 11/1/19
6 Introduction
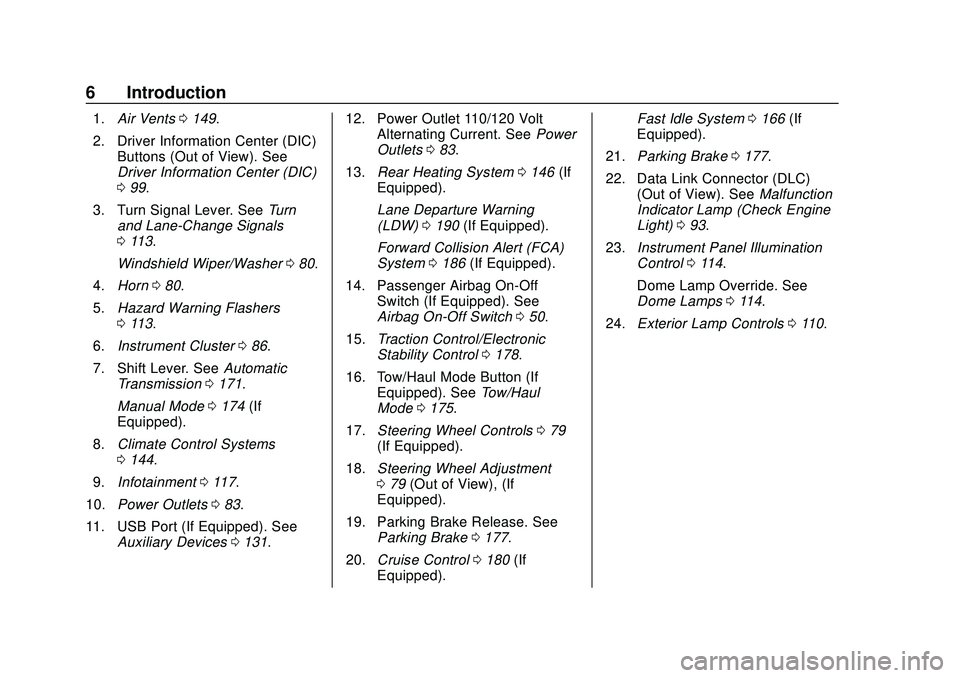
1.Air Vents 0149.
2. Driver Information Center (DIC) Buttons (Out of View). See
Driver Information Center (DIC)
099.
3. Turn Signal Lever. See Turn
and Lane-Change Signals
0 113.
Windshield Wiper/Washer 080.
4. Horn 080.
5. Hazard Warning Flashers
0113.
6. Instrument Cluster 086.
7. Shift Lever. See Automatic
Transmission 0171.
Manual Mode 0174 (If
Equipped).
8. Climate Control Systems
0144.
9. Infotainment 0117.
10. Power Outlets 083.
11. USB Port (If Equipped). See Auxiliary Devices 0131. 12. Power Outlet 110/120 Volt
Alternating Current. See Power
Outlets 083.
13. Rear Heating System 0146 (If
Equipped).
Lane Departure Warning
(LDW) 0190 (If Equipped).
Forward Collision Alert (FCA)
System 0186 (If Equipped).
14. Passenger Airbag On-Off Switch (If Equipped). See
Airbag On-Off Switch 050.
15. Traction Control/Electronic
Stability Control 0178.
16. Tow/Haul Mode Button (If Equipped). See Tow/Haul
Mode 0175.
17. Steering Wheel Controls 079
(If Equipped).
18. Steering Wheel Adjustment
079 (Out of View), (If
Equipped).
19. Parking Brake Release. See Parking Brake 0177.
20. Cruise Control 0180 (If
Equipped). Fast Idle System
0166 (If
Equipped).
21. Parking Brake 0177.
22. Data Link Connector (DLC) (Out of View). See Malfunction
Indicator Lamp (Check Engine
Light) 093.
23. Instrument Panel Illumination
Control 0114.
Dome Lamp Override. See
Dome Lamps 0114.
24. Exterior Lamp Controls 0110.
Page 22 of 356
Chevrolet Express Owner Manual (GMNA-Localizing-U.S./Canada/Mexico-
13882570) - 2020 - CRC - 11/1/19
Keys, Doors, and Windows 21
3. After the engine has started,turn the ignition off and remove
the key.
4. Insert the key to be programmed and turn the
ignition on within 10 seconds of
removing the previous key.
The security message will turn
off once the key has been
programmed. It may not be
apparent that the security
message went on due to how
quickly the key is programmed.
5. Repeat Steps 1–4 if additional keys are to be programmed.
If you lose or damage a
PASS-Key III+ key, see your dealer
or a locksmith who can service
PASS-Key III+ to have a new
key made.
Do not leave the key or device that
disarms or deactivates the
theft-deterrent system in the vehicle.Exterior Mirrors
Convex Mirrors
{Warning
A convex mirror can make things,
like other vehicles, look farther
away than they really are. If you
cut too sharply into the next lane,
you could hit a vehicle that is
driving next to you. Check the
inside mirror or glance over your
shoulder before changing lanes.
If equipped, the lower portion of the
driver and passenger side mirror is
convex. A convex mirror's surface is
curved so more can be seen from
the driver seat. The convex mirror
can be adjusted manually to the
driver preferred position for better
vision.
Manual Mirrors
Adjust the mirrors by moving the
mirror up and down and left and
right. The mirrors can be manually folded
in or out.
On the lower portion of each mirror
is an auxiliary convex mirror.
A convex mirror's surface is curved
so you can see more from the driver
seat. The auxiliary convex mirrors
can be adjusted manually by
moving the mirror.
Trailer-Tow Mirrors
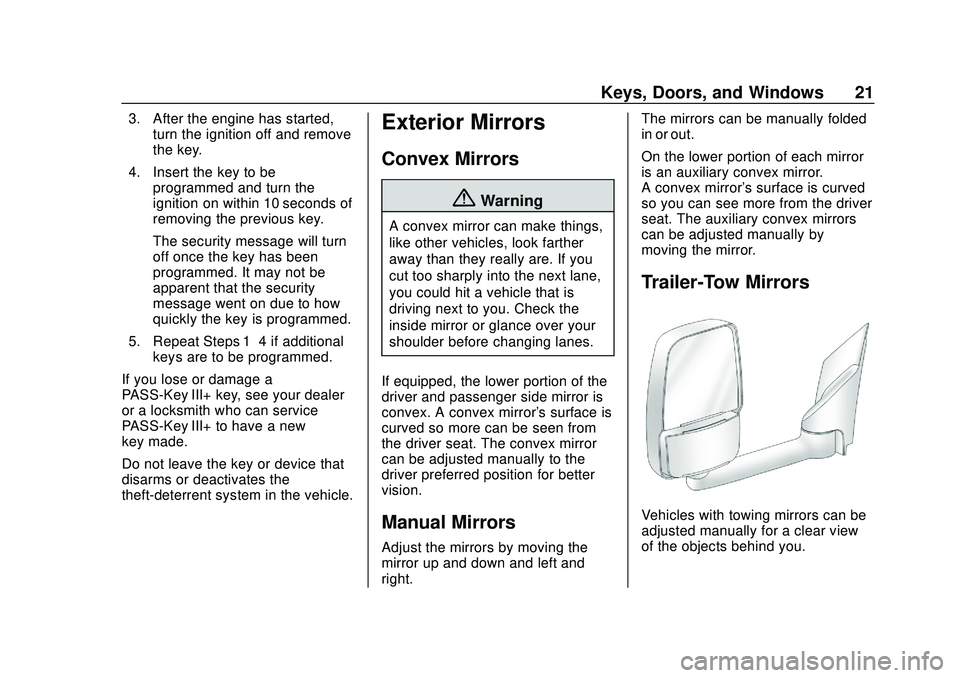
Vehicles with towing mirrors can be
adjusted manually for a clear view
of the objects behind you.
Page 23 of 356
Chevrolet Express Owner Manual (GMNA-Localizing-U.S./Canada/Mexico-
13882570) - 2020 - CRC - 11/1/19
22 Keys, Doors, and Windows
On the lower portion of each mirror
there is an auxiliary convex mirror
that can be adjusted manually to
provide an extended field of view.
The mirrors can be manually folded
in or out.
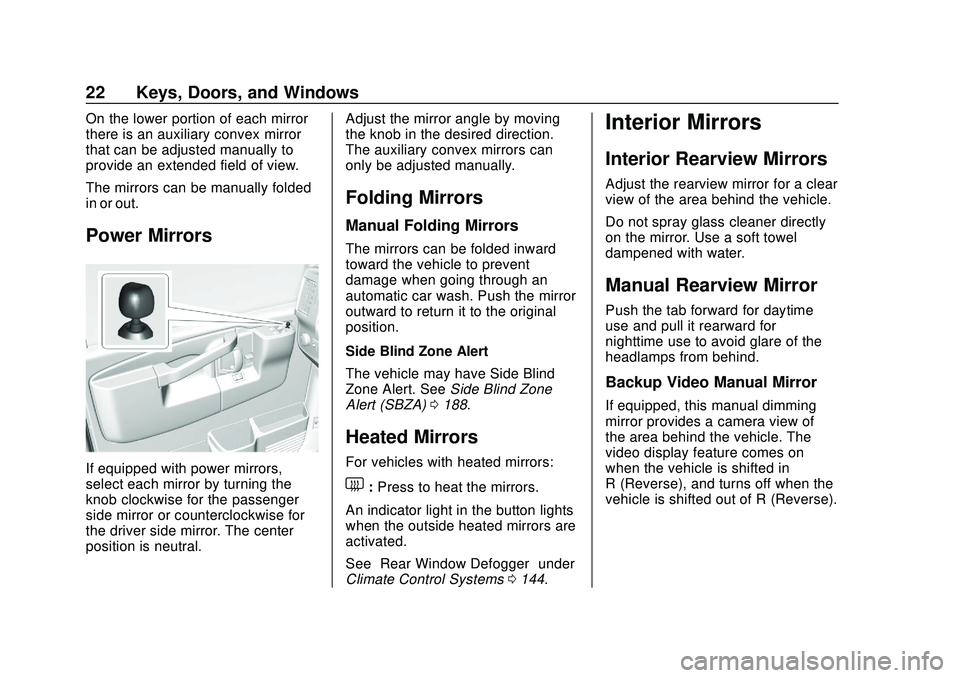
Power Mirrors
If equipped with power mirrors,
select each mirror by turning the
knob clockwise for the passenger
side mirror or counterclockwise for
the driver side mirror. The center
position is neutral.Adjust the mirror angle by moving
the knob in the desired direction.
The auxiliary convex mirrors can
only be adjusted manually.
Folding Mirrors
Manual Folding Mirrors
The mirrors can be folded inward
toward the vehicle to prevent
damage when going through an
automatic car wash. Push the mirror
outward to return it to the original
position.
Side Blind Zone Alert
The vehicle may have Side Blind
Zone Alert. See
Side Blind Zone
Alert (SBZA) 0188.
Heated Mirrors
For vehicles with heated mirrors:
1:Press to heat the mirrors.
An indicator light in the button lights
when the outside heated mirrors are
activated.
See “Rear Window Defogger” under
Climate Control Systems 0144.
Interior Mirrors
Interior Rearview Mirrors
Adjust the rearview mirror for a clear
view of the area behind the vehicle.
Do not spray glass cleaner directly
on the mirror. Use a soft towel
dampened with water.
Manual Rearview Mirror
Push the tab forward for daytime
use and pull it rearward for
nighttime use to avoid glare of the
headlamps from behind.
Backup Video Manual Mirror
If equipped, this manual dimming
mirror provides a camera view of
the area behind the vehicle. The
video display feature comes on
when the vehicle is shifted in
R (Reverse), and turns off when the
vehicle is shifted out of R (Reverse).
Page 81 of 356
Chevrolet Express Owner Manual (GMNA-Localizing-U.S./Canada/Mexico-
13882570) - 2020 - CRC - 11/1/19
80 Instruments and Controls
Navigating Folders on an iPod or
USB Device1. Press and hold
worc/x
while listening to a song until
the contents of the current
folder appear on the
infotainment display.
2. Press and hold
c/xto go
back to the previous folder list.
3. Press and release
worc/
xto scroll up or down the list.
. To select a folder, press
and hold
w, or press¨
when the folder is
highlighted.
. To go back further in the
folder list, press and hold
c/x.
b/g:Press to silence the vehicle
speakers only. Press again to turn
the sound on.
For vehicles with Bluetooth or
OnStar systems, press and hold for
longer than two seconds to interact with those systems. See
Bluetooth
0 136 and
OnStar Overview 0335, if equipped.
SRCE : Press to switch between
the radio and CD, and for equipped
vehicles, the front auxiliary.
¨: Press to go to the next radio
station while in AM, FM,
or SiriusXM, if equipped.
If equipped with a CD player or
USB port:
Press
¨to go to the next track or
chapter while sourced to the CD.
Press
¨to select a track or a folder
when navigating folders on an iPod
or USB device.
While listening to a CD, press and
hold
¨to quickly move forward
through the tracks. Release to stop
on the desired track.
+
e: Press to increase volume.
−
e: Press to decrease volume.
Horn
Press the horn symbol on the
steering wheel to sound the horn.
Windshield Wiper/Washer
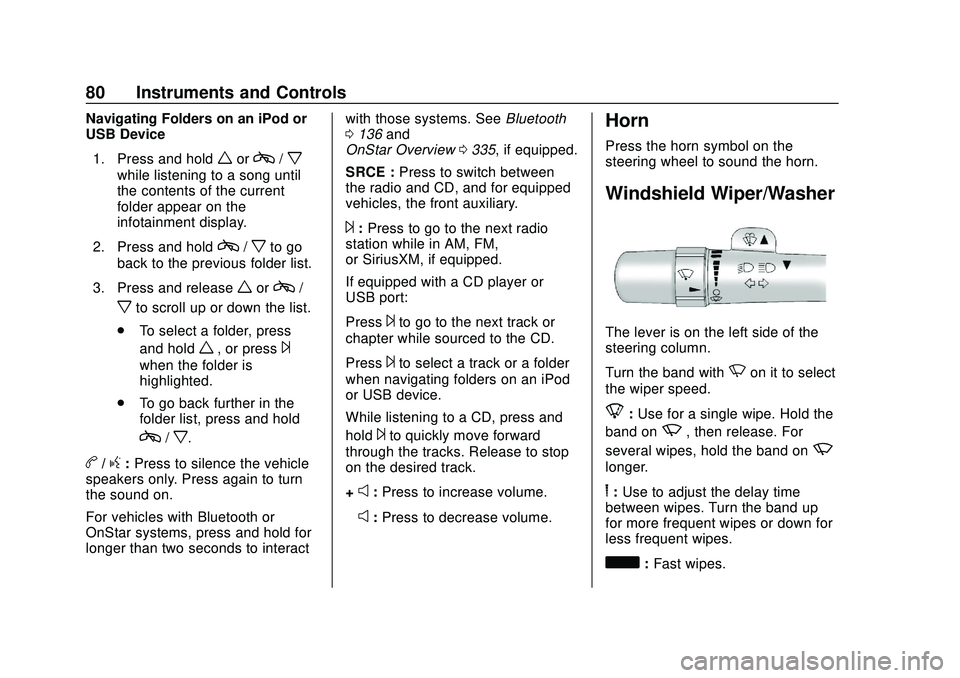
The lever is on the left side of the
steering column.
Turn the band with
Non it to select
the wiper speed.
8: Use for a single wipe. Hold the
band on
z, then release. For
several wipes, hold the band on
z
longer.
6: Use to adjust the delay time
between wipes. Turn the band up
for more frequent wipes or down for
less frequent wipes.
d: Fast wipes.
Page 118 of 356
Chevrolet Express Owner Manual (GMNA-Localizing-U.S./Canada/Mexico-
13882570) - 2020 - CRC - 11/1/19
Infotainment System 117
Infotainment
System
Introduction
Infotainment . . . . . . . . . . . . . . . . . . 117
Theft-Deterrent Feature . . . . . . . 118
Overview (AM-FM Radio) . . . . . 118
Overview (Radio withCD/MP3) . . . . . . . . . . . . . . . . . . . . 120
Operation . . . . . . . . . . . . . . . . . . . . . 121
Radio
AM-FM Radio . . . . . . . . . . . . . . . . 123
Satellite Radio . . . . . . . . . . . . . . . . 124
Radio Reception . . . . . . . . . . . . . . 125
Multi-Band Antenna . . . . . . . . . . 126
Audio Players
Avoiding Untrusted Media Devices . . . . . . . . . . . . . . . . . . . . . 126
CD Player . . . . . . . . . . . . . . . . . . . . 126
Auxiliary Devices . . . . . . . . . . . . . 131
OnStar System
OnStar System . . . . . . . . . . . . . . . 136
Phone
Bluetooth . . . . . . . . . . . . . . . . . . . . . 136
Introduction
Infotainment
Base radio information is included in
this manual. See the infotainment
manual for information on other
available infotainment systems.
Read the following pages to
become familiar with the features.
{Warning
Taking your eyes off the road for
too long or too often while using
any infotainment feature can
cause a crash. You or others
could be injured or killed. Do not
give extended attention to
infotainment tasks while driving.
Limit your glances at the vehicle
displays and focus your attention
on driving. Use voice commands
whenever possible.
The infotainment system has built-in
features intended to help avoid
distraction by disabling some functions when driving. These
functions may gray out when they
are unavailable. Many infotainment
features are also available through
the instrument cluster and steering
wheel controls.
Before driving:
.
Become familiar with the
operation, center stack controls,
and infotainment display
controls.
. Set up the audio by presetting
favorite stations, setting the
tone, and adjusting the
speakers.
. Set up phone numbers in
advance so they can be called
easily by pressing a single
control or by using a single voice
command if equipped with
Bluetooth phone capability.
See Defensive Driving 0152.
To play the infotainment system with
the ignition off, see Retained
Accessory Power (RAP) 0167.
Page 120 of 356
Chevrolet Express Owner Manual (GMNA-Localizing-U.S./Canada/Mexico-
13882570) - 2020 - CRC - 11/1/19
Infotainment System 119
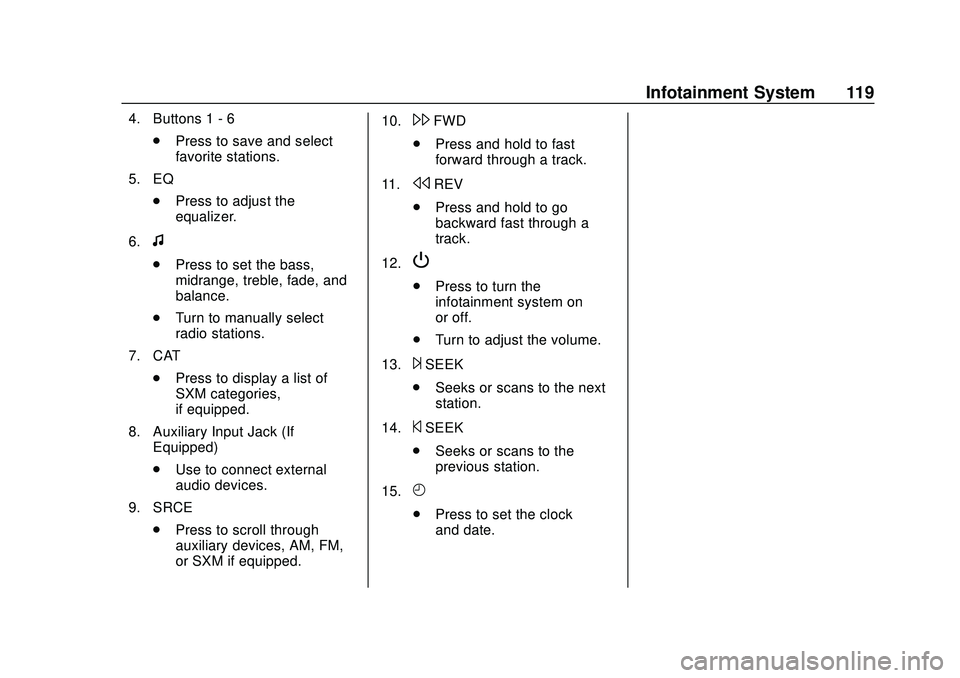
4. Buttons 1 - 6.Press to save and select
favorite stations.
5. EQ .Press to adjust the
equalizer.
6.
f
. Press to set the bass,
midrange, treble, fade, and
balance.
. Turn to manually select
radio stations.
7. CAT .Press to display a list of
SXM categories,
if equipped.
8. Auxiliary Input Jack (If Equipped)
.Use to connect external
audio devices.
9. SRCE .Press to scroll through
auxiliary devices, AM, FM,
or SXM if equipped. 10.
\FWD
. Press and hold to fast
forward through a track.
11.
sREV
. Press and hold to go
backward fast through a
track.
12.
P
. Press to turn the
infotainment system on
or off.
. Turn to adjust the volume.
13.
¨SEEK
. Seeks or scans to the next
station.
14.
©SEEK
. Seeks or scans to the
previous station.
15.
H
. Press to set the clock
and date.
Page 121 of 356
Chevrolet Express Owner Manual (GMNA-Localizing-U.S./Canada/Mexico-
13882570) - 2020 - CRC - 11/1/19
120 Infotainment System
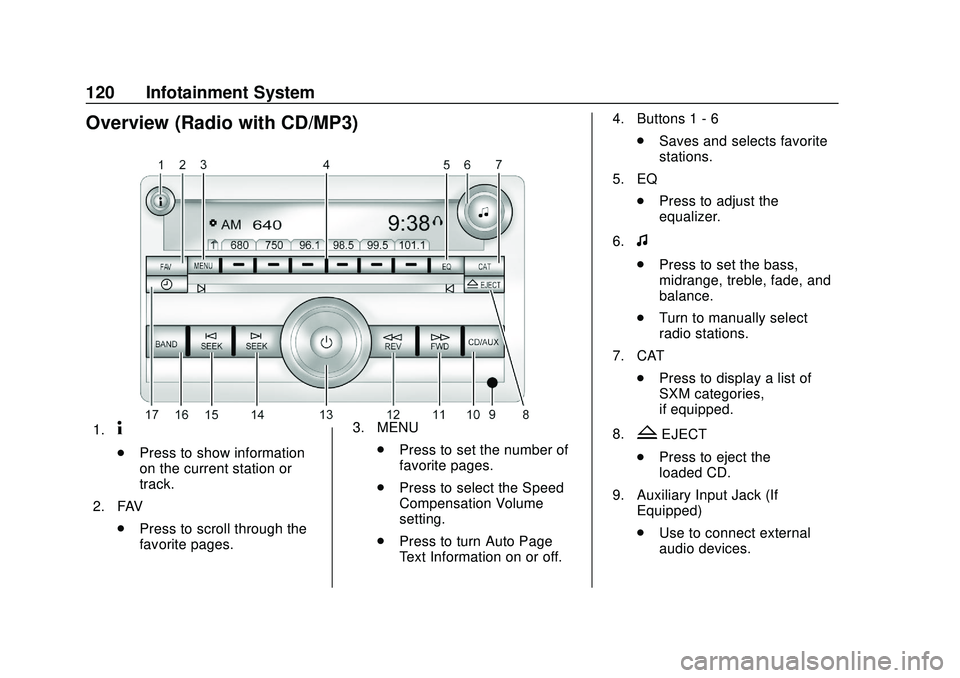
Overview (Radio with CD/MP3)
1.4
.Press to show information
on the current station or
track.
2. FAV .Press to scroll through the
favorite pages. 3. MENU
.Press to set the number of
favorite pages.
. Press to select the Speed
Compensation Volume
setting.
. Press to turn Auto Page
Text Information on or off. 4. Buttons 1 - 6
.Saves and selects favorite
stations.
5. EQ .Press to adjust the
equalizer.
6.
f
. Press to set the bass,
midrange, treble, fade, and
balance.
. Turn to manually select
radio stations.
7. CAT .Press to display a list of
SXM categories,
if equipped.
8.
ZEJECT
. Press to eject the
loaded CD.
9. Auxiliary Input Jack (If Equipped)
.Use to connect external
audio devices.
Page 122 of 356
Chevrolet Express Owner Manual (GMNA-Localizing-U.S./Canada/Mexico-
13882570) - 2020 - CRC - 11/1/19
Infotainment System 121
10. CD/AUX.Press to scroll through
selecting the CD or an
auxiliary device.
11.
\FWD
. Press and hold to fast
forward through a track.
12.
sREV
. Press and hold to go
backward fast through a
track.
13.
P
. Press to turn the
infotainment system on
or off.
. Turn to adjust the volume.
14.
¨SEEK
. Seeks or scans to the next
station.
15.
©SEEK
. Seeks or scans to the
previous station. 16. BAND
.Press to scroll through the
available bands FM1, FM2,
AM, or SXM if equipped.
17.
H
. Press to set the clock
and date.
Operation
Using the Radio
O:Press to turn the system on
and off.
Turn clockwise or counterclockwise
to increase or decrease the volume.
4: Press to switch the display
between the radio station frequency
and the time. While the ignition is
off, press this button to display the
time. Press to display additional text
information related to the current
FM-RDS station or MP3 song.
A choice of additional information
such as Channel, Song, Artist, and
CAT (category) can display.
Continue pressing to highlight the desired tab, or press the softkey
under any one of the tabs and the
information about that tab displays.
Speed Compensated Volume
(SCV) :
SCV automatically adjusts
the radio volume to compensate for
road and wind noise as the vehicle
speed changes while driving, so that
the volume level stays consistent.
To activate SCV:
1. Set the radio volume to the desired level.
2. Press the MENU button to display the radio setup menu.
3. Press the softkey under the AUTO VOLUM (automatic
volume) tab on the infotainment
display.
4. Press the softkey under the desired SCV setting (OFF, Low,
Med, or High) to select the
level of radio volume
compensation. The display
times out after approximately
10 seconds. Each higher
setting allows for more radio
volume compensation at faster
vehicle speeds.
Page 128 of 356
Chevrolet Express Owner Manual (GMNA-Localizing-U.S./Canada/Mexico-
13882570) - 2020 - CRC - 11/1/19
Infotainment System 127
Caution
If a label is added to a CD, more
than one CD is inserted into the
slot at a time, or an attempt is
made to play scratched or
damaged CDs, the CD player
could be damaged. While using
the CD player, use only CDs in
good condition without any label,
load one CD at a time, and keep
the CD player and the loading slot
free of foreign materials, liquids,
and debris.
If an error displays, see “CD Player
Messages” later in this section.
Care of CDs
If playing a CD-R, the sound quality
can be reduced due to CD-R or
CD-RW quality, the method of
recording, the quality of the music
that has been recorded, and the
way the CD-R or CD-RW has been
handled. Handle them carefully.
Store CD-Rs or CD-RWs in their
original cases or other protective cases and away from direct sunlight
and dust. The CD player scans the
bottom surface of the disc. If the
surface of a CD is damaged, such
as cracked, broken, or scratched,
the CD does not play properly or not
at all. Do not touch the bottom side
of a CD while handling it; this could
damage the surface. Pick up CDs
by the outer edges or the edge of
the hole and the outer edge.
If the surface of a CD is soiled,
clean it with a soft, lint-free cloth or
dampen a clean, soft cloth in a mild,
neutral detergent solution mixed
with water. Make sure the wiping
process starts from the center to
the edge.
Inserting a CD
Insert a CD partway into the slot,
label side up. The player pulls it in
and the CD should begin playing.
Ejecting a CD
ZEJECT :
Press and release to
eject the disc. Remove the CD
when Remove Disc displays. If the disc is not removed, after several
seconds the disc is automatically
pulled back into the player.
Playing a CD
If the ignition or radio is turned off
with a CD in the player, it stays in
the player. When the ignition or
radio is turned on, the CD starts
playing where it stopped, if it was
the last selected audio source.
When a CD is inserted, the CD
symbol displays on the left side of
the radio display. As each new track
starts to play, the track number
displays.
The CD player can play the smaller
8 cm (3 in) single CDs with an
adapter ring. Full-size CDs and the
smaller CDs are loaded in the same
manner.
CD/AUX :
Press to cycle between
CD or Auxiliary when listening to the
radio. The CD icon and a message
showing the disc and/or track
number will display when a CD is in
the player. Press again and the
system automatically searches for
Page 129 of 356
Chevrolet Express Owner Manual (GMNA-Localizing-U.S./Canada/Mexico-
13882570) - 2020 - CRC - 11/1/19
128 Infotainment System
an auxiliary input device; see
Auxiliary Devices0131. If a
portable audio player is not
connected, “No Input Device Found”
displays.
4: Press to display additional text
information related to the current
song. If information is available, the
song title information displays on
the top line of the display and artist
information displays on the bottom
line. When information is not
available, NO INFO displays.
f: Turn to select tracks on the CD
that is currently playing.
©SEEK : Press to go to the start of
the current track if more than
10 seconds on the CD have played.
Press to go to the previous track if
less than 10 seconds on the CD
have played.
Press and hold, or press multiple
times, to continue moving backward
through the tracks on the CD.
¨SEEK : Press to go to the next
track. Press and hold, or press multiple
times, to continue moving forward
through the tracks on the CD.
sREV :
Press and hold to reverse
playback quickly within a track.
\FWD : Press and hold to
advance playback quickly within a
track.
RDM : For Radios with CD/MP3.
Press to listen to tracks in random,
rather than sequential order.
To use random:
1. Press the softkey under the RDM tab until Random Current
Disc displays.
2. Press the softkey again to turn off random play.
MP3-Supported Files
Radios with CD/MP3 have the
capability of playing an MP3 CD-R
or CD-RW disc.
Format
Radios that have the capability of
playing MP3s can play .mp3 or .wma
files that were recorded onto a CD-R or CD-RW disc. The files can
be recorded with the following fixed
bit rates: 32 kbps, 40 kbps, 56 kbps,
64 kbps, 80 kbps, 96 kbps, 112 kbps,
128 kbps, 160 kbps, 192 kbps,
224 kbps, 256 kbps, and 320 kbps or
a variable bit rate.
Compressed Audio or Mixed Mode
Discs
The radio can play discs that
contain both uncompressed CD
audio and MP3 files. If both formats
are on the disc, the radio reads all
MP3 files first, then the
uncompressed CD audio files.
CD-R- or CD-RW-Supported File
and Folder Structure
The radio supports:
.
Up to 50 folders.
. Up to eight folders in depth.
. Up to 50 playlists.
. Up to 255 files.
. Playlists with an .m3u or .wpl
extension.
. Files with an .mp3, .wma, or .cda
file extension.