air conditioning CHEVROLET EXPRESS CARGO VAN 2003 1.G Owners Manual
[x] Cancel search | Manufacturer: CHEVROLET, Model Year: 2003, Model line: EXPRESS CARGO VAN, Model: CHEVROLET EXPRESS CARGO VAN 2003 1.GPages: 386, PDF Size: 2.73 MB
Page 119 of 386

Instrument Panel Overview...............................3-4
Hazard Warning Flashers................................3-5
Other Warning Devices...................................3-6
Horn.............................................................3-6
Tilt Wheel.....................................................3-7
Turn Signal/Multifunction Lever.........................3-7
Exterior Lamps.............................................3-13
Interior Lamps..............................................3-16
Accessory Power Outlets...............................3-18
Ashtrays and Cigarette Lighter........................3-18
Climate Controls............................................3-19
Climate Control System.................................3-19
Rear Heating System....................................3-20
Rear Air Conditioning and Heating System.......3-21Warning Lights, Gages and Indicators.............3-23
Instrument Panel Cluster................................3-24
Speedometer...............................................3-25
Safety Belt Reminder Light.............................3-26
Air Bag Readiness Light................................3-27
Air Bag Off Light..........................................3-28
Charging System Light..................................3-29
Voltmeter Gage............................................3-30
Brake System Warning Light..........................3-31
Anti-Lock Brake System
Warning Light...........................................3-32
Engine Coolant Temperature Gage..................3-32
Low Coolant Warning Light............................3-33
Malfunction Indicator Lamp.............................3-33
Section 3 Instrument Panel
3-1
Page 138 of 386

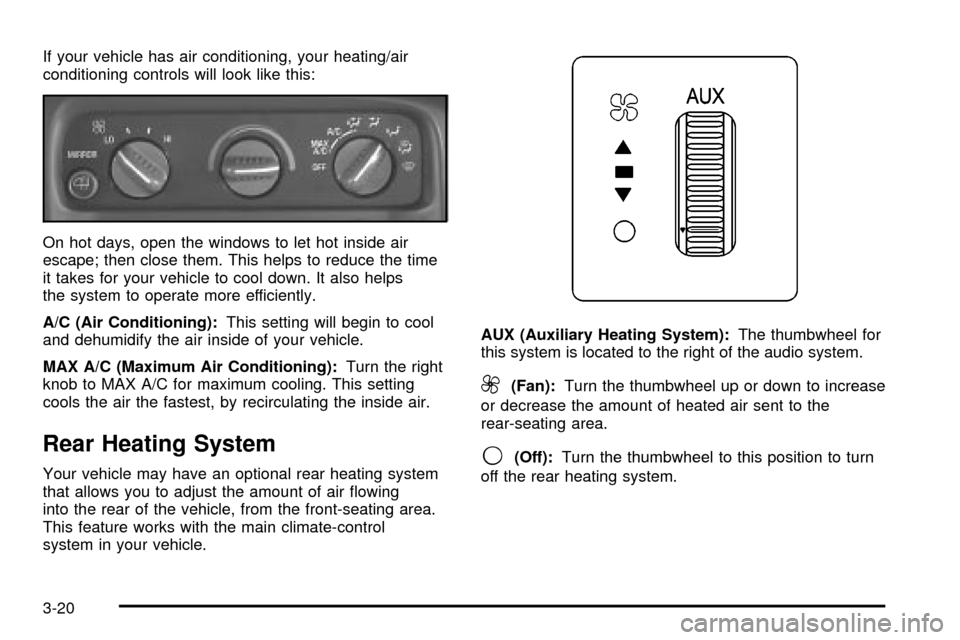
If your vehicle has air conditioning, your heating/air
conditioning controls will look like this:
On hot days, open the windows to let hot inside air
escape; then close them. This helps to reduce the time
it takes for your vehicle to cool down. It also helps
the system to operate more efficiently.
A/C (Air Conditioning):This setting will begin to cool
and dehumidify the air inside of your vehicle.
MAX A/C (Maximum Air Conditioning):Turn the right
knob to MAX A/C for maximum cooling. This setting
cools the air the fastest, by recirculating the inside air.
Rear Heating System
Your vehicle may have an optional rear heating system
that allows you to adjust the amount of air ¯owing
into the rear of the vehicle, from the front-seating area.
This feature works with the main climate-control
system in your vehicle.AUX (Auxiliary Heating System):The thumbwheel for
this system is located to the right of the audio system.
9(Fan):Turn the thumbwheel up or down to increase
or decrease the amount of heated air sent to the
rear-seating area.
9(Off):Turn the thumbwheel to this position to turn
off the rear heating system.
3-20
Page 139 of 386

Rear Air Conditioning and Heating
System
Your vehicle may have a rear heating and
air-conditioning system. This system regulates the
temperature, the fan speed and the air delivery for the
rear-seat passengers only. It also works with the
main climate-control system in your vehicle.
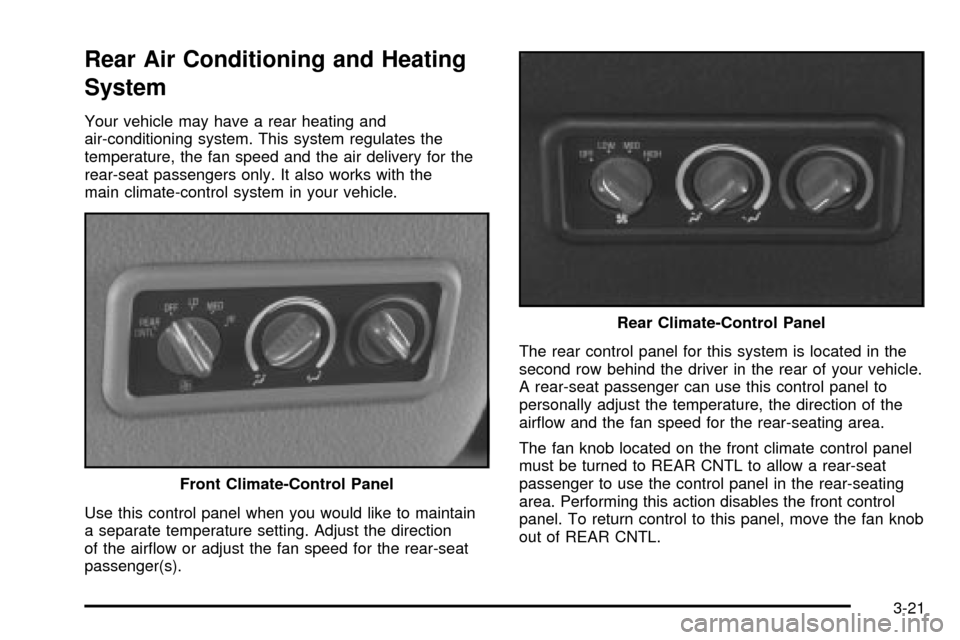
Use this control panel when you would like to maintain
a separate temperature setting. Adjust the direction
of the air¯ow or adjust the fan speed for the rear-seat
passenger(s).The rear control panel for this system is located in the
second row behind the driver in the rear of your vehicle.
A rear-seat passenger can use this control panel to
personally adjust the temperature, the direction of the
air¯ow and the fan speed for the rear-seating area.
The fan knob located on the front climate control panel
must be turned to REAR CNTL to allow a rear-seat
passenger to use the control panel in the rear-seating
area. Performing this action disables the front control
panel. To return control to this panel, move the fan knob
out of REAR CNTL. Front Climate-Control Panel
Rear Climate-Control Panel
3-21
Page 140 of 386

Turn the center knob clockwise or counterclockwise
to change the direction of the air¯ow in the
rear-seating area.
To change the current mode, select one of the following:
D(Vent):Use this mode to direct air to the upper
outlets, with a little air directed to the ¯oor outlets.
2(Floor):Use this mode to direct most of the air to
the ¯oor outlets.
9(Fan):Turn the left knob clockwise or
counterclockwise to HIGH, MED (Medium) or LOW to
increase or decrease the fan speed in the rear-seating
area. Turn the knob to OFF to turn off the fan.
(Temperature Control):To increase or decrease the
temperature for the rear of the vehicle, turn the right
knob located on the climate-control panel.
The air-conditioning system on the main climate-control
panel must be turned on to direct cooled air to the
rear of the vehicle. If it is not on, then the temperature
in the rear of the vehicle will remain at cabin
temperature.
Be sure to keep the area under the front seats clear of
any objects so that the air inside of your vehicle can
circulate effectively.For information on how to use the main climate-control
system, see
Climate Control System on page 3-19listed previously in this section. For information
on ventilation, see ªOutlet Adjustmentº earlier in this
section.
Defogging and Defrosting
Fog on the inside of windows is a result of high humidity
(moisture) condensing on the cool window glass. This
can be minimized if the climate control is used properly.
There are two modes to clear fog or frost from your
windshield and side windows.
Use the defog mode to clear the windows of fog or
moisture and warm the passengers. Use the defrost
mode to remove fog or frost from the windshield more
quickly. For best results, clear all snow and ice from the
windshield before defrosting.
Turn the knob on the right of the climate control panel
to select the defog or defrost mode.
-(Blend):With this setting, the outside air comes out
of both the ¯oor and defroster outlets. Adjust the
temperature knob for warmer or cooler air. The air
conditioning compressor may operate in this setting to
dehumidify the air.
1(Defrost):This setting operates the defroster.
Most of the air comes out near the windshield, with
some going to the ¯oor outlets and front side windows.
3-22
Page 141 of 386

The air conditioning compressor may operate in this
setting to dehumidify the air.
The blend setting is useful for cold weather with a large
number of passengers or very humid conditions to
help keep the windshield clear. Use defrost to remove
fog or ice from the windshield quickly in extremely
cold conditions. The temperature knob should be in the
red area and the fan control toward high. Do not
drive the vehicle until all the windows are clear.
Rear Window Defogger
Press this button to turn the rear window defogger on or
off. Be sure to clear as much snow from the window
as possible.
The rear window defogger uses a warming grid to
remove fog or frost from the rear window and will only
work when the ignition is RUN.
The rear window defogger will turn off several minutes
after the button is pressed. If turned on again, the
defogger will run for several more minutes before turning
off. The defogger can also be turned off by pressing
the button again or by turning off the engine.
Notice:Don't use a razor blade or something else
sharp on the inside of the rear window. If you
do, you could cut or damage the defogger and the
repairs would not be covered by your warranty.
Do not attach a temporary vehicle license, tape, a
decal or anything similar to the defogger grid.
Warning Lights, Gages and
Indicators
This part describes the warning lights and gages
that may be on your vehicle. The pictures will help
you locate them.
Warning lights and gages can signal that something is
wrong before it becomes serious enough to cause
an expensive repair or replacement. Paying attention to
your warning lights and gages could also save you
or others from injury.
Warning lights come on when there may be or is a
problem with one of your vehicle's functions. As you will
see in the details on the next few pages, some
warning lights come on brie¯y when you start the
engine just to let you know they're working. If you are
familiar with this section, you should not be alarmed
when this happens.
Gages can indicate when there may be or is a problem
with one of your vehicle's functions. Often gages
and warning lights work together to let you know when
there's a problem with your vehicle.
When one of the warning lights comes on and stays
on when you are driving, or when one of the gages
shows there may be a problem, check the section
that tells you what to do about it. Please follow this
manual's advice. Waiting to do repairs can be
costly ± and even dangerous. So please get to know
your warning lights and gages. They're a big help.
3-23
Page 254 of 386

Part C: Periodic
MaintenanceInspections
Listed in this part are inspections and services which
should be performed at least twice a year (for instance,
each spring and fall).
You should let your dealer's
service department do these jobs. Make sure any
necessary repairs are completed at once.
Proper procedures to perform these services may be
found in a service manual. SeeService Publications
Ordering Information on page 7-9.
Steering and Suspension Inspection
Inspect the front and rear suspension and steering
system for damaged, loose or missing parts, signs of
wear or lack of lubrication. Inspect the power steering
lines and hoses for proper hook-up, binding, leaks,
cracks, cha®ng, etc.
Exhaust System Inspection
Inspect the complete exhaust system. Inspect the body
near the exhaust system. Look for broken, damaged,
missing or out-of-position parts as well as open seams,
holes, loose connections or other conditions which
could cause a heat build-up in the ¯oor pan or could let
exhaust fumes into the vehicle. See
Engine Exhaust
on page 2-30.
Fuel System Inspection
Inspect the complete fuel system for damage or leaks.
Engine Cooling System Inspection
Inspect the hoses and have them replaced if they
are cracked, swollen or deteriorated. Inspect all pipes,
®ttings and clamps; replace as needed. Clean the
outside of the radiator and air conditioning condenser.
To help ensure proper operation, a pressure test of
the cooling system and pressure cap is recommended
at least once a year.
6-16
Page 365 of 386

Fuse Usage
1 Radio Battery
2 Powertrain Control Module Battery
3 Left Rear Turn Lamp
4 Right Rear Turn Lamp
5 Backup Lamps Trailer Wiring
6 Ignition 0
7 Stop Lamp
8 Right Rear Defogger/Heated Mirror
9Right Daytime Running Lamp/Turn
Signal
10Left Daytime Running Lamp/Turn
Signal
11 Truck Body Control Module 4
12 Fuel Pump
13 Trailer
14 Flasher
15 Horn
16 Truck Body Control Module 3
17 Trailer Stop/Turn Signal
18 Truck Body Control Module 2
19 Truck Body Control Module
20 Remote Function Actuator
21 Engine 2Fuse Usage
22 Ignition E
23 Engine 1
24Truck Body Control Module
Ignition 1
25 Spare
26 RPA/Inside Rearview Mirror
27 Crankcase
28Brake Transmission Shift Interlock
System
29 Auxiliary Power Outlets
30 Cigarette Lighter
31 Instrument Panel Cluster
32 Air Conditioning
33 Spare
34 Vent
35 Spare
36 Vehicle Back Up
37Supplemental In¯atable Restraint
System
38 Powertrain Control Module Ignition 1
39 Oxygen Sensor B
40 Oxygen Sensor A
41 Windshield Wipers
5-95
Page 366 of 386

Fuse Usage
42 Right Headlamp Ð Low Beam
43 Left Headlamp Ð Low Beam
44 Left Headlamp Ð High Beam
45 Right Headlamp Ð High Beam
46Truck Body Control
Module-Accessory
47 Front Windshield Wiper
48 Anti-Lock Brakes
49 Ignition A
50 Trailer
51 Climate Control Blower
52 Ignition B
63 Spare
64 SpareFuse Usage
Relay Usage
53 Windshield Wiper
54 Air Conditioning
55 Spare
56 Headlamp Ð High Beam
57 Fuel Pump
58 Headlamp Ð Low Beam
59 Horn
61 Starter
62 Spare
Circuit Breaker Usage
60 Power Seat
5-96
Page 369 of 386

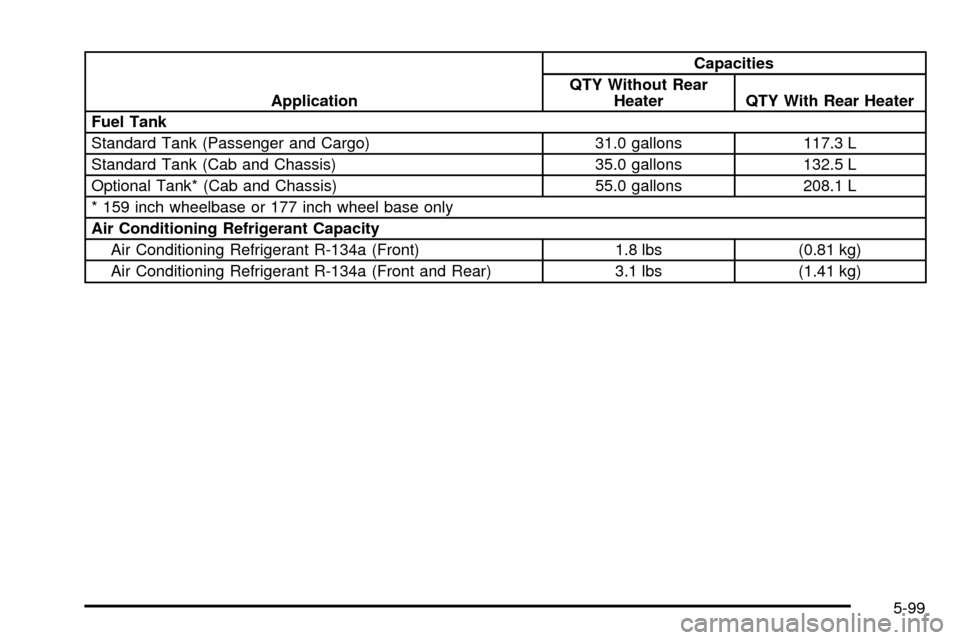
ApplicationCapacities
QTY Without Rear
Heater QTY With Rear Heater
Fuel Tank
Standard Tank (Passenger and Cargo) 31.0 gallons 117.3 L
Standard Tank (Cab and Chassis) 35.0 gallons 132.5 L
Optional Tank* (Cab and Chassis) 55.0 gallons 208.1 L
* 159 inch wheelbase or 177 inch wheel base only
Air Conditioning Refrigerant Capacity
Air Conditioning Refrigerant R-134a (Front) 1.8 lbs (0.81 kg)
Air Conditioning Refrigerant R-134a (Front and Rear) 3.1 lbs (1.41 kg)
5-99
Page 374 of 386

Cleaning the Windshield and Wiper Blades.........5-85
Cleaning Tires................................................5-86
Cleaning Vinyl................................................5-82
Cleaning........................................................5-80
Inside of Your Vehicle..................................5-80
Outside of Your Vehicle................................5-83
Underbody Maintenance...............................5-87
Weatherstrips..............................................5-83
Climate Control System...................................3-19
Rear Air Conditioning and Heating System......3-21
Rear Heating System...................................3-20
Compact Disc Messages.................3-48, 3-59, 3-70
Control of a Vehicle.......................................... 4-5
Coolant.........................................................3-32
Engine Temperature Gage............................3-32
Heater, Engine............................................2-23
Low Warning Light.......................................3-33
Cooling System..............................................5-26
Cruise Control Light........................................3-38
Cruise Control................................................3-10
Current and Past Model Order Forms................7-10
Customer Assistance Information........................ 7-7
Courtesy Transportation.................................. 7-7
Customer Assistance for Text
Telephone (TTY) Users............................... 7-4
Customer Assistance Offices........................... 7-4
Customer Satisfaction Procedure..................... 7-2
GM Mobility Program for Persons with
Disabilities................................................ 7-5
Reporting Safety Defects to General Motors...... 7-9Customer Assistance Information (cont.)
Reporting Safety Defects to the Canadian
Government.............................................. 7-9
Reporting Safety Defects to the United States
Government.............................................. 7-8
Roadside Assistance Program......................... 7-5
Service Publications Ordering Information......... 7-9
D
Daytime Running Lamps Indicator Light.............3-38
Daytime Running Lamps..................................3-15
Defensive Driving............................................. 4-2
Defogging and Defrosting.................................3-22
Doing Your Own Service Work........................... 5-3
Dome Lamp Override......................................3-16
Dome Lamps.................................................3-17
Door.............................................................2-13
60/40 Swing-Out Side Door...........................2-13
Cargo Door Relocking.................................... 2-8
Locks.......................................................... 2-7
Power Door Locks......................................... 2-8
Rear Door Security Locks............................... 2-8
Rear Doors.................................................2-14
Sliding Side Door........................................2-11
Driver............................................................1-16
Position, Safety Belt.....................................1-16
Driving On Grades..........................................4-42
Driving on Snow or Ice....................................4-24
4