steering CHEVROLET EXPRESS CARGO VAN 2014 1.G User Guide
[x] Cancel search | Manufacturer: CHEVROLET, Model Year: 2014, Model line: EXPRESS CARGO VAN, Model: CHEVROLET EXPRESS CARGO VAN 2014 1.GPages: 406, PDF Size: 5.29 MB
Page 66 of 406
Black plate (22,1)Chevrolet Express Owner Manual (GMNA-Localizing-U.S./Canada/Mexico-
6014662) - 2014 - crc - 8/26/13
3-22 Seats and Restraints
Warning (Continued)
problems following an airbag
deployment, you should seek
medical attention.
The vehicle has a feature that may
automatically unlock the doors
(if equipped with power door locks),
turn on the interior lamps and
hazard warning flashers, and shut
off the fuel system after the airbags
inflate. You can lock the doors, and
turn off the interior lamps and the
hazard warning flashers by using
the controls for those features.
{Warning
A crash severe enough to inflate
the airbags may have also
damaged important functions in
the vehicle, such as the fuel
system, brake and steering
systems, etc. Even if the vehicle (Continued)
Warning (Continued)
appears to be drivable after a
moderate crash, there may be
concealed damage that could
make it difficult to safely operate
the vehicle.
Use caution if you should attempt
to restart the engine after a crash
has occurred.
In many crashes severe enough to
inflate the airbag, windshields are
broken by vehicle deformation.
Additional windshield breakage may
also occur from the front outboard
passenger airbag.
.Airbags are designed to inflate
only once. After an airbag
inflates, you will need some new
parts for the airbag system.
If you do not get them, the airbag
system will not be there to help
protect you in another crash.
A new system will include airbag
modules and possibly other parts. The service manual for
the vehicle covers the need to
replace other parts.
.The vehicle has a crash sensing
and diagnostic module which
records information after a
crash. See
Vehicle Data
Recording on page 13-13.
.Let only qualified technicians
work on the airbag systems.
Improper service can mean that
an airbag system will not work
properly. See your dealer for
service.
Airbag On-Off Switch
If the instrument panel has one of
the switches pictured in the
following illustrations, the vehicle
has an airbag on-off switch that you
can use to manually turn on or off
the front outboard passenger airbag.
Page 74 of 406
Black plate (30,1)Chevrolet Express Owner Manual (GMNA-Localizing-U.S./Canada/Mexico-
6014662) - 2014 - crc - 8/26/13
3-30 Seats and Restraints
aftermarket equipment except when
approved by GM for your specific
vehicle. SeeAdding Equipment to
the Airbag-Equipped Vehicle on
page 3-30 for more information
about modifications that can affect
how the system operates.
The on indicator may be lit if an
object, such as a briefcase,
handbag, grocery bag, laptop or
other electronic device, is put on an
unoccupied seat. If this is not
desired remove the object from
the seat.
{Warning
Stowing of articles under the
passenger seat or between the
passenger seat cushion and
seatback may interfere with the
proper operation of the passenger
sensing system.
Servicing the
Airbag-Equipped Vehicle
Airbags affect how the vehicle
should be serviced. There are parts
of the airbag system in several
places around the vehicle. Your
dealer and the service manual have
information about servicing the
vehicle and the airbag system. To
purchase a service manual, see
Service Publications Ordering
Information on page 13-11.
{Warning
For up to 10 seconds after the
vehicle is turned off and the
battery is disconnected, an airbag
can still inflate during improper
service. You can be injured if you
are close to an airbag when it
inflates. Avoid yellow connectors.
They are probably part of the
airbag system. Be sure to follow
(Continued)
Warning (Continued)
proper service procedures, and
make sure the person performing
work for you is qualified to do so.
Adding Equipment to the
Airbag-Equipped Vehicle
Adding accessories that change the
vehicle's frame, bumper system,
height, front end, or side sheet
metal, may keep the airbag system
from working properly. The
operation of the airbag system can
also be affected by changing any
parts of the front seats, safety belts,
the airbag sensing and diagnostic
module, steering wheel, instrument
panel, any airbag modules, ceiling
or pillar garnish trim, front sensors,
rollover sensor module, or airbag
wiring.
Page 101 of 406
Black plate (1,1)Chevrolet Express Owner Manual (GMNA-Localizing-U.S./Canada/Mexico-
6014662) - 2014 - crc - 8/26/13
Instruments and Controls 5-1
Instruments and
Controls
Controls
Steering Wheel Adjustment . . . 5-2
Steering Wheel Controls . . . . . . 5-2
Horn . . . . . . . . . . . . . . . . . . . . . . . . . . 5-3
Windshield Wiper/Washer . . . . . 5-3
Compass . . . . . . . . . . . . . . . . . . . . . 5-4
Clock . . . . . . . . . . . . . . . . . . . . . . . . . 5-6
Power Outlets . . . . . . . . . . . . . . . . . 5-7
Cigarette Lighter . . . . . . . . . . . . . . 5-8
Ashtrays . . . . . . . . . . . . . . . . . . . . . . 5-8
Warning Lights, Gauges, and
Indicators
Warning Lights, Gauges, andIndicators . . . . . . . . . . . . . . . . . . . . 5-9
Instrument Cluster . . . . . . . . . . . 5-10
Speedometer . . . . . . . . . . . . . . . . 5-11
Odometer . . . . . . . . . . . . . . . . . . . . 5-11
Trip Odometer . . . . . . . . . . . . . . . 5-11
Fuel Gauge . . . . . . . . . . . . . . . . . . 5-11
Engine Oil Pressure Gauge . . . . . . . . . . . . . . . . . . . . . . 5-12
Engine Coolant Temperature Gauge . . . . . . . . . . . . . . . . . . . . . . 5-13 Voltmeter Gauge . . . . . . . . . . . . . 5-14
Safety Belt Reminders . . . . . . . 5-15
Airbag Readiness Light . . . . . . 5-15
Airbag On-Off Light . . . . . . . . . . 5-16
Passenger Airbag Status
Indicator . . . . . . . . . . . . . . . . . . . . 5-17
Charging System Light . . . . . . 5-18
Malfunction Indicator Lamp . . . . . . . . . . . . . 5-19
Brake System Warning Light . . . . . . . . . . . . . . . . . . . . . . . 5-21
Antilock Brake System (ABS) Warning Light . . . . . . . . . . . . . . 5-22
Tow/Haul Mode Light . . . . . . . . 5-22
StabiliTrak
®OFF Light . . . . . . . 5-22
Traction Control System (TCS)/StabiliTrak
®Light . . . . 5-23
Tire Pressure Light . . . . . . . . . . 5-23
Engine Oil Pressure Light . . . . 5-24
Low Fuel Warning Light . . . . . . 5-24
Security Light . . . . . . . . . . . . . . . . 5-25
High-Beam On Light . . . . . . . . . 5-25
Cruise Control Light . . . . . . . . . 5-25
Information Displays
Driver Information Center (DIC) . . . . . . . . . . . . . . . 5-25
Vehicle Messages
Vehicle Messages . . . . . . . . . . . 5-30
Battery Voltage and ChargingMessages . . . . . . . . . . . . . . . . . . 5-31
Brake System Messages . . . . 5-31
Compass Messages . . . . . . . . . 5-31
Door Ajar Messages . . . . . . . . . 5-31
Engine Cooling System Messages . . . . . . . . . . . . . . . . . . 5-32
Engine Oil Messages . . . . . . . . 5-33
Engine Power Messages . . . . 5-33
Fuel System Messages . . . . . . 5-33
Key and Lock Messages . . . . . 5-34
Lamp Messages . . . . . . . . . . . . . 5-34
Object Detection System Messages . . . . . . . . . . . . . . . . . . 5-34
Ride Control System Messages . . . . . . . . . . . . . . . . . . 5-35
Airbag System Messages . . . . 5-36
Security Messages . . . . . . . . . . 5-36
Service Vehicle Messages . . . 5-36
Tire Messages . . . . . . . . . . . . . . . 5-37
Transmission Messages . . . . . 5-38
Vehicle Reminder Messages . . . . . . . . . . . . . . . . . . 5-39
Vehicle Personalization
Vehicle Personalization . . . . . . 5-39
Page 102 of 406
Black plate (2,1)Chevrolet Express Owner Manual (GMNA-Localizing-U.S./Canada/Mexico-
6014662) - 2014 - crc - 8/26/13
5-2 Instruments and Controls
Controls
Steering Wheel
Adjustment
For vehicles with a tilt steering
wheel, the lever is located on the
left side of the steering column.
To adjust the steering wheel:
1. Pull the lever to move thesteering wheel up or down into a
comfortable position.
2. Release the lever to lock the steering wheel in place. Do not adjust the steering wheel
while driving.
Steering Wheel Controls
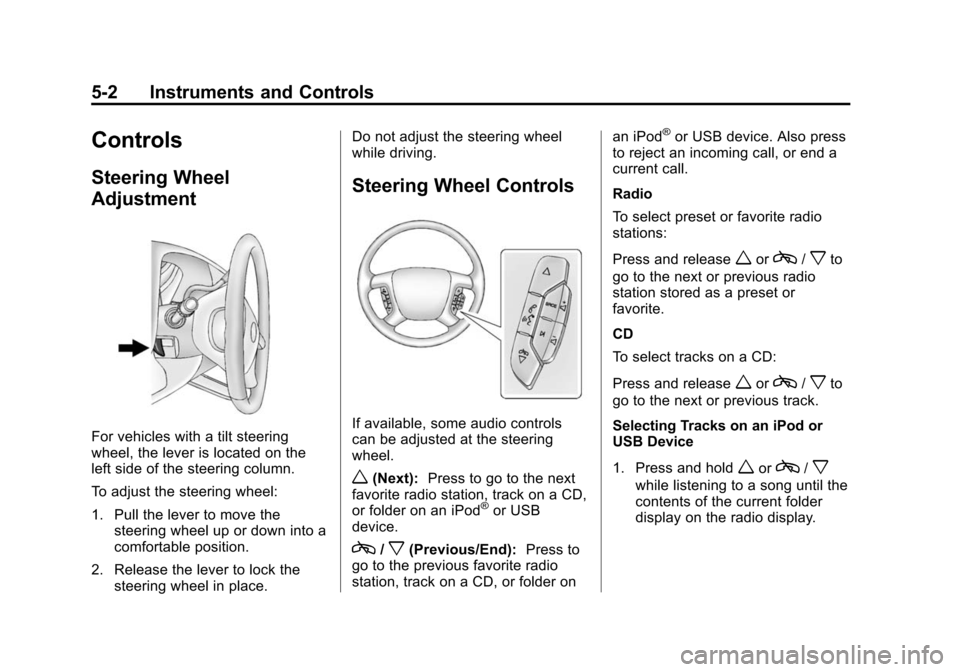
If available, some audio controls
can be adjusted at the steering
wheel.
w(Next):
Press to go to the next
favorite radio station, track on a CD,
or folder on an iPod
®or USB
device.
c/x(Previous/End): Press to
go to the previous favorite radio
station, track on a CD, or folder on an iPod
®or USB device. Also press
to reject an incoming call, or end a
current call.
Radio
To select preset or favorite radio
stations:
Press and release
worc/xto
go to the next or previous radio
station stored as a preset or
favorite.
CD
To select tracks on a CD:
Press and release
worc/xto
go to the next or previous track.
Selecting Tracks on an iPod or
USB Device
1. Press and hold
worc/x
while listening to a song until the
contents of the current folder
display on the radio display.
Page 103 of 406
Black plate (3,1)Chevrolet Express Owner Manual (GMNA-Localizing-U.S./Canada/Mexico-
6014662) - 2014 - crc - 8/26/13
Instruments and Controls 5-3
2. Press and releaseworc/x
to scroll up or down the list, then
press and hold
w, or press¨to
play the highlighted track.
Navigating Folders on an iPod or
USB Device
1. Press and hold
worc/x
while listening to a song until the
contents of the current folder
display on the radio display.
2. Press and hold
c/xto go
back to the previous folder list.
3. Press and release
worc/x
to scroll up or down the list.
.To select a folder, press
and hold
w, or press¨
when the folder is
highlighted.
.To go back further in the
folder list, press and hold
c/x.
b/g(Push to Talk): Press to
silence the vehicle speakers only.
Press again to turn the sound on. For vehicles with Bluetooth or
OnStar
®systems, press and hold
for longer than two seconds to
interact with those systems. See
Bluetooth on page 7-22 and OnStar,
if equipped.
SRCE (Source/Voice
Recognition): Press to switch
between the radio and CD, and for
equipped vehicles, the front
auxiliary.
¨(Seek): Press to go to the next
radio station while in AM, FM,
or SiriusXM
®.
For vehicles with a CD Player or
USB port:
Press
¨to go to the next track or
chapter while sourced to the CD.
Press
¨to select a track or a folder
when navigating folders on an iPod
or USB device.
While listening to a CD, press and
hold
¨to quickly move forward
through the tracks. Release to stop
on the desired track. +
e:
Press to increase volume.
−
e: Press to decrease volume.
Horn
Press the horn symbol in the middle
of the steering wheel to sound
the horn.
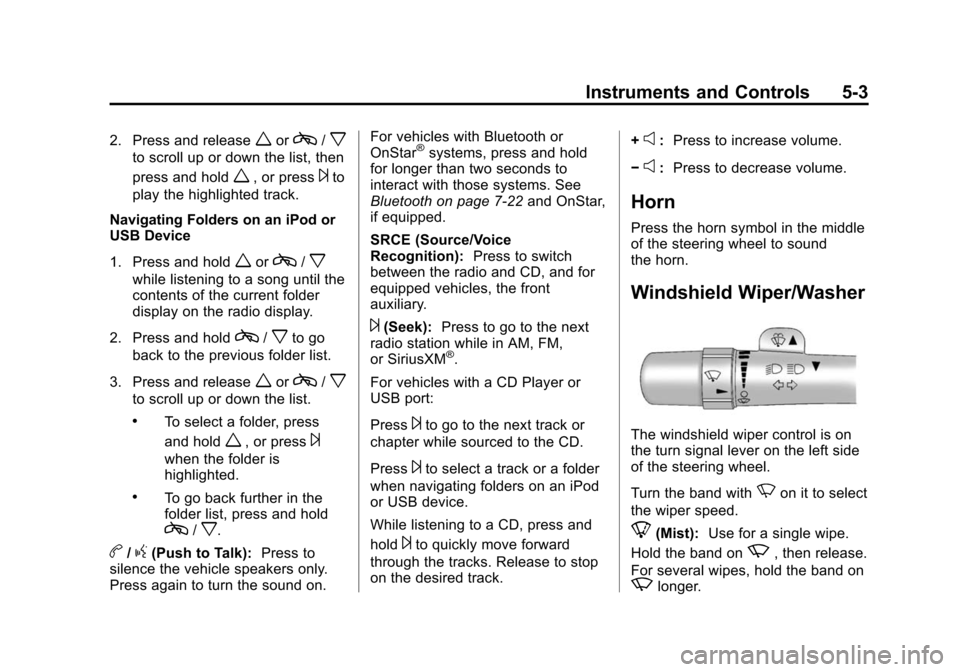
Windshield Wiper/Washer
The windshield wiper control is on
the turn signal lever on the left side
of the steering wheel.
Turn the band with
Non it to select
the wiper speed.
8(Mist): Use for a single wipe.
Hold the band on
z, then release.
For several wipes, hold the band on
zlonger.
Page 121 of 406
Black plate (21,1)Chevrolet Express Owner Manual (GMNA-Localizing-U.S./Canada/Mexico-
6014662) - 2014 - crc - 8/26/13
Instruments and Controls 5-21
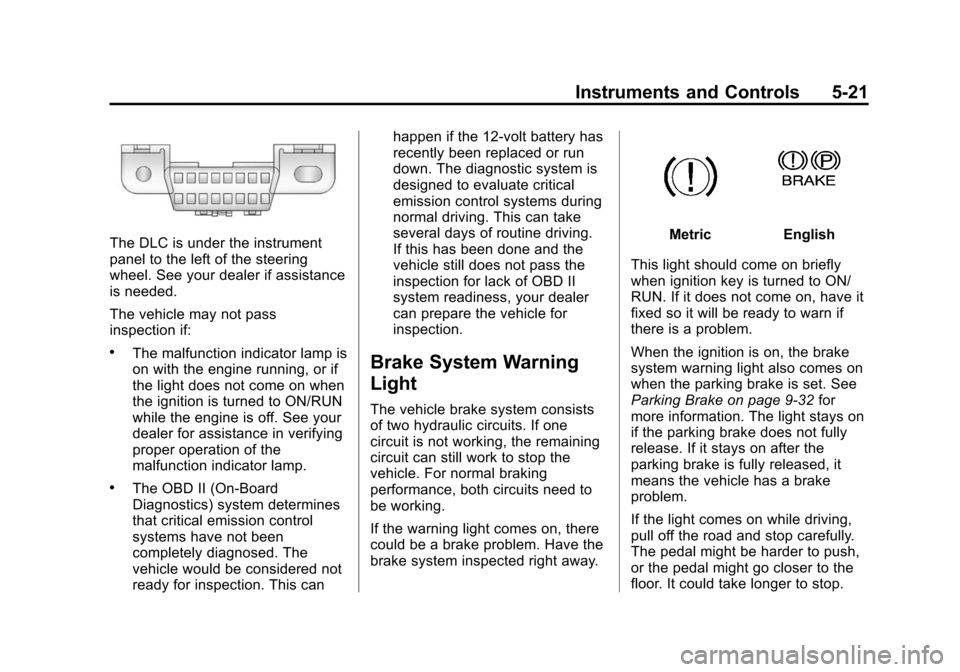
The DLC is under the instrument
panel to the left of the steering
wheel. See your dealer if assistance
is needed.
The vehicle may not pass
inspection if:
.The malfunction indicator lamp is
on with the engine running, or if
the light does not come on when
the ignition is turned to ON/RUN
while the engine is off. See your
dealer for assistance in verifying
proper operation of the
malfunction indicator lamp.
.The OBD II (On-Board
Diagnostics) system determines
that critical emission control
systems have not been
completely diagnosed. The
vehicle would be considered not
ready for inspection. This canhappen if the 12-volt battery has
recently been replaced or run
down. The diagnostic system is
designed to evaluate critical
emission control systems during
normal driving. This can take
several days of routine driving.
If this has been done and the
vehicle still does not pass the
inspection for lack of OBD II
system readiness, your dealer
can prepare the vehicle for
inspection.
Brake System Warning
Light
The vehicle brake system consists
of two hydraulic circuits. If one
circuit is not working, the remaining
circuit can still work to stop the
vehicle. For normal braking
performance, both circuits need to
be working.
If the warning light comes on, there
could be a brake problem. Have the
brake system inspected right away.
MetricEnglish
This light should come on briefly
when ignition key is turned to ON/
RUN. If it does not come on, have it
fixed so it will be ready to warn if
there is a problem.
When the ignition is on, the brake
system warning light also comes on
when the parking brake is set. See
Parking Brake on page 9-32 for
more information. The light stays on
if the parking brake does not fully
release. If it stays on after the
parking brake is fully released, it
means the vehicle has a brake
problem.
If the light comes on while driving,
pull off the road and stop carefully.
The pedal might be harder to push,
or the pedal might go closer to the
floor. It could take longer to stop.
Page 145 of 406
Black plate (1,1)Chevrolet Express Owner Manual (GMNA-Localizing-U.S./Canada/Mexico-
6014662) - 2014 - crc - 8/26/13
Lighting 6-1
Lighting
Exterior Lighting
Exterior Lamp Controls . . . . . . . . 6-1
Exterior Lamps OffReminder . . . . . . . . . . . . . . . . . . . . 6-2
Headlamp High/Low-Beam Changer . . . . . . . . . . . . . . . . . . . . . 6-2
Flash-to-Pass . . . . . . . . . . . . . . . . . 6-2
Daytime Running Lamps (DRL) . . . . . . . . . . . . . . . . 6-2
Automatic Headlamp System . . . . . . . . . . . . . . . . . . . . . . 6-3
Hazard Warning Flashers . . . . . 6-4
Turn and Lane-Change Signals . . . . . . . . . . . . . . . . . . . . . . 6-4
Interior Lighting
Instrument Panel IlluminationControl . . . . . . . . . . . . . . . . . . . . . . 6-5
Dome Lamps . . . . . . . . . . . . . . . . . 6-5
Reading Lamps . . . . . . . . . . . . . . . 6-6
Lighting Features
Entry/Exit Lighting . . . . . . . . . . . . . 6-6
Battery Load Management . . . . 6-6
Battery Power Protection . . . . . . 6-7
Exterior Lighting
Exterior Lamp Controls
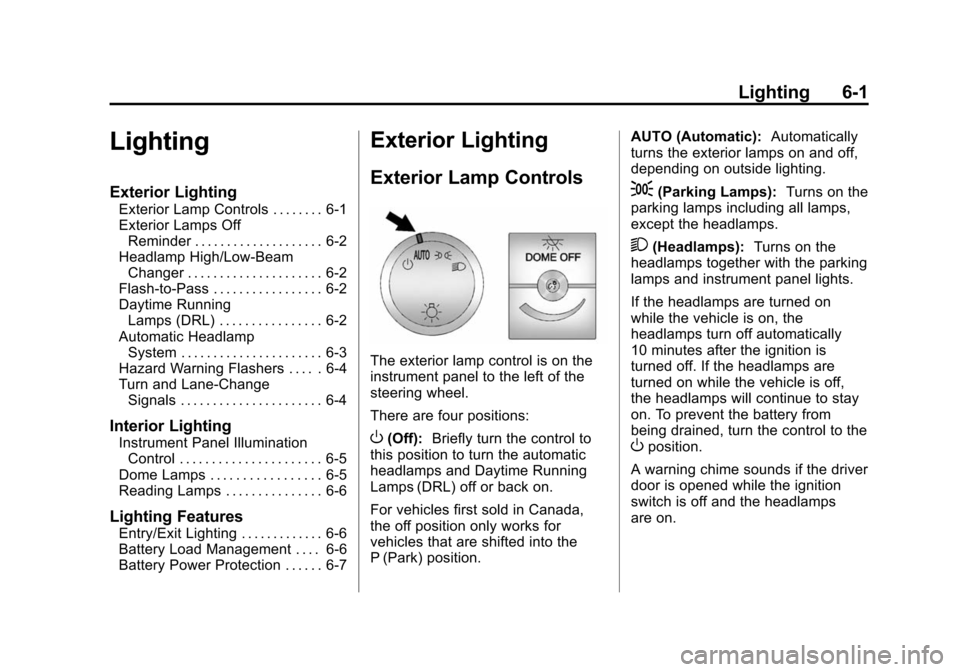
The exterior lamp control is on the
instrument panel to the left of the
steering wheel.
There are four positions:
O(Off): Briefly turn the control to
this position to turn the automatic
headlamps and Daytime Running
Lamps (DRL) off or back on.
For vehicles first sold in Canada,
the off position only works for
vehicles that are shifted into the
P (Park) position. AUTO (Automatic):
Automatically
turns the exterior lamps on and off,
depending on outside lighting.
;(Parking Lamps): Turns on the
parking lamps including all lamps,
except the headlamps.
2(Headlamps): Turns on the
headlamps together with the parking
lamps and instrument panel lights.
If the headlamps are turned on
while the vehicle is on, the
headlamps turn off automatically
10 minutes after the ignition is
turned off. If the headlamps are
turned on while the vehicle is off,
the headlamps will continue to stay
on. To prevent the battery from
being drained, turn the control to the
Oposition.
A warning chime sounds if the driver
door is opened while the ignition
switch is off and the headlamps
are on.
Page 149 of 406
Black plate (5,1)Chevrolet Express Owner Manual (GMNA-Localizing-U.S./Canada/Mexico-
6014662) - 2014 - crc - 8/26/13
Lighting 6-5
Interior Lighting
Instrument Panel
Illumination Control
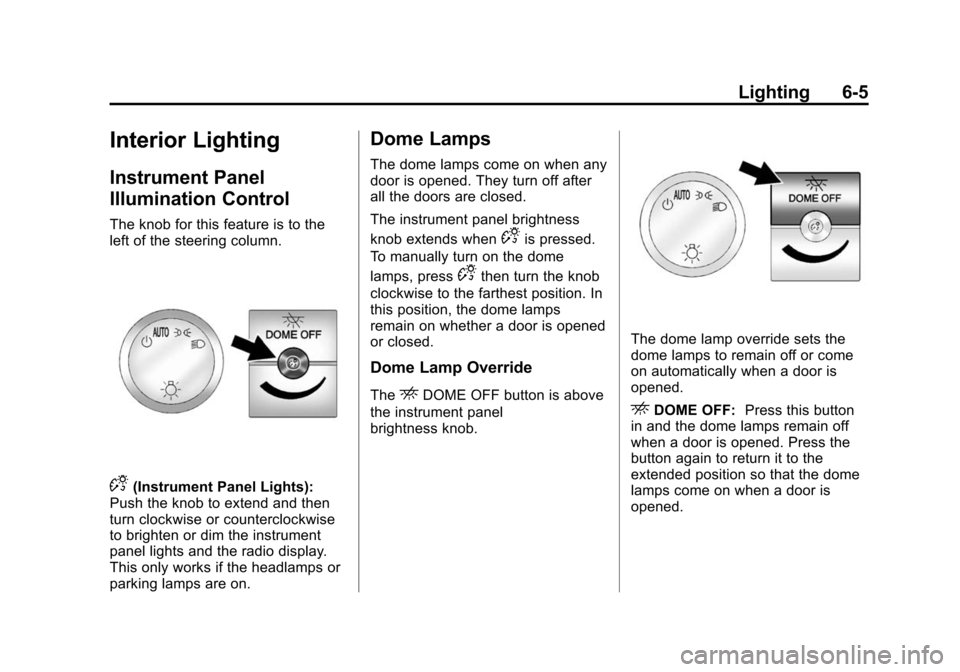
The knob for this feature is to the
left of the steering column.
D(Instrument Panel Lights):
Push the knob to extend and then
turn clockwise or counterclockwise
to brighten or dim the instrument
panel lights and the radio display.
This only works if the headlamps or
parking lamps are on.
Dome Lamps
The dome lamps come on when any
door is opened. They turn off after
all the doors are closed.
The instrument panel brightness
knob extends when
Dis pressed.
To manually turn on the dome
lamps, press
Dthen turn the knob
clockwise to the farthest position. In
this position, the dome lamps
remain on whether a door is opened
or closed.
Dome Lamp Override
TheEDOME OFF button is above
the instrument panel
brightness knob.
The dome lamp override sets the
dome lamps to remain off or come
on automatically when a door is
opened.
EDOME OFF: Press this button
in and the dome lamps remain off
when a door is opened. Press the
button again to return it to the
extended position so that the dome
lamps come on when a door is
opened.
Page 161 of 406
Black plate (9,1)Chevrolet Express Owner Manual (GMNA-Localizing-U.S./Canada/Mexico-
6014662) - 2014 - crc - 8/26/13
Infotainment System 7-9
Storing a Radio Station as a
Favorite
You are encouraged to set up radio
station favorites while the vehicle is
parked. Tune to favorite stations
using the presets, favorites button,
and steering wheel controls,
if equipped. SeeDefensive Driving
on page 9-3.
FAV (Favorites): If the vehicle has
a FAV button, a maximum of
36 stations can be programmed as
favorites using the six softkeys
below the radio station frequency
tabs and by using the radio favorites
page button (FAV button). Press the
FAV button to go through up to
six pages of favorites, each having
six favorite stations available per
page. Each page of favorites can
contain any combination of AM and
FM stations.
The balance/fade and tone settings
that were previously adjusted, are
stored with the favorite stations. To store a station as a favorite:
1. Tune to the desired radio station.
2. Press the FAV button to display
the page where the station is to
be stored.
3. Press and hold one of the six softkeys until a beep sounds.
When that softkey is pressed
and released, the station that
was set, returns.
4. Repeat the steps for each softkey radio station to be stored
as a favorite.
The number of favorites pages can
be set up using the MENU button.
To set up the number of favorites
pages:
1. Press the MENU button to display the radio setup menu.
2. Press the softkey below the FAV 1-6 tab.
3. Select the desired number of favorites pages by pressing the
softkey below the displayed
page numbers. 4. Press the FAV button, or let the
menu time out, to return to the
original main radio screen
showing the radio station
frequency tabs and to begin the
process of programming
favorites for the chosen number
of numbered pages.
Satellite Radio
SiriusXM®, if equipped, is a satellite
radio service based in the United
States and Canada only.
Finding a Category (CAT)
Station
CAT (Category): The CAT button is
used to find XM channels (if
equipped) while the radio is in the
XM mode.
Finding a Channel
BAND: Press to switch between
FM1, FM2, AM, and XM. The
selection displays.
Page 162 of 406
Black plate (10,1)Chevrolet Express Owner Manual (GMNA-Localizing-U.S./Canada/Mexico-
6014662) - 2014 - crc - 8/26/13
7-10 Infotainment System
f(Tune):Turn clockwise or
counterclockwise to increase or
decrease the station frequency.
©SEEK or¨SEEK: Press©
SEEK to go to the previous or¨
SEEK to go to the next station and
stay there.
To scan stations, press and hold
either button for two seconds until a
beep sounds. The radio goes to a
station, plays for a few seconds,
then goes to the next station. The
station frequency flashes while the
radio is in the scan mode. Press
either button again to stop scanning.
The radio seeks and scans stations
only with a strong signal that are in
the selected band.
To scan presets within the current
selected band by pressing and
holding either SEEK button for
four seconds until a double beep
sounds. The radio goes to a stored
preset, plays for a few seconds if a
strong signal is present, then goes to the next stored preset. The
station frequency flashes while the
radio is in the scan mode.
Setting Preset Stations
If the radio does not have a FAV
button, up to 18 stations (six FM1,
six FM2, and six AM), can be
programmed on the six numbered
softkeys, by performing the following
steps:
1. Turn the radio on.
2. Press BAND to select FM1,
FM2, or AM.
3. Tune in the desired station.
4. Press and hold one of the six numbered softkeys for
three seconds until a beep
sounds. When that softkey is
pressed and released, the
station that was set, returns.
5. Repeat Steps 2–4 for each softkey.
Storing a Radio Station as a
Favorite
Drivers are encouraged to set up
radio station favorites while the
vehicle is parked. Tune to favorite
stations using the presets, favorites
button, and steering wheel controls,
if the vehicle has this feature. See
Defensive Driving on page 9-3.
FAV (Favorites): If the vehicle has
a FAV button, a maximum of
36 stations can be programmed as
favorites using the six softkeys
below the radio station frequency
tabs and by using the radio favorites
page button (FAV button). Press the
FAV button to go through up to
six pages of favorites, each having
six favorite stations available per
page. Each page of favorites can
contain any combination of AM and
FM stations.
The balance/fade and tone settings
that were previously adjusted, are
stored with the favorite stations.