mirror CHEVROLET HHR 2007 1.G Owners Manual
[x] Cancel search | Manufacturer: CHEVROLET, Model Year: 2007, Model line: HHR, Model: CHEVROLET HHR 2007 1.GPages: 446, PDF Size: 2.43 MB
Page 1 of 446
Seats and Restraint Systems
....................... 7
Front Seats
.............................................. 8
Rear Seats
............................................. 17
Safety Belts
............................................ 20
Child Restraints
...................................... 43
Airbag System
........................................ 71
Restraint System Check
......................... 90
Features and Controls
................................ 93
Keys
....................................................... 95
Doors and Locks
.................................. 103
Windows
............................................... 109
Theft-Deterrent Systems
....................... 111
Starting and Operating Your Vehicle
..... 115
Mirrors
.................................................. 134OnStar®System
................................... 139
Storage Areas
...................................... 143
Sunroof
................................................ 147
Instrument Panel
....................................... 149
Instrument Panel Overview
................... 152
Climate Controls
................................... 170
Warning Lights, Gages, and Indicators
.... 177
Driver Information Center (DIC)
............ 194
Audio System(s)
................................... 206
Driving Your Vehicle
................................. 237
Your Driving, the Road, and
Your Vehicle
..................................... 238
Towing
................................................. 274
2007 Chevrolet HHR Owner ManualM
1
Page 94 of 446
Mirrors......................................................... 134
Manual Rearview Mirror............................. 134
Automatic Dimming Rearview Mirror
with OnStar
®and Compass................... 134
Automatic Dimming Rearview Mirror
with Compass........................................ 136
Outside Power Mirrors............................... 138
Outside Convex Mirror............................... 138
OnStar
®System.......................................... 139Storage Areas............................................. 143
Glove Box................................................. 143
Cupholder(s).............................................. 143
Instrument Panel Storage Area.................. 143
Floor Console Storage Area...................... 143
Rear Storage Area.................................... 143
Rear Compartment Storage Panel/Cover ... 144
Roof Rack System.................................... 146
Convenience Net....................................... 147
Sunroof....................................................... 147
Section 2 Features and Controls
94
Page 111 of 446
Sun Visors
To block out glare, swing down the visor(s).
The sun visors can also be detached from the
center mount and swung out to cover the
side windows. They can also be slid along the rod
to cover different areas of the front window.
Visor Vanity Mirrors
Your vehicle has visor vanity mirrors. Swing down
the sun visor and lift the cover to expose the
mirror.
Theft-Deterrent Systems
Vehicle theft is big business, especially in some
cities. Although your vehicle has a number of
theft-deterrent features, we know that nothing we
put on it can make it impossible to steal.
Content Theft-Deterrent
Your vehicle may have
a content theft-deterrent
alarm system. If your
vehicle has remote
keyless entry, then it
has content
theft-deterrent.
Arming the System
With the ignition off, you can arm the system by
pressing the remote keyless entry transmitter lock
button.
The system will arm after either of these things
occur:
Thirty seconds after all the doors are closed.
Sixty seconds with any door open.
If you press the lock button on the transmitter a
second time while all the doors are closed,
the system will arm immediately. The system will
still arm in 60 seconds if a door is open. When
the open door is closed, it will also become armed.
111
Page 134 of 446
Mirrors
Manual Rearview Mirror
To reduce glare from lamps behind you, move the
lever toward you to the night position. Your
vehicle may also have reading lamps. Press the
buttons, located under the mirror, up to turn
the lamps on or off.
Automatic Dimming Rearview Mirror
with OnStar
®and Compass
Your vehicle may have an automatic dimming
rearview mirror with OnStar®, compass and
reading lamps. This feature enables the mirror to
sense nighttime glare from vehicle headlamps
from behind and automatically dim to reduce the
glare to a safe level.
O(On/Off):This is the on/off button for the
automatic dimming feature.
The automatic dimming feature turns on each time
the vehicle is started. Press and hold the on/off
button once and the green indicator light located to
the left of the button will go out indicating thefeature is off. To turn the feature back on, press
and hold the on/off button and the green indicator
light will come on.
The reading lamps, located under the mirror, can
be turned on or off by pushing the buttons up.
There are three additional buttons for the OnStar
®
system. See your dealer for more information on
the system and how to subscribe to OnStar®. See
OnStar®in the Index for more information.
Compass Operation
Press the on/off button once to turn the compass
on or off.
When the ignition and the compass feature are on,
the compass will show two character boxes for a
few seconds. After a few seconds, the mirror will
display the current compass direction.
Compass Calibration
If after a few seconds the display does not show a
compass direction, (N for North for example),
there may be a strong magnetic �eld interfering
with the compass. Such interference may be
caused by a magnetic antenna mount, note pad
holder, or similar object. If the word CAL appears
in the compass window, the compass may
need to be reset or calibrated.
134
Page 135 of 446
To calibrate the compass, do the following:
1. Make sure CAL is displayed. If CAL is not
displayed, press and hold the on/off button
until CAL is displayed.
2. While CAL is displayed, drive the vehicle in
circles at 5 mph (8 km/h) or less until the
display reads a direction.
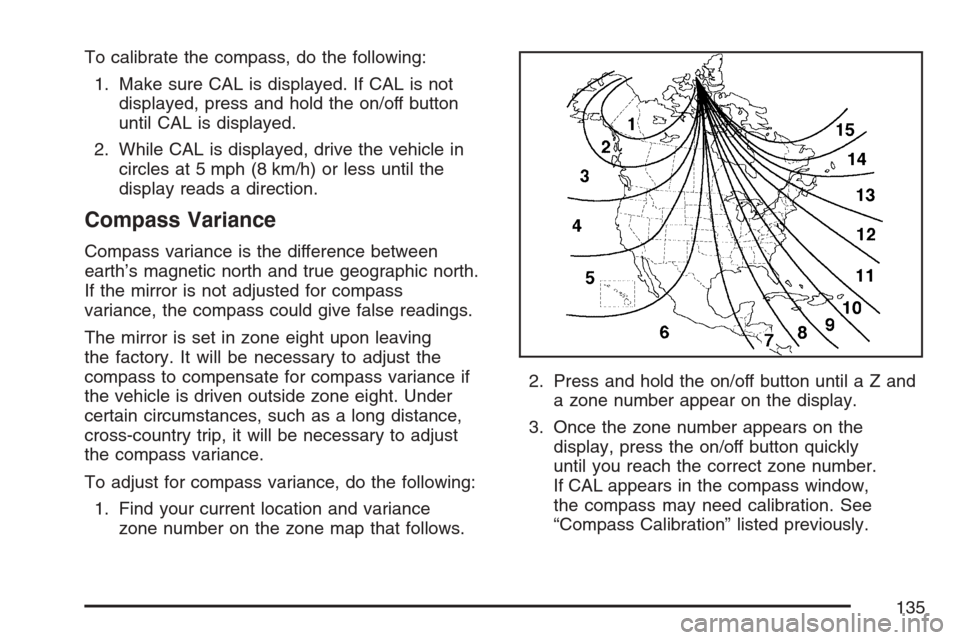
Compass Variance
Compass variance is the difference between
earth’s magnetic north and true geographic north.
If the mirror is not adjusted for compass
variance, the compass could give false readings.
The mirror is set in zone eight upon leaving
the factory. It will be necessary to adjust the
compass to compensate for compass variance if
the vehicle is driven outside zone eight. Under
certain circumstances, such as a long distance,
cross-country trip, it will be necessary to adjust
the compass variance.
To adjust for compass variance, do the following:
1. Find your current location and variance
zone number on the zone map that follows.2. Press and hold the on/off button untilaZand
a zone number appear on the display.
3. Once the zone number appears on the
display, press the on/off button quickly
until you reach the correct zone number.
If CAL appears in the compass window,
the compass may need calibration. See
“Compass Calibration” listed previously.
135
Page 136 of 446
Cleaning the Mirror
When cleaning the mirror, use a paper towel or
similar material dampened with glass cleaner. Do
not spray glass cleaner directly on the mirror
as that may cause the liquid cleaner to enter the
mirror housing.
Automatic Dimming Rearview Mirror
with Compass
Your vehicle may have an automatic dimming
rearview mirror with a compass and reading lamps.
This feature enables the mirror to sense nighttime
glare from vehicle headlamps from behind and
automatically dim to reduce the glare to a
safe level.
O(On/Off):This is the on/off button for the
automatic dimming feature.
The automatic dimming feature turns on each time
the vehicle is started. Press the on/off button
once and the green indicator light located to the
left of the button will go out indicating the feature is
off. To turn the feature back on, press and
release the on/off button and the green indicator
light will come on.The reading lamps, located under the mirror, can
be turned on or off by pushing the buttons up.
Compass Operation
Y
:This is the on/off button for the
compass feature.
Press the compass button once to turn the
compass on or off.
When the ignition and the compass feature are
on, the compass will show two character boxes for
a few seconds. After a few seconds, the mirror
will display the current compass direction.
Compass Calibration
If after a few seconds the display does not show a
compass direction, (N for North for example),
there may be a strong magnetic �eld interfering
with the compass. Such interference may be
caused by a magnetic antenna mount, note pad
holder, or similar object. If the word CAL appears
in the compass window, the compass may
need to be reset or calibrated.
136
Page 137 of 446
To calibrate the compass, do the following:
1. Make sure CAL is displayed. If CAL is not
displayed, press and hold the on/off button
until CAL is displayed.
2. While CAL is displayed drive the vehicle in
circles at 5 mph (8 km/h) or less until the
display reads a direction.
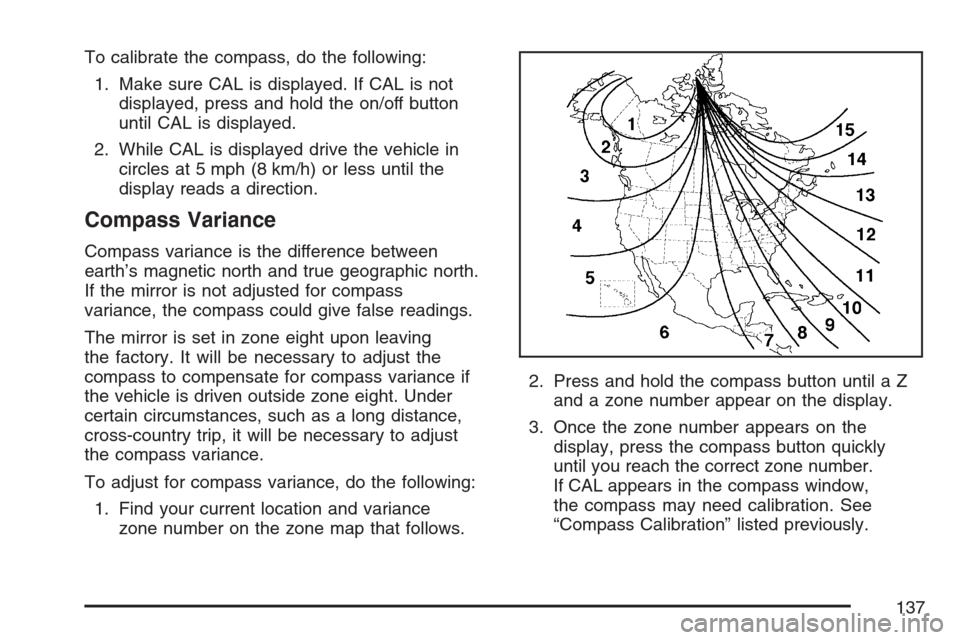
Compass Variance
Compass variance is the difference between
earth’s magnetic north and true geographic north.
If the mirror is not adjusted for compass
variance, the compass could give false readings.
The mirror is set in zone eight upon leaving
the factory. It will be necessary to adjust the
compass to compensate for compass variance if
the vehicle is driven outside zone eight. Under
certain circumstances, such as a long distance,
cross-country trip, it will be necessary to adjust
the compass variance.
To adjust for compass variance, do the following:
1. Find your current location and variance
zone number on the zone map that follows.2. Press and hold the compass button until a Z
and a zone number appear on the display.
3. Once the zone number appears on the
display, press the compass button quickly
until you reach the correct zone number.
If CAL appears in the compass window,
the compass may need calibration. See
“Compass Calibration” listed previously.
137
Page 138 of 446
Outside Power Mirrors
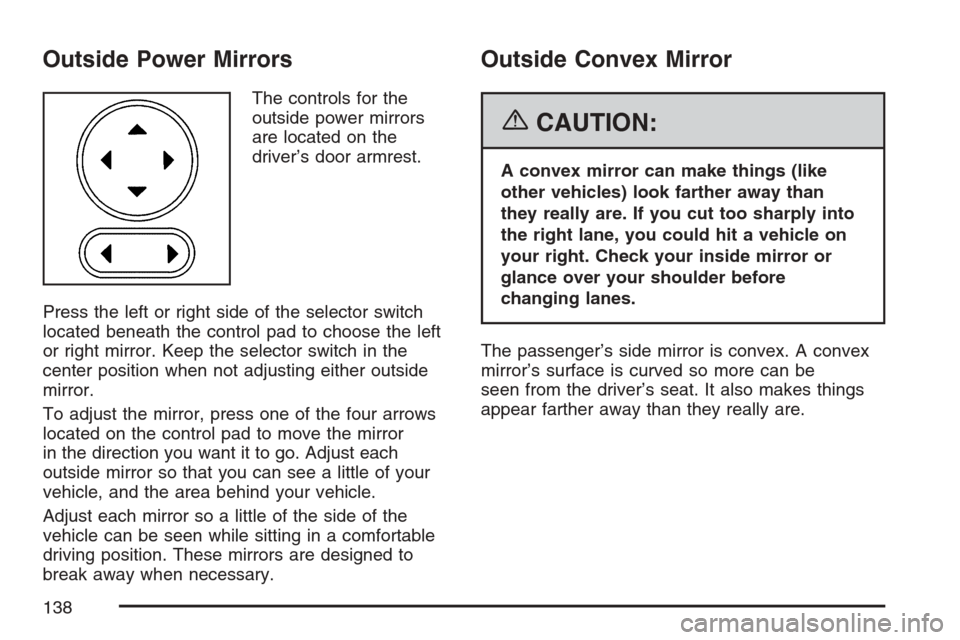
The controls for the
outside power mirrors
are located on the
driver’s door armrest.
Press the left or right side of the selector switch
located beneath the control pad to choose the left
or right mirror. Keep the selector switch in the
center position when not adjusting either outside
mirror.
To adjust the mirror, press one of the four arrows
located on the control pad to move the mirror
in the direction you want it to go. Adjust each
outside mirror so that you can see a little of your
vehicle, and the area behind your vehicle.
Adjust each mirror so a little of the side of the
vehicle can be seen while sitting in a comfortable
driving position. These mirrors are designed to
break away when necessary.
Outside Convex Mirror
{CAUTION:
A convex mirror can make things (like
other vehicles) look farther away than
they really are. If you cut too sharply into
the right lane, you could hit a vehicle on
your right. Check your inside mirror or
glance over your shoulder before
changing lanes.
The passenger’s side mirror is convex. A convex
mirror’s surface is curved so more can be
seen from the driver’s seat. It also makes things
appear farther away than they really are.
138
Page 149 of 446
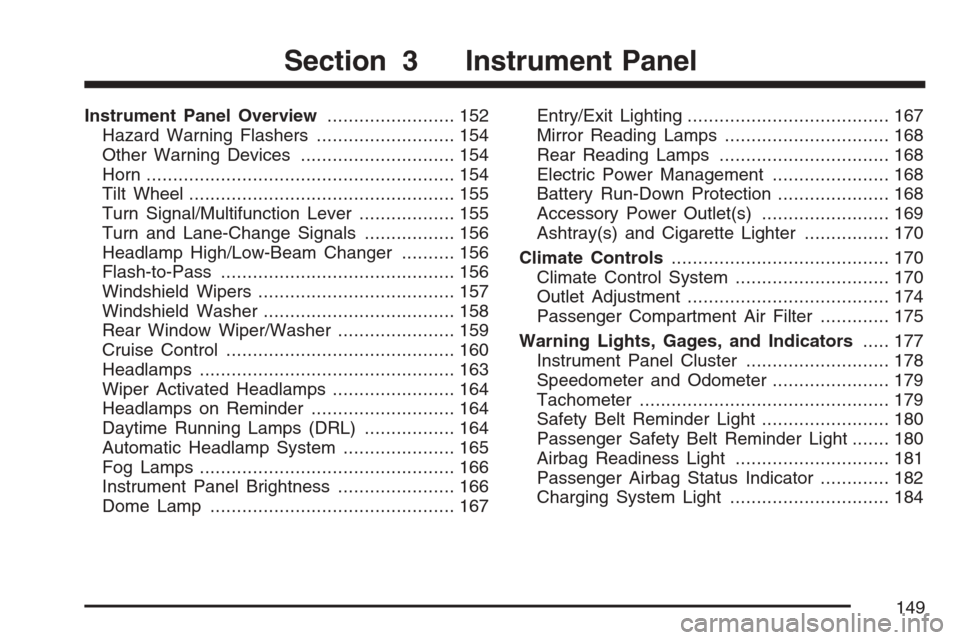
Instrument Panel Overview........................ 152
Hazard Warning Flashers.......................... 154
Other Warning Devices............................. 154
Horn.......................................................... 154
Tilt Wheel.................................................. 155
Turn Signal/Multifunction Lever.................. 155
Turn and Lane-Change Signals................. 156
Headlamp High/Low-Beam Changer.......... 156
Flash-to-Pass............................................ 156
Windshield Wipers..................................... 157
Windshield Washer.................................... 158
Rear Window Wiper/Washer...................... 159
Cruise Control........................................... 160
Headlamps................................................ 163
Wiper Activated Headlamps....................... 164
Headlamps on Reminder........................... 164
Daytime Running Lamps (DRL)................. 164
Automatic Headlamp System..................... 165
Fog Lamps................................................ 166
Instrument Panel Brightness...................... 166
Dome Lamp.............................................. 167Entry/Exit Lighting...................................... 167
Mirror Reading Lamps............................... 168
Rear Reading Lamps................................ 168
Electric Power Management...................... 168
Battery Run-Down Protection..................... 168
Accessory Power Outlet(s)........................ 169
Ashtray(s) and Cigarette Lighter................ 170
Climate Controls......................................... 170
Climate Control System............................. 170
Outlet Adjustment...................................... 174
Passenger Compartment Air Filter............. 175
Warning Lights, Gages, and Indicators..... 177
Instrument Panel Cluster........................... 178
Speedometer and Odometer...................... 179
Tachometer............................................... 179
Safety Belt Reminder Light........................ 180
Passenger Safety Belt Reminder Light....... 180
Airbag Readiness Light............................. 181
Passenger Airbag Status Indicator............. 182
Charging System Light.............................. 184
Section 3 Instrument Panel
149
Page 167 of 446
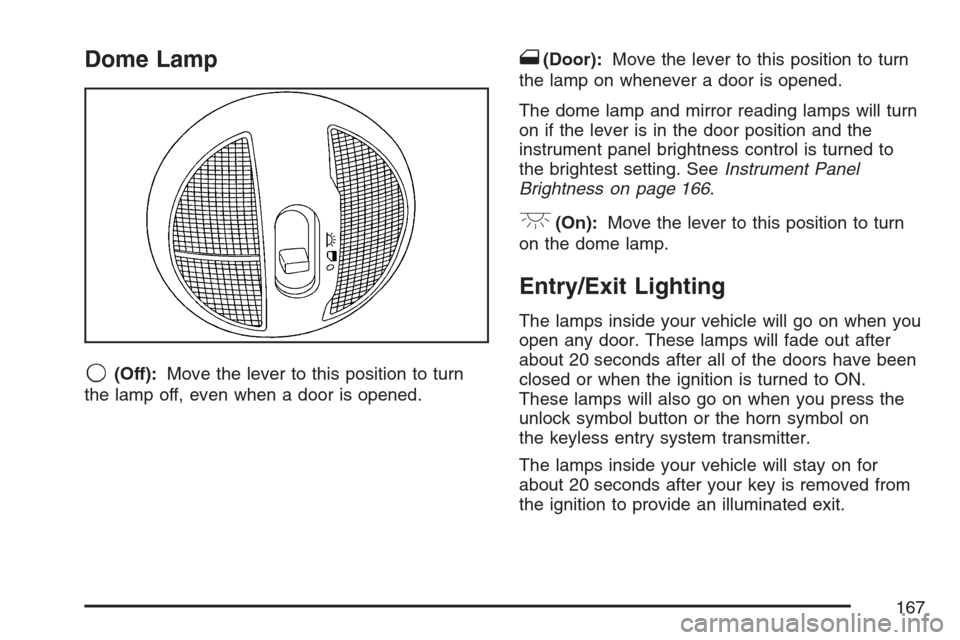
Dome Lamp
9(Off):Move the lever to this position to turn
the lamp off, even when a door is opened.
1(Door):Move the lever to this position to turn
the lamp on whenever a door is opened.
The dome lamp and mirror reading lamps will turn
on if the lever is in the door position and the
instrument panel brightness control is turned to
the brightest setting. SeeInstrument Panel
Brightness on page 166.
+(On):Move the lever to this position to turn
on the dome lamp.
Entry/Exit Lighting
The lamps inside your vehicle will go on when you
open any door. These lamps will fade out after
about 20 seconds after all of the doors have been
closed or when the ignition is turned to ON.
These lamps will also go on when you press the
unlock symbol button or the horn symbol on
the keyless entry system transmitter.
The lamps inside your vehicle will stay on for
about 20 seconds after your key is removed from
the ignition to provide an illuminated exit.
167