wiper blades CHEVROLET HHR 2008 1.G Owners Manual
[x] Cancel search | Manufacturer: CHEVROLET, Model Year: 2008, Model line: HHR, Model: CHEVROLET HHR 2008 1.GPages: 430, PDF Size: 5.63 MB
Page 141 of 430
Windshield Wipers
Be sure to clear ice and snow from the wiper blades
before using them. If the wiper blades are frozen to the
windshield, gently loosen or thaw them. If the blades
do become damaged, install new blades or blade
inserts. SeeWindshield Wiper Blade Replacement on
page 5-50.
Heavy snow or ice can overload the wiper motor. A
circuit breaker will stop the motor until it cools down.
Clear away snow or ice to prevent an overload. If
the wipers gets stuck, turn the wipers off, clear away
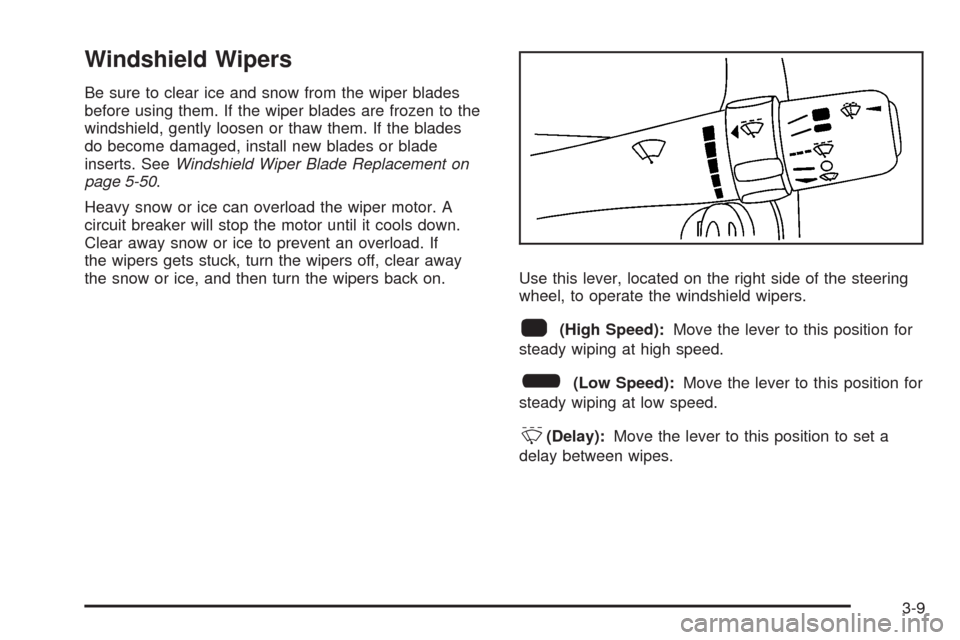
the snow or ice, and then turn the wipers back on. Use this lever, located on the right side of the steering
wheel, to operate the windshield wipers.
1(High Speed):Move the lever to this position for
steady wiping at high speed.
6(Low Speed):Move the lever to this position for
steady wiping at low speed.
&(Delay):Move the lever to this position to set a
delay between wipes.
3-9
Page 232 of 430
Before Leaving on a Long Trip
To prepare your vehicle for a long trip, consider having
it serviced by your dealer/retailer before departing.
Things to check on your own include:
Windshield Washer Fluid:Reservoir full? Windows
clean — inside and outside?
Wiper Blades:In good shape?
Fuel, Engine Oil, Other Fluids:All levels checked?
Lamps:Do they all work and are lenses clean?
Tires:Are treads good? Are tires in�ated to
recommended pressure?
Weather and Maps:Safe to travel? Have
up-to-date maps?
Highway Hypnosis
Always be alert and pay attention to your surroundings
while driving. If you become tired or sleepy, �nd a
safe place to park your vehicle and rest.
Other driving tips include:
Keep the vehicle well ventilated.
Keep interior temperature cool.
Keep your eyes moving — scan the road ahead
and to the sides.
Check the rearview mirror and vehicle instruments
often.
Hill and Mountain Roads
Driving on steep hills or through mountains is different
than driving on �at or rolling terrain. Tips for driving
in these conditions include:
Keep your vehicle serviced and in good shape.
Check all �uid levels and brakes, tires, cooling
system, and transmission.
Going down steep or long hills, shift to a
lower gear.
4-20
Page 256 of 430
Buying New Tires.........................................5-69
Different Size Tires and Wheels......................5-71
Uniform Tire Quality Grading..........................5-71
Wheel Alignment and Tire Balance..................5-73
Wheel Replacement......................................5-73
Tire Chains..................................................5-74
If a Tire Goes Flat........................................5-75
Tire Sealant and Compressor Kit....................5-76
Changing a Flat Tire.....................................5-86
Removing the Spare Tire and Tools................5-87
Removing the Flat Tire and Installing the
Spare Tire (SS Model)...............................5-90
Removing the Flat Tire and Installing the
Spare Tire (All Models Except SS).............5-101
Storing a Flat or Spare Tire and Tools...........5-106
Compact Spare Tire....................................5-109
Appearance Care..........................................5-110
Interior Cleaning.........................................5-110
Fabric/Carpet..............................................5-111
Instrument Panel, Vinyl, and Other Plastic
Surfaces.................................................5-112
Care of Safety Belts....................................5-112
Weatherstrips.............................................5-113
Washing Your Vehicle..................................5-113Cleaning Exterior Lamps/Lenses....................5-113
Finish Care................................................5-114
Windshield and Wiper Blades.......................5-114
Aluminum or Chrome-Plated Wheels
and Trim................................................5-115
Tires.........................................................5-116
Sheet Metal Damage...................................5-116
Finish Damage...........................................5-116
Underbody Maintenance...............................5-116
Chemical Paint Spotting...............................5-116
Vehicle Care/Appearance Materials................5-117
Vehicle Identi�cation.....................................5-118
Vehicle Identi�cation Number (VIN)
................5-118
Service Parts Identi�cation Label...................5-118
Electrical System..........................................5-118
Add-On Electrical Equipment.........................5-118
Headlamp Wiring........................................5-119
Windshield Wiper Fuses...............................5-119
Power Windows and Other Power Options......5-119
Fuses and Circuit Breakers..........................5-119
Floor Console Fuse Block............................5-120
Engine Compartment Fuse Block...................5-122
Capacities and Speci�cations........................5-125
Section 5 Service and Appearance Care
5-2
Page 304 of 430
License Plate Lamp
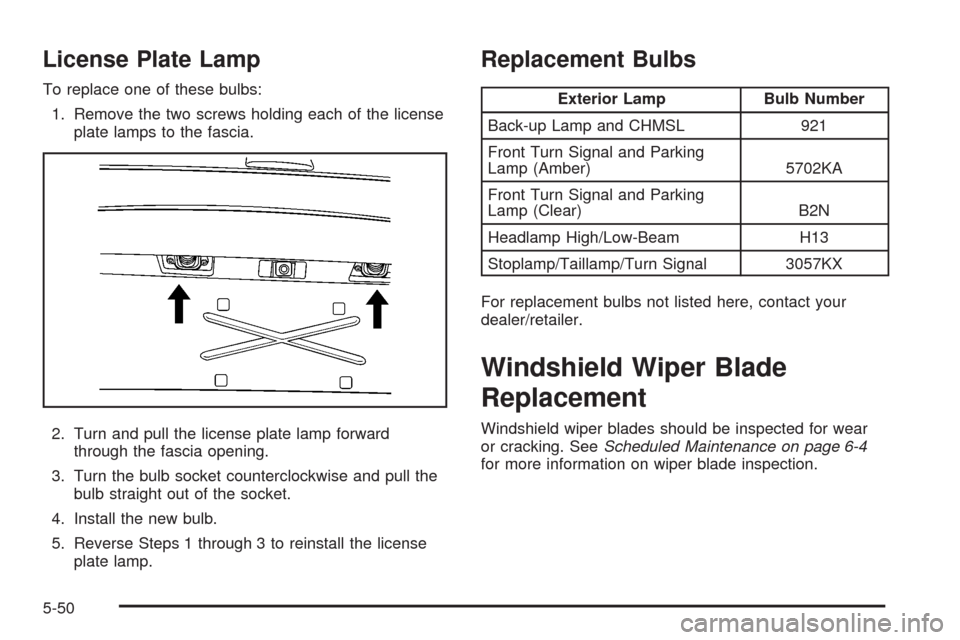
To replace one of these bulbs:
1. Remove the two screws holding each of the license
plate lamps to the fascia.
2. Turn and pull the license plate lamp forward
through the fascia opening.
3. Turn the bulb socket counterclockwise and pull the
bulb straight out of the socket.
4. Install the new bulb.
5. Reverse Steps 1 through 3 to reinstall the license
plate lamp.
Replacement Bulbs
Exterior Lamp Bulb Number
Back-up Lamp and CHMSL 921
Front Turn Signal and Parking
Lamp (Amber) 5702KA
Front Turn Signal and Parking
Lamp (Clear) B2N
Headlamp High/Low-Beam H13
Stoplamp/Taillamp/Turn Signal 3057KX
For replacement bulbs not listed here, contact your
dealer/retailer.
Windshield Wiper Blade
Replacement
Windshield wiper blades should be inspected for wear
or cracking. SeeScheduled Maintenance on page 6-4
for more information on wiper blade inspection.
5-50
Page 305 of 430
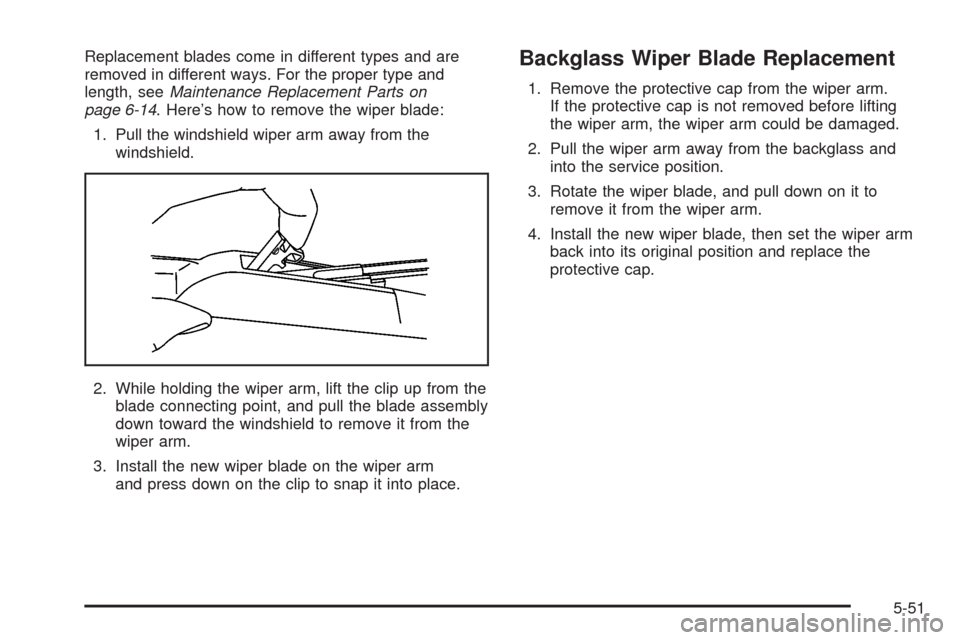
Replacement blades come in different types and are
removed in different ways. For the proper type and
length, seeMaintenance Replacement Parts on
page 6-14. Here’s how to remove the wiper blade:
1. Pull the windshield wiper arm away from the
windshield.
2. While holding the wiper arm, lift the clip up from the
blade connecting point, and pull the blade assembly
down toward the windshield to remove it from the
wiper arm.
3. Install the new wiper blade on the wiper arm
and press down on the clip to snap it into place.Backglass Wiper Blade Replacement
1. Remove the protective cap from the wiper arm.
If the protective cap is not removed before lifting
the wiper arm, the wiper arm could be damaged.
2. Pull the wiper arm away from the backglass and
into the service position.
3. Rotate the wiper blade, and pull down on it to
remove it from the wiper arm.
4. Install the new wiper blade, then set the wiper arm
back into its original position and replace the
protective cap.
5-51
Page 368 of 430
Finish Care
Occasional waxing or mild polishing of your vehicle by
hand may be necessary to remove residue from the
paint �nish. You can get approved cleaning products
from your dealer/retailer. SeeVehicle Care/Appearance
Materials on page 5-117.
If your vehicle has a basecoat/clearcoat paint �nish,
the clearcoat gives more depth and gloss to the
colored basecoat. Always use waxes and polishes that
are non-abrasive and made for a basecoat/clearcoat
paint �nish.
Notice:Machine compounding or aggressive
polishing on a basecoat/clearcoat paint �nish may
damage it. Use only non-abrasive waxes and
polishes that are made for a basecoat/clearcoat
paint �nish on your vehicle.
Foreign materials such as calcium chloride and other
salts, ice melting agents, road oil and tar, tree sap, bird
droppings, chemicals from industrial chimneys, etc.,
can damage your vehicle’s �nish if they remain on
painted surfaces. Wash the vehicle as soon as possible.
If necessary, use non-abrasive cleaners that are marked
safe for painted surfaces to remove foreign matter.
Exterior painted surfaces are subject to aging, weather
and chemical fallout that can take their toll over a
period of years. You can help to keep the paint �nish
looking new by keeping your vehicle garaged or covered
whenever possible.
Protecting Exterior Bright Metal Parts
Bright metal parts should be cleaned regularly to keep
their luster. Washing with water is all that is usually
needed. However, you may use chrome polish on
chrome or stainless steel trim, if necessary.
Use special care with aluminum trim. To avoid damaging
protective trim, never use auto or chrome polish,
steam or caustic soap to clean aluminum. A coating of
wax, rubbed to high polish, is recommended for all
bright metal parts.
Windshield and Wiper Blades
Clean the outside of the windshield with glass cleaner.
Clean the rubber blades using a lint free cloth or
paper towel soaked with windshield washer �uid or a
mild detergent. Wash the windshield thoroughly
when cleaning the blades. Bugs, road grime, sap, and a
buildup of vehicle wash/wax treatments may cause
wiper streaking. Replace the wiper blades if they are
worn or damaged.
Wipers can be damaged by:
Extreme dusty conditions
Sand and salt
Heat and sun
Snow and ice, without proper removal
5-114
Page 385 of 430
Scheduled Maintenance
Service MaintenanceIMaintenanceII
Change engine oil and �lter. SeeEngine Oil on page 5-15. Reset oil life system.
SeeEngine Oil Life System on page 5-19.An Emission Control Service.••
Visually check for any leaks or damage.See footnote (j).••
2.2L and 2.4L engines: Inspect engine air cleaner �lter. If necessary, replace
�lter. SeeEngine Air Cleaner/Filter on page 5-20.See footnote (k).•
2.0L engine only: Inspect engine air cleaner �lter. If necessary, replace �lter. See
Engine Air Cleaner/Filter on page 5-20.••
Rotate tires and check in�ation pressures and wear. SeeTire Inspection and
Rotation on page 5-66and “Tire Wear Inspection” inAt Least Once a Month
on page 6-9.••
Inspect brake system.See footnote (a).••
Check engine coolant and windshield washer �uid levels and add �uid as
needed.••
Perform any needed additional services. See “Additional Required Services”
in this section.••
Inspect suspension and steering components.See footnote (b).•
Inspect engine cooling system.See footnote (c).•
Inspect wiper blades.See footnote (d).•
Inspect restraint system components.See footnote (e).•
Lubricate body components.See footnote (f).•
Replace passenger compartment air �lter.See footnote (l).•
Inspect throttle system.See footnote (g).•
6-5
Page 387 of 430
Maintenance Footnotes
(a)Visually inspect brake lines and hoses for proper
hook-up, binding, leaks, cracks, chafing, etc. Inspect
disc brake pads for wear and rotors for surface
condition. Inspect drum brake linings/shoes for wear
or cracks. Inspect other brake parts, including drums,
wheel cylinders, calipers, parking brake, etc.
(b)Visually inspect front and rear suspension and
steering system for damaged, loose, or missing parts
or signs of wear. Inspect power steering cables for
proper hook-up, binding, cracks, chafing, etc.
(c)Visually inspect hoses and have them replaced if
they are cracked, swollen, or deteriorated. Inspect
all pipes, fittings, and clamps; replace with genuine
parts as needed. To help ensure proper operation,
a pressure test of the cooling system and pressure
cap and cleaning the outside of the radiator and
air conditioning condenser is recommended at least
once a year.
(d)Inspect wiper blades for wear, cracking, or
contamination. Clean the windshield and wiper blades,
if contaminated. Replace wiper blades that are worn
or damaged. See Windshield Wiper Blade Replacement
on page 5-50andWindshield and Wiper Blades on
page 5-114 for more information.(e)Make sure the safety belt reminder light and safety
belt assemblies are working properly. Look for any
other loose or damaged safety belt system parts. If you
see anything that might keep a safety belt system
from doing its job, have it repaired. Have any torn or
frayed safety belts replaced. Also see Checking
the Restraint Systems on page 1-72.
(f)Lubricate all key lock cylinders, door hinges and
latches, hood hinges and latches, and trunk lid hinges
and latches. More frequent lubrication may be required
when exposed to a corrosive environment. Applying
silicone grease on weatherstrips with a clean cloth will
make them last longer, seal better, and not stick or
squeak.
(g)Check system for interference or binding and for
damaged or missing parts. Replace parts as needed.
Replace any components that have high effort or
excessive wear. Do not lubricate accelerator or cruise
control cables.
6-7
Page 417 of 430
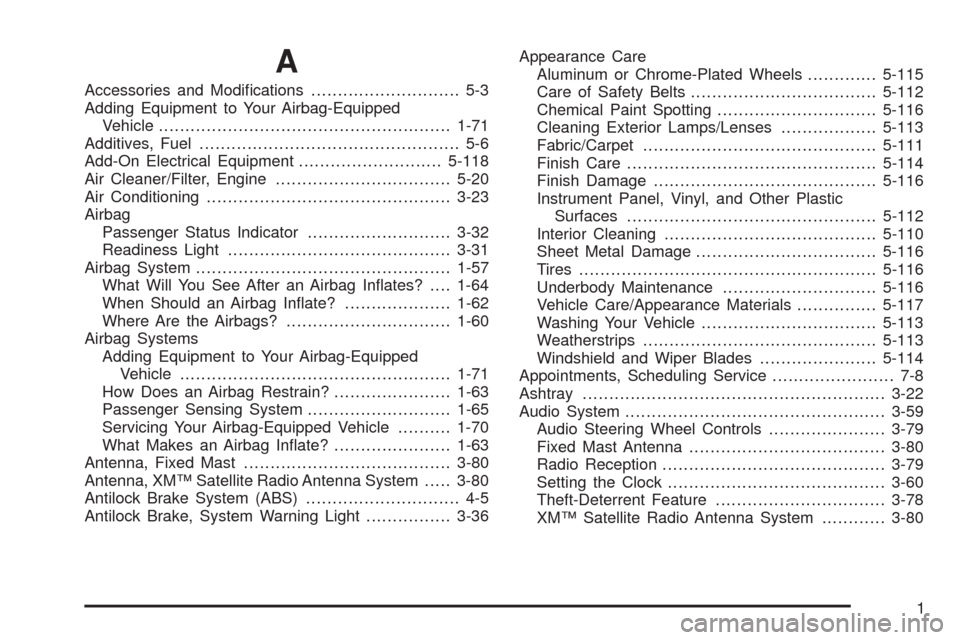
A
Accessories and Modi�cations............................ 5-3
Adding Equipment to Your Airbag-Equipped
Vehicle.......................................................1-71
Additives, Fuel................................................. 5-6
Add-On Electrical Equipment...........................5-118
Air Cleaner/Filter, Engine.................................5-20
Air Conditioning..............................................3-23
Airbag
Passenger Status Indicator...........................3-32
Readiness Light..........................................3-31
Airbag System................................................1-57
What Will You See After an Airbag In�ates?....1-64
When Should an Airbag In�ate?....................1-62
Where Are the Airbags?...............................1-60
Airbag Systems
Adding Equipment to Your Airbag-Equipped
Vehicle...................................................1-71
How Does an Airbag Restrain?......................1-63
Passenger Sensing System...........................1-65
Servicing Your Airbag-Equipped Vehicle..........1-70
What Makes an Airbag In�ate?......................1-63
Antenna, Fixed Mast.......................................3-80
Antenna, XM™ Satellite Radio Antenna System.....3-80
Antilock Brake System (ABS)............................. 4-5
Antilock Brake, System Warning Light................3-36Appearance Care
Aluminum or Chrome-Plated Wheels.............5-115
Care of Safety Belts...................................5-112
Chemical Paint Spotting..............................5-116
Cleaning Exterior Lamps/Lenses..................5-113
Fabric/Carpet............................................5-111
Finish Care...............................................5-114
Finish Damage..........................................5-116
Instrument Panel, Vinyl, and Other Plastic
Surfaces...............................................5-112
Interior Cleaning........................................5-110
Sheet Metal Damage..................................5-116
Tires........................................................5-116
Underbody Maintenance.............................
5-116
Vehicle Care/Appearance Materials...............5-117
Washing Your Vehicle.................................5-113
Weatherstrips............................................5-113
Windshield and Wiper Blades......................5-114
Appointments, Scheduling Service....................... 7-8
Ashtray.........................................................3-22
Audio System.................................................3-59
Audio Steering Wheel Controls......................3-79
Fixed Mast Antenna.....................................3-80
Radio Reception..........................................3-79
Setting the Clock.........................................3-60
Theft-Deterrent Feature................................3-78
XM™ Satellite Radio Antenna System............3-80
1
Page 419 of 430
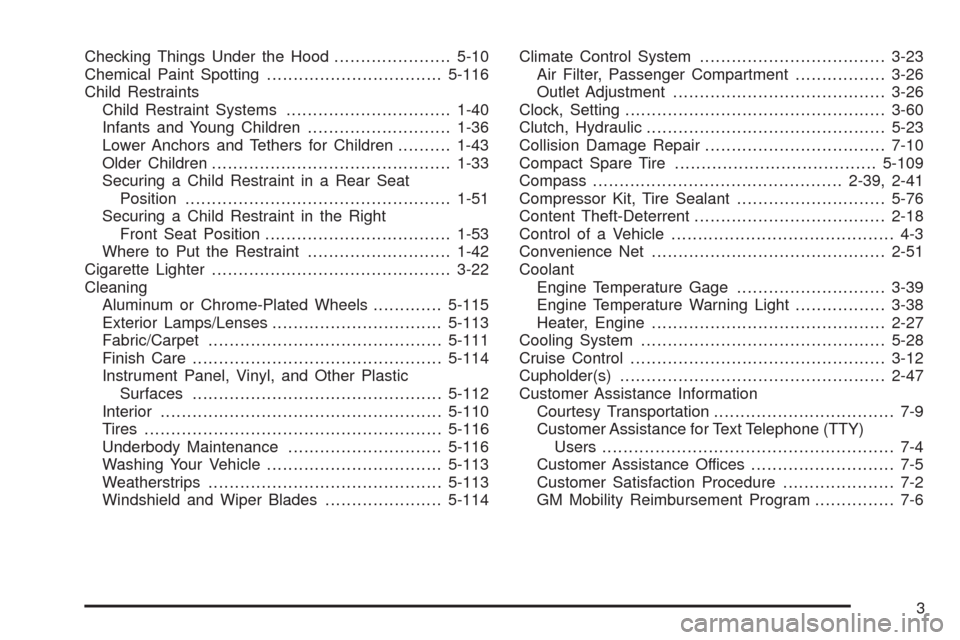
Checking Things Under the Hood......................5-10
Chemical Paint Spotting.................................5-116
Child Restraints
Child Restraint Systems...............................1-40
Infants and Young Children...........................1-36
Lower Anchors and Tethers for Children..........1-43
Older Children.............................................1-33
Securing a Child Restraint in a Rear Seat
Position..................................................1-51
Securing a Child Restraint in the Right
Front Seat Position...................................1-53
Where to Put the Restraint...........................1-42
Cigarette Lighter.............................................3-22
Cleaning
Aluminum or Chrome-Plated Wheels.............5-115
Exterior Lamps/Lenses................................5-113
Fabric/Carpet............................................5-111
Finish Care...............................................5-114
Instrument Panel, Vinyl, and Other Plastic
Surfaces...............................................5-112
Interior.....................................................5-110
Tires........................................................5-116
Underbody Maintenance.............................5-116
Washing Your Vehicle.................................5-113
Weatherstrips............................................5-113
Windshield and Wiper Blades......................5-114Climate Control System...................................3-23
Air Filter, Passenger Compartment.................3-26
Outlet Adjustment........................................3-26
Clock, Setting.................................................3-60
Clutch, Hydraulic.............................................5-23
Collision Damage Repair..................................7-10
Compact Spare Tire......................................5-109
Compass...............................................2-39, 2-41
Compressor Kit, Tire Sealant............................5-76
Content Theft-Deterrent....................................2-18
Control of a Vehicle.......................................... 4-3
Convenience Net
............................................2-51
Coolant
Engine Temperature Gage............................3-39
Engine Temperature Warning Light.................3-38
Heater, Engine............................................2-27
Cooling System..............................................5-28
Cruise Control................................................3-12
Cupholder(s)..................................................2-47
Customer Assistance Information
Courtesy Transportation.................................. 7-9
Customer Assistance for Text Telephone (TTY)
Users....................................................... 7-4
Customer Assistance Offices........................... 7-5
Customer Satisfaction Procedure..................... 7-2
GM Mobility Reimbursement Program............... 7-6
3