display CHEVROLET HHR 2009 1.G Owners Manual
[x] Cancel search | Manufacturer: CHEVROLET, Model Year: 2009, Model line: HHR, Model: CHEVROLET HHR 2009 1.GPages: 450, PDF Size: 2.49 MB
Page 90 of 450
Remote Rear Door Operation (Panel)
*:Press and hold for about one second to open
the rear driver side door.
+:Press and hold for about one second to open
the rear passenger side door.
Programming Transmitters to the
Vehicle
Only RKE transmitters programmed to the vehicle
will work. If a transmitter is lost or stolen, a replacement
can be purchased and programmed through your
dealer/retailer. When the replacement transmitter is
programmed to the vehicle, all remaining transmitters
must also be programmed. Any lost or stolen transmitters
no longer work once the new transmitter is programmed.
Each vehicle can have up to four transmitters
programmed to it.
Battery Replacement
Replace the battery if the KEY FOB BATT LOW
message displays in the DIC. See “KEY FOB BATT
LOW” underDIC Warnings and Messages on page 3-50
for additional information.
Notice:When replacing the battery, do not touch
any of the circuitry on the transmitter. Static
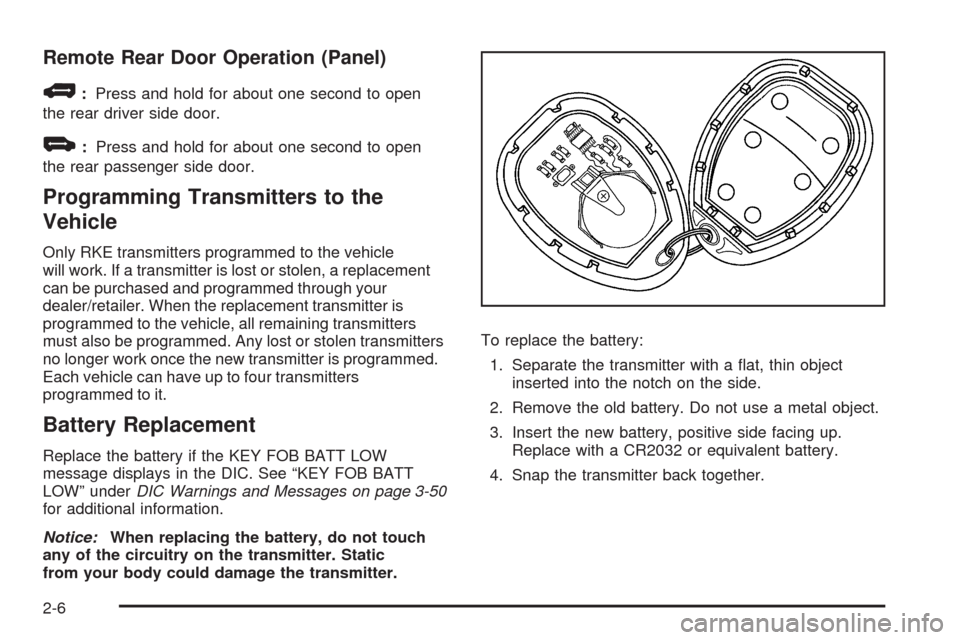
from your body could damage the transmitter.To replace the battery:
1. Separate the transmitter with a �at, thin object
inserted into the notch on the side.
2. Remove the old battery. Do not use a metal object.
3. Insert the new battery, positive side facing up.
Replace with a CR2032 or equivalent battery.
4. Snap the transmitter back together.
2-6
Page 108 of 450
R(ON/RUN):This is the position in which you can
operate the electrical accessories and to display some
instrument panel cluster warning and indicator lights. The
switch stays in this position when the engine is running.
If you leave the key in the ACC/ACCESSORY or ON/
RUN position with the engine off, the battery could be
drained. You may not be able to start the vehicle if the
battery is allowed to drain for an extended period of time.
/(START):This position starts the engine. When the
engine starts, release the key. The ignition switch will
return to ON/RUN for driving.
A warning tone will sound when the driver door is opened,
the ignition is in LOCK/OFF or ACC/ACCESSORY and
the key is in the ignition.
Column Lock Release
For vehicles with an automatic transmission, the
following procedure allows the ignition to be turned to
LOCK/OFF and ignition key to be removed in case of a
dead battery or low voltage battery.
1. Make sure the shift lever is in P (Park).
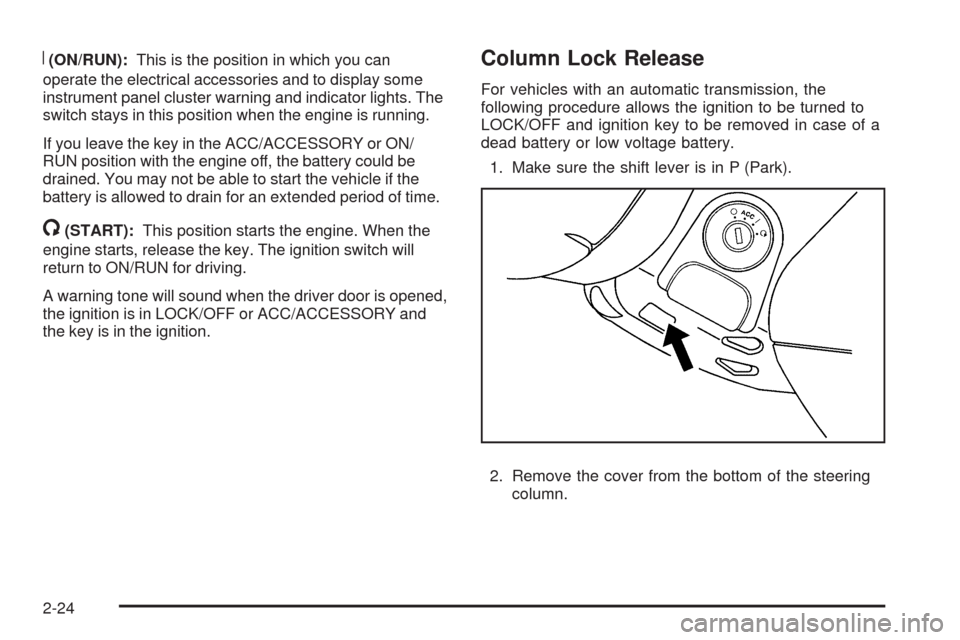
2. Remove the cover from the bottom of the steering
column.
2-24
Page 117 of 450
Parking Brake
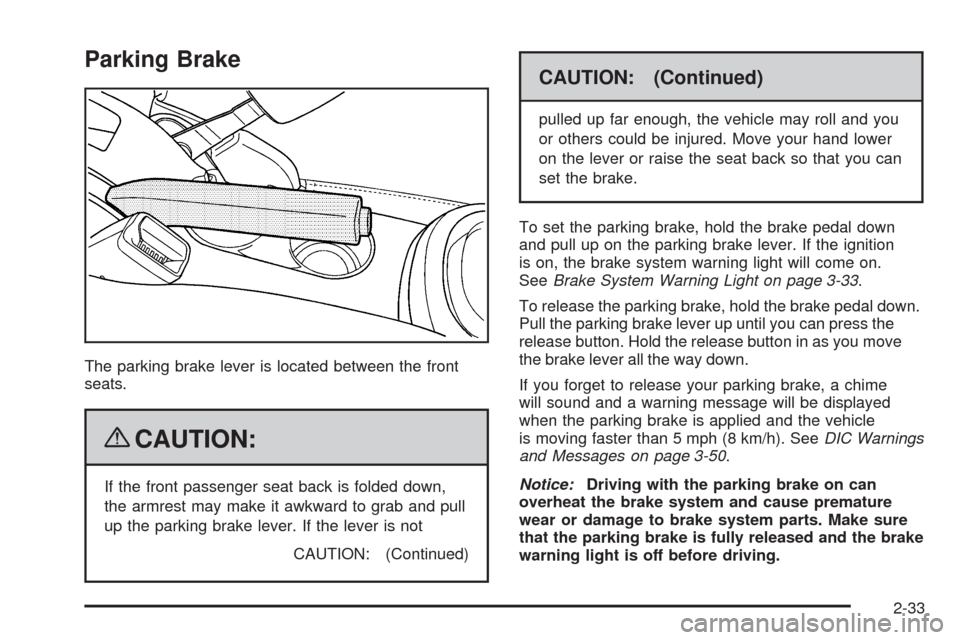
The parking brake lever is located between the front
seats.
{CAUTION:
If the front passenger seat back is folded down,
the armrest may make it awkward to grab and pull
up the parking brake lever. If the lever is not
CAUTION: (Continued)
CAUTION: (Continued)
pulled up far enough, the vehicle may roll and you
or others could be injured. Move your hand lower
on the lever or raise the seat back so that you can
set the brake.
To set the parking brake, hold the brake pedal down
and pull up on the parking brake lever. If the ignition
is on, the brake system warning light will come on.
SeeBrake System Warning Light on page 3-33.
To release the parking brake, hold the brake pedal down.
Pull the parking brake lever up until you can press the
release button. Hold the release button in as you move
the brake lever all the way down.
If you forget to release your parking brake, a chime
will sound and a warning message will be displayed
when the parking brake is applied and the vehicle
is moving faster than 5 mph (8 km/h). SeeDIC Warnings
and Messages on page 3-50.
Notice:Driving with the parking brake on can
overheat the brake system and cause premature
wear or damage to brake system parts. Make sure
that the parking brake is fully released and the brake
warning light is off before driving.
2-33
Page 123 of 450
Mirrors
Manual Rearview Mirror
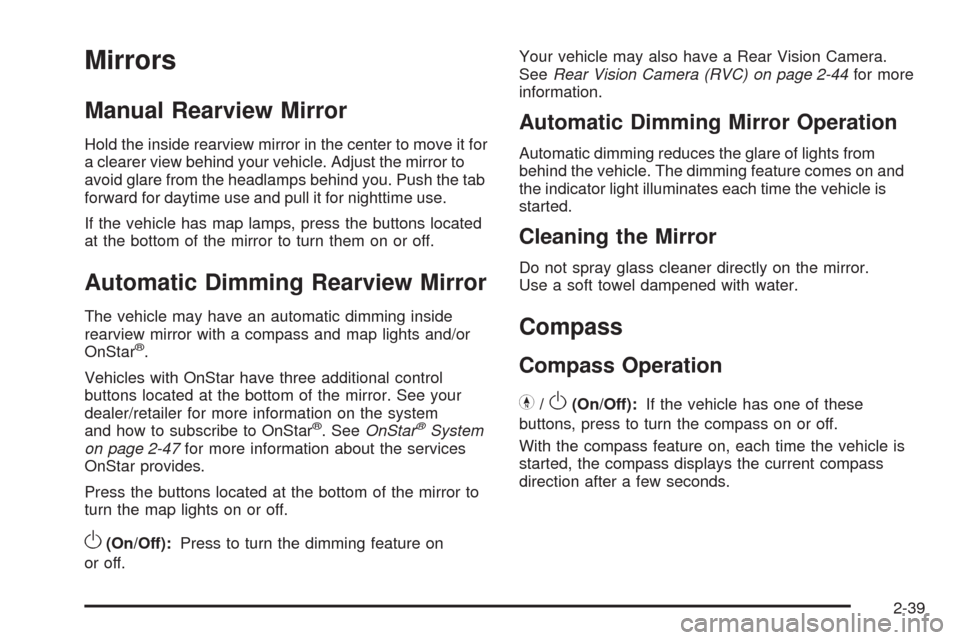
Hold the inside rearview mirror in the center to move it for
a clearer view behind your vehicle. Adjust the mirror to
avoid glare from the headlamps behind you. Push the tab
forward for daytime use and pull it for nighttime use.
If the vehicle has map lamps, press the buttons located
at the bottom of the mirror to turn them on or off.
Automatic Dimming Rearview Mirror
The vehicle may have an automatic dimming inside
rearview mirror with a compass and map lights and/or
OnStar
®.
Vehicles with OnStar have three additional control
buttons located at the bottom of the mirror. See your
dealer/retailer for more information on the system
and how to subscribe to OnStar
®. SeeOnStar®System
on page 2-47for more information about the services
OnStar provides.
Press the buttons located at the bottom of the mirror to
turn the map lights on or off.
O(On/Off):Press to turn the dimming feature on
or off.Your vehicle may also have a Rear Vision Camera.
SeeRear Vision Camera (RVC) on page 2-44for more
information.
Automatic Dimming Mirror Operation
Automatic dimming reduces the glare of lights from
behind the vehicle. The dimming feature comes on and
the indicator light illuminates each time the vehicle is
started.
Cleaning the Mirror
Do not spray glass cleaner directly on the mirror.
Use a soft towel dampened with water.
Compass
Compass Operation
Y
/O(On/Off):If the vehicle has one of these
buttons, press to turn the compass on or off.
With the compass feature on, each time the vehicle is
started, the compass displays the current compass
direction after a few seconds.
2-39
Page 124 of 450
Compass Calibration
If after a few seconds the display does not show a
compass direction, (N for North for example), there may
be a strong magnetic �eld interfering with the compass.
Interference can be caused by a magnetic antenna
mount, note pad holder, or similar object. If CAL appears
in the compass window, the compass may need to be
reset or calibrated.
To calibrate the compass:
1. Make sure CAL is displayed. If CAL is not displayed,
press and hold the compass button until CAL
displays.
2. While CAL displays, drive the vehicle in circles at
5 mph (8 km/h) or less until the display reads a
direction.
Compass Variance
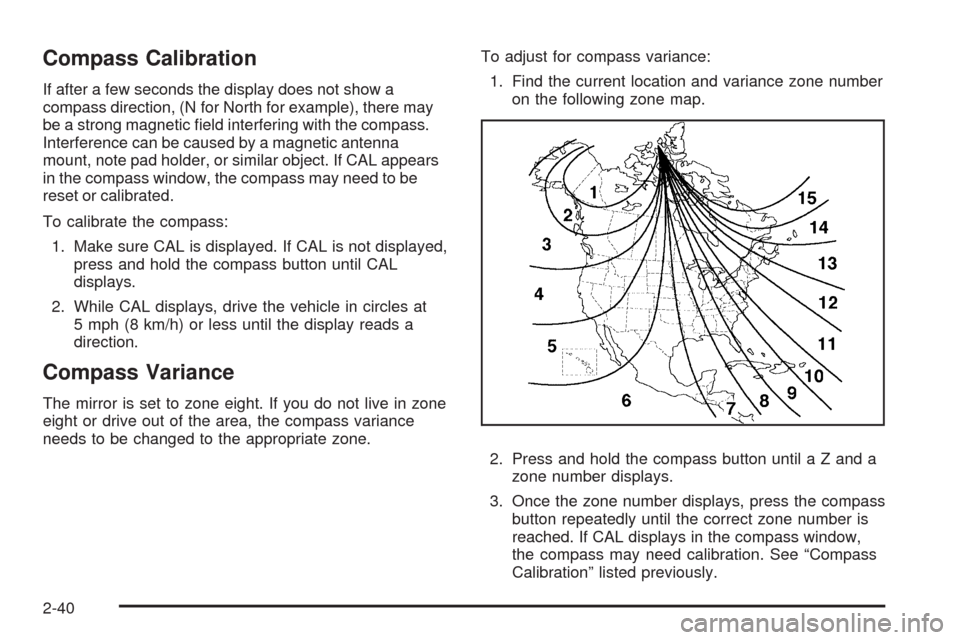
The mirror is set to zone eight. If you do not live in zone
eight or drive out of the area, the compass variance
needs to be changed to the appropriate zone.To adjust for compass variance:
1. Find the current location and variance zone number
on the following zone map.
2. Press and hold the compass button until a Z and a
zone number displays.
3. Once the zone number displays, press the compass
button repeatedly until the correct zone number is
reached. If CAL displays in the compass window,
the compass may need calibration. See “Compass
Calibration” listed previously.
2-40
Page 128 of 450
Object Detection Systems
Rear Vision Camera (RVC)
The vehicle may have a Rear Vision Camera system.
Read this entire section before using it.
{CAUTION:
The Rear Vision Camera (RVC) system does not
replace driver vision. RVC does not:
Detect objects that are outside the camera’s
�eld of view, below the bumper, or
underneath the vehicle.
Detect children, pedestrians, bicyclists, or pets.
Do not back the vehicle by only looking at the rear
vision camera screen, or use the screen during
longer, higher speed backing maneuvers or where
there could be cross-traffic. Your judged distances
using the screen will differ from actual distances.
CAUTION: (Continued)
CAUTION: (Continued)
So if you do not use proper care before backing
up, you could hit a vehicle, child, pedestrian,
bicyclist, or pet, resulting in vehicle damage,
injury, or death. Even though the vehicle has the
RVC system, always check carefully before
backing up by checking behind and around the
vehicle.
The rear vision camera system is designed to help the
driver when backing up by displaying a view of the area
behind the vehicle. When the key is in the ON/RUN
position and the driver shifts the vehicle into R (Reverse),
the video image automatically appears on the inside rear
view mirror. Once the driver shifts out of R (Reverse), the
video image automatically disappears from the inside
rear view mirror.
2-44
Page 129 of 450
Turning the Rear Vision Camera System
OfforOn
To turn off the rear vision camera system, press and
hold
z, located on the inside rearview mirror, until the
left indicator light turns off. The rear vision camera
display is now disabled.
To turn the rear vision camera system on again, press
and hold
zuntil the left indicator light illuminates.
The rear vision camera system display is now enabled
and the display will appear in the mirror normally.
Rear Vision Camera Location
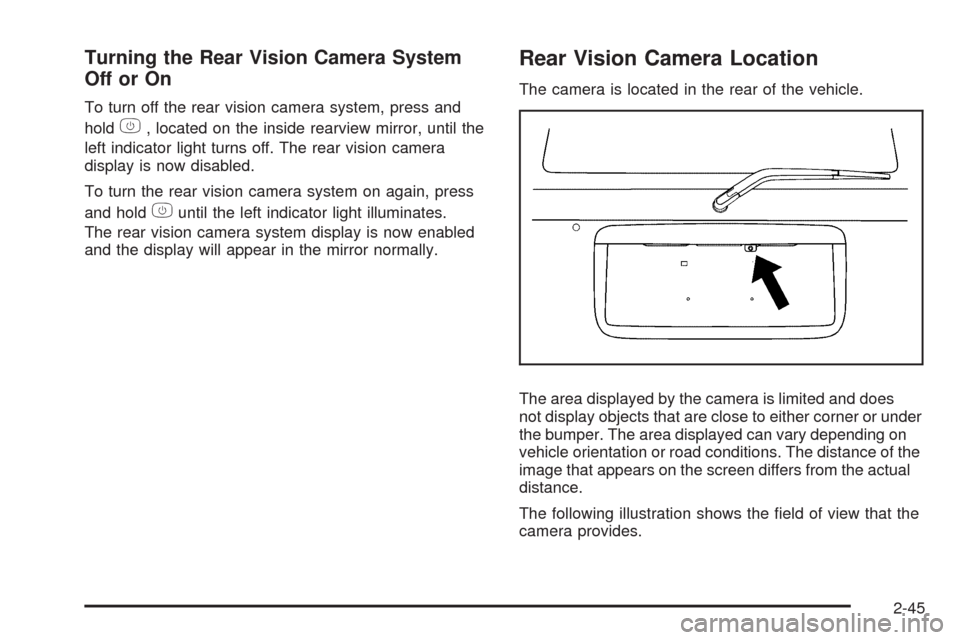
The camera is located in the rear of the vehicle.
The area displayed by the camera is limited and does
not display objects that are close to either corner or under
the bumper. The area displayed can vary depending on
vehicle orientation or road conditions. The distance of the
image that appears on the screen differs from the actual
distance.
The following illustration shows the �eld of view that the
camera provides.
2-45
Page 130 of 450
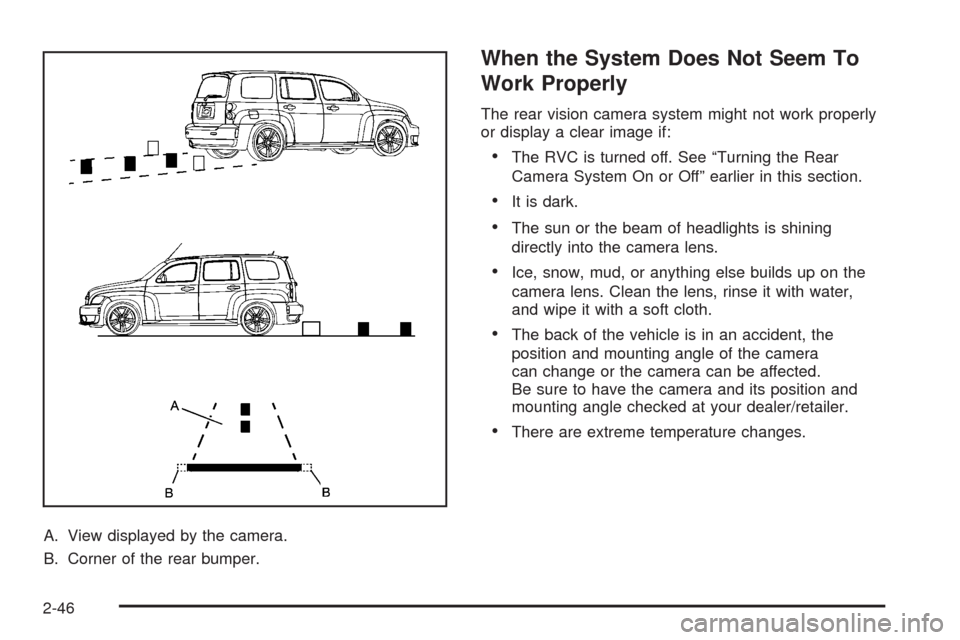
A. View displayed by the camera.
B. Corner of the rear bumper.
When the System Does Not Seem To
Work Properly
The rear vision camera system might not work properly
or display a clear image if:
The RVC is turned off. See “Turning the Rear
Camera System On or Off” earlier in this section.
It is dark.
The sun or the beam of headlights is shining
directly into the camera lens.
Ice, snow, mud, or anything else builds up on the
camera lens. Clean the lens, rinse it with water,
and wipe it with a soft cloth.
The back of the vehicle is in an accident, the
position and mounting angle of the camera
can change or the camera can be affected.
Be sure to have the camera and its position and
mounting angle checked at your dealer/retailer.
There are extreme temperature changes.
2-46
Page 131 of 450
The rear vision camera system display in the rearview
mirror may turn off or not appear as expected due to one
of the following conditions. If this occurs the left indicator
light on the mirror will �ash.
A slow �ash may indicate a loss of video signal, or no
video signal present during the reverse cycle.
A fast �ash may indicate that the display has been on
for the maximum allowable time during a reverse
cycle, or the display has reached an Over
Temperature limit.
The fast �ash conditions are used to protect the video
device from high temperature conditions. Once
conditions return to normal the device will reset and
the green indicator will stop �ashing.
During any of these fault conditions, the display will be
blank and the indicator will continue to �ash as long
as the vehicle is in R (Reverse) or until the conditions
return to normal.
Pressing and holding
zwhen the left indicator light is
�ashing will turn off the video display along with the
left indicator light.
OnStar®System
OnStar uses several innovative technologies and live
advisors to provide a wide range of safety, security,
information, and convenience services. If the airbags
deploy, the system is designed to make an automatic
call to OnStar Emergency advisors who can request
emergency services be sent to your location. If the keys
are locked in the vehicle, call OnStar at 1-888-4-ONSTAR
to have a signal sent to unlock the doors. OnStar
Hands-Free Calling, including 30 trial minutes good
for 60 days, is available on most vehicles. OnStar
Turn-by-Turn Navigation service, with one trial route, is
available on most vehicles. Press the OnStar button to
have an OnStar advisor contact Roadside Service.
OnStar service is provided subject to the OnStar Terms
and Conditions included in the OnStar Subscriber
glove box literature.
2-47
Page 142 of 450
Highbeam On Light.......................................3-41
Fuel Gage...................................................3-42
Boost Gage.................................................3-42
Recon�gurable Performance Display (RPD)......3-43
Driver Information Center (DIC).......................3-48
DIC Operation and Displays...........................3-48
DIC Warnings and Messages.........................3-50
DIC Vehicle Personalization............................3-56
Audio System(s).............................................3-61
Setting the Clock..........................................3-62
Radio(s)......................................................3-63Using an MP3..............................................3-74
XM Radio Messages.....................................3-81
Bluetooth
®...................................................3-82
Theft-Deterrent Feature..................................3-94
Audio Steering Wheel Controls.......................3-94
Radio Reception...........................................3-95
Fixed Mast Antenna......................................3-96
XM™ Satellite Radio Antenna System...............3-96
Chime Level Adjustment................................3-96
Section 3 Instrument Panel
3-2