light CHEVROLET IMPALA 2010 9.G Owner's Guide
[x] Cancel search | Manufacturer: CHEVROLET, Model Year: 2010, Model line: IMPALA, Model: CHEVROLET IMPALA 2010 9.GPages: 432, PDF Size: 1.89 MB
Page 152 of 432
Oil Pressure Light.........................................4-34
Security Light . ..............................................4-35
Fog Lamp Light............................................4-35
Cruise Control Light......................................4-35
Highbeam On Light.......................................4-36
Fuel Gage . ..................................................4-36
Driver Information Center (DIC).......................4-37
DIC Operation and Displays . ..........................4-37
DIC Compass . . . . ..........................................4-42
DIC Warnings and Messages.........................4-44
DIC Vehicle Customization . . ...........................4-51Audio System(s).............................................4-57
Setting the Clock..........................................4-58
Radio(s)......................................................4-59
Using an MP3..............................................4-68
XM Radio Messages.....................................4-72
Bluetooth
®
...................................................4-74
Theft-Deterrent Feature..................................4-84
Audio Steering Wheel Controls.......................4-84
Radio Reception...........................................4-85
Backglass Antenna.......................................4-86
XM™ Satellite Radio Antenna System.............4-86
Section 4 Instrument Panel
4-2
Page 155 of 432
Turn Signal On ChimeIf either one of the turn signals are left on and the
vehicle has been driven more than 3/4 mile (1.2 km),
a chime will sound.Headlamp High/Low-Beam ChangerTo change the headlamps from low beam to high
beam, push the turn signal/multifunction lever away
from you.
This instrument panel cluster light
3
comes on if the
high beam lamps are turned on while the ignition is
in ON/RUN.
To change the headlamps from high beam to low beam,
pull the turn signal lever toward you.
Flash-to-PassThis feature is used to signal to the vehicle ahead that
you want to pass.
If the headlamps are off or in the low-beam position,
pull the turn signal lever toward you to momentarily
switch to high-beams.
Release the lever to turn the high-beam headlamps off.
Windshield WipersTurn the band with the wiper symbol to control the
windshield wipers.8
(Mist):Single wipe, turn to
8
, then release.
Several wipes, hold the band on
8
longer.
9
(Off):Turns the windshield wipers off.
6(Adjustable Interval Wipes):Turn the band up for
more frequent wipes or down for less frequent wipes.6
(Low Speed):Slow wipes.
?
(High Speed):Fast wipes.
Clear ice and snow from the wiper blades before using
them. If frozen to the windshield, carefully loosen or
thaw them. Damaged wiper blades should be replaced.
SeeWindshield Wiper Blade Replacement on
page 6-49.
Heavy snow or ice can overload the wiper motor.
A circuit breaker will stop the motor until it cools down.
4-5
Page 157 of 432
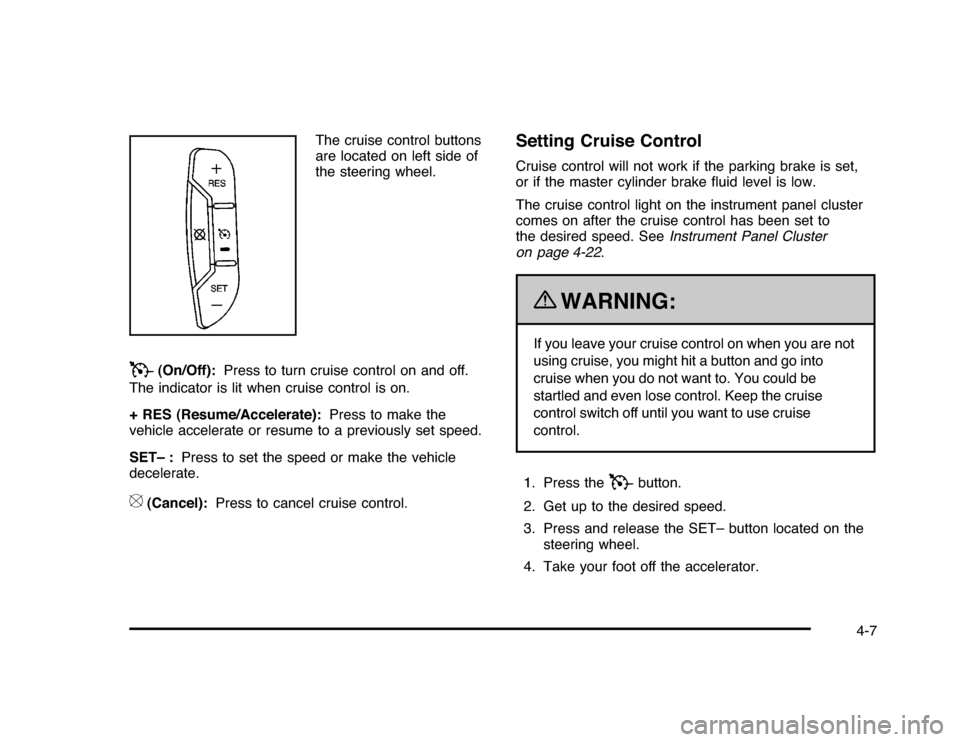
The cruise control buttons
are located on left side of
the steering wheel.
T
(On/Off):Press to turn cruise control on and off.
The indicator is lit when cruise control is on.
+ RES (Resume/Accelerate):Press to make the
vehicle accelerate or resume to a previously set speed.
SET– :Press to set the speed or make the vehicle
decelerate.
[
(Cancel):Press to cancel cruise control.
Setting Cruise ControlCruise control will not work if the parking brake is set,
or if the master cylinder brake fluid level is low.
The cruise control light on the instrument panel cluster
comes on after the cruise control has been set to
the desired speed. SeeInstrument Panel Cluster
on page 4-22.
{
WARNING:
If you leave your cruise control on when you are not
using cruise, you might hit a button and go into
cruise when you do not want to. You could be
startled and even lose control. Keep the cruise
control switch off until you want to use cruise
control.
1. Press the
T
button.
2. Get up to the desired speed.
3. Press and release the SET– button located on the
steering wheel.
4. Take your foot off the accelerator.
4-7
Page 159 of 432
Ending Cruise ControlThere are three ways to end cruise control:•
Step lightly on the brake pedal.
•
Press the
[
button on the steering wheel.
•
Press the
T
button on the steering wheel.
Erasing Speed MemoryThe cruise control set speed memory is erased by
turning off the cruise control or the ignition.Exterior Lamps
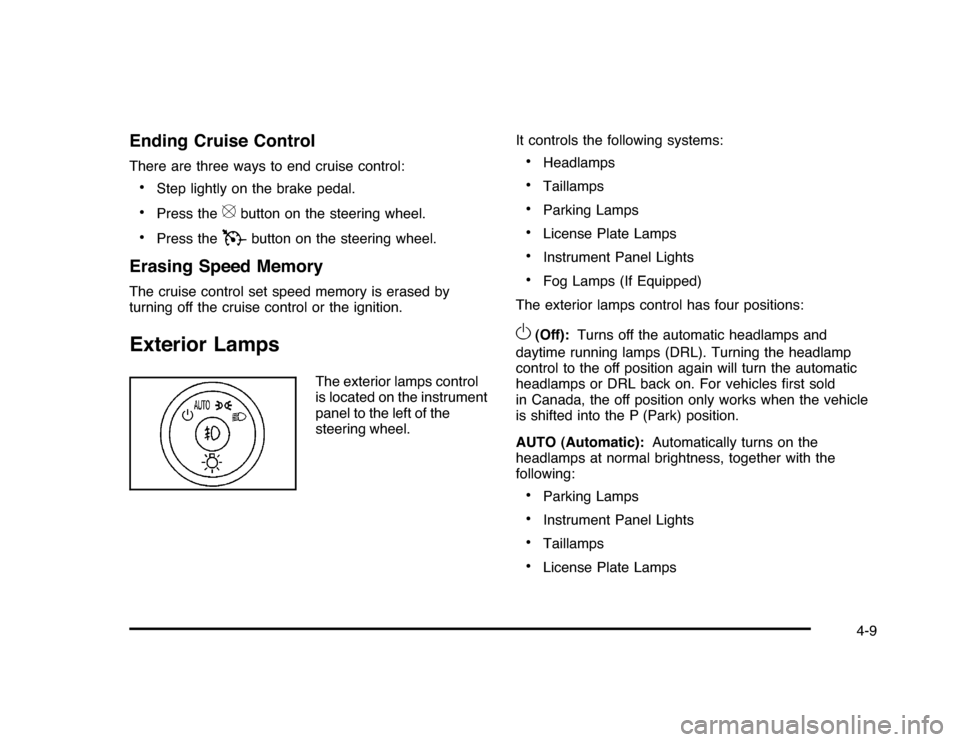
The exterior lamps control
is located on the instrument
panel to the left of the
steering wheel.It controls the following systems:
•
Headlamps
•
Taillamps
•
Parking Lamps
•
License Plate Lamps
•
Instrument Panel Lights
•
Fog Lamps (If Equipped)
The exterior lamps control has four positions:
O
(Off):Turns off the automatic headlamps and
daytime running lamps (DRL). Turning the headlamp
control to the off position again will turn the automatic
headlamps or DRL back on. For vehicles first sold
in Canada, the off position only works when the vehicle
is shifted into the P (Park) position.
AUTO (Automatic):Automatically turns on the
headlamps at normal brightness, together with the
following:•
Parking Lamps
•
Instrument Panel Lights
•
Taillamps
•
License Plate Lamps
4-9
Page 160 of 432
;
(Parking Lamps):Turns on the parking lamps
together with the following:
•
Instrument Panel Lights
•
Taillamps
•
License Plate Lamps
2
(Headlamps):Turns on the headlamps together with
the following lamps listed below. When the headlamps
are turned on while the vehicle is on, the headlamps will
turn off automatically 10 minutes after the ignition is
turned off. When the headlamps are turned on while the
vehicle is off, the headlamps will stay on for 10 minutes
before automatically turning off to prevent the battery
from being drained. Turn the headlamp control to off
and then back to the headlamp on position to make
the headlamps stay on for an additional 10 minutes.•
Parking Lamps
•
Taillamps
•
License Plate Lamps
•
Instrument Panel Lights
#
(Fog Lamps) (If Equipped):Turns on the fog
lamps.
SeeFog Lamps on page 4-11.
Daytime Running Lamps (DRL)/
Automatic Headlamp SystemDaytime Running Lamps (DRL) can make it easier for
others to see the front of your vehicle during the day.
Fully functional daytime running lamps are required
on all vehicles first sold in Canada.
The DRL system makes the low-beam headlamps
come on at a reduced brightness when the following
conditions are met:•
The ignition is in the ON/RUN position.
•
The exterior lamps control is in AUTO.
•
The engine is running.
When the DRL are on, the regular headlamps, taillamps,
sidemarker, and other lamps are not on. The instrument
panel and cluster are also not on.
The headlamps automatically change from DRL to
the regular headlamps depending on the darkness of
the surroundings. The other lamps that come on with
the headlamps will also come on.
When it is bright enough outside, the headlamps go off
and the DRL come on.
The regular headlamp system should be turned on
when needed.
Do not cover the light sensor on top of the instrument
panel because it works with the DRL.
4-10
Page 161 of 432
Fog Lamps#
(Fog Lamps):For vehicles with fog lamps,
the button is located on the exterior lamps control.
The exterior lamps control is located on the instrument
panel to the left of the steering column.
The ignition must be in the ON/RUN position for the fog
lamps to come on.
Press
#
to turn the fog lamps on or off. A light will
come on in the instrument panel cluster.
When the headlamps are changed to high-beam, the
fog lamps also go off.
Some localities have laws that require the headlamps to
be on along with the fog lamps.
Instrument Panel BrightnessD
(Instrument Panel Brightness):The knob with this
symbol on it is located next to the exterior lamps control
to the left of the steering wheel. Push the knob in all the
way until it extends out and then turn the knob clockwise
or counterclockwise to brighten or dim the lights. Push
the knob back in when finished.
Courtesy LampsWhen a door is opened, the courtesy lamps
automatically come on. They make it easy for you to
enter and leave your vehicle. You can also manually
turn these lamps on by fully turning the instrument
panel brightness control clockwise.
The reading lamps, located on the rearview mirror,
can be turned on or off independent of the automatic
courtesy lamps, when the doors are closed.Dome LampThe center mounted dome lamp overhead comes on
when a door is opened. This lamp can also be turned
on by turning the instrument panel brightness control
clockwise.
4-11
Page 162 of 432
Entry LightingFor vehicles with courtesy lamps, they come on and
stay on for a set time whenever the unlock symbol
is pressed on the Remote Keyless Entry (RKE)
transmitter, if the vehicle has one.
If a door is opened, the lamps stay on while it is open
and then turn off automatically about 20 seconds
after the door is closed. If the unlock symbol is pressed
and no door is opened, the lamps turn off after about
20 seconds.
Entry lighting includes a feature called theater dimming.
With theater dimming, the lamps do not turn off at
the end of the delay time. Instead, they slowly dim and
then go out. The delay time is canceled if the ignition
key is turned to ON/RUN or the power door lock switch
is pressed. The lamps will dim right away.
When the ignition is on, illuminated entry is inactive,
which means the courtesy lamps will not come on unless
a door is opened.
Delayed Entry LightingDelayed entry lighting illuminates the interior for a
period of time after all the doors have been closed.
The ignition must be off for delayed entry lighting
to work. Immediately after all the doors have been
closed, the delayed entry lighting feature continues to
work until one of the following occurs:•
The ignition is in ON/RUN.
•
The doors are locked.
•
An illumination period of about 25 seconds has
elapsed.
If during the illumination period a door is opened, the
timed illumination period is canceled and the interior
lamps remain on.
4-12
Page 163 of 432
Delayed Exit LightingThis feature illuminates the interior for a period of time
after the key is removed from the ignition.
The ignition must be off for delayed exit lighting to work.
When the key is removed, interior illumination activates
and remains on until one of the following occurs:•
The ignition is in ON/RUN.
•
The power door locks are activated.
•
An illumination period of 20 seconds has elapsed.
If during the illumination period a door is opened,
the timed illumination period will be canceled and the
interior lamps will remain on because a door is open.
Parade DimmingParade mode automatically prohibits the dimming of
the instrument panel displays during the daylight while
the headlamps are on so that the displays are still
able to be seen.Reading LampsThe vehicle has reading lamps that also act as the
dome lamp. Press the button near each lamp to turn
them on and off.
Map LampsThe vehicle has map lamps on the rearview mirror.
Press the button near each lamp on the mirror to turn
the map lamps on and off.Electric Power ManagementThe vehicle has Electric Power Management (EPM) that
estimates the battery’s temperature and state of charge.
It then adjusts the voltage for best performance and
extended life of the battery.
When the battery’s state of charge is low, the voltage is
raised slightly to quickly bring the charge back up. When
the state of charge is high, the voltage is lowered slightly
to prevent overcharging. If the vehicle has a voltmeter
gage or a voltage display on the Driver Information
Center (DIC), you may see the voltage move up or down.
This is normal. If there is a problem, an alert will be
displayed.
The battery can be discharged at idle if the electrical
loads are very high. This is true for all vehicles. This is
because the generator (alternator) may not be spinning
fast enough at idle to produce all the power that is
needed for very high electrical loads.
4-13
Page 166 of 432
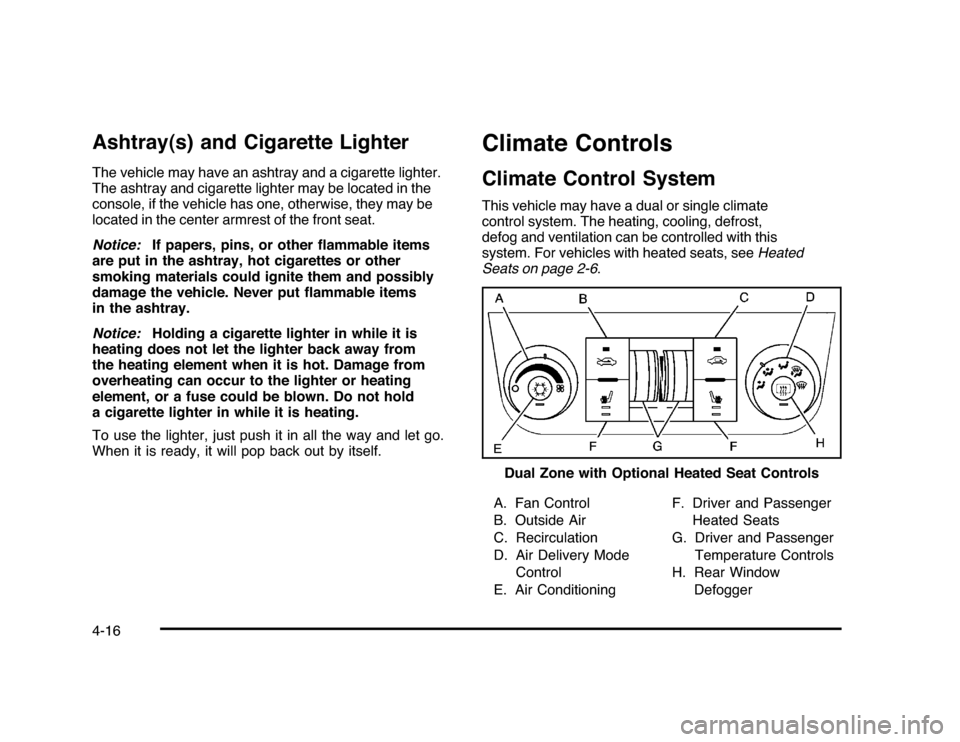
Ashtray(s) and Cigarette LighterThe vehicle may have an ashtray and a cigarette lighter.
The ashtray and cigarette lighter may be located in the
console, if the vehicle has one, otherwise, they may be
located in the center armrest of the front seat.
Notice:If papers, pins, or other flammable items
are put in the ashtray, hot cigarettes or other
smoking materials could ignite them and possibly
damage the vehicle. Never put flammable items
in the ashtray.
Notice:Holding a cigarette lighter in while it is
heating does not let the lighter back away from
the heating element when it is hot. Damage from
overheating can occur to the lighter or heating
element, or a fuse could be blown. Do not hold
a cigarette lighter in while it is heating.
To use the lighter, just push it in all the way and let go.
When it is ready, it will pop back out by itself.
Climate ControlsClimate Control SystemThis vehicle may have a dual or single climate
control system. The heating, cooling, defrost,
defog and ventilation can be controlled with this
system. For vehicles with heated seats, seeHeated
Seats on page 2-6.
A. Fan Control
B. Outside Air
C. Recirculation
D. Air Delivery Mode
Control
E. Air ConditioningF. Driver and Passenger
Heated Seats
G. Driver and Passenger
Temperature Controls
H. Rear Window
Defogger Dual Zone with Optional Heated Seat Controls
4-16
Page 168 of 432

6
(Floor):Air is directed to the floor outlets, with
some of the air directed to the windshield and side
window outlets. In this mode, the system automatically
selects outside air.
-
(Defog):This mode clears the windshield of fog
or moisture. Air is directed equally to the windshield and
the floor outlets. When defog is selected, the system
turns off recirculation and runs the air conditioning
compressor unless the outside temperature is below
40°F (4°C).
0
(Defrost):This mode clears the windshield of fog or
frost more quickly. Air is directed to the windshield with
some air to the side window vents and the floor vents.
When defrost is selected, the system automatically
forces outside air into the vehicle. The air conditioning
compressor will run automatically in this setting, unless
the outside temperature is below 40°F (4°C).
#
(Air Conditioning):Press to turn the air conditioning
system on or off. An indicator light comes on to show that
it is on. The air conditioning can be selected in any mode
as long as the fan is on and the outside temperature is
above freezing. A flashing indicator light indicates that the
air conditioning compressor is currently not available.
On hot days, open the windows to let hot inside air
escape; then close them. This helps to reduce the time
it takes for the vehicle to cool down. It also helps the
system to operate more efficiently.
For quick cool down on hot days, do the following:
1. Select the
H
mode.
2. Press the
#
button.
3. Select the coolest temperature for both zones.
4. Select the highest
9
speed.
5. When the coolest temperature is selected in the
A/C mode, the system automatically goes into the
recirculation mode to improve cooling.
4-18