CHEVROLET IMPALA 2011 9.G Owners Manual
Manufacturer: CHEVROLET, Model Year: 2011, Model line: IMPALA, Model: CHEVROLET IMPALA 2011 9.GPages: 376, PDF Size: 5.71 MB
Page 271 of 376
Black plate (25,1)Chevrolet Impala Owner Manual - 2011
Vehicle Care 10-25
Notice:
.Using the wrong fluid can
badly damage brake
hydraulic system parts. For
example, just a few drops of
mineral-based oil, such as
engine oil, in the brake
hydraulic system can
damage brake hydraulic
system parts so badly that
they will have to be replaced.
Do not let someone put in
the wrong kind of fluid.
.If brake fluid is spilled on the
vehicle's painted surfaces,
the paint finish can be
damaged. Be careful not to
spill brake fluid on the
vehicle. If you do, wash it off
immediately.
Battery
Refer to the replacement number
shown on the original battery label
when a new battery is needed. See
Engine Compartment Overview on
page 10‑6for battery location.
{DANGER
Battery posts, terminals, and
related accessories contain lead
and lead compounds, chemicals
known to the State of California to
cause cancer and reproductive
harm. Wash hands after handling.
Vehicle Storage
{WARNING
Batteries have acid that can burn
you and gas that can explode.
You can be badly hurt if you are
not careful. See Jump Starting on
page 10‑70 for tips on working
around a battery without
getting hurt.
Infrequent Usage: Remove the
black, negative (−) cable from the
battery to keep the battery from
running down.
Extended Storage: Remove the
black, negative (−) cable from the
battery or use a battery trickle
charger.
Page 272 of 376
Black plate (26,1)Chevrolet Impala Owner Manual - 2011
10-26 Vehicle Care
Starter Switch Check
{WARNING
When you are doing this
inspection, the vehicle could
move suddenly. If the vehicle
moves, you or others could
be injured.
1. Before starting this check, be sure there is enough room
around the vehicle.
2. Firmly apply both the parking brake and the regular brake.
See Parking Brake on
page 9‑29.
Do not use the accelerator
pedal, and be ready to turn off
the engine immediately if it
starts. 3. Try to start the engine in each
gear. The vehicle should start
only in P (Park) or N (Neutral).
If the vehicle starts in any other
position, contact your dealer
for service.
Automatic Transmission
Shift Lock Control
Function Check
{WARNING
When you are doing this
inspection, the vehicle could
move suddenly. If the vehicle
moves, you or others could
be injured.
1. Before starting this check, be sure there is enough room
around the vehicle. It should be
parked on a level surface. 2. Firmly apply the parking brake.
See Parking Brake on
page 9‑29.
Be ready to apply the regular
brake immediately if the vehicle
begins to move.
3. With the engine off, turn the ignition to ON/RUN, but do not
start the engine. Without
applying the regular brake,
try to move the shift lever out of
P (Park) with normal effort. If the
shift lever moves out of P (Park),
contact your dealer for service.
Page 273 of 376
Black plate (27,1)Chevrolet Impala Owner Manual - 2011
Vehicle Care 10-27
Ignition Transmission
Lock Check
While parked, and with the parking
brake set, try to turn the ignition to
LOCK/OFF in each shift lever
position.
.The ignition should turn to
LOCK/OFF only when the shift
lever is in P (Park).
.The ignition key should come
out only in LOCK/OFF.
Contact your dealer if service is
required.
Park Brake and P (Park)
Mechanism Check
{WARNING
When you are doing this check,
the vehicle could begin to move.
You or others could be injured
and property could be damaged.
Make sure there is room in front
of the vehicle in case it begins to
roll. Be ready to apply the regular
brake at once should the vehicle
begin to move.
Park on a fairly steep hill, with the
vehicle facing downhill. Keeping
your foot on the regular brake, set
the parking brake.
.To check the parking brake's
holding ability: With the engine
running and the transmission in
N (Neutral), slowly remove foot
pressure from the regular brake
pedal. Do this until the vehicle is
held by the parking brake only.
.To check the P (Park)
mechanism's holding ability:
With the engine running, shift to
P (Park). Then release the
parking brake followed by the
regular brake.
Contact your dealer if service is
required.
Wiper Blade Replacement
Windshield wiper blades should
be inspected for wear or cracking.
See Scheduled Maintenance on
page 11‑2 for more information on
wiper blade inspection.
Replacement blades come in
different types and are removed in
different ways. Here's how to
remove the wiper blade:
1. Pull the windshield wiper arm
connector away from the
windshield.
Page 274 of 376
Black plate (28,1)Chevrolet Impala Owner Manual - 2011
10-28 Vehicle Care
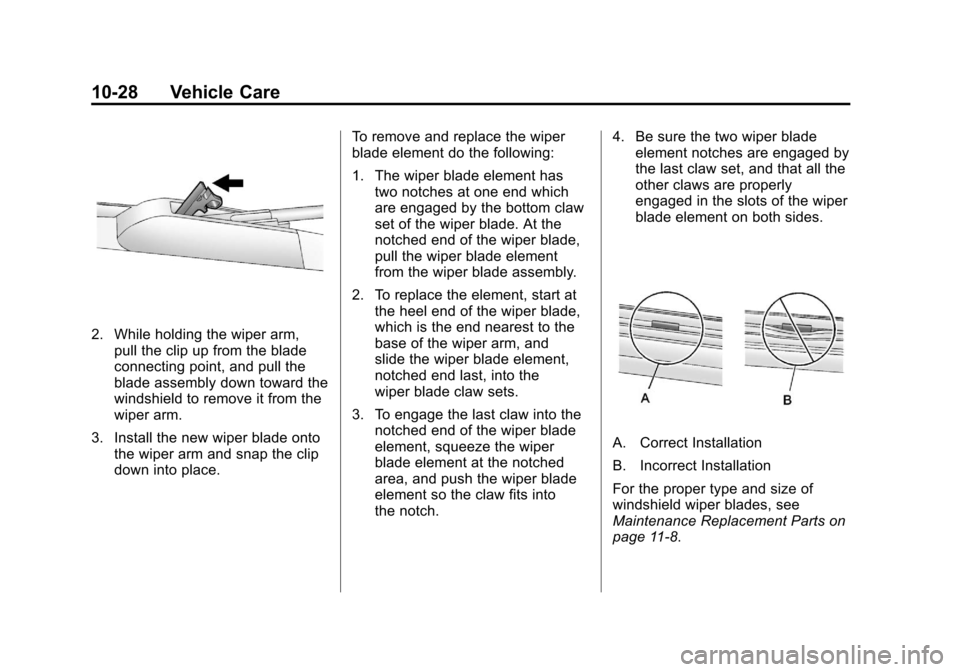
2. While holding the wiper arm,pull the clip up from the blade
connecting point, and pull the
blade assembly down toward the
windshield to remove it from the
wiper arm.
3. Install the new wiper blade onto the wiper arm and snap the clip
down into place. To remove and replace the wiper
blade element do the following:
1. The wiper blade element has
two notches at one end which
are engaged by the bottom claw
set of the wiper blade. At the
notched end of the wiper blade,
pull the wiper blade element
from the wiper blade assembly.
2. To replace the element, start at the heel end of the wiper blade,
which is the end nearest to the
base of the wiper arm, and
slide the wiper blade element,
notched end last, into the
wiper blade claw sets.
3. To engage the last claw into the notched end of the wiper blade
element, squeeze the wiper
blade element at the notched
area, and push the wiper blade
element so the claw fits into
the notch. 4. Be sure the two wiper blade
element notches are engaged by
the last claw set, and that all the
other claws are properly
engaged in the slots of the wiper
blade element on both sides.
A. Correct Installation
B. Incorrect Installation
For the proper type and size of
windshield wiper blades, see
Maintenance Replacement Parts on
page 11‑8.
Page 275 of 376
Black plate (29,1)Chevrolet Impala Owner Manual - 2011
Vehicle Care 10-29
Headlamp Aiming
Headlamp aim has been preset at
the factory and should need no
further adjustment.
However, if the vehicle is damaged
in a crash, the headlamp aim may
be affected. Aim adjustment to the
low-beam headlamps may be
necessary if oncoming drivers flash
their high-beam headlamps at you
(for vertical aim).
If the headlamps need to be
re-aimed, it is recommended that
the vehicle be taken to the dealer
for service.
Bulb Replacement
For the proper type of replacement
bulbs, seeReplacement Bulbs on
page 10‑33.
For any bulb‐changing procedure
not listed in this section, contact
your dealer.
Halogen Bulbs
{WARNING
Halogen bulbs have pressurized
gas inside and can burst if you
drop or scratch the bulb. You or
others could be injured. Be sure
to read and follow the instructions
on the bulb package.
Page 276 of 376
Black plate (30,1)Chevrolet Impala Owner Manual - 2011
10-30 Vehicle Care
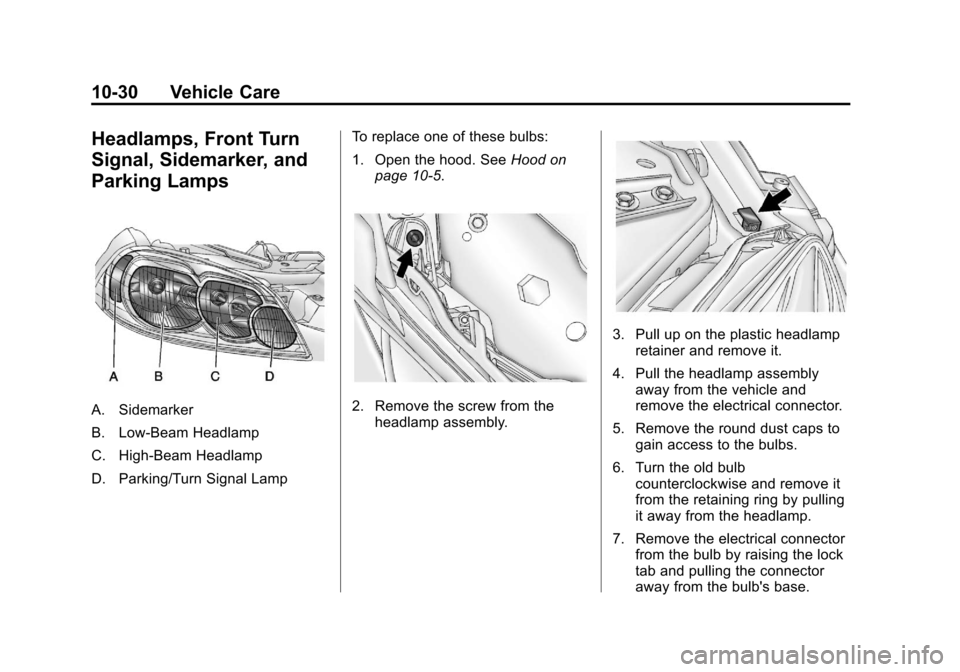
Headlamps, Front Turn
Signal, Sidemarker, and
Parking Lamps
A. Sidemarker
B. Low-Beam Headlamp
C. High-Beam Headlamp
D. Parking/Turn Signal LampTo replace one of these bulbs:
1. Open the hood. See
Hood on
page 10‑5.2. Remove the screw from the headlamp assembly.
3. Pull up on the plastic headlampretainer and remove it.
4. Pull the headlamp assembly away from the vehicle and
remove the electrical connector.
5. Remove the round dust caps to gain access to the bulbs.
6. Turn the old bulb counterclockwise and remove it
from the retaining ring by pulling
it away from the headlamp.
7. Remove the electrical connector from the bulb by raising the lock
tab and pulling the connector
away from the bulb's base.
Page 277 of 376
Black plate (31,1)Chevrolet Impala Owner Manual - 2011
Vehicle Care 10-31
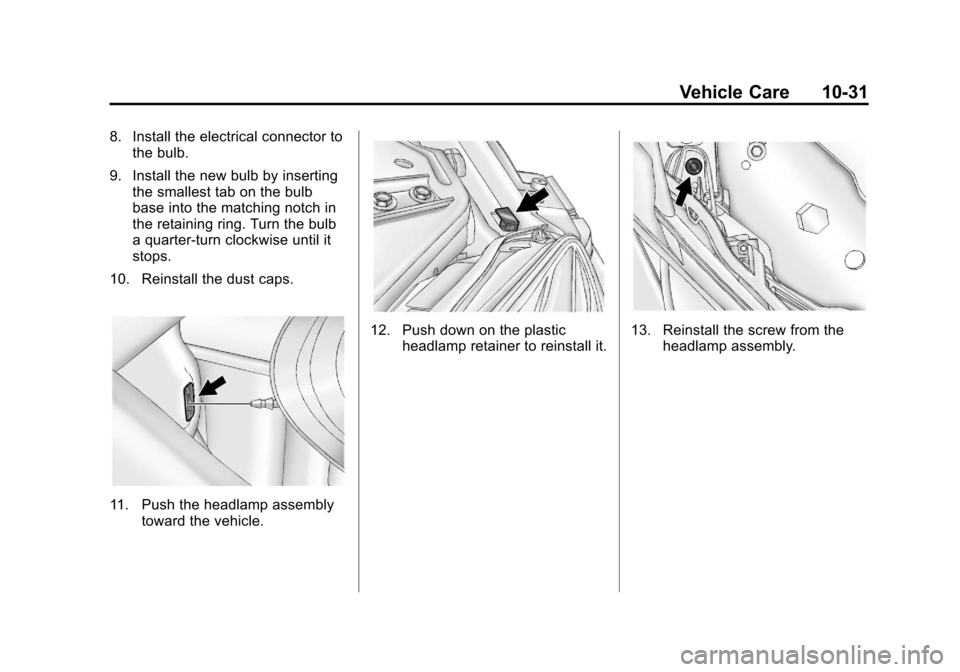
8. Install the electrical connector tothe bulb.
9. Install the new bulb by inserting the smallest tab on the bulb
base into the matching notch in
the retaining ring. Turn the bulb
a quarter-turn clockwise until it
stops.
10. Reinstall the dust caps.
11. Push the headlamp assembly toward the vehicle.
12. Push down on the plasticheadlamp retainer to reinstall it.13. Reinstall the screw from theheadlamp assembly.
Page 278 of 376
Black plate (32,1)Chevrolet Impala Owner Manual - 2011
10-32 Vehicle Care
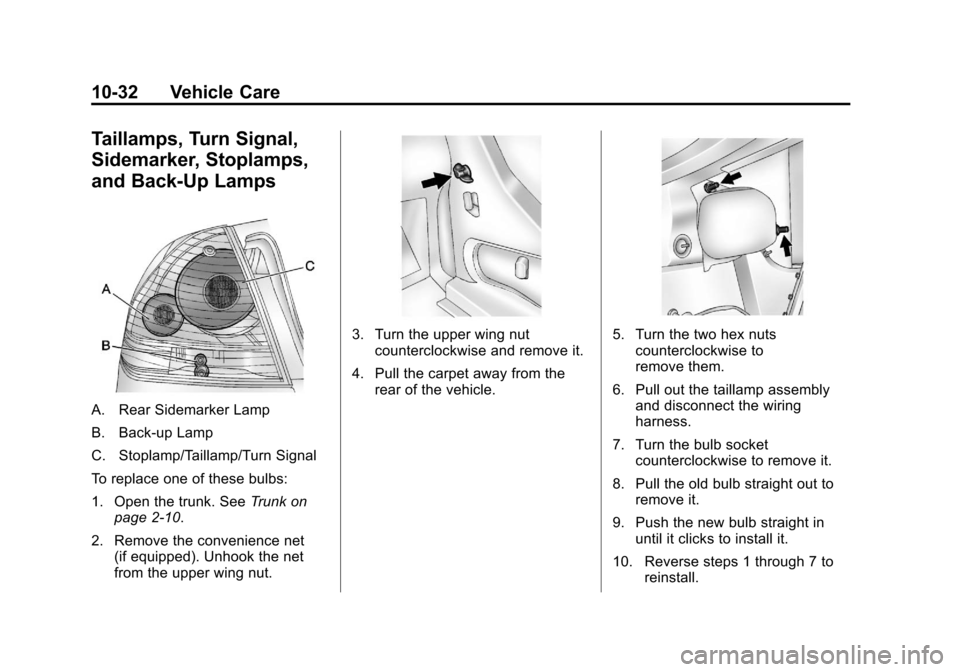
Taillamps, Turn Signal,
Sidemarker, Stoplamps,
and Back-Up Lamps
A. Rear Sidemarker Lamp
B. Back-up Lamp
C. Stoplamp/Taillamp/Turn Signal
To replace one of these bulbs:
1. Open the trunk. SeeTrunk on
page 2‑10.
2. Remove the convenience net (if equipped). Unhook the net
from the upper wing nut.
3. Turn the upper wing nutcounterclockwise and remove it.
4. Pull the carpet away from the rear of the vehicle.5. Turn the two hex nutscounterclockwise to
remove them.
6. Pull out the taillamp assembly and disconnect the wiring
harness.
7. Turn the bulb socket counterclockwise to remove it.
8. Pull the old bulb straight out to remove it.
9. Push the new bulb straight in until it clicks to install it.
10. Reverse steps 1 through 7 to reinstall.
Page 279 of 376
Black plate (33,1)Chevrolet Impala Owner Manual - 2011
Vehicle Care 10-33
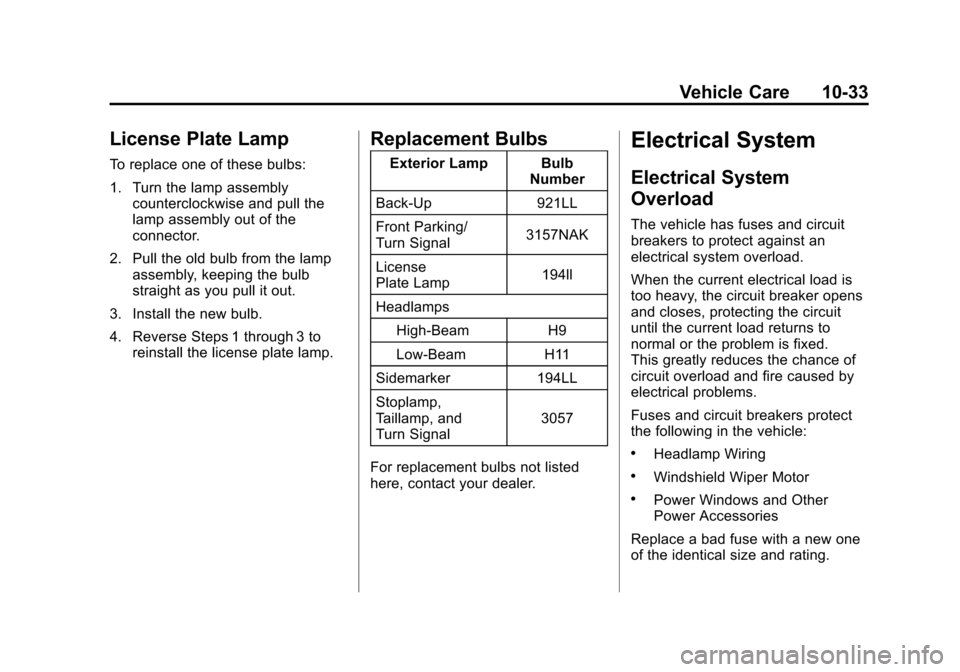
License Plate Lamp
To replace one of these bulbs:
1. Turn the lamp assemblycounterclockwise and pull the
lamp assembly out of the
connector.
2. Pull the old bulb from the lamp assembly, keeping the bulb
straight as you pull it out.
3. Install the new bulb.
4. Reverse Steps 1 through 3 to reinstall the license plate lamp.
Replacement Bulbs
Exterior Lamp Bulb
Number
Back-Up 921LL
Front Parking/
Turn Signal 3157NAK
License
Plate Lamp 194ll
Headlamps High-Beam H9
Low-Beam H11
Sidemarker 194LL
Stoplamp,
Taillamp, and
Turn Signal 3057
For replacement bulbs not listed
here, contact your dealer.
Electrical System
Electrical System
Overload
The vehicle has fuses and circuit
breakers to protect against an
electrical system overload.
When the current electrical load is
too heavy, the circuit breaker opens
and closes, protecting the circuit
until the current load returns to
normal or the problem is fixed.
This greatly reduces the chance of
circuit overload and fire caused by
electrical problems.
Fuses and circuit breakers protect
the following in the vehicle:
.Headlamp Wiring
.Windshield Wiper Motor
.Power Windows and Other
Power Accessories
Replace a bad fuse with a new one
of the identical size and rating.
Page 280 of 376
Black plate (34,1)Chevrolet Impala Owner Manual - 2011
10-34 Vehicle Care
If there is a problem on the road and
a fuse needs to be replaced, the
same amperage fuse can be
borrowed. Choose some feature of
the vehicle that is not needed to use
and replace it as soon as possible.
Headlamp Wiring
An electrical overload may cause
the lamps to go on and off, or in
some cases to remain off. Have the
headlamp wiring checked right away
if the lamps go on and off or
remain off.
Windshield Wipers
If the wiper motor overheats due to
heavy snow or ice, the windshield
wipers will stop until the motor cools
and will then restart.
Although the circuit is protected
from electrical overload, overload
due to heavy snow or ice may
cause wiper linkage damage.Always clear ice and heavy snow
from the windshield before using the
windshield wipers.
If the overload is caused by an
electrical problem and not snow or
ice, be sure to get it fixed.
Fuses and Circuit
Breakers
The wiring circuits in the vehicle are
protected from short circuits by a
combination of fuses and circuit
breakers. This greatly reduces the
chance of fires caused by electrical
problems.
Look at the silver-colored band
inside the fuse. If the band is broken
or melted, replace the fuse. Be sure
you replace a bad fuse with a new
one of the identical size and rating.
Engine Compartment
Fuse Block
The Engine Compartment Fuse
Block is in the engine compartment.
See
Engine Compartment Overview
on page 10‑6 for more information
on location.
Notice: Spilling liquid on any
electrical component on the
vehicle may damage it. Always
keep the covers on any electrical
component.