CHEVROLET IMPALA 2020 Owner's Manual
Manufacturer: CHEVROLET, Model Year: 2020, Model line: IMPALA, Model: CHEVROLET IMPALA 2020Pages: 328, PDF Size: 5.07 MB
Page 221 of 328
Chevrolet Impala Owner Manual (GMNA-Localizing-U.S./Canada-13688912) -
2020 - CRC - 6/5/19
220 Vehicle Care
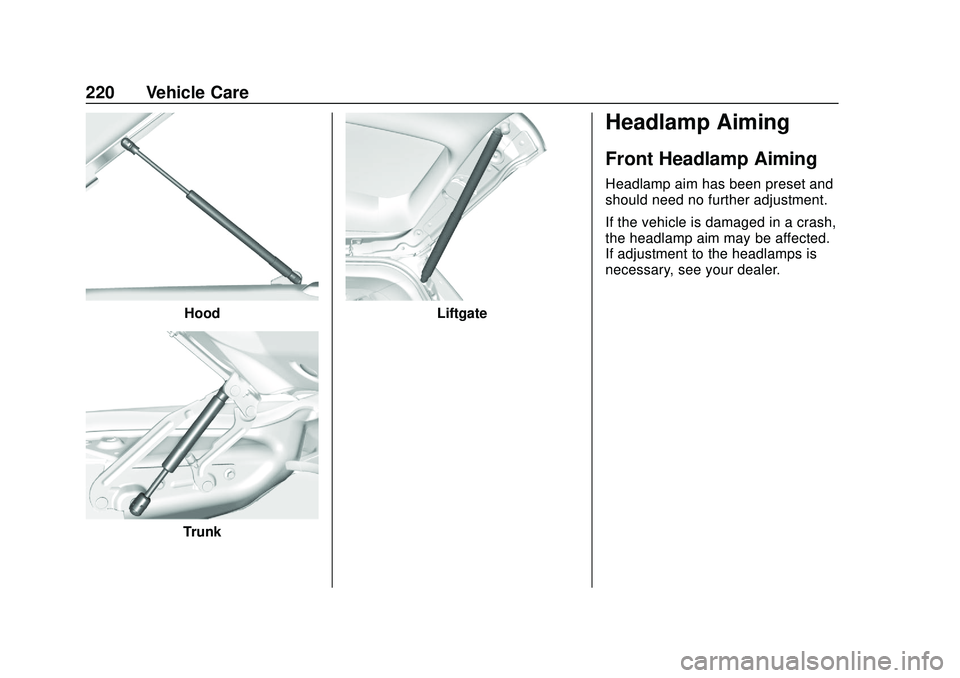
Hood
Trunk
Liftgate
Headlamp Aiming
Front Headlamp Aiming
Headlamp aim has been preset and
should need no further adjustment.
If the vehicle is damaged in a crash,
the headlamp aim may be affected.
If adjustment to the headlamps is
necessary, see your dealer.
Page 222 of 328
Chevrolet Impala Owner Manual (GMNA-Localizing-U.S./Canada-13688912) -
2020 - CRC - 6/5/19
Vehicle Care 221
Bulb Replacement
For the proper type of replacement
bulbs, or any bulb changing
procedure not listed in this section,
contact your dealer.
Caution
Do not replace incandescent
bulbs with aftermarket LED
replacement bulbs. This can
cause damage to the vehicle
electrical system.
Halogen Bulbs
{Warning
Halogen bulbs have pressurized
gas inside and can burst if you
drop or scratch the bulb. You or
others could be injured. Be sure
to read and follow the instructions
on the bulb package.
High Intensity Discharge
(HID) Lighting
{Warning
The High Intensity Discharge
(HID) lighting system operates at
a very high voltage. If you try to
service any of the system
components, you could be
seriously injured. Have your
dealer or a qualified technician
service them.
The vehicle may have HID
headlamps. After an HID headlamp
bulb has been replaced, you may
notice that the beam is a slightly
different shade than it was originally.
This is normal.
LED Lighting
This vehicle has several LED lamps.
For replacement of any LED lighting
assembly, contact your dealer.
Headlamps, Front Turn
Signal, Sidemarker, and
Parking Lamps
Base Headlamp Assembly
The base model vehicle has
halogen high/low-beam headlamps,
a parking/turn signal lamp, and a
sidemarker lamp on the headlamp
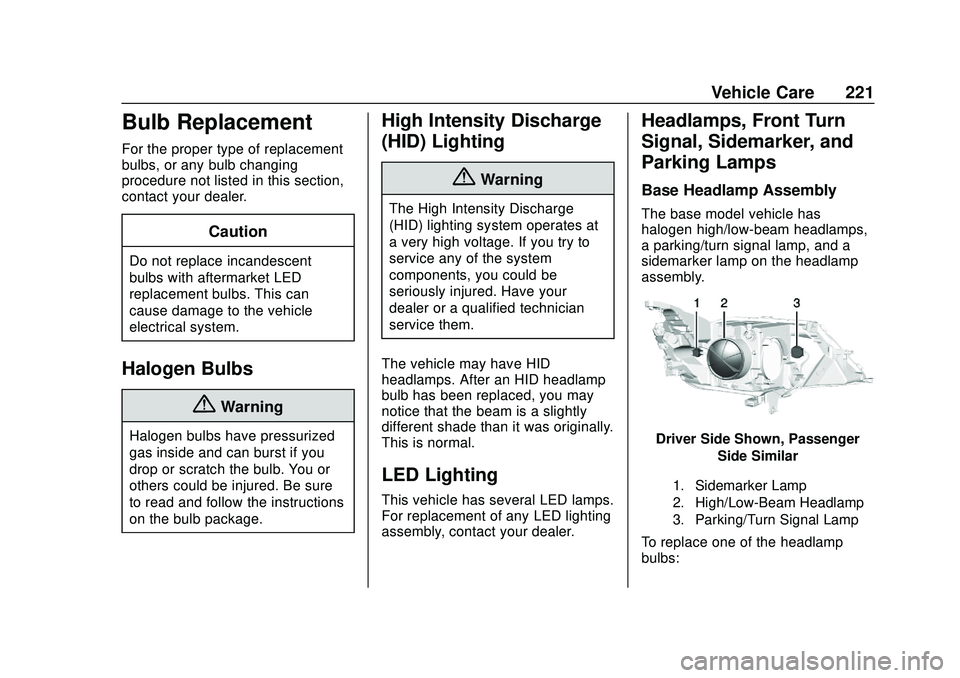
assembly.
Driver Side Shown, Passenger Side Similar
1. Sidemarker Lamp
2. High/Low-Beam Headlamp
3. Parking/Turn Signal Lamp
To replace one of the headlamp
bulbs:
Page 223 of 328
Chevrolet Impala Owner Manual (GMNA-Localizing-U.S./Canada-13688912) -
2020 - CRC - 6/5/19
222 Vehicle Care
1. Open the hood. SeeHood
0 201.
2. For the driver side bulb, remove the windshield washer
bottle filler neck by firmly
pulling it straight up and out of
the bottle.
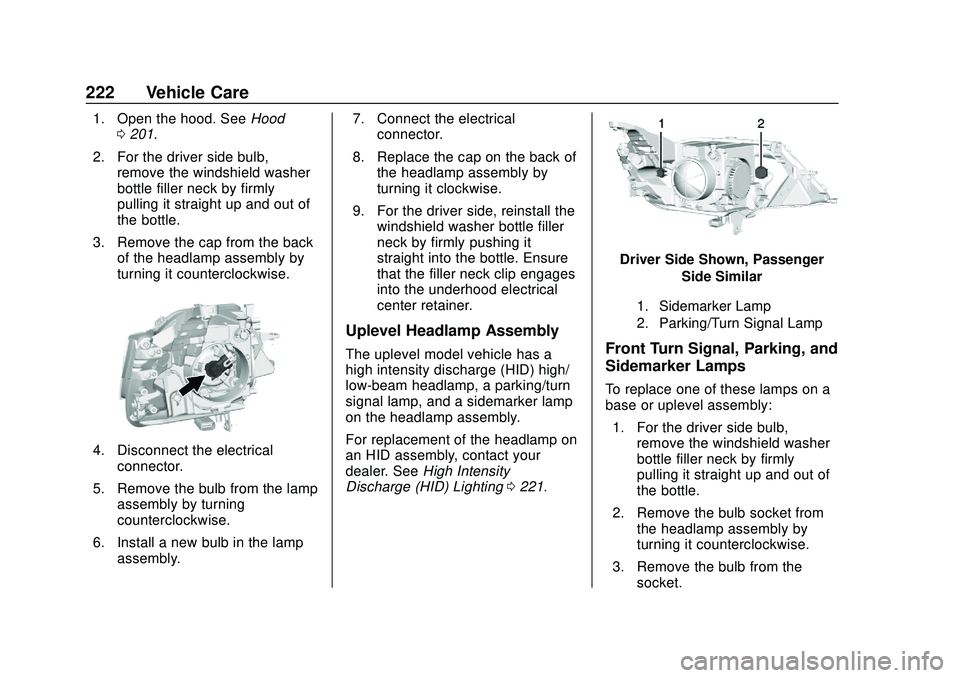
3. Remove the cap from the back of the headlamp assembly by
turning it counterclockwise.
4. Disconnect the electricalconnector.
5. Remove the bulb from the lamp assembly by turning
counterclockwise.
6. Install a new bulb in the lamp assembly. 7. Connect the electrical
connector.
8. Replace the cap on the back of the headlamp assembly by
turning it clockwise.
9. For the driver side, reinstall the windshield washer bottle filler
neck by firmly pushing it
straight into the bottle. Ensure
that the filler neck clip engages
into the underhood electrical
center retainer.
Uplevel Headlamp Assembly
The uplevel model vehicle has a
high intensity discharge (HID) high/
low-beam headlamp, a parking/turn
signal lamp, and a sidemarker lamp
on the headlamp assembly.
For replacement of the headlamp on
an HID assembly, contact your
dealer. See High Intensity
Discharge (HID) Lighting 0221.
Driver Side Shown, Passenger
Side Similar
1. Sidemarker Lamp
2. Parking/Turn Signal Lamp
Front Turn Signal, Parking, and
Sidemarker Lamps
To replace one of these lamps on a
base or uplevel assembly:
1. For the driver side bulb, remove the windshield washer
bottle filler neck by firmly
pulling it straight up and out of
the bottle.
2. Remove the bulb socket from the headlamp assembly by
turning it counterclockwise.
3. Remove the bulb from the socket.
Page 224 of 328
Chevrolet Impala Owner Manual (GMNA-Localizing-U.S./Canada-13688912) -
2020 - CRC - 6/5/19
Vehicle Care 223
4. Replace the bulb in the bulbsocket.
5. Install the bulb socket in the headlamp assembly by turning
it clockwise.
6. For the driver side, reinstall the windshield washer bottle filler
neck by firmly pushing it
straight into the bottle. Ensure
that the filler neck clip engages
into the underhood electrical
center retainer.
Taillamps, Turn Signal,
Stoplamps, and Back-Up
Lamps
Trunk Deck Inboard Taillamp
1. Open the trunk. See Trunk
0 20.
2. Remove the push pins and pull back the trunk deck trim.
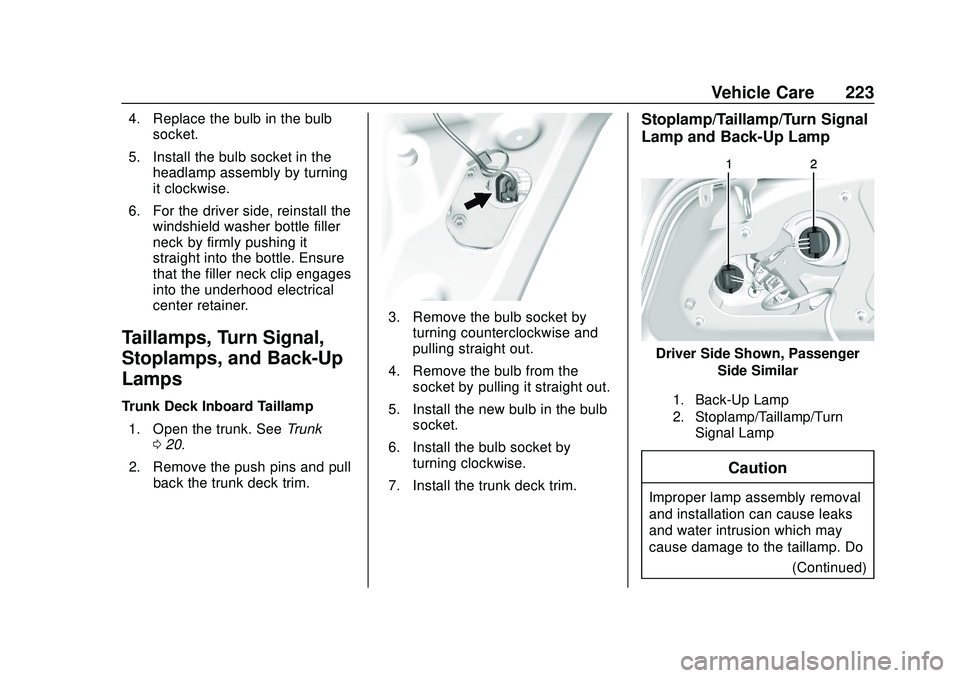
3. Remove the bulb socket byturning counterclockwise and
pulling straight out.
4. Remove the bulb from the socket by pulling it straight out.
5. Install the new bulb in the bulb socket.
6. Install the bulb socket by turning clockwise.
7. Install the trunk deck trim.
Stoplamp/Taillamp/Turn Signal
Lamp and Back-Up Lamp
Driver Side Shown, Passenger Side Similar
1. Back-Up Lamp
2. Stoplamp/Taillamp/TurnSignal Lamp
Caution
Improper lamp assembly removal
and installation can cause leaks
and water intrusion which may
cause damage to the taillamp. Do
(Continued)
Page 225 of 328
Chevrolet Impala Owner Manual (GMNA-Localizing-U.S./Canada-13688912) -
2020 - CRC - 6/5/19
224 Vehicle Care
Caution (Continued)
not remove the taillamp assembly
to replace a bulb. Use the trunk
opening to access the bulb.
To replace one of these bulbs: 1. Open the trunk. See Trunk
0 20.
2. Remove the push pins and pull the trunk trim away from the
taillamp assembly.
3. Remove the bulb socket from the taillamp assembly by
turning it counterclockwise.
4. Remove the bulb from the socket by turning the bulb
counterclockwise one-quarter
turn and pulling it straight out.
5. Install a new bulb into the socket.
6. Install the bulb socket into the taillamp assembly by turning it
clockwise.
7. Install the trunk trim and push pins.
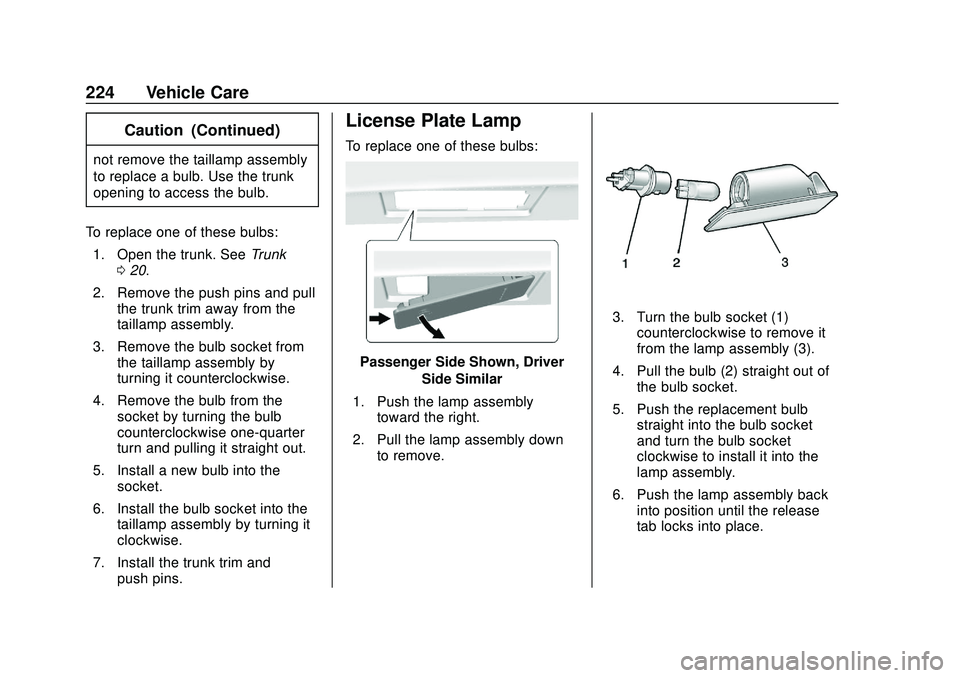
License Plate Lamp
To replace one of these bulbs:
Passenger Side Shown, Driver
Side Similar
1. Push the lamp assembly toward the right.
2. Pull the lamp assembly down to remove.
3. Turn the bulb socket (1)counterclockwise to remove it
from the lamp assembly (3).
4. Pull the bulb (2) straight out of the bulb socket.
5. Push the replacement bulb straight into the bulb socket
and turn the bulb socket
clockwise to install it into the
lamp assembly.
6. Push the lamp assembly back into position until the release
tab locks into place.
Page 226 of 328
Chevrolet Impala Owner Manual (GMNA-Localizing-U.S./Canada-13688912) -
2020 - CRC - 6/5/19
Vehicle Care 225
Electrical System
High Voltage Devices and
Wiring
{Warning
Exposure to high voltage can
cause shock, burns, and even
death. The high voltage
components in the vehicle can
only be serviced by technicians
with special training.
High voltage components are
identified by labels. Do not
remove, open, take apart,
or modify these components.
High voltage cable or wiring has
orange covering or labels. Do not
probe, tamper with, cut, or modify
high voltage cable or wiring.
Electrical System
Overload
The vehicle has fuses and circuit
breakers to protect against an
electrical system overload.
When the current electrical load is
too heavy, the circuit breaker opens
and closes, protecting the circuit
until the current load returns to
normal or the problem is fixed. This
greatly reduces the chance of circuit
overload and fire caused by
electrical problems.
Fuses and circuit breakers protect
power devices in the vehicle.
Replace a bad fuse with a new one
of the identical size and rating.
If there is a problem on the road and
a fuse needs to be replaced, the
same amperage fuse can be
borrowed. Choose some feature of
the vehicle that is not needed to use
and replace it as soon as possible.
Headlamp Wiring
An electrical overload may cause
the lamps to go on and off, or in
some cases to remain off. Have the
headlamp wiring checked right away
if the lamps go on and off or
remain off.
Windshield Wipers
If the wiper motor overheats due to
heavy snow or ice, the windshield
wipers will stop until the motor cools
and will then restart.
Although the circuit is protected
from electrical overload, overload
due to heavy snow or ice may
cause wiper linkage damage.
Always clear ice and heavy snow
from the windshield before using the
windshield wipers.
If the overload is caused by an
electrical problem and not snow or
ice, be sure to get it fixed.
Page 227 of 328
Chevrolet Impala Owner Manual (GMNA-Localizing-U.S./Canada-13688912) -
2020 - CRC - 6/5/19
226 Vehicle Care
Fuses and Circuit
Breakers
The wiring circuits in the vehicle are
protected from short circuits by a
combination of fuses and circuit
breakers. This greatly reduces the
chance of damage caused by
electrical problems.
{Danger
Fuses and circuit breakers are
marked with their ampere rating.
Do not exceed the
specified amperage rating when
replacing fuses and circuit
breakers. Use of an oversized
fuse or circuit breaker can result
in a vehicle fire. You and others
could be seriously injured or
killed.
To check a fuse, look at the
silver-colored band inside the fuse.
If the band is broken or melted,
replace the fuse. Be sure to replace
a bad fuse with a new one of the
identical size and rating. Fuses of the same amperage can
be temporarily borrowed from
another fuse location, if a fuse goes
out. Replace the fuse as soon as
possible.
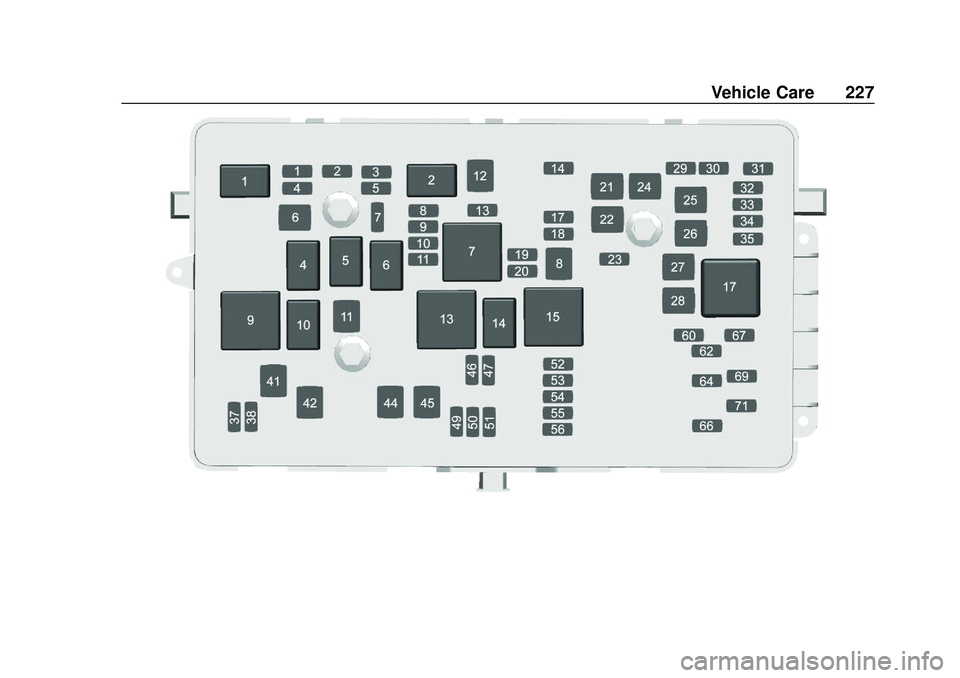
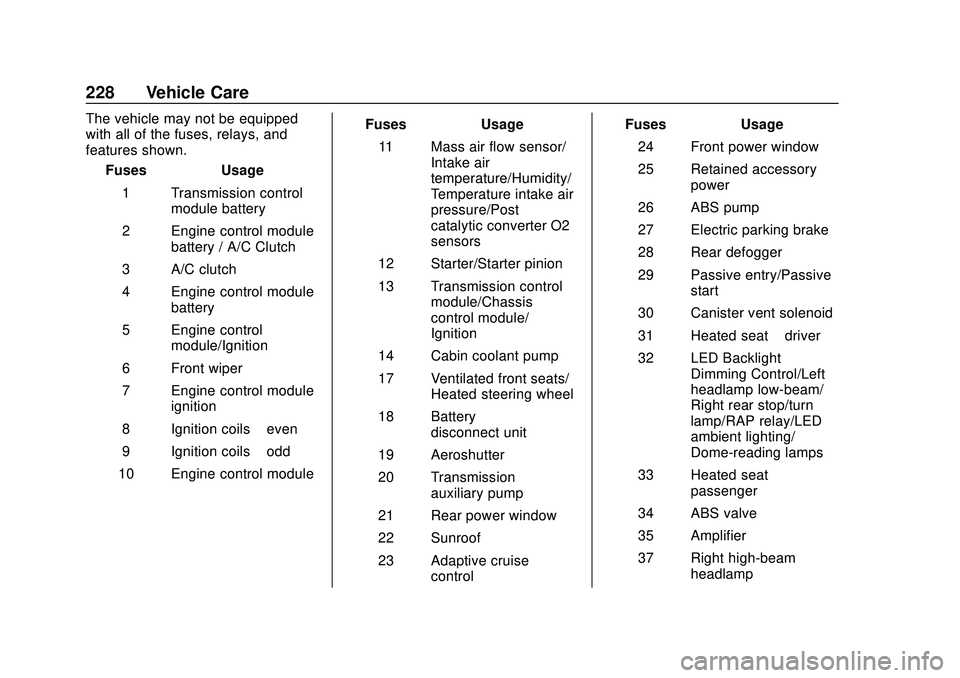
Engine Compartment
Fuse Block
The engine compartment fuse block
is on the driver side of the engine
compartment, near the battery.
Caution
Spilling liquid on any electrical
component on the vehicle may
damage it. Always keep the
covers on any electrical
component.
Page 228 of 328
Chevrolet Impala Owner Manual (GMNA-Localizing-U.S./Canada-13688912) -
2020 - CRC - 6/5/19
Vehicle Care 227
Page 229 of 328
Chevrolet Impala Owner Manual (GMNA-Localizing-U.S./Canada-13688912) -
2020 - CRC - 6/5/19
228 Vehicle Care
The vehicle may not be equipped
with all of the fuses, relays, and
features shown.Fuses Usage
1 Transmission control module battery
2 Engine control module battery / A/C Clutch
3 A/C clutch
4 Engine control module battery
5 Engine control module/Ignition
6 Front wiper
7 Engine control module ignition
8 Ignition coils –even
9 Ignition coils –odd
10 Engine control module Fuses Usage
11 Mass air flow sensor/ Intake air
temperature/Humidity/
Temperature intake air
pressure/Post
catalytic converter O2
sensors
12 Starter/Starter pinion
13 Transmission control module/Chassis
control module/
Ignition
14 Cabin coolant pump
17 Ventilated front seats/ Heated steering wheel
18 Battery disconnect unit
19 Aeroshutter
20 Transmission auxiliary pump
21 Rear power window
22 Sunroof
23 Adaptive cruise control Fuses Usage
24 Front power window
25 Retained accessory power
26 ABS pump
27 Electric parking brake
28 Rear defogger
29 Passive entry/Passive start
30 Canister vent solenoid
31 Heated seat –driver
32 LED Backlight Dimming Control/Left
headlamp low-beam/
Right rear stop/turn
lamp/RAP relay/LED
ambient lighting/
Dome-reading lamps
33 Heated seat –
passenger
34 ABS valve
35 Amplifier
37 Right high-beam headlamp
Page 230 of 328
Chevrolet Impala Owner Manual (GMNA-Localizing-U.S./Canada-13688912) -
2020 - CRC - 6/5/19
Vehicle Care 229
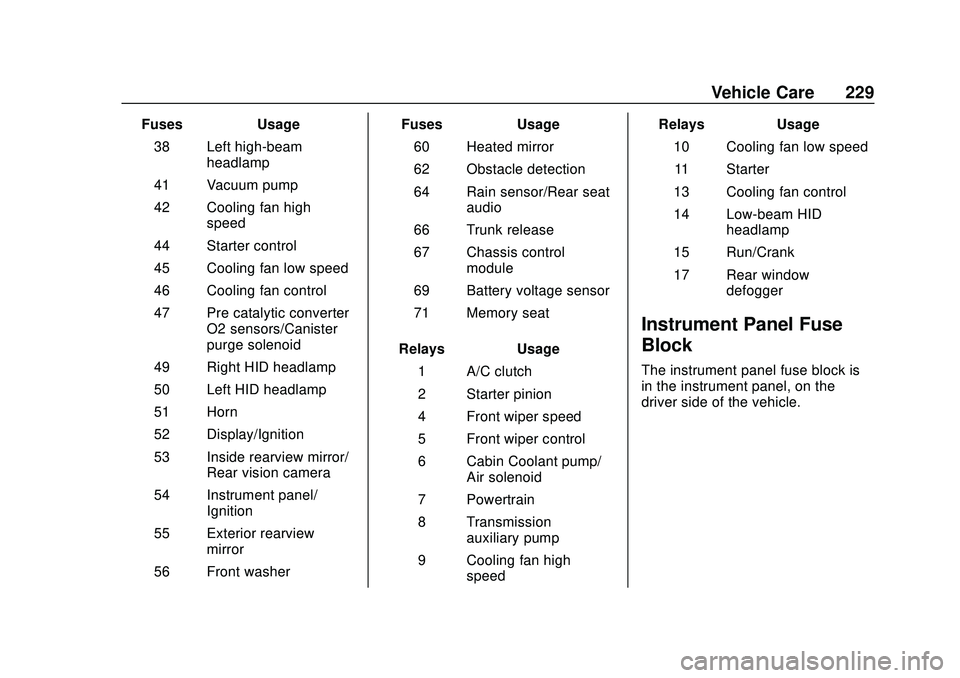
FusesUsage
38 Left high-beam headlamp
41 Vacuum pump
42 Cooling fan high speed
44 Starter control
45 Cooling fan low speed
46 Cooling fan control
47 Pre catalytic converter O2 sensors/Canister
purge solenoid
49 Right HID headlamp
50 Left HID headlamp
51 Horn
52 Display/Ignition
53 Inside rearview mirror/ Rear vision camera
54 Instrument panel/ Ignition
55 Exterior rearview mirror
56 Front washer Fuses
Usage
60 Heated mirror
62 Obstacle detection
64 Rain sensor/Rear seat audio
66 Trunk release
67 Chassis control module
69 Battery voltage sensor
71 Memory seat
Relays Usage
1 A/C clutch
2 Starter pinion
4 Front wiper speed
5 Front wiper control
6 Cabin Coolant pump/ Air solenoid
7 Powertrain
8 Transmission auxiliary pump
9 Cooling fan high speed Relays
Usage
10 Cooling fan low speed 11 Starter
13 Cooling fan control
14 Low-beam HID headlamp
15 Run/Crank
17 Rear window defogger
Instrument Panel Fuse
Block
The instrument panel fuse block is
in the instrument panel, on the
driver side of the vehicle.