CHEVROLET KODIAK 2004 Owners Manual
Manufacturer: CHEVROLET, Model Year: 2004, Model line: KODIAK, Model: CHEVROLET KODIAK 2004Pages: 366, PDF Size: 6.87 MB
Page 271 of 366
Fuel Filter (Diesel Engines)
If you have a diesel engine, your fuel filter is located in
the engine compartment on the driver’s side of the
vehicle, or along the driver’s side frame rail. SeeFuel
Filter Replacementearlier in this section for further
information.
Also seeScheduled Maintenance on page 6-5for
recommended service intervals.
Primary Fuel Filter and Water
Separator
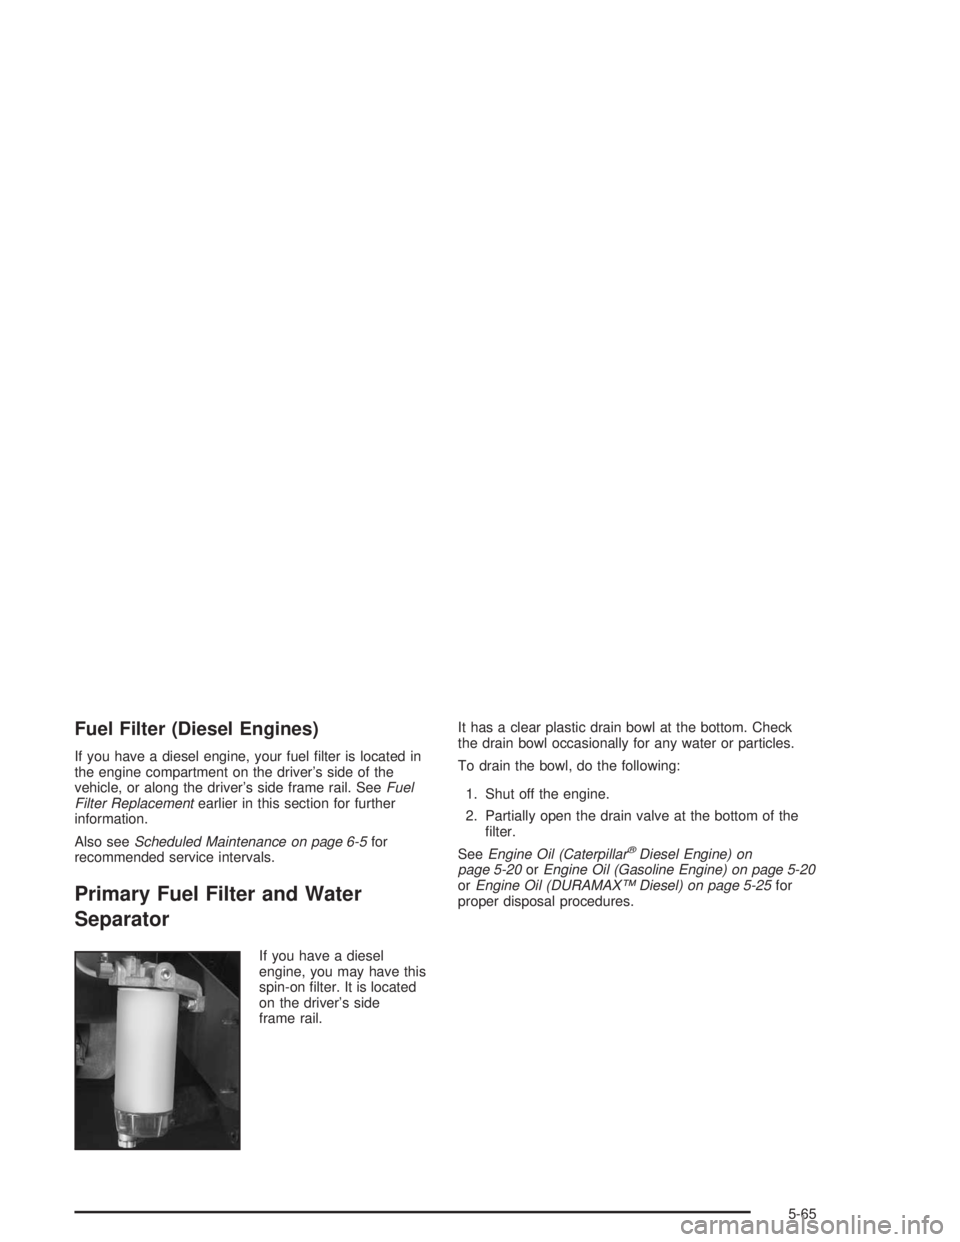
If you have a diesel
engine, you may have this
spin-on filter. It is located
on the driver’s side
frame rail.It has a clear plastic drain bowl at the bottom. Check
the drain bowl occasionally for any water or particles.
To drain the bowl, do the following:
1. Shut off the engine.
2. Partially open the drain valve at the bottom of the
filter.
SeeEngine Oil (Caterpillar
®Diesel Engine) on
page 5-20orEngine Oil (Gasoline Engine) on page 5-20
orEngine Oil (DURAMAX™ Diesel) on page 5-25for
proper disposal procedures.
5-65
Page 272 of 366

Secondary Fuel Filter and Water
Separator/Heater
If you have a Caterpillar®
diesel engine, you may
also have this spin-on filter
and fuel separator/heater.
It will be mounted in
the engine compartment
on the driver’s side of
the vehicle.
It has a metal drain bowl at the bottom. Occasionally,
check the bowl for any water or particles.
To check or drain the bowl, do the following:
•Shut off the engine.
•Push up on the spring loaded drain valve until clear
fuel is flowing from the valve.
The particles or water will drain out first. SeeEngine Oil
(Caterpillar
®Diesel Engine) on page 5-20orEngine
Oil (Gasoline Engine) on page 5-20orEngine Oil
(DURAMAX™ Diesel) on page 5-25for proper disposal
procedures.
Automatic Ether Injection System
If you have a Caterpillar®
diesel engine, you may
have this feature. The
ether cylinder is located in
the engine compartment
on the driver’s side of
the vehicle.
To change an empty ether cylinder, follow these steps.
1. Loosen the screw head on the cylinder-to-bracket
clamp.
2. Spread the clamp apart.
3. Clean any dirt from the neck of the cylinder and the
top of the valve before you take out the cylinder.
4. Check the inside of the valve for any foreign matter.
Clean the valve as necessary.
5. Cover the valve to protect it from dirt and take out
the cylinder.
5-66
Page 273 of 366
6. Install a new gasket whenever you take out the
cylinder. Use only one gasket and spread a light
film of clean oil on it before installation.
7. Put in the new cylinder. Turn it clockwise until it just
starts to contact the gasket.
8. Tighten the cylinder another half turn (180 degrees).
Don’t over-tighten.
9. Retighten the cylinder clamp.
Front Wheel Bearings with
Oil-Filled Hubs
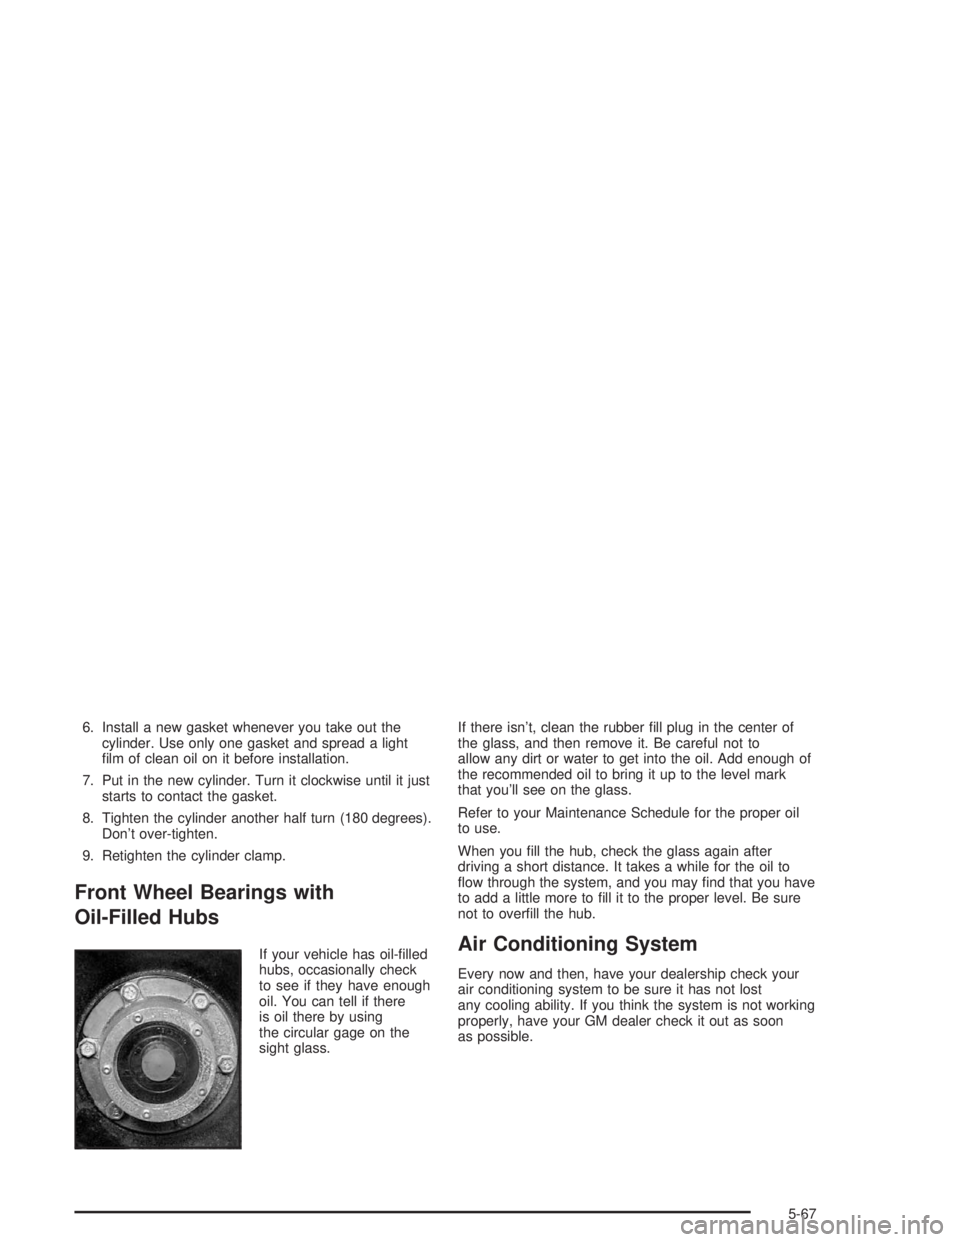
If your vehicle has oil-filled
hubs, occasionally check
to see if they have enough
oil. You can tell if there
is oil there by using
the circular gage on the
sight glass.If there isn’t, clean the rubber fill plug in the center of
the glass, and then remove it. Be careful not to
allow any dirt or water to get into the oil. Add enough of
the recommended oil to bring it up to the level mark
that you’ll see on the glass.
Refer to your Maintenance Schedule for the proper oil
to use.
When you fill the hub, check the glass again after
driving a short distance. It takes a while for the oil to
flow through the system, and you may find that you have
to add a little more to fill it to the proper level. Be sure
not to overfill the hub.Air Conditioning System
Every now and then, have your dealership check your
air conditioning system to be sure it has not lost
any cooling ability. If you think the system is not working
properly, have your GM dealer check it out as soon
as possible.
5-67
Page 274 of 366
Tires
Your new vehicle comes with high-quality tires made by
a leading tire manufacturer. If you ever have questions
about your tire warranty and where to obtain service,
see your Chevrolet Warranty booklet for details.
{CAUTION:
Poorly maintained and improperly used tires
are dangerous.
Overloading your tires can cause
overheating as a result of too much
friction. You could have an air-out and a
serious accident. See “Loading Your
Vehicle” in the Index.
CAUTION: (Continued)
CAUTION: (Continued)
Underin�ated tires pose the same danger
as overloaded tires. The resulting accident
could cause serious injury. Check all tires
frequently to maintain the recommended
pressure. Tire pressure should be checked
when your tires are cold.
Overin�ated tires are more likely to be
cut, punctured or broken by a sudden
impact — such as when you hit a pothole.
Keep tires at the recommended pressure.
Worn, old tires can cause accidents. If
your tread is badly worn, or if your tires
have been damaged, replace them.
In�ation - Tire Pressure
The GVW Rating label, which is on the driver’s door
frame, shows the correct inflation pressures for
your tires when they’re cold. “Cold” means your vehicle
has been sitting for at least three hours or driven no
more than 1 mile (1.6 km).
5-68
Page 275 of 366
Notice:Don’t let anyone tell you that underin�ation
or overin�ation is all right. It’s not. If your tires
don’t have enough air (underin�ation), you can get
the following:
Too much �exing
Too much heat
Tire overloading
Bad wear
Bad handling
Bad fuel economy
If your tires have too much air (overin�ation), you
can get the following:
Unusual wear
Bad handling
Rough ride
Needless damage from road hazards
When to Check
Check your tires once a month or more.
Also, check the tire pressure of the spare tire
(if equipped).
How to Check
Use a good quality pocket-type gage to check tire
pressure. You can’t tell if your tires are properly inflated
simply by looking at them. Radial tires may look
properly inflated even when they’re underinflated.
Be sure to put the valve caps back on the valve stems.
They help prevent leaks by keeping out dirt and
moisture.
Rims and Wheels
Rims and wheels are stamped with a maximum load
and cold inflation rating. Be sure you don’t exceed
these limits.
Dual Tire Operation
When the vehicle is new, check the wheel nut tightness
on all wheels with a torque wrench after your first
100 miles (160 km) and then 1,000 miles (1 600 km)
after that. Whenever a wheel, wheel bolt or wheel nut is
removed or serviced, repeat the 100 miles (160 km),
and then 1,000 mile (1 600 km) wheel nut tightness
check.
5-69
Page 276 of 366
SeeTightening the Wheel Nuts on page 5-71for wheel
nut tightening information and proper torque values.
{CAUTION:
If you operate your vehicle with a tire that is
badly underin�ated, the tire can overheat. An
overheated tire can lose air suddenly or catch
�re. You or others could be injured. Be sure all
tires (including the spare, if any) are properly
in�ated.
SeeTires on page 5-68andIn�ation - Tire Pressure on
page 5-68for more information on proper tire inflation.
When It Is Time for New Tires
Replace your tires when the tread depth is down to
1/8 of an inch (3.2 mm) for the front tires, or 1/16 of an
inch (1.6 mm) for a rear tire. Also, you need a new
tire if:
•You can see cord or fabric showing through the
tire’s rubber.
•The tread or sidewall is cracked, cut or snagged
deep enough to show cord or fabric.
•The tire has a bump, bulge or split.
•The tire has a puncture, cut or other damage that
can’t be repaired well because of the size or
location of the damage.
{CAUTION:
Mixing tires could cause you to lose control
while driving. If you mix tires of different
types — like radial and bias-belted tires — the
vehicle may not handle properly, and you
could have a crash. Be sure to use the same
type of tires all around.
When you replace tires, make sure they are the same
size, load range, speed rating and construction type
(bias, bias-belted or radial) as your original tires.
Wheel Alignment and Tire Balance
The wheels on your vehicle were aligned at the
factory to give you the longest tire life and best overall
performance.
5-70
Page 277 of 366
Proper front wheel alignment must be maintained in
order to ensure efficient steering, good directional
stability, and prevent abnormal tire wear. If you notice
unusual tire wear or your vehicle is pulling one way
or the other, the alignment may need to be reset. If you
notice your vehicle vibrating when driving on a smooth
road, your wheels may need to be balanced.
Tightening the Wheel Nuts
{CAUTION:
Wheel nuts that are not tight can work loose. If
all the nuts on a wheel come off, the wheel can
come off the vehicle, causing a crash. All
wheel nuts must be properly tightened. Follow
the rules in this section to be sure they are.
This section lets you know how often to check the
tightness of the wheel nuts on your vehicle and how tight
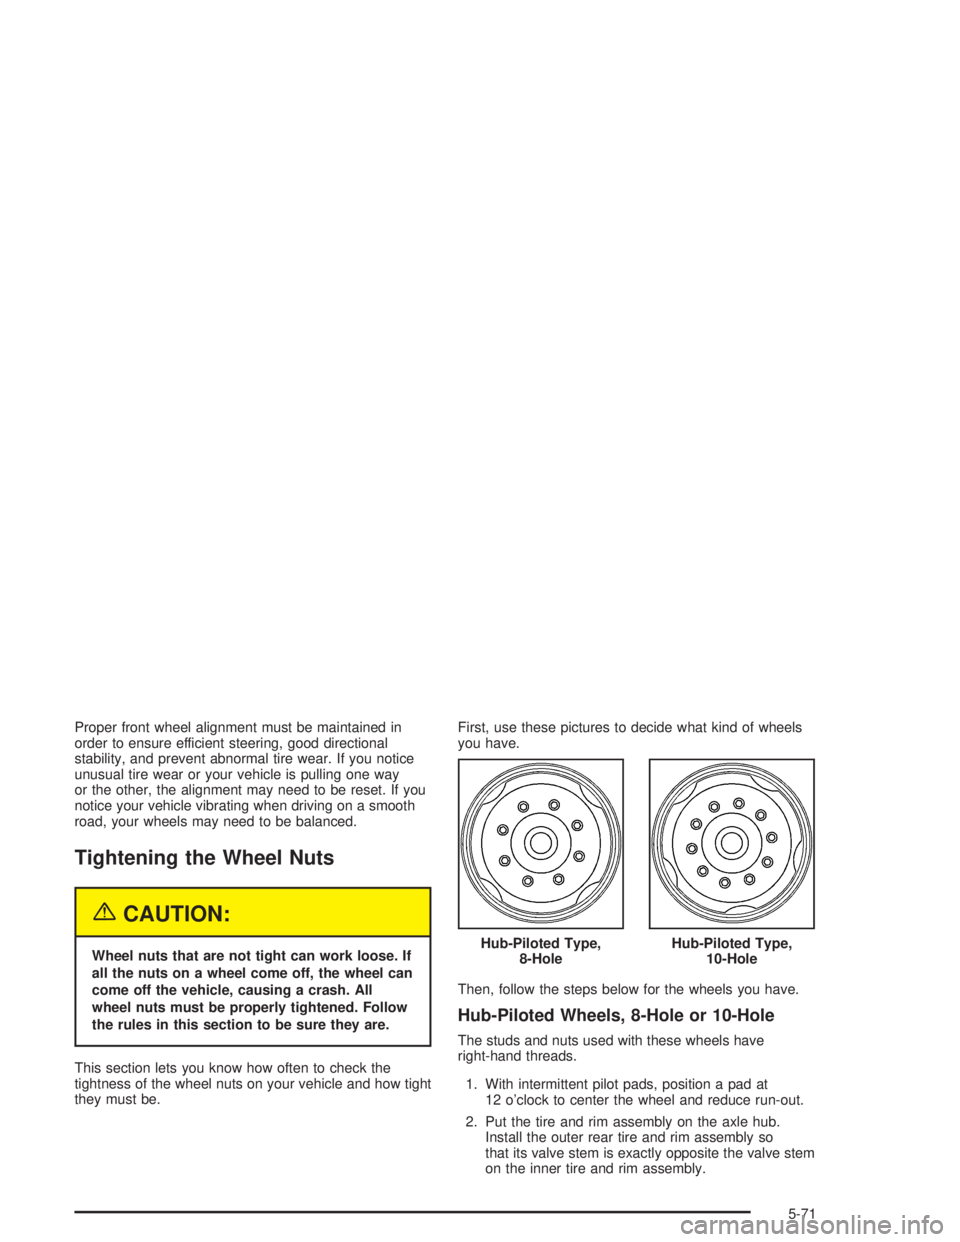
they must be.First, use these pictures to decide what kind of wheels
you have.
Then, follow the steps below for the wheels you have.
Hub-Piloted Wheels, 8-Hole or 10-Hole
The studs and nuts used with these wheels have
right-hand threads.
1. With intermittent pilot pads, position a pad at
12 o’clock to center the wheel and reduce run-out.
2. Put the tire and rim assembly on the axle hub.
Install the outer rear tire and rim assembly so
that its valve stem is exactly opposite the valve stem
on the inner tire and rim assembly. Hub-Piloted Type,
8-Hole
Hub-Piloted Type,
10-Hole
5-71
Page 278 of 366
3. Put on the wheel nuts.
4. Finger-tighten the nuts.
5. Oil the surfaces between the nuts and washers. Do
not oil the studs or the threads of the nut.
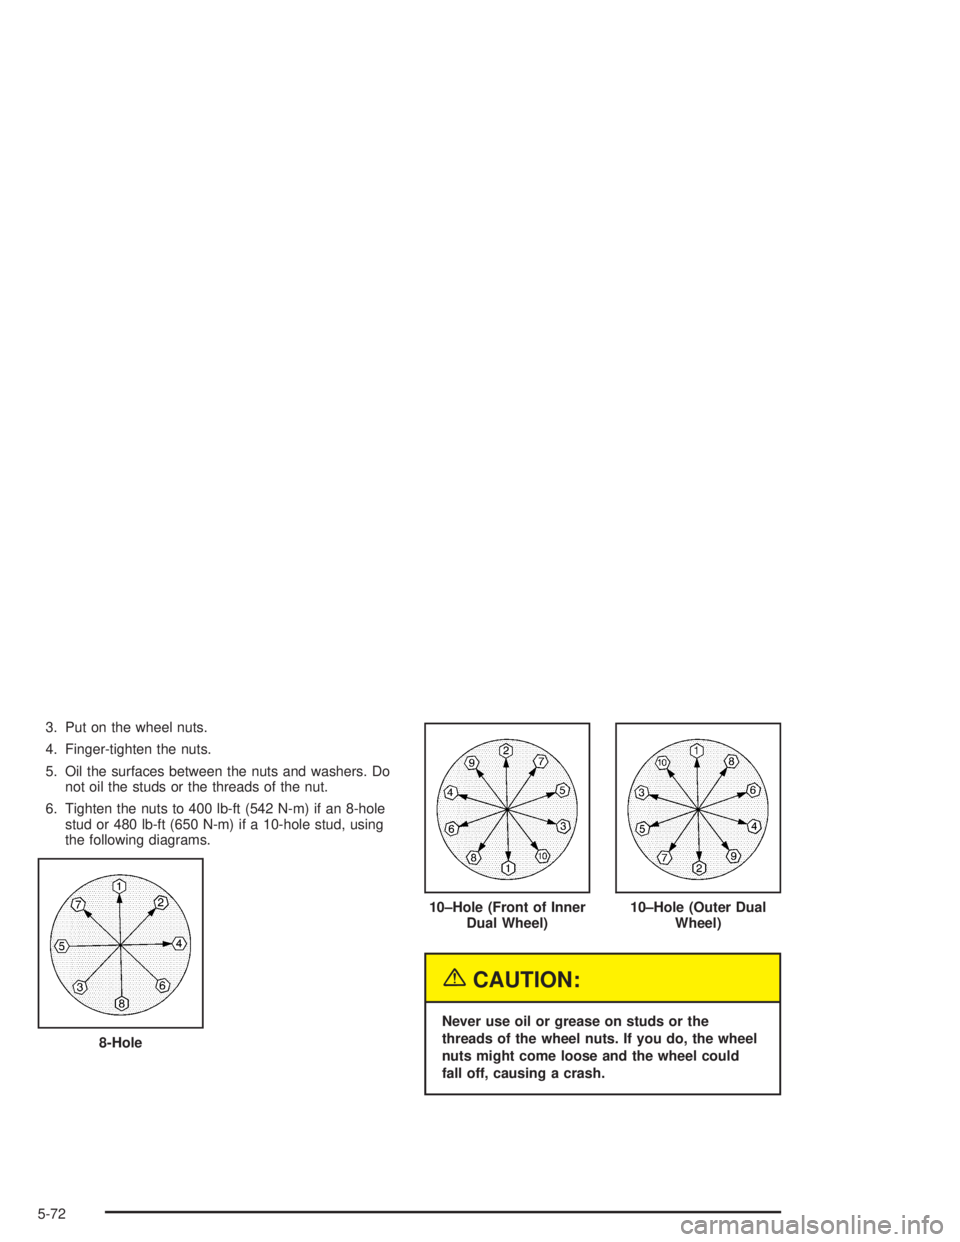
6. Tighten the nuts to 400 lb-ft (542 N-m) if an 8-hole
stud or 480 lb-ft (650 N-m) if a 10-hole stud, using
the following diagrams.
{CAUTION:
Never use oil or grease on studs or the
threads of the wheel nuts. If you do, the wheel
nuts might come loose and the wheel could
fall off, causing a crash. 8-Hole
10–Hole (Front of Inner
Dual Wheel)10–Hole (Outer Dual
Wheel)
5-72
Page 279 of 366
{CAUTION:
If wheel studs are damaged, they can break. If
all the studs on a wheel broke, the wheel could
come off and cause a crash. If any stud is
damaged because of a loose-running wheel, it
could be that all of the studs are damaged. To
be sure, replace all studs on the wheel. If the
stud holes in a wheel have become larger, the
wheel could collapse in operation. Replace any
wheel if its stud holes have become larger or
distorted in any way. Inspect hubs and hub
piloted wheels for damage. Because of loose
running wheels, piloting pad damage may
occur and require replacement of the entire
hub, for proper centering of the wheels. When
replacing studs, hubs, wheel nuts or wheels,
be sure to use GM original equipment parts.
{CAUTION:
Rust or dirt on a wheel, or on the parts to
which it is fastened, can make wheel nuts
become loose after a time. The wheel could
come off and cause a crash. When you change
a wheel, remove any rust or dirt from places
where the wheel attaches to the vehicle. In an
emergency, you can use a cloth or a paper
towel to do this; but be sure to use a scraper
or wire brush later, if you need to, to get all the
rust or dirt off.
How Often to Check
Wheel tightness is so important you should have a
technician check nut tightness on all wheels with
a torque wrench after your first 100 miles (160 km), and
then 1,000 miles (1 600 km) after that. Be sure to
repeat this service whenever you have a tire removed
or serviced. SeeScheduled Maintenance on page 6-5
for further information.
5-73
Page 280 of 366
Wheel Replacement
Replace any wheel that is bent, cracked or badly rusted
or corroded. If wheel nuts keep coming loose, replace
the wheel. If the wheel leaks air, replace it.
Your dealer will know the kind of wheel you need.
Each new wheel should have the same load-carrying
capacity, diameter, width, offset and be mounted
the same way as the one it replaces.
If you need to replace any of your wheels, wheel bolts
or wheel nuts, replace them only with new GM
original equipment parts. This way, you will be sure to
have the right wheel, wheel bolts and wheel nuts
for your vehicle.
{CAUTION:
A leaking wheel could fail without warning.
A wheel designed for tubeless tires could be
leaking because it is damaged. Don’t use
an inner tube or some other thing to try to
stop the leaking. Get a new wheel or the
proper type.
{CAUTION:
Without the correct wheel, you may not be able
to stop properly, and you could have other
problems like a tire air-out. You could have a
collision. If you don’t go to your dealer to get a
new wheel, be sure you get the correct one.
Each new wheel should match the original
wheel in load-carrying capacity, in�ation
pressure capacity, diameter, width, offset and
mounting con�guration.
Using wheels and tires with higher load-carrying limits
than the original wheels and tires doesn’t change
the GAWR or the GVWR of your vehicle. See “Loading
Your Vehicle” for more information.
Notice:The wrong wheel can cause trouble in
bearing life, brake cooling, speedometer/odometer
calibration, headlamp aim, bumper height, vehicle
ground clearance, stopping distance and tire
clearance to the body and chassis. You could also
have other problems like a tire air-out.
5-74