brake light CHEVROLET KODIAK 2006 Owner's Guide
[x] Cancel search | Manufacturer: CHEVROLET, Model Year: 2006, Model line: KODIAK, Model: CHEVROLET KODIAK 2006Pages: 398, PDF Size: 5.72 MB
Page 262 of 398
What to Do with Used Oil
Used engine oil contains certain elements that may be
unhealthy for your skin and could even cause cancer.
Do not let used oil stay on your skin for very long. Clean
your skin and nails with soap and water, or a good
hand cleaner. Wash or properly dispose of clothing or
rags containing used engine oil. See the manufacturer’s
warnings about the use and disposal of oil products.
Used oil can be a threat to the environment. If you
change your own oil, be sure to drain all the oil from the
filter before disposal. Never dispose of oil by putting it
in the trash, pouring it on the ground, into sewers, or into
streams or bodies of water. Instead, recycle it by
taking it to a place that collects used oil. If you have a
problem properly disposing of your used oil, ask
your dealer, a service station, or a local recycling center
for help.
Engine Oil Life System
(Caterpillar
®Diesel Engine)
How to Reset the Engine Oil
Life System
The Engine Oil Life System calculates when to change
your engine oil and filter based on vehicle use.
Anytime your oil is changed, reset the system so it can
calculate when the next oil change is required. If a
situation occurs where you change your oil prior to a
change engine oil light being turned on, reset the
system.
To reset the Engine Oil Life System, do the following:
1. Turn the ignition key to RUN with the engine off.
2. Fully apply and hold the brake pedal while you fully
press and release the accelerator pedal, pausing
slightly at each press and each release, three times
within five seconds.
3. Turn the key to OFF.
If the change engine oil light comes back on when you
start your vehicle, the Engine Oil Life System has
not reset. Repeat the procedure.
5-34
Page 275 of 398
Engine Fan Noise
Your vehicle has a clutched engine cooling fan. When
the clutch is engaged, the fan spins faster to provide
more air to cool the engine. In most everyday driving
conditions, the clutch is not fully engaged. This improves
fuel economy and reduces fan noise. Under heavy
vehicle loading, trailer towing and/or high outside
temperatures, the fan speed increases when the clutch
engages. So you may hear an increase in fan noise.
This is normal and should not be mistaken as the
transmission slipping or making extra shifts. It is merely
the cooling system functioning properly. The fan will
slow down when additional cooling is not required and
the clutch disengages.
You may also hear this fan noise when you start the
engine. It will go away as the fan clutch disengages.
Power Steering Fluid
SeeScheduled Maintenance on page 6-5to determine
when to check your power steering fluid.
How To Check Power Steering Fluid
Check your power steering fluid only when the engine is
warm. If the engine is not warm, you probably will not
get an accurate reading.
If the fluid level is between the MIN (Minimum) and
MAX (Maximum) marks, you have enough. If you need
fluid, add only enough of the proper fluid to bring it
in between the MIN and MAX marks.
If your power steering fluid level is low, this can cause
the brake or service brakes soon warning lights to come
on. In addition, the steering effort and emergency
brake distance could increase.
If either light remains on after you have added power
steering fluid to the proper level, then shut off the engine
for 10 seconds. This should reset the brake warning
lights. If one or both lights stay on, see “Hydraulic Brake
System Warning Lights” underBrake System Warning
Light on page 3-33for more information.
What to Use
To determine what kind of fluid to use, seePart C:
Recommended Fluids and Lubricants on page 6-33.
Notice:When adding power steering uid or
making a complete uid change, always use the
proper uid. Failure to use the proper uid can
cause leaks and damage hoses and seals.
5-47
Page 279 of 398
Four-Wheel Disc Brakes
(Hydraulic Only)
Your vehicle has four-wheel disc brakes.
Some driving conditions or climates may cause a brake
squeal when the brakes are first applied or lightly
applied. This does not mean something is wrong with
your brakes.
Brake linings should always be replaced as complete
axle sets.
Four-Wheel and Six-Wheel Drum
Brakes (Air Only)
The brake drums should be removed and inspected
each time the tires are removed for rotation or changing.
When you have the front brakes replaced, have the
rear brakes inspected, too.
Brake linings should always be replaced as complete
axle sets.
Brake Pedal Travel
See your dealer if the brake pedal does not return to
normal height, or if there is a rapid increase in
pedal travel. This could be a sign of brake trouble.
Brake Adjustment
Every time you make a brake stop, your brakes adjust
for wear.
Replacing Brake System Parts
The braking system on a vehicle is complex. Its many
parts have to be of top quality and work well together
if the vehicle is to have really good braking. Your
vehicle was designed and tested with top-quality
GM brake parts. When you replace parts of your braking
system — for example, when your brake linings wear
down and you need new ones put in — be sure you get
new approved GM replacement parts. If you do not,
your brakes may no longer work properly. For example,
if someone puts in brake linings that are wrong for
your vehicle, the balance between your front and rear
brakes can change — for the worse. The braking
performance you have come to expect can change in
many other ways if someone puts in the wrong
replacement brake parts.
5-51
Page 288 of 398
2. Get the vehicles close enough so the jumper cables
can reach, but be sure the vehicles are not touching
each other. If they are, it could cause a ground
connection you do not want. You would not be able
to start your vehicle, and the bad grounding
could damage the electrical systems.
To avoid the possibility of the vehicles rolling, set
the parking brake firmly on both vehicles involved
in the jump start procedure. Put an automatic
transmission in PARK (P) or a manual transmission
in NEUTRAL before setting the parking brake.
If you have a four-wheel-drive vehicle, be sure the
transfer case is in a drive gear, not in NEUTRAL.
Notice:If you leave your radio or other accessories
on during the jump starting procedure, they could
be damaged. The repairs would not be covered
by your warranty. Always turn off your radio and
other accessories when jump starting your vehicle.
3. Turn off the ignition on both vehicles. Unplug
unnecessary accessories plugged into the cigarette
lighter or accessory power outlets. Turn off the
radio and all lamps that are not needed. This will
avoid sparks and help save both batteries, and
it could save the radio!4. Open the hood on the other vehicle and locate the
positive (+) and the negative (−) terminal locations
on that vehicle.
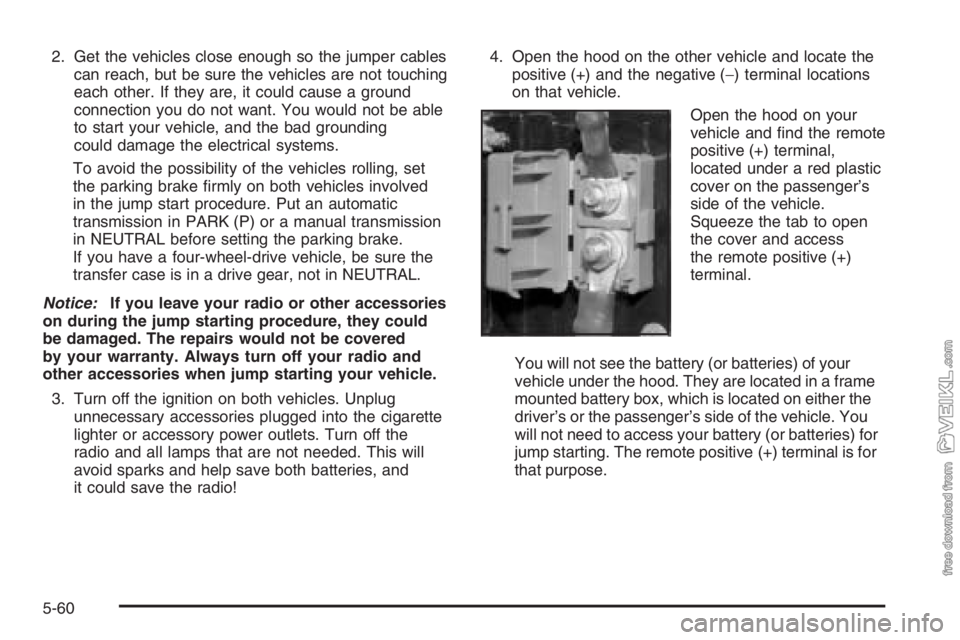
Open the hood on your
vehicle and find the remote
positive (+) terminal,
located under a red plastic
cover on the passenger’s
side of the vehicle.
Squeeze the tab to open
the cover and access
the remote positive (+)
terminal.
You will not see the battery (or batteries) of your
vehicle under the hood. They are located in a frame
mounted battery box, which is located on either the
driver’s or the passenger’s side of the vehicle. You
will not need to access your battery (or batteries) for
jump starting. The remote positive (+) terminal is for
that purpose.
5-60
Page 321 of 398
Headlamp Wiring
The headlamp wiring is protected by a circuit breaker in
the light switch. An electrical overload will cause the
lights to go on and off, or in some cases to remain off. If
this happens, have your headlamp wiring checked
right away.
Windshield Wiper Fuses
The windshield wiper motor is protected by a circuit
breaker inside the motor and a circuit breaker or fuse in
the fuse block. If the motor overheats, the wipers will
stop until the motor cools. If the overload is caused by
an electrical problem, be sure to get it fixed.
Fusible Links
A fusible link is a short piece of wire several gauge
sizes smaller than the circuit it protects. It will melt in an
overload situation, opening the circuit.
Your starter and other circuits have these fusible links.
The size is printed on the insulation. If the insulation
is burned beyond recognition, consult your GM dealer
for the proper size. Replace a fusible link with one of the
same size and insulation type. Fusible link insulation
is a special purpose high-temperature material.The hydraulic brake booster motor feed circuit and
starter circuit are protected by a fusible link. Vehicles
with a diesel engine have a fusible link for the intake
heater feed circuit.
Power Windows and Other
Power Options
Circuit breakers in the fuse panel protect the power
windows and other power accessories. When the current
load is too heavy, the circuit breaker opens. This
protects the circuit until the current load returns to
normal or the problem is fixed.
Fuses and Circuit Breakers
The wiring circuits in your vehicle are protected from
short circuits by a combination of fuses, circuit breakers,
maxi-fuses and fusible links. This greatly reduces the
chance of a fire caused by an electrical problem. There
may be a fuse taped to the wiring harness near the
hydraulic brake booster.
5-93
Page 323 of 398
Circuit Breaker Usage
9 Courtesy Lamps
10Warning Lights, Gages and
Indicators
11 Starter
12 Rear Axle/Four-Wheel-Drive
13Trailer Turn Signals/Hazard
Warning Flashers
14 Radio/Chime
15 Daytime Running Lamps
16 Airbag System
17 Exterior/Interior Lamps
18 Parking Brake
19 Accessory Power
20 Ignition 4
21 Sidemarker Lamps
22 Turn Signal/Backup Lamps
23 Transmission
24 Hydraulics/Air Brake
A Spare
B SpareFuse Usage
HTD/MIRR Heated Mirrors
Blank Not Used
RT TRN TRLR Passenger’s Side Trailer Turn Signal
Blank Not Used
LT TRN TRLR Driver’s Side Trailer Turn Signal
Blank Not Used
BRK Brake Warning Lamp
RT PRK Passenger’s Side Parking Lamps
Blank Not Used
Blank Not Used
Blank Not Used
LT PARK Driver’s Side Parking Lamps
Blank Not Used
RT REAR
TRN/STOPPassenger’s Side Rear Turn
Signal/Stoplamp
LT REAR
TRN/STOPDriver’s Side Rear Turn
Signal/Stoplamp
RADIO Radio
Blank Not Used
5-95
Page 326 of 398
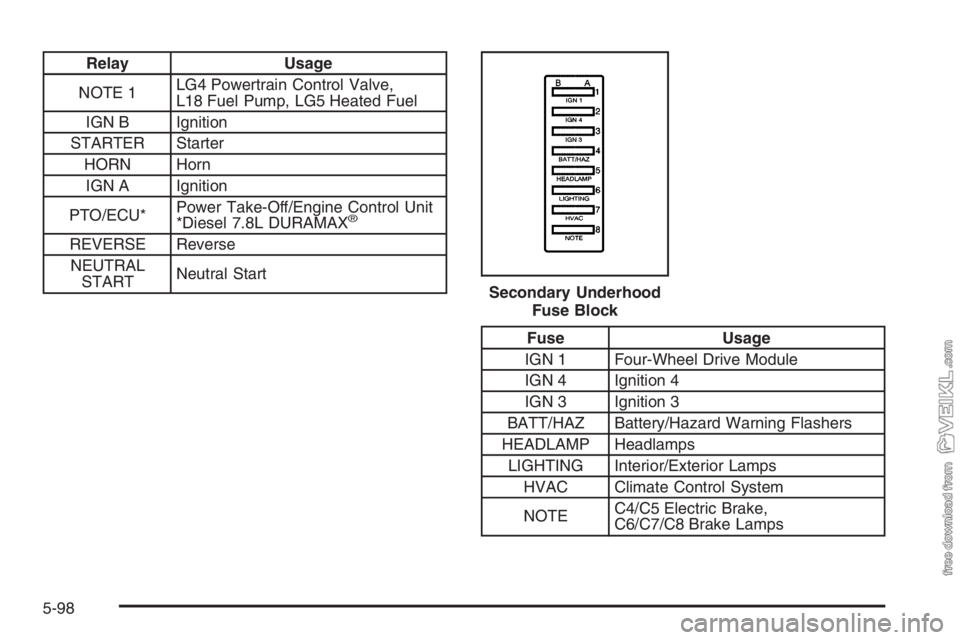
Relay Usage
NOTE 1LG4 Powertrain Control Valve,
L18 Fuel Pump, LG5 Heated Fuel
IGN B Ignition
STARTER Starter
HORN Horn
IGN A Ignition
PTO/ECU*Power Take-Off/Engine Control Unit
*Diesel 7.8L DURAMAX
®
REVERSE Reverse
NEUTRAL
STARTNeutral Start
Fuse Usage
IGN 1 Four-Wheel Drive Module
IGN 4 Ignition 4
IGN 3 Ignition 3
BATT/HAZ Battery/Hazard Warning Flashers
HEADLAMP Headlamps
LIGHTING Interior/Exterior Lamps
HVAC Climate Control System
NOTEC4/C5 Electric Brake,
C6/C7/C8 Brake Lamps Secondary Underhood
Fuse Block
5-98
Page 361 of 398
•Test air lines for leaks; tighten as needed. Replace
compressor filter.
•Inspect air parking brake chamber for leaks and
damage. Inspect lines and hoses for leaks,
cracks, chafing, etc. Also check all attachments for
tightness, wear, or damage. Note: The spring
brake section of the rear brake diaphragms are
non-serviceable.
•Replace the air compressor filter element, mounted
on the air compressor. For remote air compressor
intake service, refer to engine air cleaner filter
replacement.
•Remove, disassemble, clean, and inspect the safety
valve, standard brake chambers, quick release
valves, quick release/double check valve
combinations, parking brake control valve, double
check valves, pressure protection valves, and
alcohol injector (if equipped).
•Remove, disassemble, and clean the application
valve; replace parts showing wear.
•Remove, disassemble, clean, and inspect the
spring brake control valve; replace rubber parts.(33)= Clean and lubricate air brake automatic slack
adjuster. Check pushrod travel and auto adjustment
operation. Have serviced if needed.
(34)= Air brake chamber service: Check operation,
mounting clamps, and air lines and check for leaks.
(35)= Trailer brake hand control valve service: Check
operation; lubricate cam and follower.
(36)= Tighten the wheel stud nuts to the specified
torque values at 100 miles (160 km). Thereafter, tighten
them 1,000 miles (1 600 km) after each time the
wheel is removed. SeeTightening the Wheel Nuts on
page 5-77.
(37)= Inspect and clean any accumulated dirt, gravel,
or other foreign objects from the valves and valve boots
as needed. Using light oil, lubricate brake pedal to
brake application valve linkage components. Check any
rubber boots for cracks, holes, or deterioration and
replace if necessary.
6-27
Page 363 of 398

Tire Ination Check
Check tire inflation cold. Make sure tires are inflated to
the pressures specified on the GVW Rating label.
SeeLoading Your Vehicle on page 4-34andTires on
page 5-74for further details.
At Least Twice a Year
Restraint System Check
Make sure the safety belt reminder light (if equipped)
and all your belts, buckles, latch plates, retractors, and
anchorages are working properly. Look for any other
loose or damaged safety belt system parts. If you
see anything that might keep a safety belt system from
doing its job, have it repaired. Have any torn or
frayed safety belts replaced.
Wiper Blade Check
Inspect wiper blades for wear or cracking. Replace
blade inserts that appear worn or damaged or that
streak or miss areas of the windshield. Also see
Windshield and Wiper Blades on page 5-88.
Weatherstrip Lubrication
Silicone grease on weatherstrips will make them last
longer, seal better, and not stick or squeak. Apply
silicone grease with a clean cloth. During very cold,
damp weather more frequent application may be
required. Part C tells you what to use.
Body Lubrication Service
Lubricate all exposed surfaces such as door checks,
door lock bolts, lock strike plates, door hinge bushings,
latches, and dovetail bumper wedges. Where oil
holes are provided, a dripless oil can be used. The seat
adjusters, seat track, door weatherstrips, and rubber
cap bumpers should also be lubricated. Part C tells you
what to use. More frequent lubrication may be required
when exposed to a corrosive environment.
Parking Brake Check
Park on a fairly steep hill and hold the vehicle with the
parking brake only. This checks holding ability.
6-29
Page 365 of 398
Exhaust System Check
Be alert for any changes in the sound of the exhaust
system or any smell of fumes. These are signs the
system may be leaking. Have it checked and/or repaired
at once. Refer toEngine Exhaust on page 2-45and
Running the Engine While Parked on page 2-46.
Windshield Wipers and Washers Check
Check operation and condition of the wiper blades.
Check the flow of the washer spray.
Defroster Check
Move the control to the defrost symbol and the fan to
HI or the high symbol. Then check the airflow from
the ducts at the inside base of the windshield.
Mirrors and Sun Visors Check
Check that friction joints hold mirrors and sun visors in
place.
Seat Adjuster Check
When adjusting a manual seat, be sure seat adjusters
latch by attempting to move the seat after latching.
Lamps Check
Check panel lighting, warning lights, indicator lights, and
interior lamps. On the outside, check: license plate
lamps, sidemarker lamps, reflectors or lights on outside
mirrors, headlamps, parking lamps, identification and
clearance lamps, taillamps, brake lamps, turn signals,
backup lamps, and hazard warning flashers. Have
headlamp aim checked at once if beams seem
improperly aimed.
Glass, Mirrors, Lamps and/or
Reectors Condition Check
Look for broken, scratched, dirty, or damaged glass,
mirrors, lamps, or reflectors that could reduce the view
or visibility or cause injury. Replace, clean or repair
promptly.
Door Latches Check
Check that doors close, latch, and lock tightly. Check for
broken, damaged, or missing parts that might prevent
tight latching.
6-31