tow CHEVROLET LOW CAB FORWARD 2017 Owner's Guide
[x] Cancel search | Manufacturer: CHEVROLET, Model Year: 2017, Model line: LOW CAB FORWARD, Model: CHEVROLET LOW CAB FORWARD 2017Pages: 414, PDF Size: 7.97 MB
Page 149 of 414

Chevrolet Low Cab Forward Owner Manual (GMNA-Localizing-U.S.-
10716700) - 2017 - crc - 12/6/16
148 Driving and Operating
.Do not use a sharp implement to
remove snow. Sharp edges
could damage rubber parts.
Refer to Antilock Brake System
(ABS) 0217.
Remove snow that has stuck to the
inside of the fenders and to the
brake hoses. Otherwise, it may
damage components. After driving
on a salted road, wash the
underside of the vehicle as soon as
possible to prevent the salt from
causing rust. Spraying water under
high pressure is an effective way to
get the salt off.
After washing the vehicle, wipe the
door openings dry.
If the Vehicle Is Stuck
When Driving on Bad Roads
Freeing the Vehicle from Sand,
Mud, Snow, and Ice
If your vehicle gets stuck in sand,
mud, snow or ice, move the selector
lever from "Second" to "Reverse".
Apply a light pressure to the
accelerator pedal while the
transmission is in gear. Remove your foot from the accelerator and
press the brake pedal while shifting.
Do not race the engine. For best
traction, avoid spinning the wheels.
When you cannot avoid driving
through deep mud, using tire chains
is an effective way to avoid getting
stuck.
Do not allow wheels to spin freely in
mud, sand, snow, ice or other poor
road conditions. This free spinning
will damage the rear axle. Even
vehicles equipped with LSD (Limited
Slip Differential) have traction
limitations. If your vehicle gets stuck
and it is difficult to extricate,
immediately stop driving and have
the vehicle towed. Spinning wheels
for an extended period of time may
cause abnormal noises or
malfunction to LSD.
Do not spin wheels faster than
32 km/h (20 MPH). Damage may
result from excessive wheel
spinning, including tire, transmission
and/or rear axle malfunction.
When driving in sand or mud, avoid
hard braking, sudden acceleration
and sharp turns of the steering
wheel. Such actions could get the
vehicle stuck and make it difficult to
extricate.
After driving through deep mud: any
mud stuck to the vehicle can harm
the steering, brakes and powertrain.
Wash the vehicle and remove all
mud and other incrustation.
The vehicle speed sensors are fitted
on the wheels. When removing mud
and other incrustation, take great
care not to damage the
components.
Do not use a sharp implement to
remove mud. Sharp edges could
damage rubber parts.
Refer to
Antilock Brake System
(ABS) 0217 andExterior Care
0 334.Emergencies
(Troubleshooting)
Troubleshooting
Performing regular inspections and
maintenance prevents damage. Be
sure to perform inspections and
maintenance at regular intervals.
Page 168 of 414

Chevrolet Low Cab Forward Owner Manual (GMNA-Localizing-U.S.-
10716700) - 2017 - crc - 12/6/16
Driving and Operating 167
feature. To restart when you're
already moving, use
N (Neutral) only.
Do not try to shift to P (Park) if
your vehicle is moving. If you
do, you could damage the
transmission. Shift to P (Park)
only when your vehicle is
stopped.
2. Do not push the accelerator pedal before starting your
engine. In some other vehicles
you might need to do this, but
because of your vehicle's
computer systems, you do not
need to.
3. Turn your ignition key to Start. When the engine starts, let go
of the key. The idle speed will
go down as your engine
gets warm.
4. If it does not start right away, hold your key in START. If it
doesn't start in 3 seconds,
push the accelerator pedal
about one-quarter of the way
down for 12 more seconds,
or until it starts. 5. If your engine still will not start
(or starts but then stops), it
could be flooded with too much
gasoline. Try this: Wait 20 to
30 seconds to let the starter
motor cool down. Then push
your accelerator pedal all the
way to the floor. Hold it there.
Then, hold the key in START
for no more than 10 seconds.
This clears the extra gasoline
from the engine.
If the engine still does not start, wait
another 20 to 30 seconds and do
Step 5 again.
Hot Engine Restart
If your engine is already hot and
then stalls, turn your ignition key to
ACC. Then, turn your key to ON,
and wait about 20 to 30 seconds
before you restart your engine.
When the engine starts, let go of the
key and the accelerator pedal.
Your engine is designed to work
with the electronics in your vehicle.
If you add electrical parts or
accessories, you could change the
way the fuel injection system operates. Before adding electrical
equipment, check with your dealer.
If you do not, your engine might not
perform properly.
If you ever have to have your
vehicle towed, see the part of this
manual that tells how to do it without
damaging your vehicle. See
Towing
the Vehicle 0332.
Recommendations for Warming
Up the Engine
The engine is sufficiently warmed
up when the needle of the engine
coolant temperature gauge starts
to move.
. Do not race the engine or
quickly accelerate before the
engine has sufficiently warmed
up. Oil would not have
adequately reached and
lubricated components, and a
breakdown may result.
. The exhaust pipe becomes
extremely hot while the engine is
idling. Before warming up the
engine, make sure there is no
Page 212 of 414

Chevrolet Low Cab Forward Owner Manual (GMNA-Localizing-U.S.-
10716700) - 2017 - crc - 12/6/16
Driving and Operating 211
2. Move the selector lever in theP position, check that the shift
indicator is indicating P, and
slowly ease your right foot off
the brake pedal.
3. Stop the engine and remove the key. When the selector
lever is not placed in the P
position, the shift lock system
operates and the key cannot
be removed.
See Starting and Stopping the
Vehicle (Gasoline Only) 0165 or
Starting and Stopping the Vehicle
(Diesel Only) 0168, and Parking
Brake 0221.
If you cannot move the selector
lever from the P position after
starting the engine, perform the
following necessary checks:
. Check that you are firmly
pressing the brake pedal.
. Check if the area where your
vehicle is parked is not a slope.
. If your vehicle is parked on a
downhill slope, the push
operation of the selector lever
may become heavy to move. In this case, you can operate the
selector lever more smoothly by
pushing the selector lever
towards the front of the vehicle
while pushing the button.
Shift Lock System (Diesel
vehicles only)
When Starting Your Vehicle
The selector lever cannot be
operated from the P position to any
other position without the brake
pedal being pressed. Be sure to
operate the lever while pressing the
brake pedal.
When Parking Your Vehicle
The key cannot be removed unless
the selector lever is securely placed
in the P position (key interlock
system). Be sure to place the
selector lever in the P position when
parking the vehicle.
The shift lock system is a system for
safety to prevent incorrect operation
of the automatic transmission. Use it
correctly and drive safely.
If You Cannot Move the Selector
Lever from the P Position
Caution
When the selector cannot be
operated from the P position to
any other position even after
performing the operation below
repeatedly, the shift lock system
may have a failure. Have the
vehicle inspected at your dealer.
If you cannot move the selector
lever from the P position after
starting the engine, perform the
following checks:
. Check that you are firmly
pressing the brake pedal. When
the brake pedal is not pressed,
the shift lock system operates
and the selector lever cannot be
shifted from P to any other
position.
. Check if the area where your
vehicle is parked is not a slope.
Page 213 of 414

Chevrolet Low Cab Forward Owner Manual (GMNA-Localizing-U.S.-
10716700) - 2017 - crc - 12/6/16
212 Driving and Operating
.If your vehicle is parked on a
downside slope, the operation of
the selector lever may become
heavy to move. In this case, you
can operate the selector lever
more smoothly by moving the
selector lever towards the front
of the vehicle while pressing the
button.
Releasing the Shift Lock in an
Emergency
If moving of the selector lever from
P to another position is still not
possible even after performing the
instructions given in the steps
above, with the brake pedal fully
pressed and the vehicle parked on a
flat surface, carry out the procedure
described under “If You Cannot
Move the Selector Lever from the P
Position”.
Page 215 of 414

Chevrolet Low Cab Forward Owner Manual (GMNA-Localizing-U.S.-
10716700) - 2017 - crc - 12/6/16
214 Driving and Operating
Selector Lever
Move the selector lever (2) to make
a shift into each gear position.
Diesel Engine Selector Lever
Gasoline Engine Selector Lever
P (Parking) : Used when the
vehicle is parked or when starting
the engine. The P position is to be
used with the parking brake. The P
and N positions are the two
positions in which the engine can be
started.
R (Reverse) : Used when backing
up the vehicle. Bring the truck to a
complete stop before moving the
selector to the R position.
N (Neutral) : Can be used when
starting the engine, but for safety,
get in the habit of starting the engine in the P position. The N
position is used should it become
necessary to tow your truck.
D (Drive
–Diesel Engine Only) :
The D position is for all normal
forward driving. The system
automatically selects the gear
according to the vehicle speed.
Press the overdrive off switch (3) to
switch to the overdrive ON position
for greater fuel economy.
D6 (Drive D6 Gear –Gasoline
Engine Only) : The D6 position is
for all normal forward driving. The
shifting of 1st - 2nd - 3rd - 4th - 5th -
6th takes place according to the
vehicle speed and accelerator pedal
pressing rate. It is recommended
that this range be used to improve
fuel economy and reduce vehicle
noise.
D4 (Drive D4 Gear –Gasoline
Engine Only) : The D4 position is
when you feel shifting between 4th
and 5th troublesome while climbing
a long hill. Shifting of 1st - 2nd - 3rd
- 4th takes place according to the
vehicle speed and accelerator pedal
pressing rate.
Page 245 of 414

Chevrolet Low Cab Forward Owner Manual (GMNA-Localizing-U.S.-
10716700) - 2017 - crc - 12/6/16
244 Vehicle Care
Vehicle Care
General Information
General Information . . . . . . . . . . 245
California Proposition65 Warning . . . . . . . . . . . . . . . . . 245
California Perchlorate Materials Requirements . . . . . 245
Accessories and Modifications . . . . . . . . . . . . . . . . 245
Vehicle Checks
Doing Your OwnService Work . . . . . . . . . . . . . . . 245
Cab Tilting . . . . . . . . . . . . . . . . . . . . 247
Engine Compartment Overview . . . . . . . . . . . . . . . . . . . . 249
Engine Cover . . . . . . . . . . . . . . . . . 250
Engine Oil (Diesel) . . . . . . . . . . . 251
Engine Oil (Gasoline) . . . . . . . . . 257
Automatic Transmission Fluid . . . . . . . . . . . . . . . . . . . . . . . . 260
Engine Air Cleaner/Filter . . . . . . 263
Engine Coolant . . . . . . . . . . . . . . . 263
Engine Overheating . . . . . . . . . . 269
Power Steering Fluid . . . . . . . . . 273
Washer Fluid . . . . . . . . . . . . . . . . . 274
Brakes . . . . . . . . . . . . . . . . . . . . . . . 275
Brake Fluid . . . . . . . . . . . . . . . . . . . 280
Battery . . . . . . . . . . . . . . . . . . . . . . . . 281 Fuel Filter . . . . . . . . . . . . . . . . . . . . 282
Rear Axle (Gear Oil Viscosity
Chart) . . . . . . . . . . . . . . . . . . . . . . . 283
Rear Axle (Oil Level Check) . . . . . . . . . . . . . . . . . . . . . . 283
Noise Control System . . . . . . . . 284
Automatic Transmission Shift Lock Control Function Check
(Diesel Only) . . . . . . . . . . . . . . . . 285
Wiper Blade Replacement . . . . 286
Headlamp Aiming
Headlamp Aiming . . . . . . . . . . . . 288
Bulb Replacement
Bulb Replacement . . . . . . . . . . . . 288
Headlamps and Front Turn Signal . . . . . . . . . . . . . . . . . . . . . . . 291
Roofmarker Lamps . . . . . . . . . . . 295
Sidemarker Lamps (Including Turn Signal and Cornering
Lamps) . . . . . . . . . . . . . . . . . . . . . . 295
Taillamps, Turn Signal, Stoplamps, and Back-Up
Lamps . . . . . . . . . . . . . . . . . . . . . . 297
License Plate Lamp . . . . . . . . . . 297
Interior Lamps . . . . . . . . . . . . . . . . 298
Electrical System
Electrical System Overload . . . 298
Wheels and Tires
Wheels and Tires . . . . . . . . . . . . . 308
Tire Pressure . . . . . . . . . . . . . . . . . 322
Tire Rotation . . . . . . . . . . . . . . . . . 323
If a Tire Goes Flat . . . . . . . . . . . . 326
Jump Starting
Jump Starting - North America . . . . . . . . . . . . . . . . . . . . . 326
Towing the Vehicle
Towing the Vehicle . . . . . . . . . . . 332
Appearance Care
Exterior Care . . . . . . . . . . . . . . . . . 334
Interior Care . . . . . . . . . . . . . . . . . . 340
Page 259 of 414

Chevrolet Low Cab Forward Owner Manual (GMNA-Localizing-U.S.-
10716700) - 2017 - crc - 12/6/16
258 Vehicle Care
The engine oil dipstick is under the
engine inspection sub cover located
beneath the passenger's seat.
Checking Engine Oil
Check the engine oil level regularly,
every 650 km (400 mi), especially
prior to a long trip. The engine oil
dipstick handle is a loop. See
Engine Compartment Overview
0249 for the location.
{Warning
The engine oil dipstick handle
may be hot; it could burn you.
Use a towel or glove to touch the
dipstick handle.
Follow these guidelines:
. To get an accurate reading, park
the vehicle on level ground.
Check the engine oil level after
the engine has been off for at
least two hours. Checking the
engine oil level on steep grades
or too soon after engine shutoff
can result in incorrect readings.
Accuracy improves when checking a cold engine prior to
starting. Remove the dipstick
and check the level.
. If unable to wait two hours, the
engine must be off for at least
15 minutes if the engine is
warm, or at least 30 minutes if
the engine is not warm. Pull out
the dipstick, wipe it with a clean
paper towel or cloth, then push it
back in all the way. Remove it
again, keeping the tip down, and
check the level.When to Add Engine Oil
If the oil is below the cross-hatched
area at the tip of the dipstick and
the engine has been off for at least
15 minutes, add 1 L (1 qt) of the
recommended oil and then recheck the level. See
“Selecting the Right
Engine Oil” later in this section for
an explanation of what kind of oil to
use. For engine oil crankcase
capacity, see Capacities and
Specifications 0389.
Caution
Do not add too much oil. Oil
levels above or below the
acceptable operating range
shown on the dipstick are harmful
to the engine. If you find that you
have an oil level above the
operating range, i.e., the engine
has so much oil that the oil level
gets above the cross-hatched
area that shows the proper
operating range, the engine could
be damaged. You should drain
out the excess oil or limit driving
of the vehicle and seek a service
professional to remove the
excess amount of oil.
See Engine Compartment Overview
0 249 for the location of the engine
oil fill cap.
Page 287 of 414

Chevrolet Low Cab Forward Owner Manual (GMNA-Localizing-U.S.-
10716700) - 2017 - crc - 12/6/16
286 Vehicle Care
3. Remove the selector levercover by removing the four
screws and lifting it up.
4. Operate the selector lever (1)
while pressing the release
lever (2).
Caution
When the selector cannot be
operated from the P position to
any other position even after
performing the operation below
repeatedly, the shift lock system
may have a failure. Have the
vehicle inspected at your dealer. When installing the cover, perform
the removal procedure in reverse
order.
Wiper Blade Replacement
Removal
1. Pull the wiper arm up to the
vertical position.
2. While pressing the wiper-blade hook towards the arm, slide the
blade downwards (towards the
base of the arm).
3. With the blade and arm almostperpendicular, remove the
blade from the arm.
Installation
Page 292 of 414

Chevrolet Low Cab Forward Owner Manual (GMNA-Localizing-U.S.-
10716700) - 2017 - crc - 12/6/16
Vehicle Care 291
Contact your dealer when replacing
lights that are not listed here.
Headlamps and Front
Turn Signal
Replacing the Headlamps
When the bulb has blown out,
replace it with a bulb of the
specified wattage. Be careful not to
excessively tighten the mounting
screws when replacing the
headlamp bulbs.
Do not replace a bulb with other
than the specified wattage.
Proper aiming of the headlamps is
important to ensure sufficient
illumination of the highway without
blinding other motorists. When
replacing headlamp bulbs, have the
headlamp aim adjusted at your
dealer.
When replacing a bulb, make sure
the light switch is“OFF”.
See Bulb Replacement 0288.
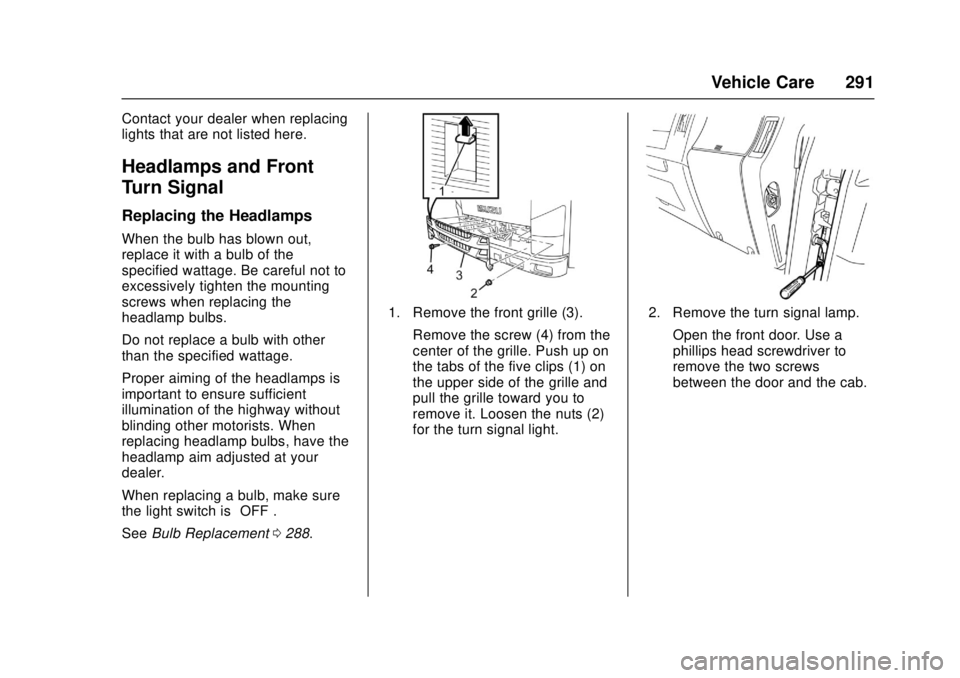
1. Remove the front grille (3).
Remove the screw (4) from the
center of the grille. Push up on
the tabs of the five clips (1) on
the upper side of the grille and
pull the grille toward you to
remove it. Loosen the nuts (2)
for the turn signal light.2. Remove the turn signal lamp.Open the front door. Use a
phillips head screwdriver to
remove the two screws
between the door and the cab.
Page 293 of 414

Chevrolet Low Cab Forward Owner Manual (GMNA-Localizing-U.S.-
10716700) - 2017 - crc - 12/6/16
292 Vehicle Care
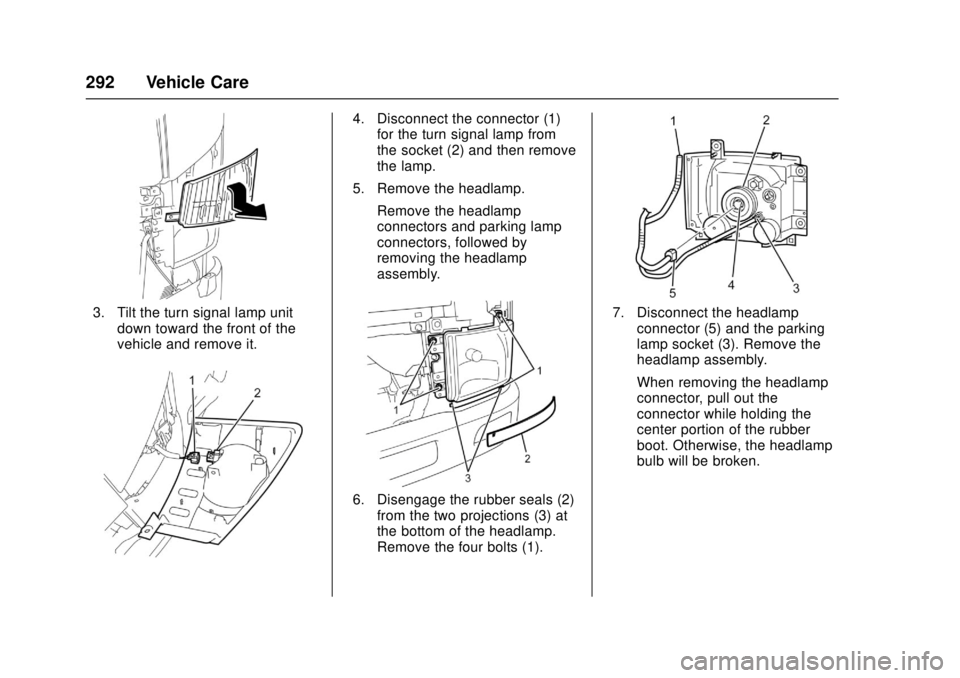
3. Tilt the turn signal lamp unitdown toward the front of the
vehicle and remove it.
4. Disconnect the connector (1)for the turn signal lamp from
the socket (2) and then remove
the lamp.
5. Remove the headlamp. Remove the headlamp
connectors and parking lamp
connectors, followed by
removing the headlamp
assembly.
6. Disengage the rubber seals (2)from the two projections (3) at
the bottom of the headlamp.
Remove the four bolts (1).
7. Disconnect the headlamp
connector (5) and the parking
lamp socket (3). Remove the
headlamp assembly.
When removing the headlamp
connector, pull out the
connector while holding the
center portion of the rubber
boot. Otherwise, the headlamp
bulb will be broken.